
Popular categories
Looking for a yarn?


Comments / Questions (127)
![]() Barbara wrote:
Barbara wrote:
Moet je na de armsgaten als je verder haakt in het patroon ook elke zesde toer extra blijven meerderen?
26.10.2015 - 17:18DROPS Design answered:
Hoi Barbara. Ja, jeg gaat door met de vierkant tot het vierkantje 21 cm meet vanaf het armsgat. Pas bij het haken van de voorpanden maak je geen meerderingen meer.
27.10.2015 - 14:40
![]() Barbara wrote:
Barbara wrote:
Ik heb een vraag over de toer ná de armsgaten. Je moet volgens het patroon haken, ook over de losse van de armsgaten. Dus drie lossen en een stokje neem ik aan. Als ik op de losse haak, om de hoeveel steken komt dan mijn stokje?
23.10.2015 - 13:08DROPS Design answered:
Hoi Barbara. Je haakt om de lossen, je hoeft ze niet te tellen en in te haken.
23.10.2015 - 13:47Theresa Lambert wrote:
I'm not understanding what to do on row 4 would you please help me says something and adding another dc? Please help me out.
20.10.2015 - 00:23DROPS Design answered:
Dear Theresa, it is just to clear, that there is 1 dc + 3 ch more between each corner on every round. Just follow previous instructions.
18.12.2015 - 11:53
![]() Lorraine De Maria wrote:
Lorraine De Maria wrote:
I think this is my last question on the armholes- thank you for all your help - I understand I am counting the side of the pattern and then chaining that many for the hole in the sleeve- do I attach it in the middle between both corners on the side of this or do I attached it to the other corner before doing my pattern again??
19.10.2015 - 13:43DROPS Design answered:
Dear Mrs De Maria, when you have crocheted the chain for armhole and skipped the number of sts matching between first (1st armhole) corner and mid between 1st and 2nd corner, crochet as before from middle between 1st and 2nd corner to the 2nd corner. For 2nd armhole, crochet as before from 3rd corner to middle side before 4th corner, crochet a chain skipping the matching number of sts to the 4th corner. Happy crocheting!
19.10.2015 - 14:10Lorraine De Maria wrote:
Thank you so much - I think I understand now- I will get back to you if I have any questions in the future - Love your site!!
16.10.2015 - 19:38
![]() Lorraine De Maria wrote:
Lorraine De Maria wrote:
Maybe this is a better way to ask- I will follow for the armhole on the answer that says to chain as many chains as it would take to reach the middle of the square - then do I attach it with a chain where I counted 1/2 before the corner?? or do I attach it in the corner I am working on? and how many sets of double crochets and chains do I put in the corner before doing this long chain??
15.10.2015 - 22:38DROPS Design answered:
Dear Mrs De Maria, after you have skipped half the side (from the corner to middle between both corners), continue in pattern as before to next corner. Number of chains will depend of number of sts you will skip - count the number of sts skipped to the middle between both corners and chain this number. Happy crocheting!
16.10.2015 - 09:28
![]() Lorraine De Maria wrote:
Lorraine De Maria wrote:
I sent a question early about the sleeves (armholes) and I see others have wrote for help on the same subject and I have been crocheting for years and I am still confused- one answer is saying to decrease - the other is saying count the stitches half way to the next corner and chain that amount - then attach it where? and which one is it?
15.10.2015 - 22:10DROPS Design answered:
Dear Mrs De Maria, when working armhole, work as before until first corner, then work 3 dc+3 ch+ 3 dc in corner (as before), then crochet a ch to create armhole (number of ch = number of sts skipped from 1st corner to the middle of the side between 1st and 2nd corner), and continue as before and repeat armhole between 3rd and 4th corner: work from 3rd corner as before to middle of side between both corners, ch same number of ch as for 1st armhole and 3dc,3ch,3dc in 4th corner, then work as before to the beg of round. Happy crocheting!
16.10.2015 - 09:24
![]() Lorraine De Maria wrote:
Lorraine De Maria wrote:
I bought the yarn for the drops Pattern (around the world) I had no trouble with it until I got to the Sleeves - I don't understand - do I just do a DC and then ch 3 in each of the corners on the square of the Pattern instead of the 3dc, ch3 and 3dc??
15.10.2015 - 21:20DROPS Design answered:
Dear Mrs De Maria, on 1st round of sleeve, work around armhole, ie in last row on square (skipped sts when working armhole) + in the ch/1st row after armhole and work around 1 dc in each ch-space with 3 ch between each dc. Happy crocheting!
16.10.2015 - 09:14
![]() Helen wrote:
Helen wrote:
Please can to tell me where I can find instructions on how to do a crochet tension square. In relation to this pattern. As I can only find how too do Knitted ones.
14.10.2015 - 14:20DROPS Design answered:
Dear Helen, you can work the first 7 rounds to check your tension as stated on the tab "materials" at the right side of the picture. Happy crocheting!
14.10.2015 - 16:42Kathie wrote:
This is the most confusing pattern I have ever tried to follow. No matter how many times I start over I end up with an extra DC and Ch 3 space on the final side of the A-1 Diagram. It does not matter if I follow the written pattern or the chart. If this is so easily written I would think that you would just make a video of how to do the actual pattern instead of videos just showing the stitches that are used.
01.10.2015 - 02:35
|
||||||||||||||||||||||
Around the World#aroundtheworldcardigan |
||||||||||||||||||||||
 |
 |
|||||||||||||||||||||
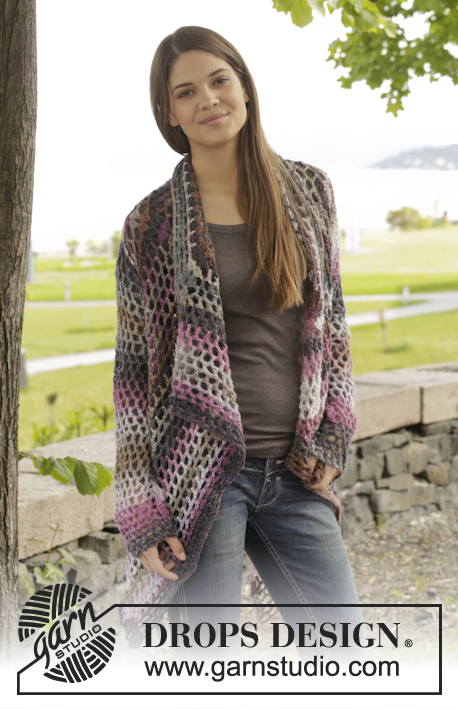
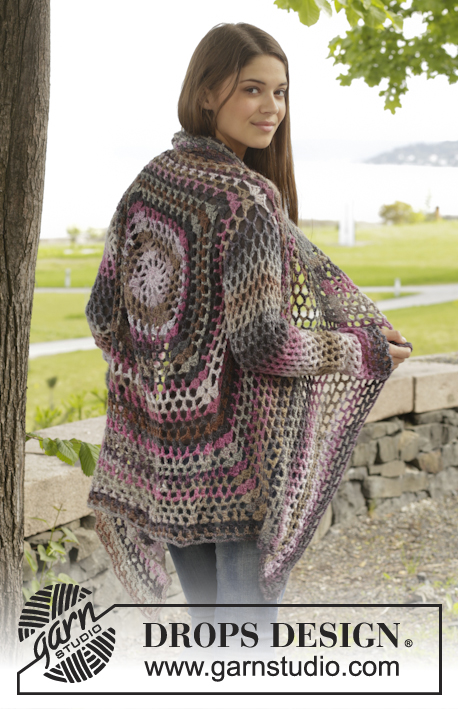
Crochet DROPS jacket with lace pattern in ”Big Delight”. Size: S - XXXL
DROPS 156-42 |
||||||||||||||||||||||
|
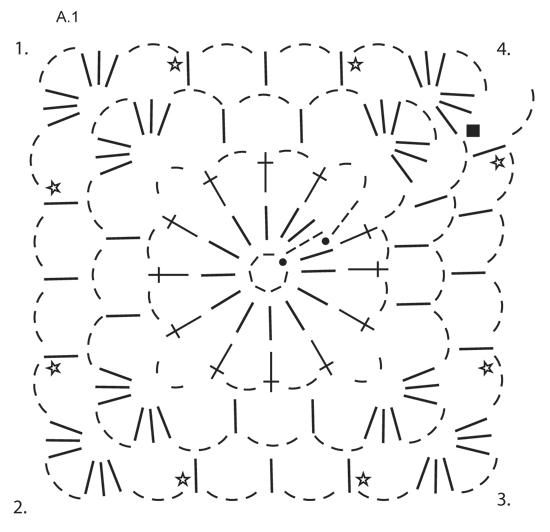
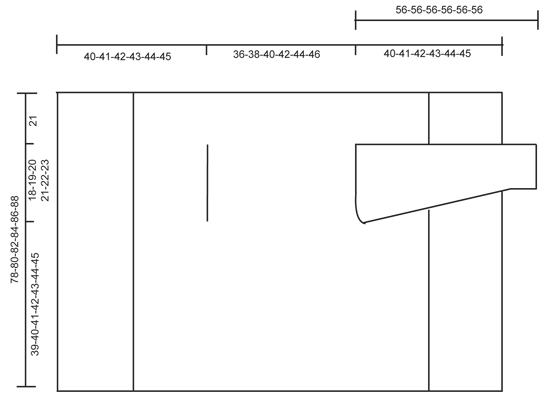
PATTERN: See diagram A.1. DECREASE TIP (applies to sleeves): Dec 1 repetition (= 1 tr + 3 ch) by not working ch, but work 2 tr into 1 tr as follows: Work 1 tr but wait with last pull through (= 2 strands on hook), then work next tr but on last pull through, pull yarn through all sts on hook. ---------------------------------------------------------- BODY: Worked in the round from mid back on the back. Work 6 ch on hook size 5 mm with Big Delight and form a ring with 1 sl st in first ch. Work according to diagram A.1, i.e. work as follows: ROUND 1: Work 3 ch, 13 tr in ch-ring, finish with 1 sl st in 3rd ch from beg of round. ROUND 2: 5 ch, skip 1 tr, 1 tr in next tr, * 2 ch, 1 tr in next tr *, repeat from *-* the entire round, finish with 2 ch = 12 tr + 2 ch. ROUND 3: Now work the circle into a square, i.e. work as follows: Work 3 tr + 3 ch + 3 tr (= corner) in first ch-space, 3 ch, 1 tr in next ch-space, 3 ch, 1 tr in next ch-space, 3 ch, * 3 tr + 3 ch + 3 tr (= corner) in next ch-space, 3 ch, 1 tr in next ch-space, 3 ch, 1 tr in next ch-space, 3 ch *, repeat from *-* 3 times in total, 1 tr in next ch-space (= last 2 ch from previous round), 3 ch. ROUND 4: Work 3 tr + 3 ch + 3 tr (= corner) in first ch-space, * 3 ch, 1 tr in next ch-space, 3 ch, 1 tr in next ch-space, 3 ch, 1 tr in next ch-space, 3 ch, 3 tr + 3 ch + 3 tr (= corner) in next ch-space *, repeat from *-* 3 times in total, 3 ch, 1 tr in next ch-space, 3 ch, 1 tr in next ch-space, 3 ch, 1 tr in next ch-space, 3 ch, 1 tr in next ch-space, 3 ch. REMEMBER THE CROCHET TENSION! Repeat 4th round with inc, i.e. work 1 tr + 3 ch more between each corner on every round (= 4 inc per round) AT THE SAME TIME on every 6th round inc 1 tr + 3 ch extra on each side of each corner – see star in diagram (= 8 extra inc per round). Continue like this until square measures 36-38-40-42-44-46 cm x 36-38-40-42-44-46 cm. Now work armhole as follows: Work as before until first corner, work 3 tr + 3 ch + 3 tr in ch-space in the corner. Now work ch until the middle of next side (i.e. in the middle between 1st and 2nd corner) as follows: Work 1 ch for every ch/tr skipped. Then work pattern as before until the middle between 3rd and 4th corner. Now work ch until beg of round as follows: Work 1 ch for every ch/tr skipped. On next round work pattern and inc as before over all sts, also in ch for armholes. Continue like this until square measures 78-80-82-84-86-88 cm x 78-80-82-84-86-88 cm (i.e. 21 cm in all sizes from armhole). Fasten off. FRONT PIECE: Now work back and forth between first and second corner. NOTE! Work front piece without inc. 1st ROW: Work from first corner as follows: 3 tr in ch-space in the corner, * 3 ch, 1 tr in ch-space *, repeat from *-* ending with 3 ch and 3 tr in the corner. 2nd ROW: Turn and work like this: 1 tr in each of the first 3 tr, * 1 tr in the ch-space, 3 ch *, repeat from *-* ending with 1 tr in the last ch-space and 1 tr in each of the 3 tr. 3rd ROW: Turn and work like this: 1 tr in each of the first 3 tr, * 3 ch, 1 tr in the ch-spance *, repeat from *-* and end with 3 ch and 1 tr in each of the last 3 tr. Continue repeating 2nd and 3rd row. Continue working like this until 19-20-21-22-23-24 cm have been worked back and forth, fasten off. Repeat on the other side, now work back and forth from third to fourth corner. Finally work a round around the entire square, work pattern as before but in ch-space in each corner work 6 tr. Fasten off. SLEEVE: Work in the round, top down from armhole, beg from mid under sleeve from RS. ROUND 1: Work 6 ch (= 1 tr + 3 ch), * 1 tr in next ch-space, 3 ch *, repeat from *-* 16-17-18-19-20-21 times in total, finish with 1 sl st in 3rd ch. ROUND 2: Work 5 ch, * 1 tr in next ch-space, 3 ch *, repeat from *-* 16-17-18-19-20-21 times in total, work 1 ch, finish with 1 sl st in 3rd ch at beg of round. Repeat 1st and 2nd ROUND - AT THE SAME TIME dec 1 tr + 3 ch at beg of 4th-6th-6th-8th-8th-6th round by working 2 tr tog – READ DECREASE TIP – mid under sleeve. Repeat dec every 6th-6th-6th-4th-4th-4th round = 12-12-13-13-14-14 tr. Repeat round without dec until sleeve measures approx. 56 cm in all sizes. Fasten off. Work another sleeve. |
||||||||||||||||||||||
Diagram explanations |
||||||||||||||||||||||
|
||||||||||||||||||||||
 |
||||||||||||||||||||||
 |
||||||||||||||||||||||
Have you finished this pattern?Tag your pictures with #dropspattern #aroundtheworldcardigan or submit them to the #dropsfan gallery. Do you need help with this pattern?You'll find 7 tutorial videos, a Comments/Questions area and more by visiting the pattern on garnstudio.com. © 1982-2026 DROPS Design A/S. We reserve all rights. This document, including all its sub-sections, has copyrights. Read more about what you can do with our patterns at the bottom of each pattern on our site. |
||||||||||||||||||||||


With over 40 years in knitting and crochet design, DROPS Design offers one of the most extensive collections of free patterns on the internet - translated to 17 languages. As of today we count 324 catalogues and 12290 patterns translated into English (UK/cm). 12290
We work hard to bring you the best knitting and crochet have to offer, inspiration and advice as well as great quality yarns at incredible prices! Would you like to use our patterns for other than personal use? You can read what you are allowed to do in the Copyright text at the bottom of all our patterns. Happy crafting!
Post a comment to pattern DROPS 156-42
We would love to hear what you have to say about this pattern!
If you want to leave a question, please make sure you select the correct category in the form below, to speed up the answering process. Required fields are marked *.