
Popular categories
Looking for a yarn?


Comments / Questions (208)
![]() Janice Kern wrote:
Janice Kern wrote:
Now I get it!! :)) THANKS so much! I assume you meant inc not dec? I appreciate your help. :)
18.07.2014 - 02:23DROPS Design answered:
Dear Mrs Kern, you are correct, it's all about increase there not decrease (the last answer will be corrected). Happy knitting!
18.07.2014 - 09:11
![]() Janice Kern wrote:
Janice Kern wrote:
Thanks. Still, how can you inc every 3/4" and then every 1.5" on the 2nd inc when 3/4" + 3/4" = 1.5"? I am at 200 sts so I worked it out ok so far. I love the yarn and your videos are the best ones anywhere. Love doing just garter (NO purls) stitch so hoping it will be ok. I just wish I could knit faster! I bought yarn through your Nordic Super Mart in Cal. Thanks for your help :))
16.07.2014 - 19:58DROPS Design answered:
Dear Mrs Kern, in size S eg you inc 5 times every 3/4'': first inc will be done after 1st ridge, then 2nd inc after another 3/4'', then 3rd after another 3/4'' and so on until 5 inc rows have been worked. After these 5 inc rows work 1½'' then work a new row with inc, work another 1½'' inc again, work finaly 2" and inc for the last time. (please check for your size, this apply for size S. Happy knitting!
17.07.2014 - 09:21
![]() Janice Kern wrote:
Janice Kern wrote:
There is definitely a mistake in this pattern re: the increasing. I think this should be clarified. It lists increase 3x it doesn't make sense to have one increase at 3/4" 5x and then 2nd one at 1.5" 7x. So "frogging" it. I think you should just do it Row by Row instructions-that would be MUCH easier but corrections would be appreciated. Thanks.
15.07.2014 - 18:43DROPS Design answered:
Dear Mrs Kern, you inc (see your size): 8-9-10-10-10-10 sts every 3/4" 5-6-7 times in total 8-8-6-7-9-9 sts every 1½'' 2 times in total 8-7-0-6-8-8 sts after having worked 2" more = 190-200-210-222-234-246 sts. Remember you can ask your Drops store for any help when required, they will answer even per telefon or mail. Happy knitting!
16.07.2014 - 09:33
![]() Ursula wrote:
Ursula wrote:
Hvor mange nøgler skal jeg brugeistr. M?
15.07.2014 - 15:20DROPS Design answered:
Hej Ursula. Der står i mønstret du skal bruge 100 gr Brushed Alpaca Silk til str M. Hvert nøgle vejer 25 gram, så skal du bruge 4
15.07.2014 - 15:51
![]() Beate Fjærgård wrote:
Beate Fjærgård wrote:
Way too big over the shoulders! Having read other comments warning about this, I knitted size S (I am usually L) with needle size 6,5 instead of 7. Even then the poncho is far from fitting over the shoulders. And the overall appearance is a lot less flattering than the illustration photo. Sadly, this work will end up in my dust bin :-(
13.07.2014 - 03:33DROPS Design answered:
Dear Mrs Fjærgård, you will find all measurements for each size in the chart at the bottom of the pattern, so that for size L neckline is 41 cm x 2 = 82 cm wide with a tension of 14 sts = 10 cm. But you are welcome to knit a smaller size if you rather get a shorter neckline. Happy knitting!
14.07.2014 - 09:40
![]() Catherine Barec wrote:
Catherine Barec wrote:
Joli modèle. J'ai la laine, mais sur l'étiquette ce sont des aiguilles du 5. J'ai fait un échantillon comme l'explication (n°7) et un autre avec les aiguilles n°5. Il me faut dans ce cas 17 mlles pour 10 Cms. C'est beaucoup plus lache avec les n°7. J'hésite, quand pensez-vous?
06.07.2014 - 16:09DROPS Design answered:
Bonjour Mme Barec, ce modèle se tricote volontairement en déjaugé, sur la base d'un échantillon de 14 m x 26 rangs au point mousse = 10 x 10 cm, avec des aiguilles 7 ou celles qui vous permettront d'obtenir le bon échantillon. Bon tricot!
07.07.2014 - 09:00
![]() Juditha Klilnk wrote:
Juditha Klilnk wrote:
Da ich sehr schmale Schultern habe, rutscht mir der Poncho immer von ihnen herunter. Ich habe noch Rest-Wolle und könnte damit nach oben eine Blende anstricken. Sie soll nicht zu breit werden; in welchem Muster sollte ich sie anfertigen und wie nehme ich dabei Maschen ab? Oder gibt es noch eine andere Idee (z.B. häkeln)? Juditha
03.07.2014 - 08:46DROPS Design answered:
Liebe Juditha, leider sprengt es an dieser Stelle den Rahmen, eine detaillierte Anleitung zu Ihrem Problem zu geben. Bitte wenden Sie sich an das Geschäft, in dem Sie die Wolle gekauft haben, dort kann man Sie dann ausführlicher beraten. Eine Idee wäre noch, oben einen Faden durchzufädeln und den oberen Rand damit etwas zu raffen, das düfte bei dem Modell recht hübsch aussehen, probieren Sie es einfach aus, wenn Sie die Idee mögen.
04.07.2014 - 15:12
![]() Janice Kern wrote:
Janice Kern wrote:
Re: "First Date" Just cast-on! Thx for your great service. Reading ahead: Are the increases for buttonholes IN ADDITION to the 1st evenly spaced increases? Hope I don't bug you! 1st major knitting project! Best regards
01.07.2014 - 21:30
![]() Åsa wrote:
Åsa wrote:
OBS! Stickade M den blev enorm......
28.06.2014 - 19:32
![]() Bibi wrote:
Bibi wrote:
Ponchon blir jättestor. Gjorde en L och den ramlar ner över axlarna. Ska virka några varv, som håller in i halsringningen. I övrigt är iden bra. Ska virka en till och då ta finare stickor och göra efter small och se om det blir bra. Ska även flytta sprundet, så man kan ha knappraden lite mer på framsidan och göra sprundet så det också kommer på framsidan. Tror det blir bättre.
09.06.2014 - 11:19
|
|
First date#firstdateponcho |
|
|
|
|
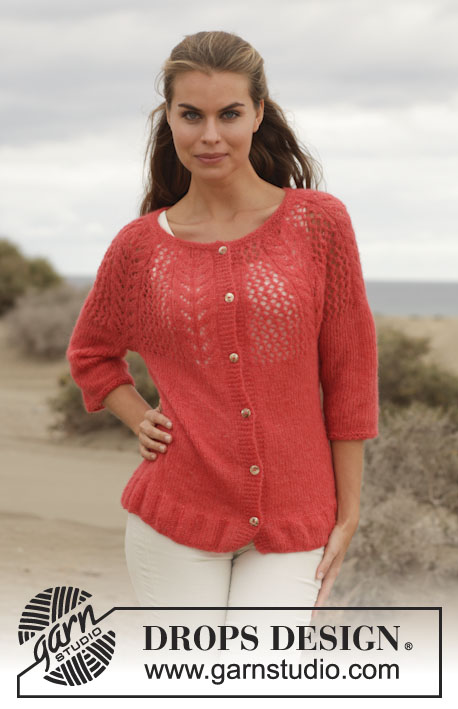
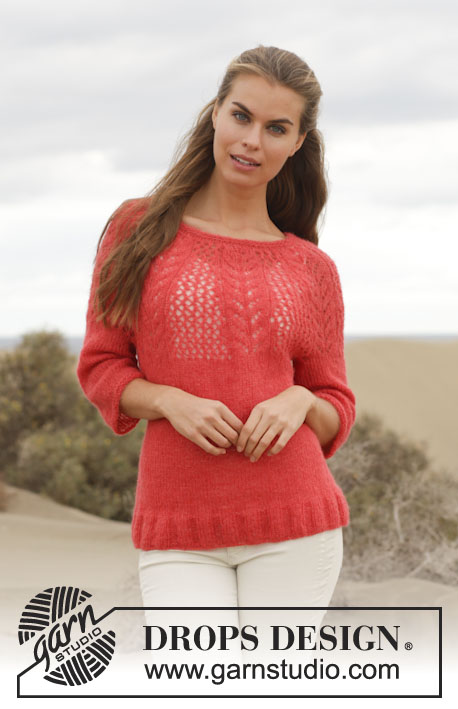
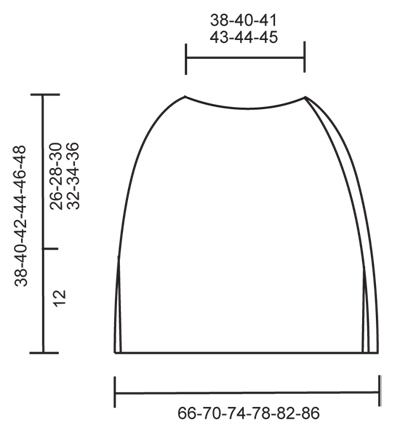
Knitted DROPS poncho in garter st with vent in ”Brushed Alpaca Silk”. Size S-XXXL.
DROPS 154-4 |
|
|
GARTER ST (back and forth on needle): K all rows. 1 ridge = 2 rows K. INCREASE TIP: Inc 1 st by getting yarn between 2 sts from previous row - K this st twisted, i.e. work in back loop of st instead of front to avoid holes. BUTTONHOLES: Dec for buttonholes in right side of piece, seen from RS. 1 buttonhole = K tog third and fourth st from edge and make 1 YO. Measure from neck edge and dec for buttonholes when piece measures: SIZE S: 2, 10, 18 and 26 cm SIZE M: 2, 10, 18 and 26 cm SIZE L: 2, 10, 18 and 26 cm SIZE XL: 2, 11, 20 and 29 cm SIZE XXL: 2, 11, 20 and 29 cm SIZE XXXL: 2, 11, 20 and 29 cm ---------------------------------------------------------- PONCHO: Worked back and forth on circular needle, top down. Loosely cast on 106-111-115-119-123-126 sts with Brushed Alpaca Silk on circular needle size 7 mm. Work 1 ridge in GARTER ST - see explanation above. On next row from RS, inc 20-21-23-23-25-24 sts evenly = 126-132-138-142-148-150 sts - READ INCREASE TIP. Continue back and forth in garter st until finished measurements. AT THE SAME TIME dec for BUTTONHOLE and inc evenly as follows: Inc 8-9-10-10-10-10 sts every 2 cm 5-5-6-6-6-7 times in total, 8-8-6-7-9-9 sts every 4 cm 2 times in total for all sizes and 8-7-0-6-8-8 sts after another 5 cm 1 time (= 64-68-72-80-86-96 sts inc) = 190-200-210-222-234-246 sts. Continue to work until piece measures 26-28-30-32-34-36 cm in total. Then insert a marker in the side for vent so that there are 95-100-105-111-117-123 sts on each side of marker. Then finish front and back piece separately. FRONT PIECE: Continue back and forth in garter st over the 95-100-105-111-117-123 sts on front piece. Loosely cast off all sts from WS when piece measures 38-40-42-44-46-48 cm in total. BACK PIECE: Work as front piece and loosely cast off from WS. ASSEMBLY: Fasten all strands and sew buttons on to left band, i.e. in left side of piece seen from RS. |
|
 |
|
Have you finished this pattern?Tag your pictures with #dropspattern #firstdateponcho or submit them to the #dropsfan gallery. Do you need help with this pattern?You'll find 12 tutorial videos, a Comments/Questions area and more by visiting the pattern on garnstudio.com. © 1982-2026 DROPS Design A/S. We reserve all rights. This document, including all its sub-sections, has copyrights. Read more about what you can do with our patterns at the bottom of each pattern on our site. |


With over 40 years in knitting and crochet design, DROPS Design offers one of the most extensive collections of free patterns on the internet - translated to 17 languages. As of today we count 324 catalogues and 12290 patterns translated into English (UK/cm). 12290
We work hard to bring you the best knitting and crochet have to offer, inspiration and advice as well as great quality yarns at incredible prices! Would you like to use our patterns for other than personal use? You can read what you are allowed to do in the Copyright text at the bottom of all our patterns. Happy crafting!
Post a comment to pattern DROPS 154-4
We would love to hear what you have to say about this pattern!
If you want to leave a question, please make sure you select the correct category in the form below, to speed up the answering process. Required fields are marked *.