
Popular categories
Looking for a yarn?


Comments / Questions (133)
![]() Ingunn wrote:
Ingunn wrote:
Jepp... kom plutselig på at jeg fikk ikke kasten rett over hverandre.... må lære meg å lese nøye... hi hi...snart ferdig nå med genseren og den blir fin :-)
22.07.2013 - 14:40
![]() Ingunn wrote:
Ingunn wrote:
Hei. Jeg strever med denne. Det blir ikke så fint og rett som på bildet. Det ser ut som om det hele blir litt vridd på... vanskelig å forklare men trekantene blir på en måte litt sving på. Så blir ikke hullene etter kastene slik på bildet. Har startet for 3 gang nå. Mulig det retter seg når det blir tatt av rundpinnen.. noe som har et tips? På bildet ser det ut som masken melom kastene er strikker rett hele veien.. forvirret..
17.07.2013 - 23:59DROPS Design answered:
Hej Ingunn. Det vrider sig lidt naar du strikker rundt paa pinnene, men det skal nok rette sig naar du har lukket af. Du skal vaere sikker paa du laver dine kast om den samme maske - ellers kan det ogsaa vride! Og du skal strikke kastet rett i hver pind (staar i mönstret). Jeg strikker denne nu og jeg laver kastene i en vrang pind og strikker dem da i en rett pind, saa bliver det fint ;-) Haaber det hjaelper dig
19.07.2013 - 12:52
![]() Sandra wrote:
Sandra wrote:
Hi, Im really struggling with the tension on this garment. I've knitted the tension square on size 6mm needles and it measures 12x 16cm!!!!!!, I've therefore tried a size 5.5 mm and this measured 9x13cm, I also tried 5mm needles and after 26 rows it measured 9.5x9cm (the 9cm being the length of the stiches on the needle. I love this pattern and have purchased 2 lots of Paris yarn to knit it so any help you can offer would be gratefully received. Best wishes. Sandra
06.07.2013 - 22:37DROPS Design answered:
Dear Sandra, you could knit the gauge in a round and above all not to stretch the garter st at measuring. Happy knitting!
09.07.2013 - 11:12
![]() Lucy wrote:
Lucy wrote:
After I have slipped the 16 stitches from the front piece onto a place holder and start working back and forth, I am extremely confused by what you are saying about casting off every other row. I don't even know what to ask about it since I just generally have no idea what I am trying to achieve here. Also, there is no further direction on what to do with the place-marked stitches. What do I do from this point on?
03.06.2013 - 09:17DROPS Design answered:
Dear Lucy,the 16 mid sts you slipped onto a st holder are for neckline, you then continue back and forth inc at markers as before, and to shape neckline, you cast off sts each side (towards neck = at the beg of every row) : 2 sts 2 times and 1 st 2 times. Happy knitting!
03.06.2013 - 09:46
![]() Helle wrote:
Helle wrote:
Jeg har heller ikke strikket den lang bagpå, og manglede også 2 nøgler.. Selvom alle mål passer..
14.05.2013 - 10:56
![]() Vibeke Boes wrote:
Vibeke Boes wrote:
Har i 2 tilfælde været ude for, at der mangler 1-2 nøgler garn og i begge tilfælde er trøjen ikke strikket ekstra lang bagpå.
12.05.2013 - 18:04
![]() Pernille wrote:
Pernille wrote:
Jeg er nået til hvor man skal strikke frem og tilbage. Men har problemer med at få samme mønster, når jeg strikker vrang frem og tilbage. Halvdelen af strikketøjet er ret frem og tilbage. Den anden halvdel er vrang frem og tilbage. Kan i hjælpe? Videoen viser det kun på retmasker
28.03.2013 - 21:07DROPS Design answered:
Når du strikker retstrik rundt på rundpind, strikker du hver 2.p vrang. Men når du strikker retstrik frem og tilbage så strikker du alle pinde ret. Se begge vore videoer over Retstrik
03.04.2013 - 10:30
![]() Lisa Laco wrote:
Lisa Laco wrote:
Have thw yarn.. Have the needles. Puzzled by the directions. Just keep adding stitches every second row? If anyone has knit this yet please offer some advice on starting it off?
23.03.2013 - 15:03DROPS Design answered:
Dear Mrs Laco, you are correct, you'll continue inc 8 sts every other row to form the square. Happy knitting!
25.03.2013 - 11:26
![]() Kim wrote:
Kim wrote:
Hallo, habe nur eine kurze Frage: Die Masche (Marker) zwischen den beiden Umschlägen, wird die auch in Krausrippe gestrickt, oder glatt rechts ?
04.03.2013 - 13:07DROPS Design answered:
Liebe Kim, diese Masche wird auch in Krausrippe gestrickt.
05.03.2013 - 10:18
![]() Christina wrote:
Christina wrote:
Hallo, ich würde euch ganz dringend um eure Hilfe bitten. Ich verstehe nicht recht, wie ich die beiden hintereinanderliegenden Umschläge richtig rechts abstricke. Grüße
26.02.2013 - 13:13DROPS Design answered:
Liebe Christina. zwischen den Umschlägen liegt noch die markierte Masche. Die Umschläge werden re abgestrickt (nicht verschränkt) damit sich ein dekoratives Loch ergibt.
27.02.2013 - 10:16
|
|
Hugs and kisses#hugsandkissessweater |
|
 |
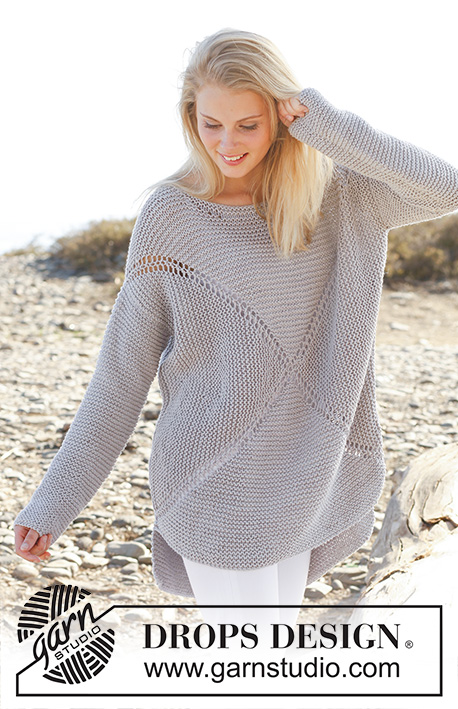 |
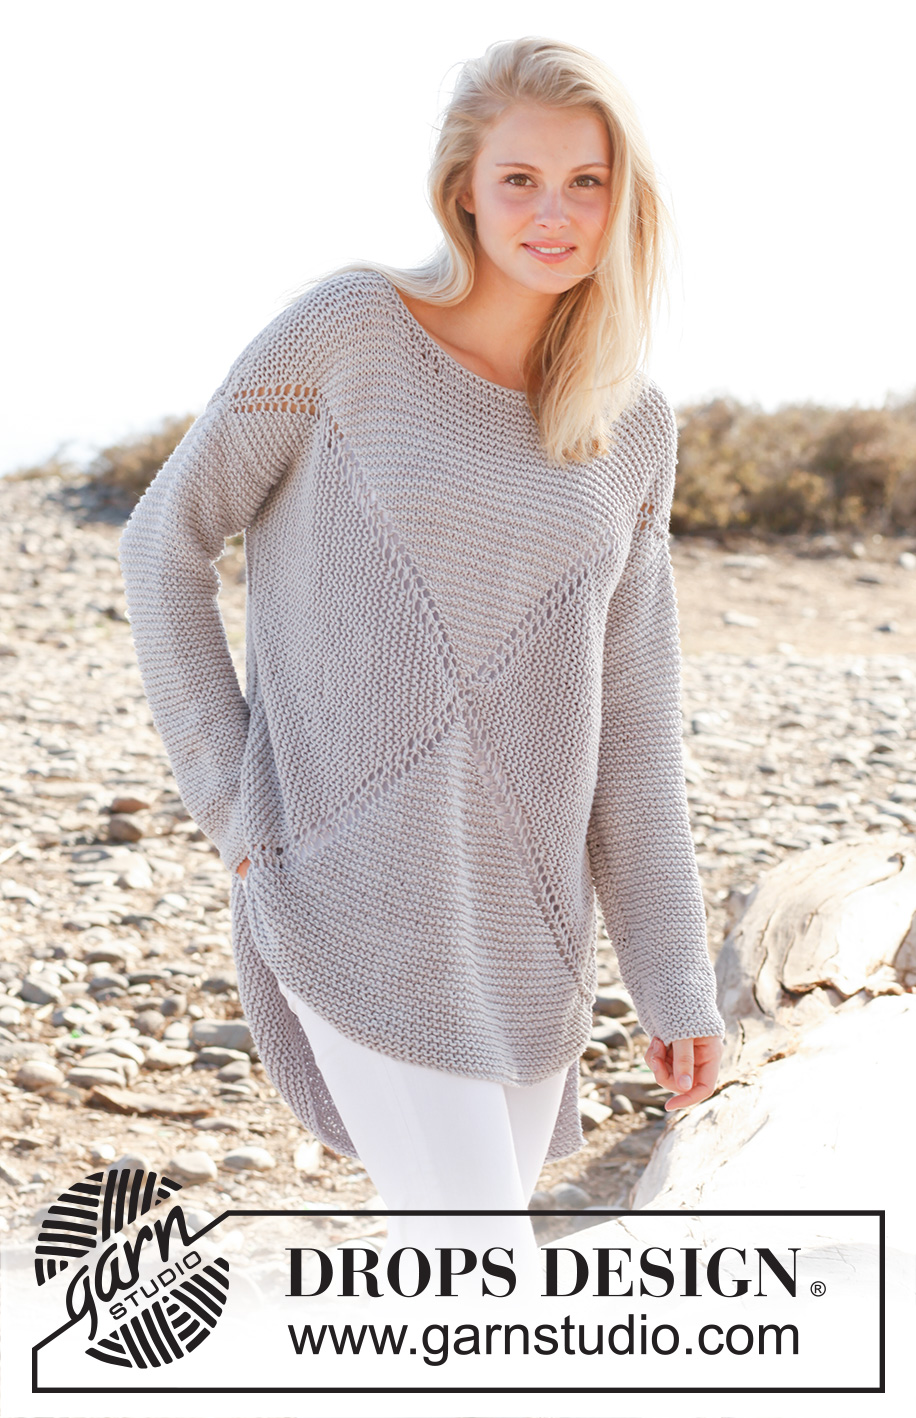
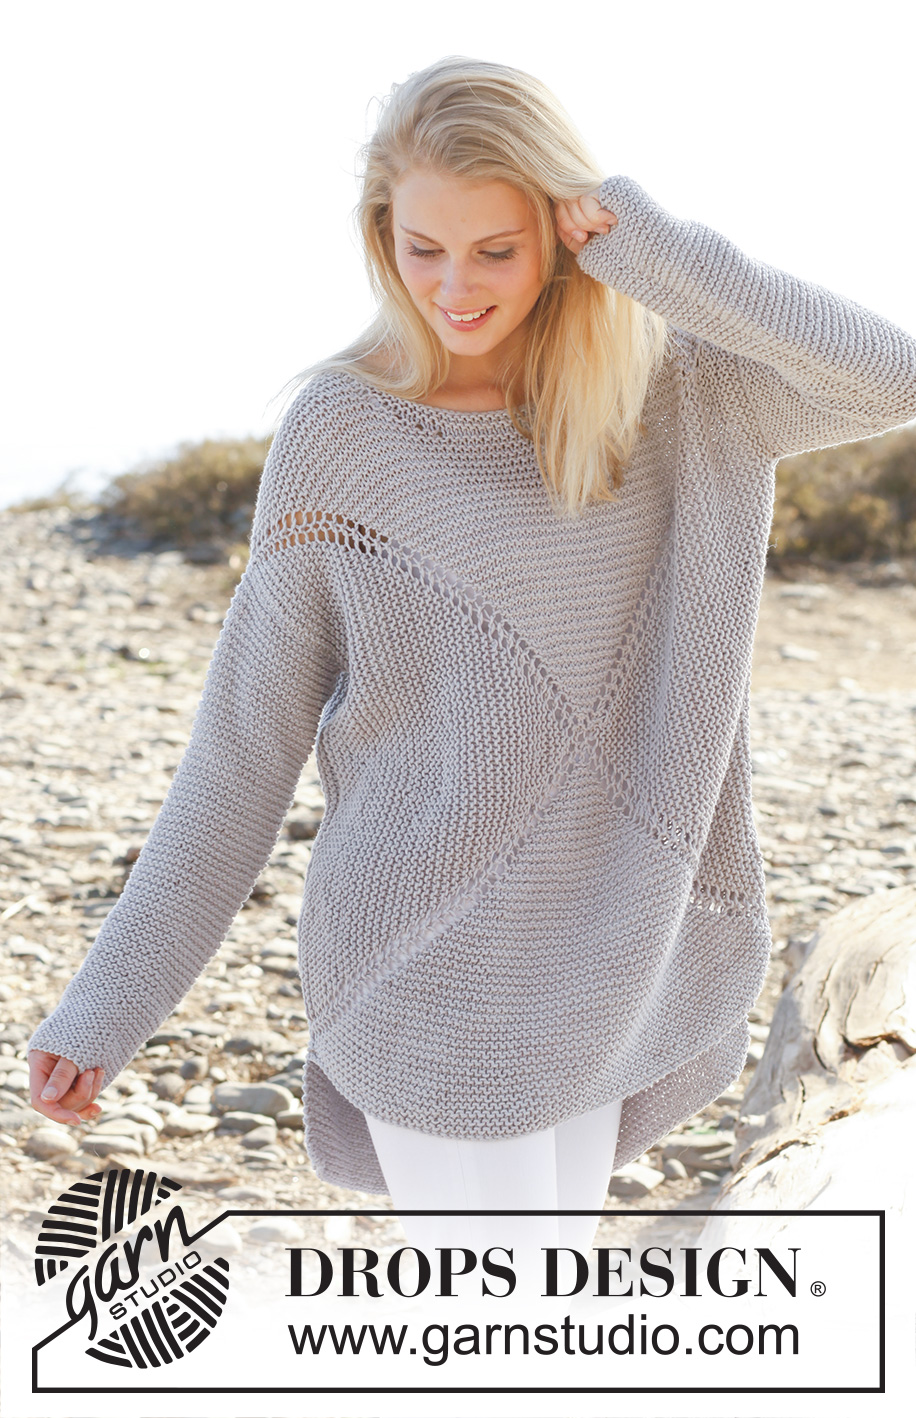
Knitted DROPS jumper worked in a square in garter st in ”Paris”. Size: S - XXXL.
DROPS 146-2 |
|
|
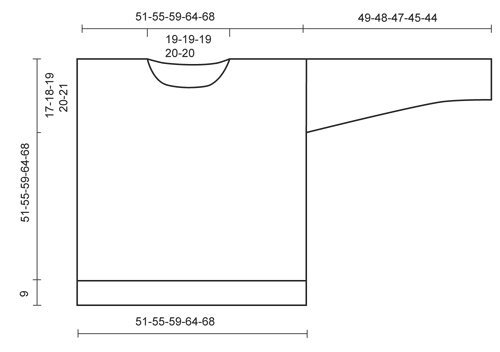
GARTER ST (in the round on circular needle): 1 ridge = 2 rounds. * K 1 round and P 1 round *, repeat from *-*. GARTER ST (back and forth on needle): K all rows. 1 ridge = 2 rows K. MEASURING TIP: Hold the piece up when measuring. Because of the garter st and the weight of the yarn the sleeve will be somewhat longer. If a lighter sleeve is wanted, work 4 ridges at the bottom of sleeve, then work in reversed stocking st. ---------------------------------------------------------- JUMPER: Worked in 2 parts from mid front/mid back in a square. Cast on and work on double pointed needles, switch to circular needle when needed. Finish by working the sleeves. FRONT PIECE: Cast on 8 sts with Paris and divide them on 4 double pointed needles size 6 mm (= 2 sts on every needle). Insert a marker in the first, third, fifth and seventh st (= 4 markers). Then work in the round and in GARTER ST over all sts - see explanation above. AT THE SAME TIME on every other round make 1 YO on each side of every marker (= 8 inc on every other round), on next round K YOs to make holes. Continue like this until there are 240-264-288-320-344 sts on needle (= 29-32-35-39-42 inc and 60-66-72-80-86 sts on each of the 4 sides). Stop with 1 P round. Now slip the middle 16-16-18-18-18 sts between 1st and 2nd marker on a stitch holder for neck, then work piece back and forth. Continue in garter st and continue inc at markers - AT THE SAME TIME cast off towards the neck on every other row as follows: 2 sts 2 times and 1 st 2 times. Continue inc until there are 284-308-330-362-386 sts on needle (= 38-41-44-48-51 inc, 78-84-90-98-104 sts between markers, 25-28-30-34-37 sts on each side of neck). Keep sts between 3rd and 4th marker on needle, cast off the other sts = 78-84-90-98-104 sts on needle. Work 2 ridges back and forth over these sts. Cast off. Insert a marker in each side, 17-18-19-20-21 cm down from the shoulder. This shows where the sleeve is sewn in. BACK PIECE: Cast on 8 sts with Paris and divide them on 4 double pointed needles size 6 mm (= 2 sts on every needle). Insert a marker in the first, third, fifth and seventh st (= 4 markers). Then work in the round and in garter st over all sts, AT THE SAME TIME on every other round make 1 YO on each side of every marker (= 8 inc on every other round), on next round K YOs to make holes. Continue like this until there are 288-312-336-368-392 sts on needle (= 35-38-41-45-48 inc and 72-78-84-92-98 sts between markers). Now cast off the middle 28-28-30-30-30 sts between 1st and 2nd marker for neck, then work piece back and forth = 260-284-306-338-362 sts. Continue inc until there are 284-308-330-362-386 sts on needle (= 38-41-44-48-51 inc, 78-84-90-98-104 sts between markers, 25-28-30-34-37 sts on each side of neck). Keep sts between 3rd and 4th marker on needle, cast off the other sts = 78-84-90-98-104 sts on needle. Work 15 ridges back and forth over these sts. Cast off. Insert a marker in each side, 17-18-19-20-21 cm down from the shoulder. This shows where the sleeve is sewn in. SLEEVE: Worked back and forth on circular needle. READ MEASURING TIP! Cast on 37-38-41-44-45 sts (incl 1 edge st in each side) on circular needle size 6 mm with Paris. Work in garter st. When piece measures 8 cm, inc 1 st in each side. Repeat inc every 5-4½-4½-4-3½ cm 7-8-8-8-9 more times (= 8-9-9-9-10 inc in total) = 53-56-59-62-65 sts. Cast off when piece measures 49-48-47-45-44 cm (shorter measurements in the larger sizes because of broader shoulder width). ASSEMBLY: Sew the shoulder seams. Sew in sleeves down to markers on front/back piece. Sew underarm and side seams in one inside 1 edge st, leave the bottom 10 cm = vent. NECK EDGE: Knit up approx. 66 to 74 sts (incl sts on stitch holder) on a short circular needle (40 cm) around the neck. Work 2 ridges. Cast off. |
|
 |
|
Have you finished this pattern?Tag your pictures with #dropspattern #hugsandkissessweater or submit them to the #dropsfan gallery. Do you need help with this pattern?You'll find 17 tutorial videos, a Comments/Questions area and more by visiting the pattern on garnstudio.com. © 1982-2026 DROPS Design A/S. We reserve all rights. This document, including all its sub-sections, has copyrights. Read more about what you can do with our patterns at the bottom of each pattern on our site. |
|


With over 40 years in knitting and crochet design, DROPS Design offers one of the most extensive collections of free patterns on the internet - translated to 17 languages. As of today we count 325 catalogues and 12298 patterns translated into English (UK/cm). 12298
We work hard to bring you the best knitting and crochet have to offer, inspiration and advice as well as great quality yarns at incredible prices! Would you like to use our patterns for other than personal use? You can read what you are allowed to do in the Copyright text at the bottom of all our patterns. Happy crafting!
Post a comment to pattern DROPS 146-2
We would love to hear what you have to say about this pattern!
If you want to leave a question, please make sure you select the correct category in the form below, to speed up the answering process. Required fields are marked *.