
Popular categories
Looking for a yarn?


Comments / Questions (123)
![]() Hettyh wrote:
Hettyh wrote:
Wordt de hals niet af gewerkt?
13.07.2014 - 09:14
![]() Mette Krogh-Larnkjær wrote:
Mette Krogh-Larnkjær wrote:
Hej igen. Tak for svaret, når jeg hækler som beskrevet både i svaret og i opskriften, så får jeg alt for mange masker, for så øges der med 2 masker i hver side hver gang. Jeg har lige pillet et helt ærme op, for jeg opdagede det først ved den sidste udtagning. Jeg må jo forsøge mig frem, men forstår stadig ikke helt hvordan man laver udtagning med en maske for opskriften siger jo egentlig 2 hvis man følger udtagningstippet.
20.06.2014 - 13:07DROPS Design answered:
Det skal stemme med opskriften. Men skriv gerne en kommentar om hvordan du løste det, så kan vi eft skrive det tydeligere i opskriften.
05.09.2014 - 12:21
![]() Mette Krogh-Larnkjær wrote:
Mette Krogh-Larnkjær wrote:
Har en udfordring med udtagning. Hvordan går man det nemmest når man skal øge med 1 m i et mønster med 2 m hvoraf den ene er luftmaske?
18.06.2014 - 07:13DROPS Design answered:
Hej Mette. Du skal tage ud ved at haekle 1 st + 1 lm i den den yderste st i hver side. Dvs, hvis du fölger diagrammet saa haekler du bare 1 lm + 1 st i den yderste m ekstra. Du skal ikke haekle 1 st + 1 lm (altsaa i den raekkefölge, for saa kan jeg forestille mig det bliver kompliceret). God fornöjelse.
19.06.2014 - 13:30
![]() Jackie wrote:
Jackie wrote:
Hi there! Thanks again for the clarification. I think I understand, but I just want to list out what I think the pattern is for the beginning of the back piece - hopefully you can clarify! After finishing A.1A, and continuing to read the pattern to complete A.1B, do I repeat only the stiches specified between the brackets (noting section B), and then go back to the bottom once I reach the top of the bracket that is labeled section A1? Thanks for all of your help!
31.05.2014 - 16:42DROPS Design answered:
Dear Jackie, after A.1A (=ch3, 1 dc), repeat M.1B = *ch1, skip 1ch, 1 dc in next ch, ch1, skip 1ch, 1 dc in next ch, ch1, skip 1ch, 1 dc in next ch* until 2 sts remain on row, and finish with A.1C(=1ch, skip 1 ch, 1dc in next ch). then turn and start 2nd row starting from the left towards the right. Happy crocheting!
16.06.2014 - 10:05
![]() Jackie wrote:
Jackie wrote:
Hi there! I absolutely love this pattern but I am having trouble understanding how to read the diagram - do I read horizontally or vertically? I feel as though it may zig-zag, but this is the first time I have seen a pattern like this before. Your help is much appreciated! Thank you so much :)
28.05.2014 - 00:06DROPS Design answered:
Dear Jackie, start reading diagram from the bottom corner on the right side towards the right (RS rows), on WS rows, read from the left towards the right - the 3 ch at beg of rows = 1st dc (= A.1A from RS, A.1C from WS), repeat A.1B on the middle sts. Happy crocheting!
28.05.2014 - 09:08
![]() Chiara wrote:
Chiara wrote:
Buongiorno vorrei capire se sto sbagliando qualcosa nella realizzazione di questo capo. Sto facendo il dietro. Nel passaggio dallo schema A1 allo schema A2 il lavoro passa kentamente ma inesorabilmente dopo 13 righe da 60 cm a 72 cm in larghezza, nonostante abbia mantenuto lo stesso numero di maglie come nella spiegazione. Ho provato anche a rifare lo schema A2 con un uncinetto più piccolo, il 3,5, ma nulla è cambiato. Che cosa sto sbagliando? Potete aiutarmi? Grazie
22.05.2014 - 08:15DROPS Design answered:
Buongiorno Chiara. Per risolvere il suo problema può riprendere, a intervalli regolari, un numero inferiore di m nel passaggio tra lo schema A.1 e lo schema A.2. Buon lavoro!
22.05.2014 - 13:06
![]() Susanne wrote:
Susanne wrote:
LES ØKETIPS. Gjenta økningen på hver 7.-5.-4½.-3½.-3½.-3.cm 5-7-8-9-9-10 ganger til (totalt 6-8-9-10-10-11 økninger) = 57-61-65-69-71-75 st/lm Jeg har økt 4 ganger på hver side og har 61 masker der nå. Men skal jeg telle med lm også? Er det riktig å kun øke 4 ganger på hver side? eller er det å øke 8 ganger på hver side?? trenger svar så raskt som mulig : ) takk på forhånd
06.05.2014 - 11:01DROPS Design answered:
Du har 45 m öger 8 gange i hver side = 16 m 45 + 16 = 61 m God fornöjelse!
07.05.2014 - 09:13
![]() Jane wrote:
Jane wrote:
My comfortable measurements underarm to underarm is 64cm making it 128cm in total. The 126cm is closest, but I would have to downsize making it slightly tighter. Would perhaps going for the next size up (138cm) be more of a sensible decision? Any advise would be happily received as I have no clue which way to go. Thank you in advance.
07.10.2013 - 23:32DROPS Design answered:
Dear Jane, check if these 2 cm tighter can fit or not, so that you can rather decide to make smaller size or larger size. Do not hesitate to get help from your local store, they also can help you. Happy crocheting!
08.10.2013 - 09:50
![]() Jane wrote:
Jane wrote:
Would it be fair to say that a US size XXL is equivilent to a UK size 18?
06.10.2013 - 23:22DROPS Design answered:
Dear Jane, you will see at the bottom of the pattern a measurement chart. Compare the measurements (in cm) to one of your similar garment to find the correct size. The measurements are taken flat, from side to side. Happy crocheting!
07.10.2013 - 09:51
![]() A.v.Rooij wrote:
A.v.Rooij wrote:
Heb dit patroon uitgeprobeerd en dan kom het volgende tegen, als je het onderste gedeelte klaar hebt krijg je bij het tweede gedeelte veel meer volume,hoe los je dit op(door steken te minderen?
24.05.2013 - 06:35DROPS Design answered:
Het gedeelte A.1 zou dezelfde breedte krijgen als A.2. Er blijft hetzelfde aantal steken op de toer en zorg ervoor dat u bij het beginnen van A.2 ook 1 stk haakt in elke l l van A.1 (zie teltekening).
29.05.2013 - 16:18
|
|||||||
Donna#donnasweater |
|||||||
 |
 |
||||||
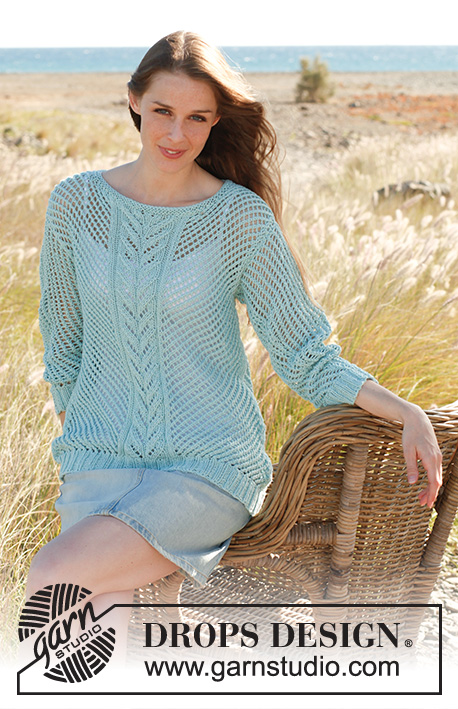
Crochet DROPS jumper in ”Cotton Light”. Size: S - XXXL.
DROPS 145-19 |
|||||||
|
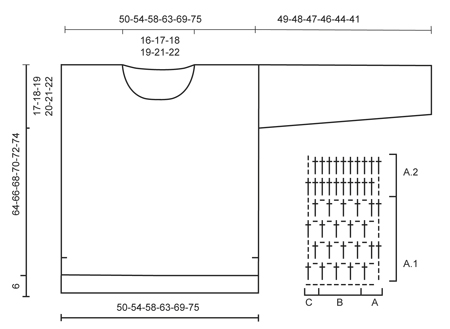
PATTERN: Work according to A.1 and A.2. DECREASE TIP: Turn when one tr remains = 1 tr dec. INCREASE TIP: Inc by working 1 tr + 1 ch extra in outermost tr in each side. Work the inc sts gradually in A.1. ---------------------------------------------------------- BACK PIECE: Worked back and forth. Back piece is worked 6 cm longer than front piece. Work a row with 88-94-102-110-120-130 LOOSE ch (it is important that the ch are loose to avoid a tight edge) on hook size 4 mm with Cotton Light. Turn and work 1 tr in 6th ch from hook (A.1 A has now been worked – see Diagram). Work A.1 B over the next 80-86-94-102-112-122 ch, and finish with A.1 C in the last 2 ch. Then continue to work according to A.1. When piece measures 47-48-49-50-51-52 cm, work as follows: A.2 A, repeat A.2 B until 2 tr/ch remain, work A.2 C = 85-91-99-107-117-127 tr. Continue with A.2 until finished measurements. When piece measures 53-54-55-56-57-58 cm, insert 1 marker in each side (marks where armhole beg). When piece measures 68-70-72-74-76-78 cm, the middle 27-29-31-33-35-37 tr are no longer worked = 29-31-34-37-41-45 tr remain on each shoulder. Now finish each shoulder separately. Continue with A.2, cut and fasten the thread when piece measures 70-72-74-76-78-80 cm. FRONT PIECE: Beg and work as on back piece until piece measures 41-42-43-44-45-46 cm - NOTE: Back piece should be 6 cm longer than front piece - hence the different measures. Now continue as follows: A.2 A, repeat A.2 B until 2 tr/ch remain, work A.2 C = 85-91-99-107-117-127 tr. Continue with A.2 until finished measurements. When piece measures 47-48-49-50-51-52 cm, insert 1 marker in each side (marks where armhole beg). When piece measures 56-58-60-62-64-66 cm, the middle 23-25-27-29-31-33 tr are no longer worked. Now finish each shoulder separately, at the same time dec 1 tr on every row towards the neck 2 times in total – read DECREASE TIP = 29-31-34-37-41-45 tr remain on each shoulder. Continue with A.2, cut and fasten the thread when piece measures 64-66-68-70-72-74 cm. SLEEVE: Work sleeve back and forth. Work a row with 48-48-50-52-54-56 LOOSE ch (it is important that the ch are loose to avoid a tight edge) on hook size 4 mm with Cotton Light. Turn and work 1 tr in 6th ch from hook (A.1 A has now been worked). Work A.1 B over the next 40-40-42-44-46-48 ch, and finish with A.1 C in the last 2 ch = 45-45-47-49-51-53 tr/ch. Then continue to work according to A.1. When piece measures 8 cm, inc 1 st in each side - READ INCREASE TIP! Repeat inc every 7-5-4½-3½-3½-3 cm 5-7-8-9-9-10 more times (6-8-9-10-10-11 inc in total) = 57-61-65-69-71-75 tr/ch. Cut and fasten the thread when piece measures 49-48-47-46-44-41 cm (shorter measurements in the larger sizes because of broader shoulder width). ASSEMBLY: Sew the shoulder seams. Sew in sleeves – from shoulder and down to marker on front and back piece. Sew underarm seams and side seams in one, stop when 26 cm remain on back piece and 20 cm remain on front piece = vent. |
|||||||
Diagram explanations |
|||||||
|
|||||||
 |
|||||||
Have you finished this pattern?Tag your pictures with #dropspattern #donnasweater or submit them to the #dropsfan gallery. Do you need help with this pattern?You'll find 5 tutorial videos, a Comments/Questions area and more by visiting the pattern on garnstudio.com. © 1982-2026 DROPS Design A/S. We reserve all rights. This document, including all its sub-sections, has copyrights. Read more about what you can do with our patterns at the bottom of each pattern on our site. |
|||||||


With over 40 years in knitting and crochet design, DROPS Design offers one of the most extensive collections of free patterns on the internet - translated to 17 languages. As of today we count 324 catalogues and 12290 patterns translated into English (UK/cm). 12290
We work hard to bring you the best knitting and crochet have to offer, inspiration and advice as well as great quality yarns at incredible prices! Would you like to use our patterns for other than personal use? You can read what you are allowed to do in the Copyright text at the bottom of all our patterns. Happy crafting!
Post a comment to pattern DROPS 145-19
We would love to hear what you have to say about this pattern!
If you want to leave a question, please make sure you select the correct category in the form below, to speed up the answering process. Required fields are marked *.