
Popular categories
Looking for a yarn?


Comments / Questions (123)
Lisa wrote:
Hi, I am working on the sleeve for size S, and after the third increase I already have the total 57 tr/ch stitches , because increasing by 1tr+1ch at each end of the row means there is an increase of 4 stitches for the row, but the pattern only counts 2 to calculate the total. Is that correct, and if so should I end up with a total of 69 stitches? Or am I doing something wrong? thanks
30.04.2017 - 16:33DROPS Design answered:
Dear Lisa, number of sts after increase will be check, thank you. Happy crocheting!
02.05.2017 - 10:35
![]() Sylvia wrote:
Sylvia wrote:
What does, A.1B stands for. First time doing symbols. Thanks
02.04.2017 - 07:12DROPS Design answered:
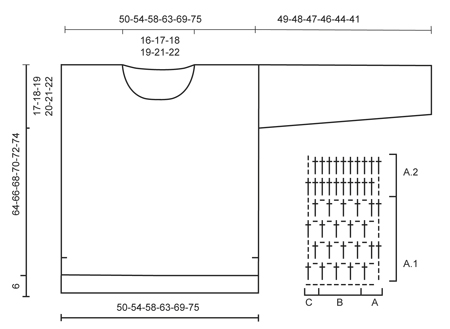
Dear Sylvia, diagram A.1 is divided into 3 parts: A.1A = beg of row from RS (= row1: 3 ch, 1 ch, skip 1 st, 1 dc in next st) and end of row from WS, then A.1B to repeat until last 3 sts on row 1 (= *1 ch, skip 1 st, 1 dc in next ch*, repeat from *-* a total of 3 times for 1 repeat of A.1B, repeat these until 2 sts remain on row, and A.1C = end of row from RS, beg of row from WS (row 1 = 1 ch, 1 dc in last st). Your DROPS store will provide you any further invidivual assistance required for reading charts. Happy crocheting!
03.04.2017 - 10:39
![]() Tommie wrote:
Tommie wrote:
Can you send me the pattern for this. I would be happy to pay for a pdf or written out.
03.11.2016 - 02:33DROPS Design answered:
Dear Tommie, you will find the pattern for free scrolling down the page. Happy crocheting!
03.11.2016 - 09:45Eva wrote:
Hello!!!Can you tell me the size of the jumper on picture?Thank you.
10.08.2016 - 00:13DROPS Design answered:
Dear Eva, our models are usually wearing size M - read more about sizing here. Happy crocheting!
10.08.2016 - 08:45
![]() Wendy wrote:
Wendy wrote:
I am on the back section starting A2 which seems to be a row of treble's. I've done that and I have 5 extra trebles which I don't know how to get rid of but also, because it has gone from a mesh pattern to all treble's, it is very curly. Am I reading the pattern correctly, is it a row of all treble's?
04.08.2016 - 23:51DROPS Design answered:
Dear Wendy, A.2 is all trebles - remember to check and keep gauge (17 tr = 10 cm) when working A.1, and do not work too tight the rows with ch and tr. Happy crocheting!
05.08.2016 - 09:45
![]() Wendy wrote:
Wendy wrote:
I really want to make this and looking at it, it appears easy, however, I don't understand the pattern at all. On the back piece, after the foundation row, I've done a treble in the 6th chain from the hook as instructed. It tells me that is A.1A, but the diagram shows it as two chains and a treble. Is it possible to get the written pattern instructions as opposed to looking at the diagram? If not, can you tell me what to do after the first treble in row 2.
31.07.2016 - 01:57DROPS Design answered:
Dear Wendy, when you work first row you skip first 5 ch (working in the 6th ch from hook), these first 5 ch are : 1st tr (= 3 ch), 1 ch before next tr + 1 ch skipped before crocheting next tr). At the beg of row 2 work A.1C: 3ch, 1 tr around next ch, then repeat A.1B and finish with A.1C. Happy crocheting!
01.08.2016 - 09:35
![]() Sarah wrote:
Sarah wrote:
I need further clarification on the sleeve increases, inadvertently I am acquiring an extra two stitches when increasing the sleeves leading to too many stitches. I have looked at the pattern to see how I can prevent the extra stitches from occurring but having great difficulty in figuring out how, can you advise further? The first increase stitch is placed at A.1 A and at the end however the extra stitches are occurring in every third row following this, hope this makes sense, Thanks Sarah
11.03.2016 - 23:30DROPS Design answered:
Dear Sarah, you inc for sleeve 1 st in each side, ie you will have a total of 2 tr more on every inc row - increase should be done by working 1 tr + 1 ch more in outermost tr in each side. On next row, work in A.1 as before, you will have same as before, but just 2 more tr per inc row. Happy crocheting!
12.03.2016 - 18:03Trishy wrote:
I'm new to the Crotchet world. And was wondering, if I try to make a large size in this jumper, how do I know how many stitches do I need for the back, & front etc?
31.10.2015 - 04:23DROPS Design answered:
Dear Trishy, you will find at the bottom of the pattern a measurement chart, compare the measurements (in cm) to a similar garment you have and like the shape and find out the matching size - you can then follow this size in the pattern. Read more about sizing here. Happy crocheting!
31.10.2015 - 18:09
![]() Federica Piucci wrote:
Federica Piucci wrote:
Buon pomeriggio, io intendo confezionare questa maglia in con due colori diversi, uno per la parte superiore e uno per quella inferiore. Indicativamente quanti grammi potrebbero servire per le due parti prese separatamente?
12.10.2015 - 15:06DROPS Design answered:
Buongiorno Federica. Non riusciamo ad essere precisi sul quantitativo di filato necessario per lavorare con due colori. Lavorare un piccolo campione con i due diversi motivi potrebbe dare una prima indicazione. Il suo rivenditore di fiducia è a sua disposizione per consigliarla. Se possibile e non troppo oneroso, si informi anche sulla possibilità di restituire eventuali gomitoli di filato integri e non utilizzati. Buon lavoro!
16.10.2015 - 23:39Dalia wrote:
When piece measures 53-54-55-56-57-58 cm / 21''-21¼''-21 5/8''-22''-22½''-22¾'', insert 1 marker in each side (marks where armhole beg). where exactly do I insert my markers?
14.07.2015 - 10:29DROPS Design answered:
Dear Dalia, see answer below. Happy crocheting!
27.07.2015 - 11:29
|
|||||||
Donna#donnasweater |
|||||||
 |
 |
||||||
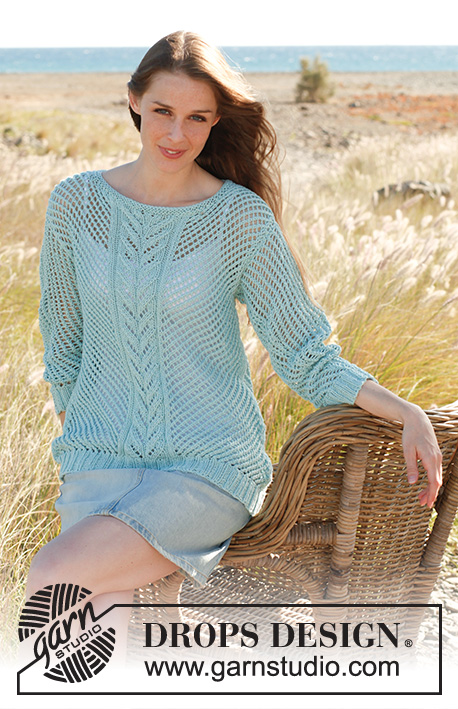
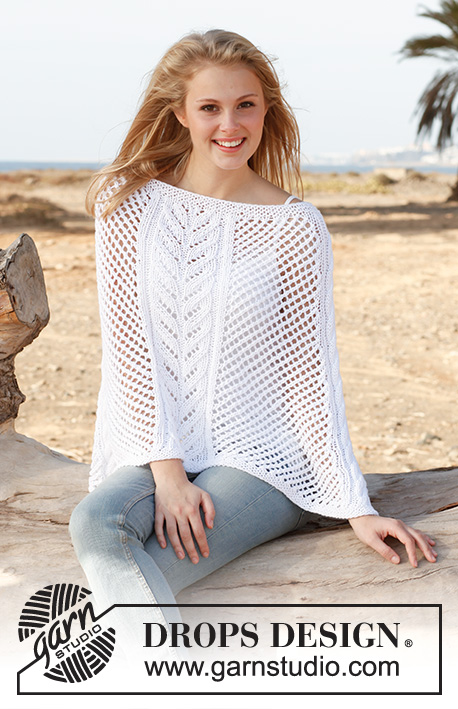
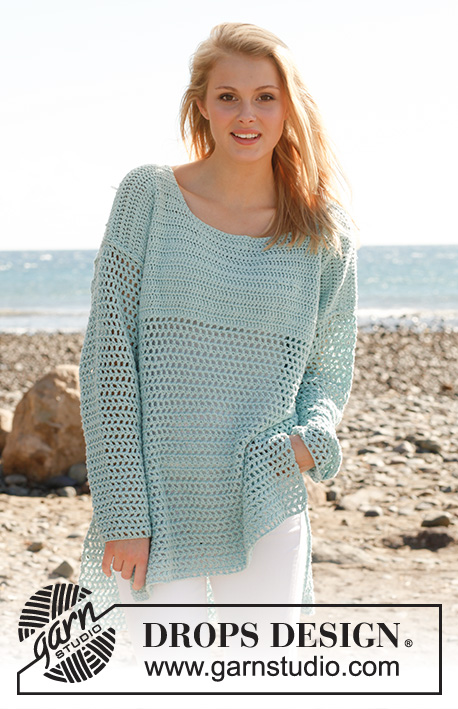
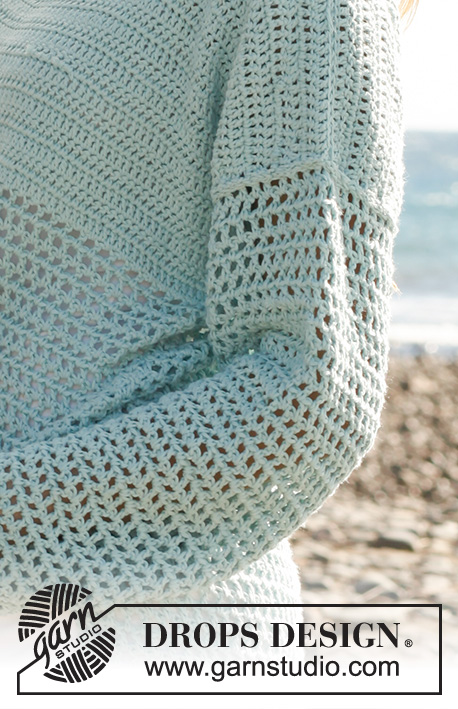
Crochet DROPS jumper in ”Cotton Light”. Size: S - XXXL.
DROPS 145-19 |
|||||||
|
PATTERN: Work according to A.1 and A.2. DECREASE TIP: Turn when one tr remains = 1 tr dec. INCREASE TIP: Inc by working 1 tr + 1 ch extra in outermost tr in each side. Work the inc sts gradually in A.1. ---------------------------------------------------------- BACK PIECE: Worked back and forth. Back piece is worked 6 cm longer than front piece. Work a row with 88-94-102-110-120-130 LOOSE ch (it is important that the ch are loose to avoid a tight edge) on hook size 4 mm with Cotton Light. Turn and work 1 tr in 6th ch from hook (A.1 A has now been worked – see Diagram). Work A.1 B over the next 80-86-94-102-112-122 ch, and finish with A.1 C in the last 2 ch. Then continue to work according to A.1. When piece measures 47-48-49-50-51-52 cm, work as follows: A.2 A, repeat A.2 B until 2 tr/ch remain, work A.2 C = 85-91-99-107-117-127 tr. Continue with A.2 until finished measurements. When piece measures 53-54-55-56-57-58 cm, insert 1 marker in each side (marks where armhole beg). When piece measures 68-70-72-74-76-78 cm, the middle 27-29-31-33-35-37 tr are no longer worked = 29-31-34-37-41-45 tr remain on each shoulder. Now finish each shoulder separately. Continue with A.2, cut and fasten the thread when piece measures 70-72-74-76-78-80 cm. FRONT PIECE: Beg and work as on back piece until piece measures 41-42-43-44-45-46 cm - NOTE: Back piece should be 6 cm longer than front piece - hence the different measures. Now continue as follows: A.2 A, repeat A.2 B until 2 tr/ch remain, work A.2 C = 85-91-99-107-117-127 tr. Continue with A.2 until finished measurements. When piece measures 47-48-49-50-51-52 cm, insert 1 marker in each side (marks where armhole beg). When piece measures 56-58-60-62-64-66 cm, the middle 23-25-27-29-31-33 tr are no longer worked. Now finish each shoulder separately, at the same time dec 1 tr on every row towards the neck 2 times in total – read DECREASE TIP = 29-31-34-37-41-45 tr remain on each shoulder. Continue with A.2, cut and fasten the thread when piece measures 64-66-68-70-72-74 cm. SLEEVE: Work sleeve back and forth. Work a row with 48-48-50-52-54-56 LOOSE ch (it is important that the ch are loose to avoid a tight edge) on hook size 4 mm with Cotton Light. Turn and work 1 tr in 6th ch from hook (A.1 A has now been worked). Work A.1 B over the next 40-40-42-44-46-48 ch, and finish with A.1 C in the last 2 ch = 45-45-47-49-51-53 tr/ch. Then continue to work according to A.1. When piece measures 8 cm, inc 1 st in each side - READ INCREASE TIP! Repeat inc every 7-5-4½-3½-3½-3 cm 5-7-8-9-9-10 more times (6-8-9-10-10-11 inc in total) = 57-61-65-69-71-75 tr/ch. Cut and fasten the thread when piece measures 49-48-47-46-44-41 cm (shorter measurements in the larger sizes because of broader shoulder width). ASSEMBLY: Sew the shoulder seams. Sew in sleeves – from shoulder and down to marker on front and back piece. Sew underarm seams and side seams in one, stop when 26 cm remain on back piece and 20 cm remain on front piece = vent. |
|||||||
Diagram explanations |
|||||||
|
|||||||
 |
|||||||
Have you finished this pattern?Tag your pictures with #dropspattern #donnasweater or submit them to the #dropsfan gallery. Do you need help with this pattern?You'll find 5 tutorial videos, a Comments/Questions area and more by visiting the pattern on garnstudio.com. © 1982-2026 DROPS Design A/S. We reserve all rights. This document, including all its sub-sections, has copyrights. Read more about what you can do with our patterns at the bottom of each pattern on our site. |
|||||||


With over 40 years in knitting and crochet design, DROPS Design offers one of the most extensive collections of free patterns on the internet - translated to 17 languages. As of today we count 324 catalogues and 12290 patterns translated into English (UK/cm). 12290
We work hard to bring you the best knitting and crochet have to offer, inspiration and advice as well as great quality yarns at incredible prices! Would you like to use our patterns for other than personal use? You can read what you are allowed to do in the Copyright text at the bottom of all our patterns. Happy crafting!
Post a comment to pattern DROPS 145-19
We would love to hear what you have to say about this pattern!
If you want to leave a question, please make sure you select the correct category in the form below, to speed up the answering process. Required fields are marked *.