
Popular categories
Looking for a yarn?


Comments / Questions (130)
![]() Wilma Reinders wrote:
Wilma Reinders wrote:
Dank voor de snelle beantwoording. Ik denk dat ik mijn denkfout doorheb. Ik meerderde bij elke markeerder 5 stokjes, maar het moet gewoon 1 stokje zijn en dat 5 (of 3, bij de 4e toer) keer. Hèhè, ik snap het! Nogmaals dank! En ik begrijp uw uitleg over geen geluid.
26.10.2016 - 13:28
![]() Wilma Reinders wrote:
Wilma Reinders wrote:
Wat bedoelen jullie met: 'Haak heen en weer met stk en meerder TEGELIJKERTIJD 1 stk bij alle markeerders als volgt: om de toer 5 keer en elke 4e toer 3 keer' (maat xl). Wat is 'tegelijkertijd'? Met 104 stokjes zou ik na de 2e toer (23 x 5 stk meerderen) 219 stk moeten hebben, maar ik heb er 'slechts' 198. En waarom zit er geen geluid bij jullie video's? Mijn laptop staat op zijn hardst...
26.10.2016 - 12:14DROPS Design answered:
Hoi Wilma. Tegelijkertijd = tegelijk, in dezelfde tijd. Dus, tegelijk met het heen en weer haken meerder je zoals beschreven bij alle markeerders. Voor de kleinste maat heb je 88 stk aan het begin en 19 markeerders. Je meerdert bij elke markeerder (dus 19 keer) in totaal 7 keer (+ 133 st) = 88+133 = 221. 219 heb ik niet in het patroon staan. Onze video's hebben geen geluid. Onze video's hebben geen geluid. Wij zijn een internationaal bedrijf en onze video's worden bekeken door gebruikers over de hele wereld. Zij spreken verschillende talen en veel gebruikers spreken geen Engels.
26.10.2016 - 12:26
![]() Sissy wrote:
Sissy wrote:
Jeg lurer litt på målene på denne jakken. Jeg bruker normalt large i topper og det pleier også å gjelde for deres mønstre. I dette mønsteret er målet under armene oppgitt til 48 cm for large. Er dette brystvidden, altså målt under armen på det høyeste over brystene? Må bare vite om dette skal regnes som brystmål, eller om det er et mål lengre nede, for å vite hvilken størrelse jeg skal velge.
03.05.2016 - 19:09
![]() Sophie wrote:
Sophie wrote:
Merci beaucoup pour votre réponse rapide, je vais pouvoir partir sur de bonnes bases ;)
25.04.2016 - 17:24
![]() Sophie wrote:
Sophie wrote:
Bonjour, Je débute ce gilet et je ne comprends pas la phrase : " augmenter 1 B à chaque marqueur ainsi : 5-6-6-5-5-6 fois tous les 2 rangs et 2-2-2-3-3-3 fois tous les 4 rangs ". J'ai bien relu la réponse faite à Adeline dernièrement mais le nombre de "fois", c'est dans les 21 marqueurs ou je dois répartir les 6 augmentations sur les 96 brides? Je vous remercie par avance pour cette précieuse information, Bon week end, Sophie
24.04.2016 - 15:31DROPS Design answered:
Bonjour Sophie, les augmentations se font à chaque marqueur (cf: AUGMENTATIONS au début des explications), c'est-à-dire à la 1ère augmentation, augmentez 1 B avant chaque marqueur, puis à l'augmentation suivante, augmentez 1 B après chaque marqueur et ainsi de suite. Bon crochet!
25.04.2016 - 10:13
![]() Decou wrote:
Decou wrote:
Bonjour, je ne comprends pas ceci - comment sauter des mailles du rang précédent? Voici ce que je ne comprends pas : Crocheter ensuite le rang suivant ainsi : 36-40-43-47-51-58 B (devant), 8 ml (= emmanchure), sauter 52-56-56-60-64-68 B du rang précédent (crochetées ensuite pour la manche), 59-67-73-81-89-103 B (dos), 8 ml (emmanchure), sauter 52-56-56-60-64-68 B du rang précédent (crochetées pour la manche plus tard) et 36-40-43-47-51-58 B (devant)
05.04.2016 - 15:30DROPS Design answered:
Bonjour Mme Decou, sur ce rang, on prépare le bas du gilet: 36-58 B (cf taille) pour le 1er devant, puis on fait 8 ml pour l'emmanchure (sous la manche), sautez 52-68 B (= ne crochetez pas ces mailles, elles seront ensuite crochetées quand vous ferez la manche), crochetez le dos (= 59-103 B), puis formez l'autre emmanchure comme avant: 8 ml, sautez les 52-68 B suivantes et terminez par les 36-58 B du 2ème devant. Vous avez maintenant les mailles des manches sur les côtés "remplacées" par les 8 ml - continuez maintenant jusqu'en bas du gilet et crochetez les manches à la fin. Bon crochet!
05.04.2016 - 15:47
![]() Adeline wrote:
Adeline wrote:
Bonjour une fois le 1er paragraphe terminé on doit avoir 271B pour une taille L. Mais combien de rang doit on avoir? Doit on augmenter de 21 bride à chaque rang ou tous les 2 rangs? Et pour les 2 fois tous les 4 rangs? Svp merci de m'aider
31.10.2015 - 06:47DROPS Design answered:
Bonjour Adeline, Crochetez d'abord 1 rang après la chaînette de base (96B à la fin de ce rang), puis augmentez 6 fois tous les 2 rangs (+12 rangs) et 2 fois tous les 4 rangs (+8 rangs) (264B après le dernier rang), puis crochetez encore 1 rang en répartissant 7 augmentations = 271 B et 22 rangs au total. Bon crochet!
31.10.2015 - 18:15
![]() Mireya wrote:
Mireya wrote:
Hi! I don't understand this part. Please help me. "When piece measures 10 cm / 4'' from marker, inc 1 dc-group in the right side as follows: Work 3 dc + 1 ch in the first 8-9-10-11-12-13 ch, in next ch work as follows: 3 dc, ch 1, 3 dc, 1 ch. When piece measures 17 cm / 6 3/4'', inc the same way in the left side – inc when 9-10-11-12-13-14 ch remain. "
04.10.2015 - 06:55DROPS Design answered:
Dear Mireya, when piece measures 4" you inc 1 dc-group in the first side only in the first 8-13 ch (see size) from beg of round and when it measures 6 3/4", inc 1 dc-group in the other side when 9-14 ch before the end of row remain. Happy crocheting!
05.10.2015 - 09:48Mireya Miranda wrote:
¡Hola! Según las instrucciones para el cuerpo y que lo haré en talla L, debo hacer 6 veces aumentos de 1 vareta en cada marcador para hileras alternas y 2 en cada 4a hilera... Si lo anterior es correcto ¿son 11 hileras? Las alternas las entiendo como la 1, 3,5,7,9 y 11 y las de las 4as hileras las 4y 8, ¿las hileras 2, 6 y 10 se trabajan normalmente sin aumentos?
29.09.2015 - 20:44DROPS Design answered:
Hola Mireya. Primero aumentamos cada 2ª fila, es decir en la 1ª,3ª,5ª, 7ª, 9ª y 11ª ( las filas 2,4,6,8,10,12 se trabajan sin aum), después aumentamos cada cuarta fila, es decir en la fila 15 y 19, El resto de filas se trabajan como antes.
05.10.2015 - 08:54Agustina wrote:
Me gustaría pudieran explicarme la siguente parte del patrón: "En hileras alternas 5-6-6-5-5-6 veces y en cada 4ª hilera 2-2-2-3-3-3 veces" Una vez colocados los 21 marcapuntos respectivos a mi talle, en la primera vuelta hago el aumento en el p.a., a partir de la segunda vuelta ya no se cómo seguir. Pueden ayudarme?
14.08.2015 - 19:23DROPS Design answered:
Hola Agustina, después de colocar los marcapuntos comenzamos los aumentos. En tu talla tienes que trabajar (ver tip para los aum) cada segunda fila 6 vcs. Después cada 4ª fila 2 vcs más. Al final debes de tener 264 p.a.
28.08.2015 - 10:50
|
|
Chantal#chantalcardigan |
|
 |
 |
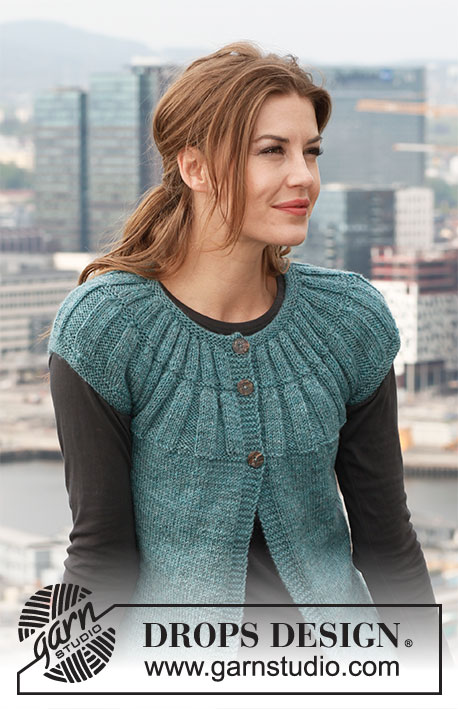
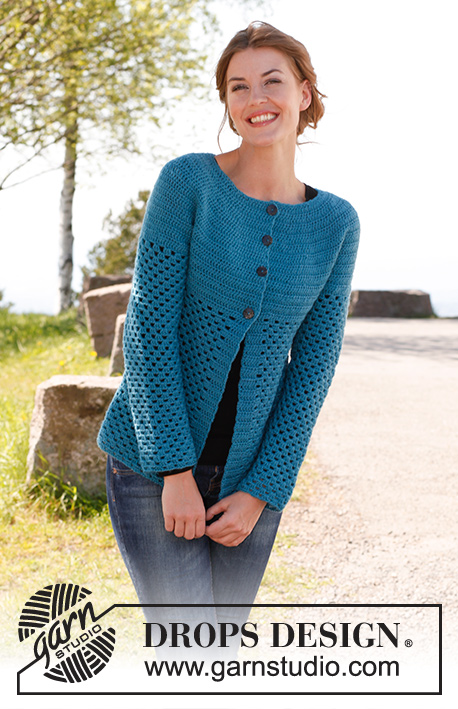
Crochet DROPS jacket in ”Karisma”. Size: S - XXXL.
DROPS 142-6 |
|
|
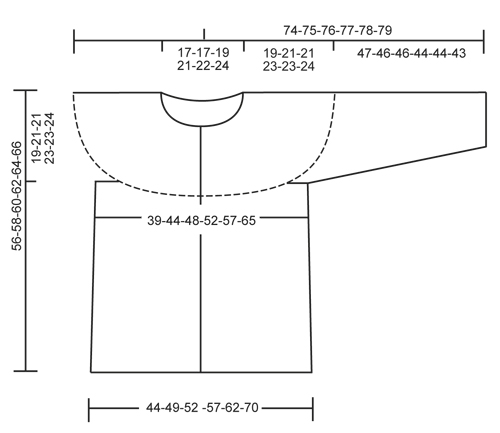
CROCHET INFO: Replace first tr on every round/row with 3 ch. Finish every round with 1 sl st in 3rd ch from beg of round. Finish every row with 1 tr in first tr from beg of previous row. INCREASE TIP: Inc by working 2 tr in 1 tr, first on one side of all markers on row, next time on the other side of all markers on row, continue inc like this. DECREASE TIP: Work 1 tr but wait with last pull through (= 2 sts on hook), then work next tr but on last pull through, pull thread through all sts on hook = 1 st dec. ---------------------------------------------------------- BODY: The piece is worked top down. Worked back and forth from mid front. Work 111-116-121-131-136-146 ch (incl 3 ch to turn with) on hook size 4 mm with Karisma. Work next row as follows: 1 tr in 4th ch (= 2 tr), 1 tr in each of the next 2 ch, * skip 1 ch, 1 tr in each of the next 4 ch *, repeat from *-* = 88-92-96-104-108-116 tr - read CROCHET INFO. Insert 19-20-21-23-24-26 markers in the piece as follows: Insert 1st marker after 8th tr, then insert 18-19-20-22-23-25 markers 4 tr apart, 8 tr remain after last marker. Work back and forth with tr while AT THE SAME TIME inc 1 tr at all markers as follows: On every other row 5-6-6-5-5-6 times and then on every 4th row 2-2-2-3-3-3 times – READ INCREASE TIP = 221-252-264-288-300-350 tr. Work 1 row while at the same time inc 14-7-7-7-19-5 tr evenly (do not inc over the first and last 6 tr = band) = 235-259-271-295-319-355 tr. Work next row as follows: 36-40-43-47-51-58 tr (front piece), 8 ch (= under sleeve), skip 52-56-56-60-64-68 tr from previous row (used for sleeve later), 59-67-73-81-89-103 tr (back piece), 8 ch (under sleeve), skip 52-56-56-60-64-68 tr from previous row (used for sleeve later) and 36-40-43-47-51-58 tr (front piece). Insert a marker and measure the piece from here. Work 1 tr in every tr/ch = 147-163-175-191-207-235 tr. Continue to work as follows: 1 tr in each of the first 6 tr (= band), * 1 ch, skip 3 tr, work 3 tr in next tr *, repeat from *-* and finish with 1 ch, skip 3 tr and work 1 tr in each of the last 6 tr (= 33-37-40-44-48-55 tr-groups with 6 tr in each side). Continue to work as follows: ROW 1: 1 tr in each of the first 6 tr, 3 tr in first ch, 1 ch, * skip 3 tr, 3 tr in next ch, 1 ch *, repeat from *-* until 1 ch and 6 tr remain, finish with 3 tr in last ch and 1 tr in each of the last 6 tr. ROW 2: 1 tr in each of the first 6 tr, * 1 ch, skip 3 tr, 3 tr in next ch *, repeat from *-* until 6 tr remain, finish with 1 ch and 1 tr in each of the last 6 tr. Repeat 1st and 2nd row upwards. When piece measures 10 cm from marker, inc 1 tr-group in the right side as follows: Work 3 tr + 1 ch in the first 8-9-10-11-12-13 ch, in next ch work as follows: 3 tr, 1 ch, 3 tr, 1 ch. When piece measures 17 cm, inc the same way in the left side – inc when 9-10-11-12-13-14 ch remain. When piece measures 24 cm, inc 1 tr-group in the right side, inc in the 10-11-12-13-14-15 ch the same way as before. When piece measures 31 cm, inc in the left side – inc when 10-11-12-13-14-15 ch remain. After all inc are done there are 37-41-44-48-52-59 tr-groups on row. Cut and fasten the thread when piece measures 37-37-39-39-41-42 cm from marker, piece measures 56-58-60-62-64-66 cm in total. SLEEVE: Worked in the round, top down. Beg by working mid under sleeve as follows: Work 1 dc in the 5th ch of the 8 ch worked for armhole on body. Work 3 ch (= 1 tr). Then work 1 tr in each of the next 3 ch. Then work 1 tr in every tr over sleeve, before working 1 tr in each of the remaining 4 ch under sleeve = 60-64-64-68-72-76 tr. Insert a marker mid under sleeve. Continue to work as follows: 1 tr in each of the first 10-10-10-12-12-14 tr, * 1 ch, skip 3 tr, work 3 tr in next tr *, repeat from *-* and work 1 tr in each of the last 10-10-10-12-12-14 tr. Continue with 1 tr in each of the 20-20-20-24-24-28 tr mid under sleeve, in every ch work 3 tr + 1 ch. Continue this pattern AT THE SAME TIME when piece measures 4 cm, dec 1 tr on each side of marker - READ DECREASE TIP. Repeat dec every 3½-3½-3½-3-3-2½ cm 9-9-9-11-11-13 more times = 40-44-44-44-48-48 tr. After all dec, work 3 tr + 1 ch in every ch. Cut and fasten the thread when sleeve measures 47-46-46-44-44-43 cm from marker – NOTE – shorter measurements in the larger sizes because of larger neck and broader shoulder width. ASSEMBLY: Sew buttons on to left front piece – the top button 1 cm from neck edge, the last in the transition between tr and tr-groups. Button the buttons between 2 tr on right front piece. |
|
 |
|
Have you finished this pattern?Tag your pictures with #dropspattern #chantalcardigan or submit them to the #dropsfan gallery. Do you need help with this pattern?You'll find 7 tutorial videos, a Comments/Questions area and more by visiting the pattern on garnstudio.com. © 1982-2026 DROPS Design A/S. We reserve all rights. This document, including all its sub-sections, has copyrights. Read more about what you can do with our patterns at the bottom of each pattern on our site. |
|


With over 40 years in knitting and crochet design, DROPS Design offers one of the most extensive collections of free patterns on the internet - translated to 17 languages. As of today we count 324 catalogues and 12290 patterns translated into English (UK/cm). 12290
We work hard to bring you the best knitting and crochet have to offer, inspiration and advice as well as great quality yarns at incredible prices! Would you like to use our patterns for other than personal use? You can read what you are allowed to do in the Copyright text at the bottom of all our patterns. Happy crafting!
Post a comment to pattern DROPS 142-6
We would love to hear what you have to say about this pattern!
If you want to leave a question, please make sure you select the correct category in the form below, to speed up the answering process. Required fields are marked *.