
Popular categories
Looking for a yarn?


Comments / Questions (161)
![]() María José wrote:
María José wrote:
Pues tal y como aparece en la foto del gorro, yo creo que las aplicaciones de la tira están unidas colocando los cuadrados derecho contra derecho. Pero queda bien de las dos maneras
25.10.2018 - 12:22Bridie wrote:
Thank you for posting this beautiful design. I am currently making a hat I have my eight granny squares ready to join. I am struggling to understand this part of the pattern... 'Place 2 and 2 squares on top of each other, insert hook through ch-space in the corner on both squares'. Do you place the squares on top of each other with the wrong sides together or are they placed on top of each other as you look at them on the table? Thanks in advance. x
29.09.2018 - 12:09DROPS Design answered:
Dear Bridie, yes, you put the squares o top of each other, the wrong sides facing each other. Alternately, you can attach the squares to each other in the very last round with a slip stitch at the corners and at the chain loops. Happy Crochet!
30.09.2018 - 09:00
![]() Paola wrote:
Paola wrote:
La sciarpa che si vede in un'altra foto non è ad anello, ma diritta. Va lavorare sui due lati della striscia a quadri in giro di andata e ritorno oppure taglia do il filo alla fine di ogni giro?Grazie
27.12.2017 - 01:16DROPS Design answered:
Buonasera Paola. Se capiamo correttamente la domanda, se vuole lavorare la sciarpa diritta, può lavorare sui due lati della striscia in righe di andata e ritorno. Buon lavoro!
30.12.2017 - 21:52
![]() Daniela wrote:
Daniela wrote:
Grazie mille|
30.11.2017 - 13:02
![]() Daniela wrote:
Daniela wrote:
Buongiorno, sto per iniziare questo lavoro, ma lo scaldacollo devo cucirlo per forza ad 8 o posso farlo rotondo normale e poi lo attorciglio io quando lo indosso? Grazie
30.11.2017 - 11:58DROPS Design answered:
Buongiorno Daniela. Può formare un tondo normale, se preferisce. Cambia solo la seconda parte del lavoro. Senza chiudere ad “otto”, lavorerà prima il bordo lungo uno dei lati dei quadrati, poi il bordo lungo l’altro lato dei quadrati. Buon lavoro!
30.11.2017 - 12:50Elisangela Lima wrote:
Bom dia! Gostaria de encomendar uma touca desse modelo para entrega no Brasil, ha possibilidade?
01.10.2017 - 00:39DROPS Design answered:
Não fazemos encomendas. Pode, no entanto, pedir a uma tricoteira que faça o modelo. Bom tricô
12.10.2017 - 13:40
![]() Vivian wrote:
Vivian wrote:
Ik ben bezich met de halswarmer. Ik ben nu bezich met de tweede toer ( heb de rij met vierkantjes al gedaan). Moet ik dan het werk draaien en de eerste halve vaste vervangen voor drie lossen.
21.08.2016 - 20:07DROPS Design answered:
Hoi Vivian. Ja, je moet de draai maken en elke toer beginnen met 3 l (= stk)
24.08.2016 - 12:36
![]() Susanna Di Pascale wrote:
Susanna Di Pascale wrote:
Scusate, ma il colore n.ro 10 sembra essere composto da tre gomitoli di colore verde, ruggine e prugna. Quindi per fare il collo cosa devo ordinare? Grazie
03.05.2016 - 15:16DROPS Design answered:
Buongiorno Susanna. Il filato Delight è un filato multicolore, quindi ogni gomitolo presenta sfumature di più colori, in questo caso dei colori oliva, ruggine e prugna. Il colore da ordinare è il numero 10. Buon lavoro!
03.05.2016 - 15:19
![]() Roseann Allen wrote:
Roseann Allen wrote:
I made all the squares and they measured the correct gauge. However when I connected them and crocheted around them the yarn stretched a lot and my scarf is now almost double the width.
07.12.2015 - 16:29
![]() Stefania wrote:
Stefania wrote:
Il modello sembra essere eseguito con lane no melangelate ma con gomitoli di diverso colore ,mi sbaglio? grazie
04.11.2015 - 10:53DROPS Design answered:
Buongiorno Stefania, questo modello è realizzato tutto con Delight colore n° 10, sono le sfumature del gomitolo che danno quest'effetto. Buon lavoro!
04.11.2015 - 20:39
|
|
Magic#magicset |
|
 |
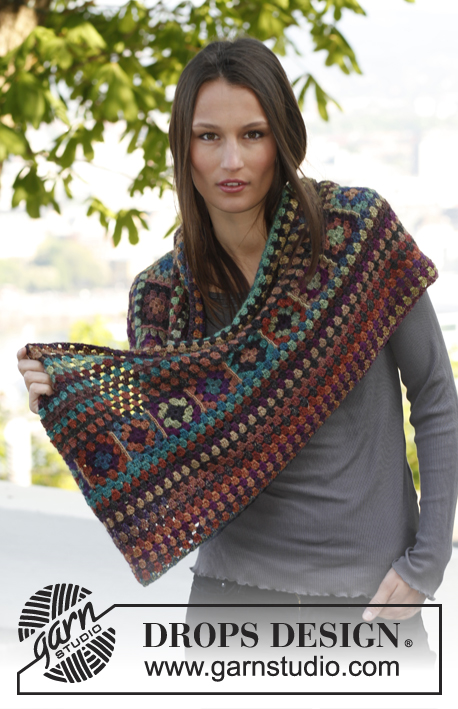 |
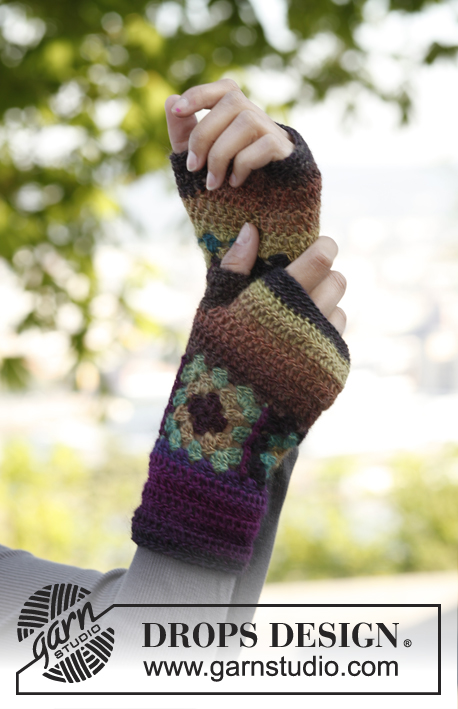
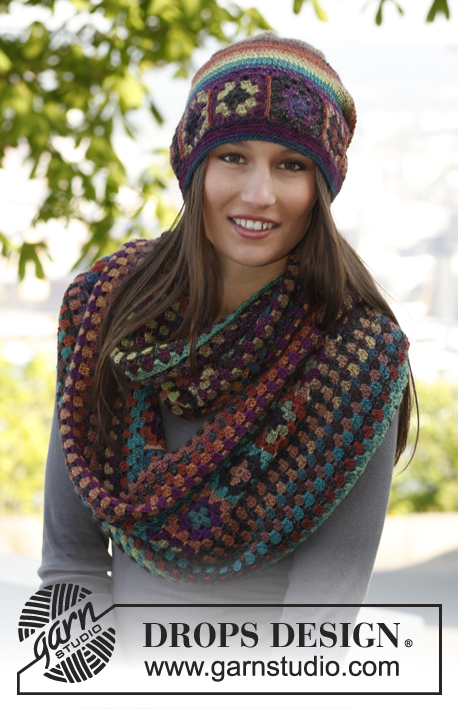
Crochet DROPS moebius neck warmer and hat with squares in ”Delight”.
DROPS 143-40 |
|
|
NECK WARMER: ROUNDS WITH TR: Beg every round with tr with 3 ch (= 1st tr), finish round with 1 sl st in 3rd ch from beg of round. COLOUR CHANGE: To get a nice colour change work last sl st on round with the new thread. Continue on to next round with the new thread. -------------------------------------------------------- SQUARE: Work 6 ch with Delight on hook size 3.5 mm and form a ring with 1 sl st in 1st ch. Read ROUNDS WITH TR. ROUND 1: * Work 3 tr in ch-ring, 3 ch *, repeat from *-* a total of 4 times = 12 tr and 4 ch-loops. Sl sts until next ch-loop, cut the thread and switch to another colour of the same ball (= new colour each round) - READ COLOUR CHANGE. ROUND 2: In every ch-loop work as follows: 3 tr, 3 ch and 3 tr, 1 ch = 24 tr and 8 ch-loops. Sl sts until next ch-loop, cut the thread and switch to another colour of the same ball. ROUND 3: * In next ch-loop work as follows: 3 tr, 3 ch and 3 tr (= corner), 1 ch, in next ch-loop work 3 tr, 1 ch *, repeat from *-* the entire round = 36 tr and 12 ch-loops. Cut and fasten the thread. Work a total of 25 squares. Work squares tog into 1 strip as follows: Place 2 and 2 squares on top of each other, insert hook through ch-loop in the corner on both squares, work 1 ch and 1 dc, * 3 ch, 1 dc in next ch-loop on both squares *, repeat from *-*, cut and fasten the thread. Work the ends of the strip tog the same way to form a ring – NOTE: twist the strip 1 time to form a twisted ring, before working the ends tog. NECK WARMER: Worked from middle of piece = the twisted ring and out towards the outer edges - i.e. work upwards and downwards at the same time. NOTE! Beg every round with 3 ch (= 1st tr). Work 1st round along the strip as follows: In each of the 4 ch-loops on every square work 3 tr and 1 ch, finish round with 1 sl st in 3rd ch from beg of round (= 1st tr), sl st until next ch-loop. Continue to work as follows: In every ch-loop work 3 tr, 1 ch, finish round with 1 sl st in 3rd ch from beg of round (= 1st tr), sl st until next ch-loop. Continue like this until neck warmer measures approx. 36 cm vertically (the entire piece, not just from the middle and outwards). Cut and fasten the thread. -------------------------------------------------------- HAT: ROUNDS WITH TR: Beg every round with tr with 3 ch (= 1st tr), finish round with 1 sl st in 3rd ch from beg of round. DECREASE TIP 1: Dec 1 tr by working the next 2 tr tog as follows: Work 1 tr but wait with last pull through (= 2 sts on hook), work next tr but on last pull through, pull thread through all 3 sts on hook. ROUNDS WITH DC: Beg every round with dc with 1 ch (not counted as 1st dc) - NOTE! Work dc in back loop of every dc, finish with 1 sl st in 1st dc. DECREASE TIP 2: Dec 1 dc by working 2 dc tog as follows: * Insert hook in back loop of next dc, get thread *, repeat from *-* one more time, make 1 YO and pull thread through all 3 sts on hook. COLOUR CHANGE: To get a nice colour change work last sl st on round with the new thread. Continue on to next round with the new thread. -------------------------------------------------------- SQUARE: Work 6 ch with Delight on hook size 3.5 mm and form a ring with 1 sl st in 1st ch. Read ROUNDS WITH TR. ROUND 1: * Work 3 tr in ch-ring, 3 ch *, repeat from *-* a total of 4 times = 12 tr and 4 ch-loops. Sl sts until next ch-loop, cut the thread and switch to another colour of the same ball (= new colour each round) - READ COLOUR CHANGE. ROUND 2: In every ch-loop work as follows: 3 tr, 3 ch and 3 tr, 1 ch = 24 tr and 8 ch-loops. Sl sts until next ch-loop, cut the thread and switch to another colour of the same ball. ROUND 3: * In next ch-loop work as follows: 3 tr, 3 ch and 3 tr (= corner), 1 ch, in next ch-loop work 3 tr, 1 ch *, repeat from *-* the entire round = 36 tr and 12 ch-loops. Cut and fasten the thread. Work a total of 8-9 squares. Work squares tog into 1 strip as follows: Place 2 and 2 squares on top of each other, insert hook through ch-loop in the corner on both squares, work 1 ch and 1 dc, * 3 ch, 1 dc in next ch-loop on both squares *, repeat from *-*, cut and fasten the thread. Work the ends of the strip tog the same way to form a ring. HAT: Worked in the round. Work along one side of strip as follows: In each of the 4 ch-loops on every square work 3 tr, finish with 1 sl st in 3rd ch (= 1st tr) from beg of round = 96-108 tr. Then work ROUNDS WITH TR - read explanation above - as follows: 3 ch (= 1st tr), skip 1st tr from previous round, 1 tr in every tr, finish round with 1 sl st in 3rd ch from beg of round. Continue until hat measures approx. 16 cm from bottom edge. Then dec as follows: ROUND 1: * 1 tr in each of the next 6-7 tr, dec 1 tr - READ DECREASE TIP 1 *, repeat from *-* the entire round = 84-96 tr (= 12 sts dec). ROUND 2: * 1 tr in each of the next 5-6 tr, dec 1 tr *, repeat from *-* the entire round = 72-84 tr. ROUND 3: * 1 tr in each of the next 4-5 tr, dec 1 tr *, repeat from *-* the entire round = 60-72 tr. ROUND 4: * 1 tr in each of the next 3-4 tr, dec 1 tr *, repeat from *-* the entire round = 48-60 tr. ROUND 5: * 1 tr in each of the next 2-3 tr, dec 1 tr *, repeat from *-* the entire round = 36-48 tr. ROUND 6: * 1 tr in each of the next 1-2 tr, dec 1 tr *, repeat from *-* the entire round = 24-36 tr. SIZE S/M: Work all tr on round tog 2 by 2 = 12 tr, cut the thread and sew the last tr tog with thread end. SIZE L/XL: ROUND 7: * 1 tr in next tr, dec 1 tr *, repeat from *-* the entire round = 24 tr. ROUND 8: Work all tr on round tog 2 by 2 = 12 tr, cut the thread and sew the last tr tog with thread end. EDGE: Work an edge along bottom edge of hat (along the other side of strip with squares) as follows: Work 1 ch, in each of the 4 ch-loops on every square work 4 dc = 128-144 dc, finish with 1 sl st in 1st dc from beg of round. Then work ROUNDS WITH DC - read explanation above. When edge measures approx. 1 cm, dec 16-20 dc evenly on round - READ DECREASE TIP 2 = 112-124 dc. Continue until edge measures approx. 2 cm, cut and fasten the thread. The hat measures approx. 24-25 cm vertically. |
|
Have you finished this pattern?Tag your pictures with #dropspattern #magicset or submit them to the #dropsfan gallery. Do you need help with this pattern?You'll find 8 tutorial videos, a Comments/Questions area and more by visiting the pattern on garnstudio.com. © 1982-2026 DROPS Design A/S. We reserve all rights. This document, including all its sub-sections, has copyrights. Read more about what you can do with our patterns at the bottom of each pattern on our site. |
|


With over 40 years in knitting and crochet design, DROPS Design offers one of the most extensive collections of free patterns on the internet - translated to 17 languages. As of today we count 324 catalogues and 12290 patterns translated into English (UK/cm). 12290
We work hard to bring you the best knitting and crochet have to offer, inspiration and advice as well as great quality yarns at incredible prices! Would you like to use our patterns for other than personal use? You can read what you are allowed to do in the Copyright text at the bottom of all our patterns. Happy crafting!
Post a comment to pattern DROPS 143-40
We would love to hear what you have to say about this pattern!
If you want to leave a question, please make sure you select the correct category in the form below, to speed up the answering process. Required fields are marked *.