
Popular categories
Looking for a yarn?


Comments / Questions (97)
![]() Monica wrote:
Monica wrote:
Salve, volessi lavorarlo in tinta unita, quanti grammi di Lima occorrono? Grazie
25.10.2016 - 21:07DROPS Design answered:
Buonasera Monica. Dovrebbe considerare 3 gomitoli in più; 5 gomitoli in più per le due taglie più grandi. Buon lavoro!
25.10.2016 - 21:57
![]() Christiane wrote:
Christiane wrote:
Hallo mit dem Einstricken von Diagramm A2 beginne ich am Vorderteil oder bereits beim Ärmel?
09.10.2016 - 20:06DROPS Design answered:
Liebe Christiane, Sie können beim Ärmel anfangen (zwischen Rückenteil und Ärmel).
10.10.2016 - 10:11
![]() Paola wrote:
Paola wrote:
Ops.....non ci avevo pensato!!! grazie per la pazienza saluti paola
28.09.2016 - 16:41
![]() Paola wrote:
Paola wrote:
Grazie!! Ottimo consiglio!! Ultima domanda....sui suggerimenti x diminuzioni del raglan dite "sul rovescio del lavoro". Si intende la parte dietro del maglione xche sui ferri circolari non c'è mi sembrail rovescio Grazie ancora
28.09.2016 - 08:10DROPS Design answered:
Buongiorno Paola. Quando lavora lo sprone, a un certo punto mette alcune maglie in attesa per lo scollo. Da lì in avanti lavora avanti e indietro, e quindi lavora sia sul diritto del lavoro che sul rovescio. Buon lavoro!
28.09.2016 - 08:42
![]() Paola wrote:
Paola wrote:
Grazie per il primo quesito, mi trovo comunque a dover porre un'altra domanda. Ho iniziato oggi, dopo aver letto tutto e aver chiarito con voi il passo richiesto; prima di iniziare a sbagliare vorrei avere conferma sulle diminuzioni del raglan perchè non l'ho mai fatto con le maniche insieme. Devo diminuire ogni giro sia dalle maniche che dal davanti e dietro, quindi lungo le giunzioni fra i vari pezzi: 4 punti o 8 x giro? posso trovare un disegno da qualche parte? grazie ancora
27.09.2016 - 20:02DROPS Design answered:
Buongiorno Paola. Potrebbe esserle utile fare una tabella con il numero del giro in riga e due colonne, una per le maniche e una per il davanti/dietro. Per le maniche segnerà di diminuire ai giri 1,5,9 ecc. Per il davanti/dietro ai giri 1,3,5, 7 e così via. Quindi al giro 1 diminuirà sia per le maniche che per il davanti/dietro (8 m diminuite). Al giro 3 solo sul davanti/dietro (4 m diminuite), giro 5 sia sulle maniche che sul davanti/dietro e così via. Buon lavoro!
28.09.2016 - 01:38
![]() Paola wrote:
Paola wrote:
Sprone parte "sul davanti/dietro": dim. ogni 4 giri per 0 volte (mia taglia L), e poi ogni 2 giri per 27 v. Devo fare 4 giri senza dim. nel davanti/dietro, ma diminuendo lo stesso per le maniche? poichè per le maniche nella L devo diminuire ogni 4 giri per 3 v (quindi 12 giri) e poi ogni 2 giri per 22 v , devo iniziare le diminuzioni relative al davanti/dietro dopo i 12 giri? Oppure inizio subito le diminuzioni per il davanti/dietro? grazie1000 paola
27.09.2016 - 14:03DROPS Design answered:
Buongiorno Paola. Per il davanti/dietro, nella taglia L, inizia le diminuzioni subito. In questo modo finisce le dimizioni sulle maniche e sul davanti/dietro senza troppi giri di scarto. Buon lavoro!
27.09.2016 - 14:21
![]() Susanna wrote:
Susanna wrote:
Sen undrar jag, när man nu satt 35 maskor på tråd mitt fram, då ska det maskas av i början på varje varv på varje sida, alltså på sidorna om denna tråd? Ska man sedan plocka upp maskor i avmaskningen när man gör "förhöjning bak i nacken"? Det står i ett annat svar att det inte ska maskas av något förrän man kommer till "halskant", men i mönstret står det ju "Sedan maskas det av till hals så här i början på varje v i varje sida". När är "Sedan"?
24.09.2016 - 23:04DROPS Design answered:
Hej Susanna. Du begynder med at lukke af til halsudskaering ligesaa snart du er har sat m paa en traad og strikker frem og tilbage. Naar du er faerdig med din raglan og har ca 79-83-83-89-89-93 m tilbage, flytter du start af pind til midt bag og strikker rundt over alle masker: de 79-93 m du havde tilbage + maskerne fra traaden midtfor og du tager nye masker op paa hver side af traaden (der du lukkede af).
26.09.2016 - 15:17
![]() Susanna wrote:
Susanna wrote:
Varför lägger ni inte till i mönstret att det endast är de mittersta maskorna FRAM som ska sättas på en tråd? Jag kan inte italienska, men bland övriga språk har ju nästan alla samma fråga!
24.09.2016 - 23:03DROPS Design answered:
Hej Susanna. For det meste lukker du af til halsudskaering paa forstykket og ikke i nakken. Men jeg skal laegge en besked om det kan aendres i opskriften saa det er tydeligere.
26.09.2016 - 15:13
![]() Mai Hatvik wrote:
Mai Hatvik wrote:
Tusen takk for nyttige svar....:) Nå skal jeg nok klare å få den ferdig:)
28.01.2016 - 08:35
![]() Mai Hatvik wrote:
Mai Hatvik wrote:
Enda mer spørsmål, når jeg er ferdig med felling av raglan og hals, skal det være 83 masker igjen, og da spør jeg, er det med de 4 x 4 maskene også( raglanmasken)? Og et spørsmål til, er det her jeg skal begynne med forhøyning bak i nakken? Eller er det samtidig som jeg setter de 29 til halsen foran på tråd? ...for i min størrelse skal hele genseren være 60 cm. Jeg synes dette er vanskelig. mvh og takk mai.
27.01.2016 - 18:54DROPS Design answered:
Hej. Etter alle fellinger til raglan og hals er det totalt ca 79-83-83-89-89-93 m tilbake på p, inklusive raglanmasker. Det är efter det du börjar med stycket som heter FORHØYNING BAK I NAKKEN. Lycka till!
28.01.2016 - 08:23
|
|||||||||||||
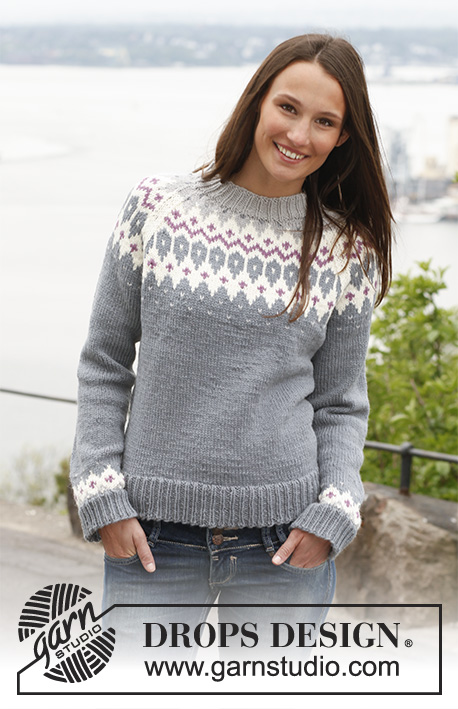
Diamond Rose#diamondrosesweater |
|||||||||||||
 |
 |
||||||||||||
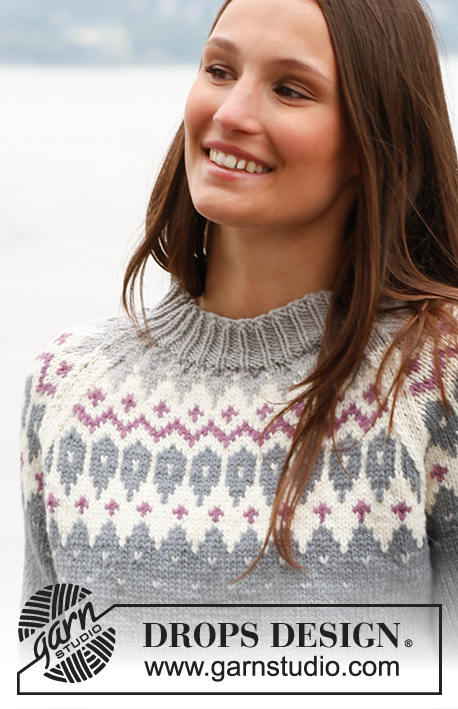
Knitted DROPS jumper with raglan and pattern in "Lima". Size: S - XXXL.
DROPS 141-41 |
|||||||||||||
|
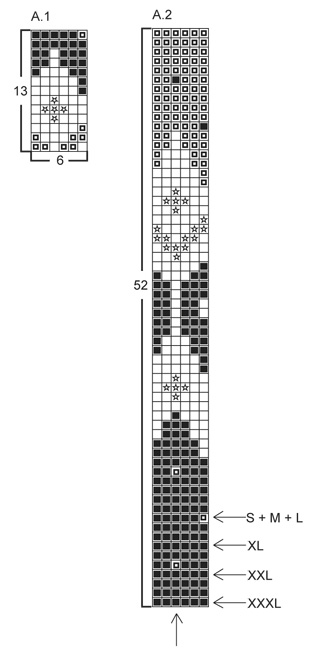
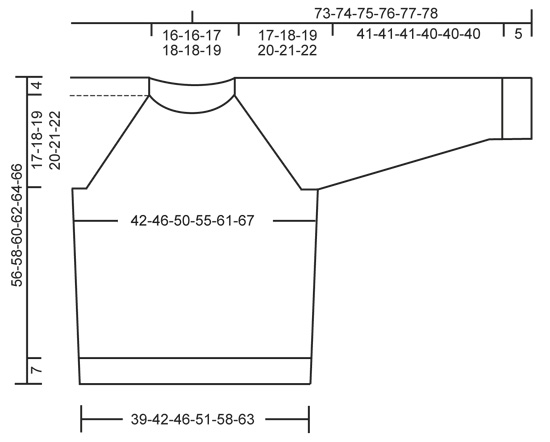
PATTERN: See diagrams A.1 and A.2. Work entire pattern in stocking st. PATTERN TIP: The 4 sts in each raglan line are worked in the base colour in which A.2 is worked, i.e. first medium grey, then off white and finally light grey (see picture). DECREASE TIP (applies to raglan): From RS: Dec as follows after marker: K 1, slip 1 st as if to K, K 1, psso. Dec as follows 3 sts before marker: K 2 tog and K 1. From WS: Dec as follows after marker: P 1 and P 2 tog. Dec as follows 3 sts before marker: P 2 twisted tog and P 1. KNITTING TIP: If knitting tension is incorrect in height and the knitting is too tight, the raglan dec will be too short and the armholes too small. This can be adjusted by working 1 extra row without dec evenly spaced between dec. If the piece is worked too loosely, dec more often than written in pattern. ---------------------------------------------------------- BODY: Cast on 195-213-234-258-291-321 sts on circular needle size 3 mm with medium grey. K 1 round, then work rib (= K 1/P 2). When rib measures 7 cm, switch to circular needle size 4 mm. Continue in stocking st while AT THE SAME TIME dec 33-35-40-44-49-55 sts evenly on 1st round = 162-178-194-214-242-266 sts. Insert 1 marker in each side (= 81-89-97-107-121-133 sts between markers on front and back piece). When piece measures 9-9-10-10-10-10 cm, inc 1 st on each side of both markers (= 4 sts inc). Repeat inc every 7-7-7-8-8-8 cm 3 more times = 178-194-210-230-258-282 sts. When piece measures 35-36-37-38-39-40 cm, cast off 8-8-8-10-10-10 sts in each side for armholes (i.e. 4-4-4-5-5-5 sts on each side of both markers) = 81-89-97-105-119-131 sts remain on front and back piece. Put piece aside and knit the sleeves. SLEEVE: Cast on 51-54-54-57-60-63 sts on double pointed needles size 3 mm with medium grey. K 1 round, then work rib (= K 1/P 2). When rib measures 5 cm, switch to double pointed needles size 4 mm. K 1 round while AT THE SAME TIME dec 9-12-6-9-6-9 sts evenly = 42-42-48-48-54-54 sts. Insert 1 marker at beg of round (= mid under sleeve). Now work PATTERN according to diagram A.1. After A.1 work with medium grey. AT THE SAME TIME on 1st round after A.1, inc 1-3-1-3-1-1 st evenly = 43-45-49-51-55-55 sts. When piece measures 11-12-12-11-13-11 cm, inc 1 st on each side of marker mid under sleeve. Repeat inc every 3-2½-2½-2½-2-2 cm 11-12-12-13-14-16 more times = 67-71-75-79-85-89 sts. When piece measures 46-46-46-45-45-45 cm, cast off 8-8-8-10-10-10 sts mid under sleeve (i.e. 4-4-4-5-5-5 sts on each side of marker) = 59-63-67-69-75-79 sts. Insert 1 marker in the middle st on round (= mid on top of sleeve). Put piece aside and knit another sleeve. YOKE: Slip sleeves on to same circular needle as body where armholes were cast off = 280-304-328-348-388-420 sts. Now insert 1 marker in every transition between sleeves and body (= 4 markers). In addition insert 1 marker in the middle st on front and back piece (sleeves already have 1 marker in the middle st). READ ALL OF THE FOLLOWING SECTION BEFORE CONTINUING: Now work PATTERN according to diagram A.2 – READ PATTERN TIP. NOTE: St with marker on front and back piece and on sleeves should fit st with arrow in diagram. Count out towards the side (i.e. pattern will not fit in transitions between body and sleeves). AT THE SAME TIME dec for raglan in every transition between body and sleeves as follows - READ DECREASE TIP and KNITTING TIP: ON SLEEVE: Work 1-1-0-1-0-1 round before dec beg. Now dec every 4th round a total of 4-3-3-3-2-0 times and then every other round a total of 17-20-22-23-27-31 times (= 17 sts remain on sleeve in all sizes). ON BODY: Work 1-1-0-1-0-1 round before dec beg. Now dec every 4th round a total of 4-3-0-0-0-0 times, every other round a total of 17-20-27-28-25-23 times and then every round/row a total of 0-0-0-0-10-16 times. AT THE SAME TIME when piece measures 50-52-54-56-58-60 cm, slip the middle 25-29-29-35-35-39 sts on a stitch holder for neck and work piece back and forth on needle. Then cast off for neck at beg of row in each side as follows: Cast off 2 sts 1 time and then 1 st until raglan dec is done. After all dec for raglan and cast off for neck approx. 79-83-83-89-89-93 sts remain on the needle and piece measures approx. 56-58-60-62-64-66 cm from shoulder and down. ELEVATION IN BACK OF NECK: Beg mid back and work around the neck on circular needle size 4 mm with light grey, AT THE SAME TIME knit up new sts on each side of sts on stitch holder at the front and slip the 25-29-29-35-35-39 sts on stitch holder back on needle so that there are approx. 112-120-120-132-132-140 sts on needle. Insert 1 marker mid front. Work in stocking st while AT THE SAME TIME dec evenly to 80-82-84-88-90-92 sts on 1st round. Then work back and forth while AT THE SAME TIME working an elevation at the back of neck as follows - NOTE: On every turn, slip 1st st, tighten thread and then work: Beg mid back and work until 12-13-14-15-16-17 sts remain before marker mid front, turn, tighten thread and work until 12-13-14-15-16-17 sts remain before marker in the other side. Turn, tighten thread and work until 19-20-21-22-23-24 sts remain before marker, turn, tighten thread and work until 19-20-21-22-23-24 sts remain before marker in the other side. Turn and work until 26-27-28-29-30-31 sts remain before marker, turn, tighten thread and work until 26-27-28-29-30-31 sts remain in the other side. Turn, tighten thread and work until 33-34-35-36-37-38 sts remain before marker, turn, tighten thread and work until 33-34-35-36-37-38 sts remain before marker in the other side. Turn, tighten thread and work until mid back. NECK EDGE: Switch to circular needle size 3 mm and K 1 round (in the round over all sts) while AT THE SAME TIME inc evenly 96-99-102-105-108-111 sts. Work rib (= K 1/P 2) until rib measures 4 cm. Then loosely cast off with K over K and P over P. ASSEMBLY: Sew the openings under the sleeves. |
|||||||||||||
Diagram explanations |
|||||||||||||
|
|||||||||||||
 |
|||||||||||||
 |
|||||||||||||
Have you finished this pattern?Tag your pictures with #dropspattern #diamondrosesweater or submit them to the #dropsfan gallery. Do you need help with this pattern?You'll find 12 tutorial videos, a Comments/Questions area and more by visiting the pattern on garnstudio.com. © 1982-2026 DROPS Design A/S. We reserve all rights. This document, including all its sub-sections, has copyrights. Read more about what you can do with our patterns at the bottom of each pattern on our site. |
|||||||||||||


With over 40 years in knitting and crochet design, DROPS Design offers one of the most extensive collections of free patterns on the internet - translated to 17 languages. As of today we count 324 catalogues and 12290 patterns translated into English (UK/cm). 12290
We work hard to bring you the best knitting and crochet have to offer, inspiration and advice as well as great quality yarns at incredible prices! Would you like to use our patterns for other than personal use? You can read what you are allowed to do in the Copyright text at the bottom of all our patterns. Happy crafting!
Post a comment to pattern DROPS 141-41
We would love to hear what you have to say about this pattern!
If you want to leave a question, please make sure you select the correct category in the form below, to speed up the answering process. Required fields are marked *.