
Popular categories
Looking for a yarn?


Comments / Questions (101)
![]() Anna wrote:
Anna wrote:
Ang mössan, 131-11. På bilden ser mössan ut att vara omkring 25-30 cm hög och ha minst 2,5 (eller 3) gånger av M2 på höjden, man ser början av nästa rapport M2 på höjden efter de två första. Om det stämmer med 2 ggr M2 på höjden skulle mössan bli omkring 20 cm hög, inte se ut som den på bilden och det skulle räcka med 50g garn, inte de 100g som står angivet... Är det inte 3 ggr M2 på höjden ni menar?
07.02.2013 - 16:00DROPS Design answered:
Jo, du har ret. det skal strikkes 3 ggr på höjden. Vi rätter. Tack.
12.02.2013 - 13:28
![]() Anna wrote:
Anna wrote:
I mönstret till mössan måste det vara fel. Det står att M2 ska stickas totalt två gånger på höjden. Är det inte tre gånger ni menar.
04.02.2013 - 16:11DROPS Design answered:
Det er fel i mönstret. Vi har rättet. Tack.
12.02.2013 - 13:29
![]() Kerstin Svensson wrote:
Kerstin Svensson wrote:
Har stickat en mössa .Mönster 131-11.Det står: Sticka M.2 totalt 2ggr på höjden. Enl.mej är det för lite även på bilden ser det ut att vara fler M.2 rapporter. Jag stickade M.2 7ggr på höjden o det blev bra. Jag använder alltid era mönster o är jättenöjd. Mvh/Kerstin
30.01.2013 - 23:33
![]() Nadine wrote:
Nadine wrote:
Je tricote l'écharpe, mais le motif à l'intérieur de chaque losange a tendance à gondoler vers l'arrière. Pouvez-vous me dire ce que je ne fais par correctement ?
22.01.2013 - 15:08DROPS Design answered:
Bonjour Nadine, Essayez de laver et tendre votre échantillon aux bonnes mesures pour le séchage et regardez si le motif vous convient mieux ainsi. Bon tricot !
22.01.2013 - 15:45
![]() Nadine wrote:
Nadine wrote:
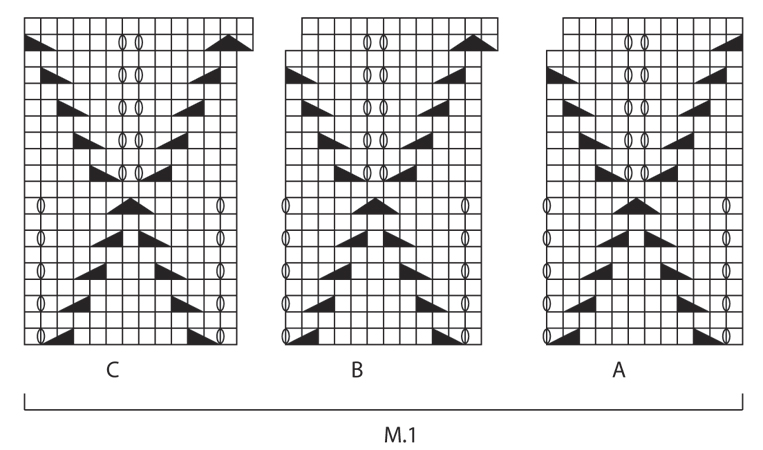
N'y a t'il pas une inversion au niveau des motifs M1A et M1C ? Si non, jeune comprends pas comment tricoter les 2 rangs du haut de ces motifs.
16.01.2013 - 20:42DROPS Design answered:
Bonjour Nadine, M1A représente le début du motif et M1C la fin du motif. Au dernier rang sur l'endroit (avant dernier du diag.), la dernière m de M1A se tricote avec la 1ère m de M1B et la dernière m de M1B se tricote soit avec la 1ère m du M1B suivant soit avec la 1ère m de M1C. Bon tricot !
17.01.2013 - 09:33
![]() Jackie Fabian wrote:
Jackie Fabian wrote:
Knitted the hat up, then unpicked it as i wasn't happy with it (looked thin and tatty) and was left with over 50g of yarn. After playing about with it, found that by knitting with 2 balls of the yarn at once it comes out thicker and looks huge amounts better, the pattern holds nicer and less lumpy. This is something that is not mentioned in the pattern but makes the hat and scarf come out like the pictures. AWESOME.
07.01.2013 - 20:43
![]() Annie Theriault wrote:
Annie Theriault wrote:
Je ne comprends pas cette partie: Après chaque motif de M.2 en hauteur, le point fantaisie se décale d'une m à droite. J'aimerais avoir plus de détails. Merci
16.12.2012 - 18:37DROPS Design answered:
Bonjour Madame Thierault, quand vous tricotez le dernier rang de M.2, vous "utilisez" 1 m du rang rang précédent au début du motif, car vous faites 1 surjet double (on passe de 3 à 1 m). Bon tricot !
17.12.2012 - 11:38
![]() Ann-Charlotte Alvhult wrote:
Ann-Charlotte Alvhult wrote:
Visst måste man också avsluta med M.1A spegelvänd. Till halsduken. Jag har försökt så många gånger nu och får många maskor över.
12.12.2012 - 10:59DROPS Design answered:
Du stickar 4+MA+ B+ B+ C+4 = 57m 4+12+12+12+13+4=57m Lycka till!
13.12.2012 - 09:23
![]() Judith wrote:
Judith wrote:
Macht es denn optisch einen großen Unterschied, ob ich den Schal als ein Stück stricke, oder nach der Hälfte abkette, einen Zwilling stricke und dann zusammennähe?
29.10.2012 - 08:27DROPS Design answered:
Hallo Judith, ja es sieht dann etwas anders aus, denn so zeigt das Muster am Anfang und am Ende beim Tragen in die gleiche Richtung.
29.10.2012 - 16:15Martine wrote:
J'aimerais savoir si quelqu'un a réussi le patron dece bonnet, soit la grille M2. Je n'y arrive pas, il me reste des mailles sur les 156, je cherche mon erreur
15.10.2012 - 14:32DROPS Design answered:
Bonjour Martine, M2 se tricote sur 12 m, et se répète 13 fois au total tout le tour. N'hésitez pas à placer un marqueur après chaque rapport du motif pour bien vous repérer. Bon tricot !
15.10.2012 - 21:42
|
||||||||||||||||
Sweet Caroline#sweetcarolineset |
||||||||||||||||
|
|
||||||||||||||||
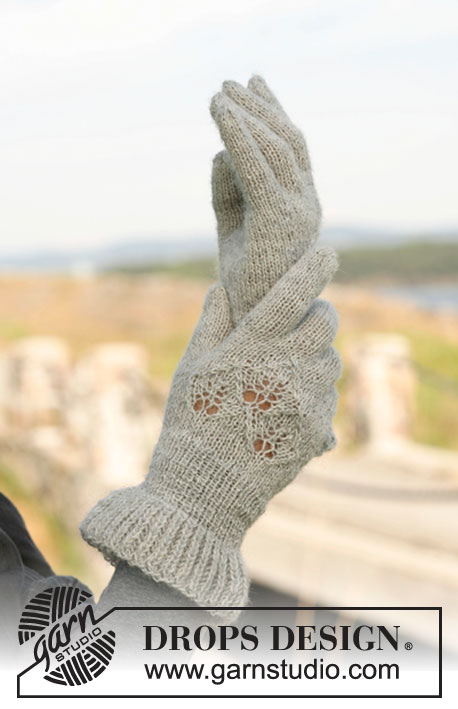
Set consists of: Knitted DROPS scarf and hat with lace pattern in “Alpaca”.
DROPS 131-11 |
||||||||||||||||
|
GARTER ST (back and forth on needle): K all rows. PATTERN: See diagrams M.1 and M.2. The diagrams show the pattern from RS. ENGLISH RIB (back and forth on needle): 1st row: 1 st in garter st, * K 1, 1 YO, slip 1 st as if to P *, repeat from *-* until 2 sts remain, finish with K 1 and 1 st in garter st. 2nd row: 1 st in garter st, * 1 YO, slip 1 st as if to P, K tog YO and slipped st *, repeat from *-* until 2 sts remain, finish with 1 YO, slip 1 st as if to P, 1 st in garter st. 3rd row: 1 st in garter st, * K tog YO and slipped st, 1 YO, slip 1 st as if to P *, repeat from *-* until 3 sts remain, K tog YO and slipped st, 1 st in garter st. Repeat 2nd and 3rd row upwards. RIB: 1st row: * K 1, P 1 *, repeat from *-* and finish with K 1. 2nd row: K over K and P over P. Repeat 2nd row upwards. --------------------------------------------------------- SCARF: The scarf consist of 2 equal parts that are sewn together in the middle at the end. Cast on 57 sts on needle size 3.5 mm with Alpaca and work 4 rows in GARTER ST - see explanation above. Work next row from RS as follows: 4 sts in garter st, diagram M.1A 1 time, diagram M.1B 2 times, diagram M.1C 1 time, 4 sts in garter st. Continue like this until piece measures approx. 72 cm, finish nicely according to pattern. On next row inc by working * K 2, 1 YO *, repeat from *-* until 1 st remains, K 1 = 85 sts. Now work 4 cm in RIB - see explanation above - make sure to work 1 row from WS at the end. Then switch to needle size 4.5 mm and work 10 rows in ENGLISH RIB - see explanation above. LOOSELY cast off on next row, cast off YOs as K sts. Knit another part the same way. ASSEMBLY: Sew the two parts tog in front loop of outermost st along cast on edge. The piece measures approx. 160 cm. HAT: Worked in the round on circular needle and then on double pointed needles. Cast on 120 sts on circular needle size 3.5 mm with Alpaca and work 5 cm in rib; K1, P1. Work next round in stocking st while at the same time inc 36 sts evenly = 156 sts. Then work diagram M.2 13 times. NOTE! After each repetition of diagram M.2 vertically, the pattern will shift 1 st to the right. Work diagram M.2 a total of 3 times vertically. Work 1 round in stocking st. * On next round dec by working all sts tog 2 by 2. Switch to double pointed needles when needed. Work 2 cm in stocking st *, repeat from *-* 1 more time = 39 sts. Dec on next round by working all sts tog 2 by 2, finish with K 1 = 20 sts. Cut the thread and pull it through the remaining sts and tighten tog, fasten tightly. |
||||||||||||||||
Diagram explanations |
||||||||||||||||
|
||||||||||||||||
 |
||||||||||||||||
 |
||||||||||||||||
Have you finished this pattern?Tag your pictures with #dropspattern #sweetcarolineset or submit them to the #dropsfan gallery. Do you need help with this pattern?You'll find 12 tutorial videos, a Comments/Questions area and more by visiting the pattern on garnstudio.com. © 1982-2026 DROPS Design A/S. We reserve all rights. This document, including all its sub-sections, has copyrights. Read more about what you can do with our patterns at the bottom of each pattern on our site. |
||||||||||||||||


With over 40 years in knitting and crochet design, DROPS Design offers one of the most extensive collections of free patterns on the internet - translated to 17 languages. As of today we count 324 catalogues and 12290 patterns translated into English (UK/cm). 12290
We work hard to bring you the best knitting and crochet have to offer, inspiration and advice as well as great quality yarns at incredible prices! Would you like to use our patterns for other than personal use? You can read what you are allowed to do in the Copyright text at the bottom of all our patterns. Happy crafting!
Post a comment to pattern DROPS 131-11
We would love to hear what you have to say about this pattern!
If you want to leave a question, please make sure you select the correct category in the form below, to speed up the answering process. Required fields are marked *.