
Popular categories
Looking for a yarn?


Comments / Questions (131)
![]() Helle Hansen wrote:
Helle Hansen wrote:
Hej, - er kan I anbefale garnalternativer til denne, vil gerne lave den i blandingsprodukt á la bomuld/uld (50/50), og er I tvivl om hvilken af disse der passer med hæklefastheden. De garn jeg har, kigget ser ud til at have længere løbelængde end denne Nepal, og dermed anden hæklefasthed. Håber I har tid til at hjælpe så jeg kan lave denne lækre sag :-)
06.05.2019 - 14:39DROPS Design answered:
Hej Helle, Denne opskrift kan også hækles i DROPS Paris. Hvis du hellere vi hækle en jakke i DROPS Cotton Light, så finder du opskrifter som passer til her hæklet - jakker - dame - garngruppe B
07.05.2019 - 09:31
![]() Trine M wrote:
Trine M wrote:
Hej. Jeg forstår ikke hvordan jeg afslutter hver omgang med en kædemaske i 3. lm i beg af forrige omg? Hvis jeg laver en km bliver den ikke lige så høj som stm. Skal man lave en stm og afslutte den som en km og hvis ja hvordan gør man det? Eller hvordan gør man? Vh Trine
06.03.2019 - 11:56DROPS Design answered:
Hei Trine. Du hekler en kjedemaske på vanlig måte, og du hekler den i den 3 luftmasken på starten av forrige rad, altså raden under den du nå hekler. Den vil derfor festes lenger ned enn resten av raden, men dette gjevner seg ut og vil ikke være synlig. God fornøyelse
11.03.2019 - 11:14
![]() Anita Toft Jensen wrote:
Anita Toft Jensen wrote:
Jeg er i gang med denne flotte sag. Jeg bruger Drops Nepal, men hækler med nål 6 for at få fastheden til at passe. Skal jeg så bruge mere garn, end der er oplyst i opskriften ? Har brugt 3 nøgler på at hækle ca. 15 cm
27.01.2019 - 18:39DROPS Design answered:
Hei Anita. Hvis heklefastheten din stemmer overens med den angitte heklefastheten skal garnmengden også stemme overens. Du har gjort helt rett når du justerer nålstørrelsen slik at heklefastheten blir riktig. God fornøyelse.
29.01.2019 - 13:18
![]() Porte wrote:
Porte wrote:
J exécute le 121-33 et ne comprend pas le diagramme M1 les signes manquants dans les explications Merci de m aider
23.01.2019 - 19:16DROPS Design answered:
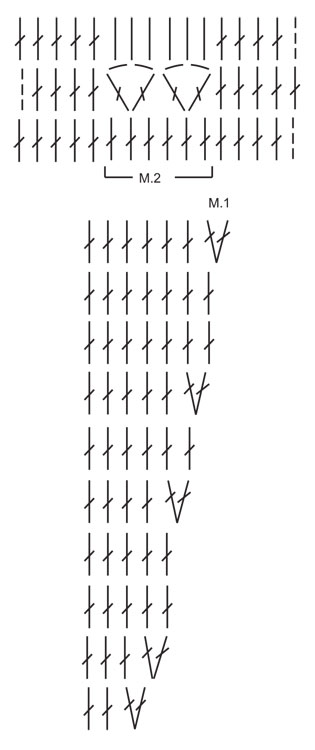
Bonjour Mme Porte, tous les symboles du diagramme M.1 sont expliqués, lisez le diagramme en commençant en bas à droite sur l'endroit (rang 1 = 2 brides dans la même maille, 1 bride dans chacune des 2 m suivantes), et sur l'envers de gauche à droite: (rang 2= 1 bride dans les 3 m suivantes, 2 brides dans la m suivante). Bon crochet!
24.01.2019 - 09:44
![]() Flaminia Cornaggia wrote:
Flaminia Cornaggia wrote:
Hello, sorry for disturbing. I am a beginner and English is not my first language and this makes this pattern confusing. At line 4 of the explanation I have to use the M1 diagram, but how? Should it be 5dc+M1 repeated until the last 5 stitches (6 DC +2 DC in the same stitch) +5dc? Or the diagram has to be read from bottom to top? I\'m lost... Thank you in advance!
18.01.2019 - 22:29
![]() Flaminia Cornaggia wrote:
Flaminia Cornaggia wrote:
Hello, sorry for disturbing. I am a beginner and English is not my first language and this makes this pattern confusing. At line 4 of the explanation I have to use the M1 diagram, but how? Should it be 5dc+M1 repeated until the last 5 stitches (6 DC +2 DC in the same stitch) +5dc? Or the diagram has to be read from bottom to top? I\'m lost... Sorry if it is a silly question, the language barrier does not help. Thank you in advance!
18.01.2019 - 14:55DROPS Design answered:
Dear Mrs Cornaggia, work M.1 as follows: 5 dc (= front band sts), then repeat M.1 until 5 sts remain and finish with 5 dc. On row 1 in M.1 you will work: *2 dc in same st, 1 dc in each of the next 2 sts*, repeat from *-*. On row 2, work: * 1 dc in each of the next 3 sts, 2 dc in same st*, repeat from *-*. Continue like this, ie read RS rows from the right towards the left and WS rows from the left towards the right. Happy crocheting!
18.01.2019 - 17:27
![]() Carmen wrote:
Carmen wrote:
Cuando ya tengo 18 cm en el cuerpo después de la cenefa dice 1-0-2-1-0-2 peo no entiendo que quiere decir. Son p.a ? Saltos? Cadenas? Podrían explicarlo, por favor. Gracias
10.12.2018 - 22:31DROPS Design answered:
Hola Carmen. Revisé el patrón y no he encontrado el fallo que estás mencionando. En todos casos, la fila se trabaja con puntos altos (p.a.)
16.12.2018 - 22:15Lilith Kenis wrote:
Are there any pictures of the back? Thank you and greeting from Belgium in Europe
20.11.2018 - 01:22DROPS Design answered:
Dear Mrs Kenis, there is no picture of the back of this jacket, it looks like the front piece (without buttons and opening of course). Happy crocheting!
20.11.2018 - 08:36
![]() Pansi wrote:
Pansi wrote:
Hej! jag är inte den mest rutinerade när det gäller att läsa mönster. När jag virkat färdigt oket enligt mönster nr 1 har jag mycket fler maskor än det står i mönstret. Ska jag först virka 5 maskor och sedan börja med att virka enligt mönstret eller ska jag virka enligt mönstret direkt? Jag har provat båda delar men lyckas trots det inte få rätt antal maskor i slutändan. Känner mig jättedum men hittar inte felen.
03.10.2018 - 10:53DROPS Design answered:
Hei Pansi. De 5 stavene til stolpe i hver side av arbeidet er ikke inkludert i mønster M.1. Du hekler altså 5 staver til stolpe, 19-21-23-25-27-29 rapporter av M.1 (altså så mange ganger M.1 gjentas i bredden) 5 staver til stolpe. Den første raden av M.1 hekles over 3 av de stavene du allerede har slik: hekle 2 staver i første stav, hekle 1 stav i hver av de neste 2 stavene = 1 stav økt. Dette gjentar du til det gjenstår 5 staver (stolpe). Når M.1 er heklet 1 gang i høyden er det 8 staver i hver rapport. Altså det økes 1 stav i hver rapport av M.1 på rad 1, 2, 5, 7 og 10. På de andre radene hekles 1 stav i hver stav. God fornøyelse.
04.10.2018 - 08:46
![]() Lilyrose wrote:
Lilyrose wrote:
Bonjour madame. Est-ce normal que je doive utiliser un crochet n° 6 au lieu de 4.5 comme préconisé. Ce qui fait un point qui ne rend pas du tout comme sur la photo, mais beaucoup plus aéré. Merci pour votre réponse
18.06.2018 - 10:24DROPS Design answered:
Bonjour Lilyrose, chacune a sa propre façon de crocheter, plus ou moins serré/lâche. Pour obtenir le même résultat que sur la photo, vous devez avoir 12 brides x 7 rangs = 10 x 10 cm. Vous pouvez avoir besoin d'un crochet plus fin ou plus gros, en fonction de votre propre façon de crocheter. Quand votre échantillon est fait, vous pouvez le laver et le faire sécher, vérifiez alors vos mesurez et essayez un nouvel échantillon si besoin. Bon crochet!
18.06.2018 - 13:44
|
|||||||||||||
A Kiss For Midwinter#akissformidwintercardigan |
|||||||||||||
 |
 |
||||||||||||
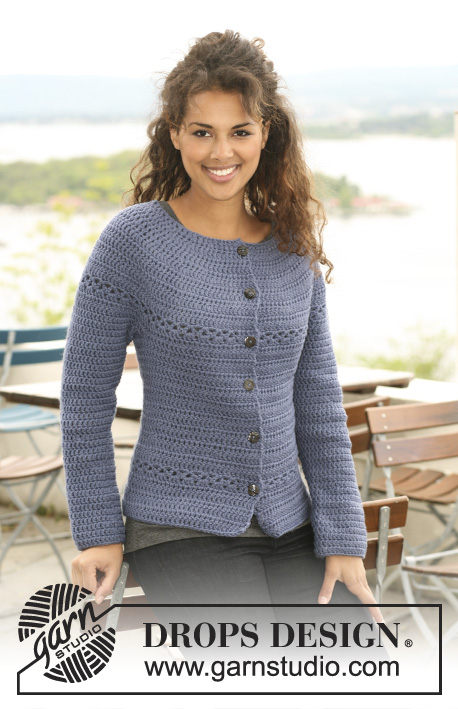
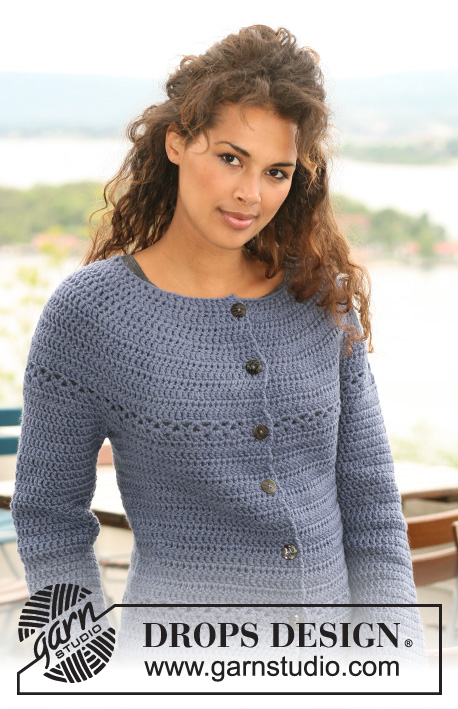
Crochet DROPS jacket in ”Nepal”. Size XS to XXXL.
DROPS 121-33 |
|||||||||||||
|
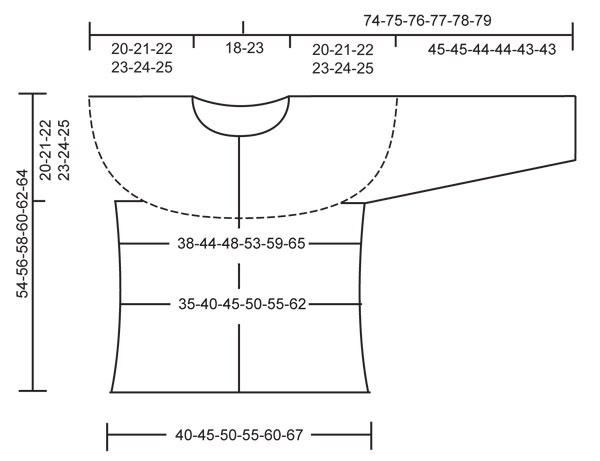
CROCHET INFO: Replace first tr on each round/row with 3 ch. Finish each round with 1 sl st in 3rd ch from beg of round/beg of previous row. PATTERN: See diagram M.1 and M.2. Diagram shows the pattern from RS. DECREASING TIP: Work 1 tr, but wait with last pull-through (= 2 sts on hook), work next tr, but when doing the last pull-through pull thread through all sts on hook – 1 dec tr. ---------------------------------------------------------- BODY PIECE: Worked from top down, back and forth from mid front. Work 91-99-107-115-123-131 ch (includes 3 ch to turn with) with crochet hook size 4.5 mm and Nepal. Work next row as follows: 1 tr in 4th ch, * skip 1 ch, 1 tr in each of the next 3 ch *, repeat from *-*, skip 1 ch and finish with 1 tr in the last 2 ch = 67-73-79-85-91-97 tr – see CROCHET INFO. Now work 10 rows acc to M.1 (5 tr each side = front band, work 1 tr in each tr – not included in diagram). After M.1 there are 162-178-194-210-226-242 tr on row. Continue with 1 tr in each tr. When piece measures 16-17-18-19-20-21 cm continue as follows: 5 tr on front band, 1-0-2-1-0-2 tr, repeat M.2 until 6-5-7-6-5-7 tr remain, finish with 1-0-2-1-0-2 tr and 5 tr on front band. Continue with 1 tr in each tr until piece measures 20-21-22-23-24-25 cm. Work next row as follows: 24-27-30-33-36-40 tr (front piece), 8 ch (under sleeve/armhole), skip 38-40-42-44-46-46 tr from previous round (to be used later for sleeve), 38-44-50-56-62-70 tr (back piece), 8 ch (under sleeve/armhole), skip 38-40-42-44-46-46 tr from previous row (to be used later for sleeve) and 24-27-30-33-36-40 tr (front piece). Continue with 1 tr in each tr/ch = 102-114-126-138-150-166 tr. Insert a marker in the middle of the 8 ch under sleeve each side (back piece = 46-52-58-64-70-78 tr, front piece = 28-31-34-37-40-44 tr). Continue with 1 tr in each tr. When piece measures 34-36-38-40-42-44 cm dec 8 sts evenly (do not dec on front band) - see DECREASING TIP = 94-106-118-130-142-158 tr. When piece measures 40-42-44-46-48-50 cm inc 12-12-12-12-12-14 tr evenly (do not inc on front band) = 106-118-130-142-154-172 tr. When piece measures 43-45-47-49-51-53 cm continue as follows: 5 tr on front band, repeat M.2, finish with 5 tr on front band. Continue with 1 tr in each tr until piece measures 54-56-58-60-62-64 cm, cut and fasten thread. SLEEVE: Worked from top down. Beg mid under sleeve as follows: 1 dc in the 5th of the 8 ch under sleeve/on armhole. Work 3 ch (= 1 tr) and continue with 1 tr in each ch. NOTE: Before continuing over armhole work 1 tr in transition (to avoid a hole). Continue with 1 tr in each tr over armhole, work 1 tr in transition and work 1 tr in each of the remaining ch under sleeve = 48-50-52-54-56-56 tr. Insert a marker mid under sleeve. NOW MEASURE PIECE FROM HERE. Work 1 tr in each tr. When piece measures 4 cm dec 1 tr each side of marker, see DECREASING TIP, and repeat the dec on every 4.5-4.5-4-4-4-4 cm, a total of 8-8-9-9-9-9 times = 32-34-34-36-38-38 tr. Cut and fasten thread when sleeve measures 45-45-44-44-43-43 cm – NOTE – less for the larger sizes because of wider neck and shoulder. ASSEMBLY: Sew buttons on left front piece – place the top one 1 cm from neckline, then the remaining with approx 8 cm between each. Use gap between 2 tr on front band as buttonhole. |
|||||||||||||
Diagram explanations |
|||||||||||||
|
|||||||||||||
 |
|||||||||||||
 |
|||||||||||||
Have you finished this pattern?Tag your pictures with #dropspattern #akissformidwintercardigan or submit them to the #dropsfan gallery. Do you need help with this pattern?You'll find 7 tutorial videos, a Comments/Questions area and more by visiting the pattern on garnstudio.com. © 1982-2026 DROPS Design A/S. We reserve all rights. This document, including all its sub-sections, has copyrights. Read more about what you can do with our patterns at the bottom of each pattern on our site. |
|||||||||||||


With over 40 years in knitting and crochet design, DROPS Design offers one of the most extensive collections of free patterns on the internet - translated to 17 languages. As of today we count 324 catalogues and 12245 patterns translated into English (UK/cm). 12245
We work hard to bring you the best knitting and crochet have to offer, inspiration and advice as well as great quality yarns at incredible prices! Would you like to use our patterns for other than personal use? You can read what you are allowed to do in the Copyright text at the bottom of all our patterns. Happy crafting!
Post a comment to pattern DROPS 121-33
We would love to hear what you have to say about this pattern!
If you want to leave a question, please make sure you select the correct category in the form below, to speed up the answering process. Required fields are marked *.