
Popular categories
Looking for a yarn?


Comments / Questions (24)
![]() Encarni wrote:
Encarni wrote:
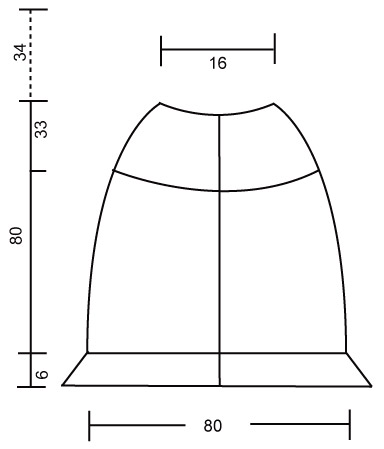
I'm trying to work out this pattern with a smaller number of stitches because my yarn is making my gauge too wide, but I'm confused with the measurements in the diagram. If 13st = 10cm (as per gauge), then casting on 325st=250cm around the bottom. What does the 80cm along the bottom in the diagram refer to?
28.03.2020 - 18:16DROPS Design answered:
Dear Encarni, at the very bottom of the piece there is a small "ruffle", that is why you cast on more stitches and after 6 cm-s you will decrease a large number of stitches, and knit the cape from there. The 80 cm refers to the width after this ruffle (after the decrease). Happy Knitting!
29.03.2020 - 22:34
![]() Kl wrote:
Kl wrote:
Hi.... this pattern is a little messed up...directions for garter are actually stockinette... Then when at 10:5” it says 6 band sts , rib pattern, 6 garter sts followed by 23 garter sts ... This makes no sense ....
03.08.2019 - 16:08DROPS Design answered:
Dear Ki, when you work garter stitch back and forth you need to K all stitches on every row. When piece measures 10½'' you will work a small edge over holes for arms, that's why you will work some stitches in rib (K over K and P over P) and some other stitches in garter st (= K from RS as well as from WS). Happy knitting!
08.08.2019 - 10:44
![]() Petra wrote:
Petra wrote:
Was sind Blendem? Welche Maschen muss ich da stricken.
25.05.2019 - 12:39DROPS Design answered:
Liebe Petra, die "Blendem" sind hier die Blendemaschen. Viel Spaß beim stricken!
27.05.2019 - 13:20
![]() Joan wrote:
Joan wrote:
I understand the "Garter Pattern" and the *P4,K2* repeat (ribbing). On the RS after the 6 front band sts there is K2. What happens to these on the WS? Are they part of the ribbing and therefore P2. for Clarification Is this correct WS: 6 st band in garter st, p2, *k4, P2* 5X, 41sts Garter St Pattern, P2 …..
05.04.2019 - 19:05DROPS Design answered:
Dear Joan, yes, the pattern goes ths way - so on WS you knit P2 after band sts. Happy knitting!
05.04.2019 - 21:54
![]() Joan Shirikian wrote:
Joan Shirikian wrote:
Thank you so much for the fast response to my question. It makes perfect sense.🙂
04.04.2019 - 16:12
![]() Joan Shirikian wrote:
Joan Shirikian wrote:
This pattern’s main “body” has a RS row that is a variation of ..RS: 6 front band sts in garter st, K2, * P4, K2 *, repeat from *-* on the next 30 sts, Garter st pattern – see above - on the next 41 sts, K2, repeat from *-* on the next 60 sts, Garter st pattern on the next 41 sts, K2, repeat from *-* on the next 30 sts and finish with 6 front band sts in garter st.[variation because the # of stitches vary but the “pattern” is common]. What is the next WS row?
04.04.2019 - 15:09DROPS Design answered:
Dear Mrs Shirikian, from WS work the rib pattern with K over K and P over P (= the P4 from RS will be worked K4 from WS and the K2 from RS will be worked P2 from WS) and work the stitches from garter stitch pattern as explained at the beginning of the pattern (= row 1 = K from RS, row 2 = P from WS, row 3 = K from RS, row 4 = P from WS, Row 5 = P from RS and row 6 = K from WS). Happy knitting!
04.04.2019 - 15:52
![]() Dennez wrote:
Dennez wrote:
Bonjour merci pour votre réponse j'ai bien les 172 mailles mais justement je ne comprends pas le Cheminement des points quand on commence l'empiecement.... Je pense qu'il y a une coquille dans le décompte... 6 2 30(5x 4+2) 6 11 6 2 30 6 cela fait 99 mailles et non 172... Voilà ma question....
28.11.2018 - 21:56DROPS Design answered:
Bonjour Mme Dennez, il manquait effectivement des mailles dans la répartition des mailles, elle a été corrigée, merci. Bon tricot!
29.11.2018 - 09:40
![]() Nathalie DENNEZ wrote:
Nathalie DENNEZ wrote:
Bonjour, n\\\'y a t il pas une coquille sur l\\\'empiecement 172 mailles.... Mais j\\\'arrive à 99 mailles... Il me manque à priori 63 mailles, pouvez vous regarder, svp??
26.11.2018 - 19:29DROPS Design answered:
Bonjour Mme Dennez, après la séparation de l'ouvrage, vous avez: 41 m pour chaque devant et 90 m pour le dos (quand toutes les diminutions sont terminées), soit 41+90+41= 172 m. Bon tricot!
27.11.2018 - 08:00
![]() Marion Homer wrote:
Marion Homer wrote:
How much yarn do I need? Number of balls or size of balls or total grams needed?
11.11.2018 - 15:47DROPS Design answered:
Dear Marion, you need 350g of DROPS Melody, which is available in 50g balls, so you need 7 balls of this yarn. Happy knitting!
11.11.2018 - 22:18
![]() Stefanie Silvia Oechslin-Walpole wrote:
Stefanie Silvia Oechslin-Walpole wrote:
Are there other sizes available?
28.01.2018 - 15:52DROPS Design answered:
Dear Stephanie, this pattern is only available for the M size.
28.01.2018 - 16:44
|
|
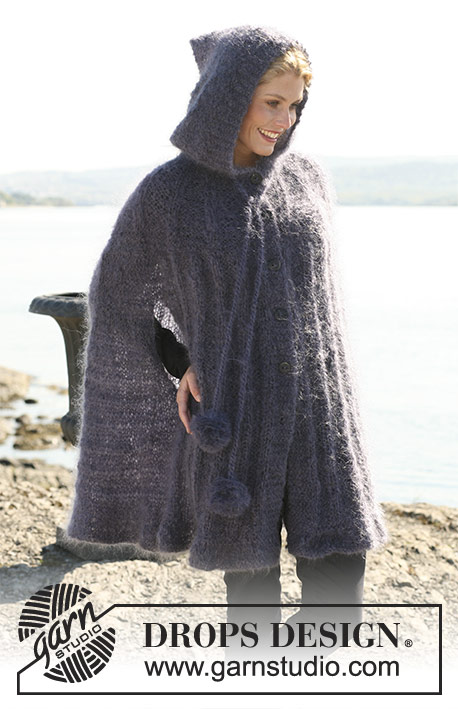
Elven Dance |
|
 |
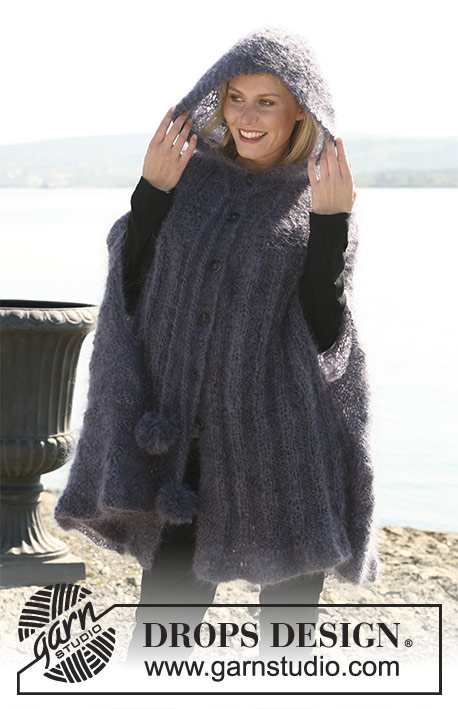 |
DROPS cape with hood in ”Vienna” eller "Melody". Size M.
DROPS Extra 0-450 |
|
|
Garter st, back and forth on needle: K all rows. Decreasing tip: Dec 4 sts each side by dec 4 sts evenly on sts worked in Garter st pattern. Dec on rows from RS. Garter st pattern: Row 1: K from RS Row 2: P from WS Row 3: K from RS Row 4: P from WS Row 5: P from RS Row 6: K from WS Repeat row 1 to 6. Double moss st: Row 1: * K2, P2 *, repeat from *-* and finish with K2. Row 2: K over K and P over P. Row 3: P over K and K over P. Row 4: K over K and P over P. Repeat row 3 and 4. Buttonholes: Cast off for buttonholes on right front piece. 1 buttonhole = cast off 3rd front band st from mid front and cast on 1 new st on return row. Cast off for buttonholes when piece measures (measured from the first MT): 34, 43, 52, 61, 70 and 79 cm. Cape: Worked back and forth on circular needle from mid front. Cast on 325 sts (includes 6 front band sts each side towards mid front) on circular needle size 7 mm with Vienna or Melody. K 2 rows. Continue in stocking st with 6 front band sts each side in garter st. Remember the knitting tension! When piece measures 6 cm work next row as follows from RS: 6 front band sts in garter st, * K1, K2 tog *, repeat from *-* until 7 sts remain, K1, 6 front band sts in garter st = 221 sts. K 1 row from WS. Insert a Marking Thread (MT) and now measure piece from here. K 1 row from RS, at the same time dec 1 st after the 6 front band sts = 220 m. K from row from WS. Continue as follows from RS: 6 front band sts in garter st, K2, * P4, K2 *, repeat from *-* on the next 30 sts, Garter st pattern – see above - on the next 41 sts, K2, repeat from *-* on the next 60 sts, Garter st pattern on the next 41 sts, K2, repeat from *-* on the next 30 sts and finish with 6 front band sts in garter st. At the same time when piece measures 10 cm from MT dec 4 sts each side – see Decreasing tip! Repeat the dec on every 7 cm a total of 6 times. At the same time when piece measures 27 cm from MT (after 3 dec = 196 sts on row) continue as follows from RS: 6 front band sts in garter st, K2, * P4, K2 *, repeat from *-* on the next 30 sts, 6 garter sts, Garter st pattern on the next 23 sts, K2, repeat from *-* on the next 60 sts, Garter st pattern on the next 23 sts, 6 garter sts, K2, repeat from *-* on the next 30 sts and finish with 6 front band sts in garter st. When piece measures 29 cm from MT divide the piece as follows: keep the first 41 sts on needle and slip the remaining 155 sts on a stitch holder. Right front piece: Continue back and forth on needle on the 41 sts as follows: 6 front band sts in garter st, K2, * P4, K2 * repeat from *-* on the next 30 sts, 3 garter sts. Continue like this until piece measures 18 cm from where piece was divided. Note! Remember to cast off for buttonholes – see above. Slip the 41 sts on a stitch holder. Back piece: Slip the next 114 sts back on needle and work pattern as before back and forth on needle. Note! Remember dec at sides. Continue like this until piece measures 18 cm from where piece was divided (= 47 cm from MT). All dec are now complete = 90 sts. Slip the 90 sts on a stitch holder. Left front piece: Slip the last 41 sts back on needle and continue back on forth on needle as follows: 3 garter sts, * P4, K2 *, repeat from *-* on the next 30 sts, K2, 6 front band sts in garter st. Continue like this until piece measures 18 cm from where piece was divided. Yoke: Slip all sts back on needle = 172 m. Insert a MT and now measures piece from here. Continue as follows from RS: 6 front band sts in garter st, K2, * P4, K2 *, repeat from *-* on the next 30 sts, 6 garter sts, Garter st pattern on the next 11 sts, K2, repeat from *-* on the next 60 sts, m, Garter st pattern on the next 11 sts, 6 garter sts, K2, repeat from *-* on the next 30 sts and finish with 6 front band sts in garter st. Continue like this until piece measures 2 cm from MT. Continue as follows: 6 front band sts in garter st, K2, * P4, K2 *, repeat from *-* on the next 30 sts, Garter st pattern on the next 17 sts, K2, repeat from *-* over de next 60 sts, Garter st pattern on the next 17 sts, K2, repeat from *-* on the next 30 sts and finish with 6 front band sts in garter st. Continue like this until piece measures 7 cm from MT. K 1 row from RS on all sts at the same time dec 14 sts evenly = 158 sts. K 1 row from WS. K 1 row from RS, at the same time dec 14 sts evenly = 144 sts. K 1 row from WS. Now continue as follows: 6 front band sts, K2, * P8, K2 *, repeat from *-* on the next 130 sts and finish with 6 front band sts. When piece measures 11 cm from MT dec 1 st in each P section and repeat the dec on every 3.5 cm a total of 6 times = 66 sts. Continue with K over K and P over P (with front bands in garter st as before) until piece measures 31 cm from MT and now K 6 rows on all sts. Hood: K 1 rows from RS, at the same time inc 4 sts evenly = 70 sts. Insert a MT and now measure piece from here. Continue in Double moss st – see above – with 6 front band sts in garter st each side. Continue like this until hood measures approx 34 cm from MT and cast off loosely. Assembly: Sew tog hood at the top, edge to edge with neat sts. Sew on buttons. Twisted ribbon: Cut 4 threads measuring 3 meters each. Twist them until they resist, fold threads double and let them twist again. Tie a knot each end and thread the ribbon round neckline. Make 2 pompoms with a diameter of approx 8 cm and attach to the ends of ribbon. www.garnstudio.com |
|
 |
|
Have you finished this pattern?Tag your pictures with #dropspattern or submit them to the #dropsfan gallery. Do you need help with this pattern?You'll find 20 tutorial videos, a Comments/Questions area and more by visiting the pattern on garnstudio.com. © 1982-2026 DROPS Design A/S. We reserve all rights. This document, including all its sub-sections, has copyrights. Read more about what you can do with our patterns at the bottom of each pattern on our site. |
|


With over 40 years in knitting and crochet design, DROPS Design offers one of the most extensive collections of free patterns on the internet - translated to 17 languages. As of today we count 324 catalogues and 12290 patterns translated into English (UK/cm). 12290
We work hard to bring you the best knitting and crochet have to offer, inspiration and advice as well as great quality yarns at incredible prices! Would you like to use our patterns for other than personal use? You can read what you are allowed to do in the Copyright text at the bottom of all our patterns. Happy crafting!
Post a comment to pattern DROPS Extra 0-450
We would love to hear what you have to say about this pattern!
If you want to leave a question, please make sure you select the correct category in the form below, to speed up the answering process. Required fields are marked *.