
Popular categories
Looking for a yarn?


Comments / Questions (35)
![]() Jyotsna Naik wrote:
Jyotsna Naik wrote:
I am having trouble with the right front edge piece. The pattern states to work 2 rows on the first 16 stitches and then 2 rows over the first 33 stitches and then 2 rows over all stitches. How do you do the short rows on the right front edge piece. Can you explain how to work the short rows for the 'left front' please ?
08.04.2024 - 06:50DROPS Design answered:
Dear Mrs Jyotsna, you can use this technique for the short rows - the one explained under Knitting Tips at the beg of the pattern. On the right front piece you will start the short rows from RS (from the outer edge) and on the left front piece you will start the short rows from WS to get a mirrored piece. Happy knitting!
08.04.2024 - 08:39
![]() Jyotsna Naik wrote:
Jyotsna Naik wrote:
I am not able to follow " 16-20-21-28 sts (5-9-10-17 garter sts, M.1A), 2 rows over the first 33-37-38-45 sts (5-9-10-17 garter st s, M.1A, M.2A), 2 rows over all sts*, repeat from *-* until the piece measures 29-32-35-37 cm 2 rows over the first 16-20-21-28 sts (5-9-10-17 garter sts, M.1A), 2 rows over the first 33-37-38-45 sts (5-9-10-17 garter sts, M.1A, M.2A), 2 rows over all sts*, repeat from *-* until the piece measures 29-32-35-37 cm " Can you please explain
02.04.2024 - 16:09DROPS Design answered:
Dear Mrs Naik, these are short rows to shape piece, this means you will work the first 16-28 sts (seen from RS), turn (remaining sts are not worked) and work back row, then work the first 33-45 sts, turn and work back row, then work 2 rows over all sts. Repeat these 6 rows to the measurements for your size. Happy knitting!
03.04.2024 - 08:24
![]() Jyotsna Naik wrote:
Jyotsna Naik wrote:
Please clarify " Inc. inside first garter st at the mid front and garter all new sts. "
28.03.2024 - 11:50DROPS Design answered:
Dear Jyotsna, it means, you need to increase right next to the first titch that you knitted with garter stitch (the side of the stitch toward the rest of the piece). All knew stitches should be knitted with garter stitch from then on. Happy Knitting!
28.03.2024 - 12:24
![]() Caterina wrote:
Caterina wrote:
Salve, vorrei sapere se le diminuzioni per le maniche devono eseguirsi solo sui ferri a dritto (essendo previsto che si debbano fare lavorando due maglie insieme a dritto) oppure anche sui ferri a rovescio, essendo scritto "intrecciare 1 m a ogni lato su ogni f per un totale di 13 volte come segue: 2 m insieme a dir.". Grazie
30.06.2015 - 18:03DROPS Design answered:
Buonasera Caterina, le maniche iniziano con 6 ferri a m legaccio, cioè tutto a diritto e sul f successivo bisogna fare delle diminuzioni lavorando 2 m insieme a dir fino a raggiungere il n° di m indicato. Poi si prosegue a m rasata rovescia e quando il lavoro misura 6 cm si modella il collo intrecciando 1 m a ogni lato su ogni f per un totale di 13 volte come segue: 2 m insieme a dir. Gli intrecci vengono fatti sia sul diritto sia sul rovescio del lavoro (2 m diminuite per ferro). Buon lavoro!
30.06.2015 - 22:31
![]() Minicouturettes wrote:
Minicouturettes wrote:
D'après le diagramme je dois faire les boules sur l'envers...je ne comprend pas, ne devraient-elles pas être sur les rangs endroit???? Mon tricot ne ressemble à rien :/
21.01.2014 - 16:43DROPS Design answered:
Bonjour Minicouturettes, les diagrammes ont été modifiées pour que les jetés et les nopes soient sur l'endroit. Bon tricot!
14.02.2014 - 10:07
![]() Drops wrote:
Drops wrote:
Tak Hanne og Marianne for jeres fantastiske samarbejde :) Er der en af jer som kan forklare på en enkle måde hvordan i løse det?
16.04.2012 - 15:39
![]() Hanne Hammersholt wrote:
Hanne Hammersholt wrote:
Tusinde tak Marianne. Du har været en meget stor hjælp. Du løste mit problem. Så nu går det fremad igen :-) Så Drops jeg behøver ikke jeres hjælp.
15.04.2012 - 23:07
![]() Marianne Griese Hansen wrote:
Marianne Griese Hansen wrote:
Skal nok vise dig hvordan, for det er lige ud af landevejen :D
15.04.2012 - 15:02
![]() Hanne Hammersholt wrote:
Hanne Hammersholt wrote:
Jeg har problemer med opskrift nr. 100-16. Når man strikker venstre kant stk. drejer det fint spejlvendt men diagrammet kommer ikke til at passe. Har gjort præcist som der står i opskriften men mønstret kommer til at vende forkert. M.1B er forkert i forhold til M.1A. Boble mønstret passer heller ikke, kommer til at vende forkert. kan I hjælpe mig! KH Hanne
14.04.2012 - 20:46DROPS Design answered:
Marianne skriver: Skal nok vise dig hvordan, for det er lige ud af landevejen :D
17.04.2012 - 11:53
![]() AH wrote:
AH wrote:
This is such a great pattern. Please translate this into American English. Thank you.
15.07.2010 - 19:39
|
||||||||||||||||||||||||||||||||||||||||
Willow Song#willowsongbolero |
||||||||||||||||||||||||||||||||||||||||
 |
 |
|||||||||||||||||||||||||||||||||||||||
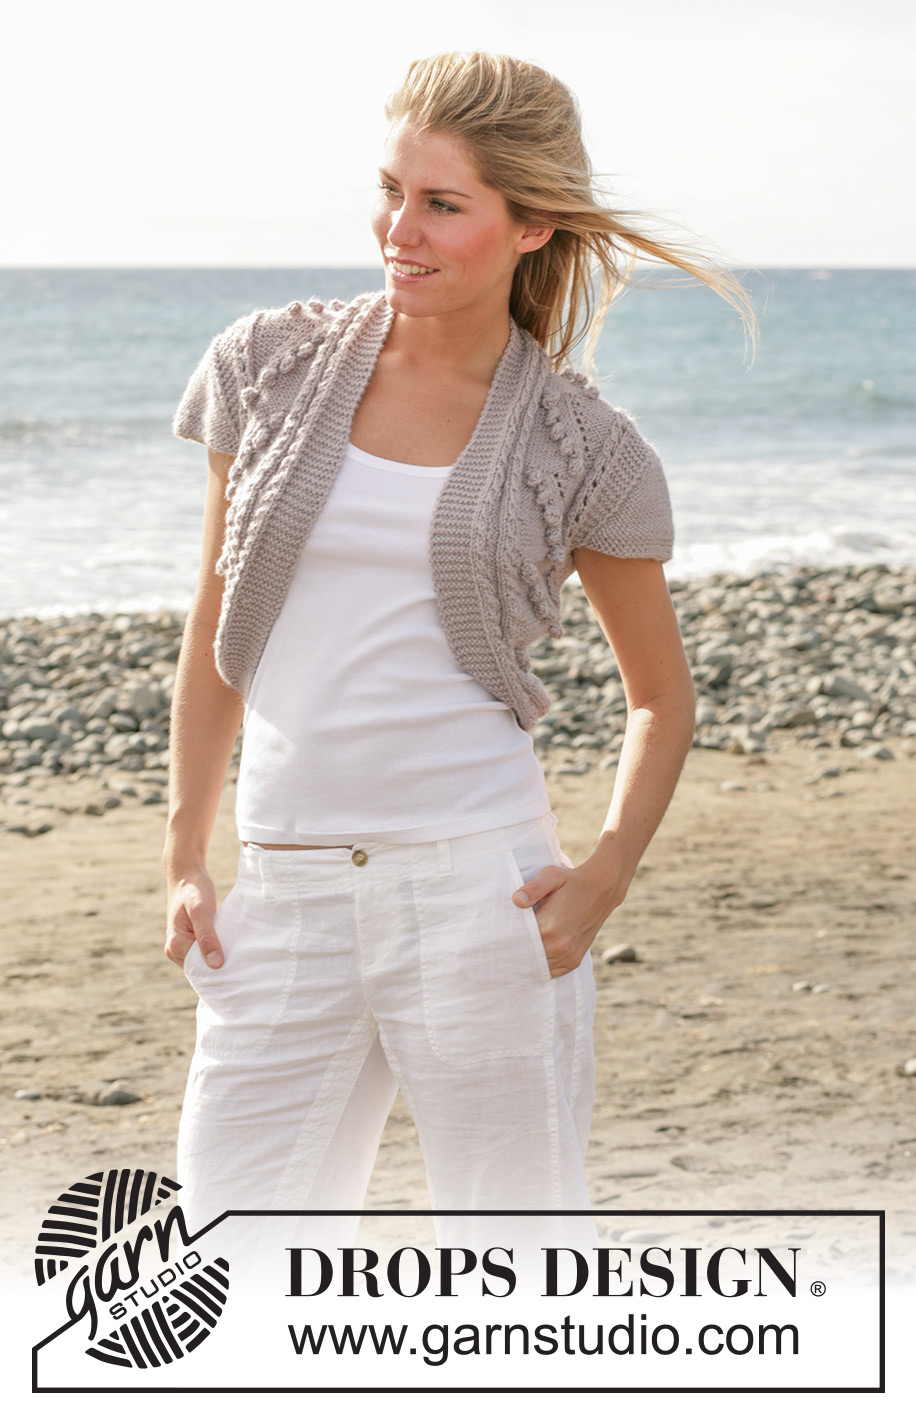
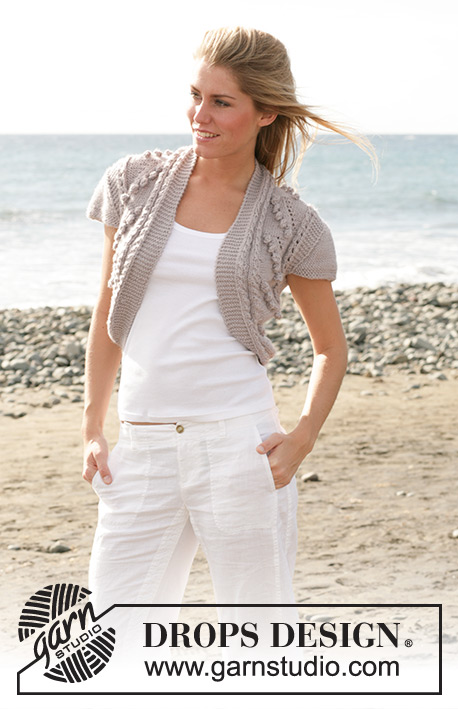
DROPS shrug with short sleeves knitted in bobble and lace pattern with “Silke-Alpaca”.
DROPS 100-16 |
||||||||||||||||||||||||||||||||||||||||
|
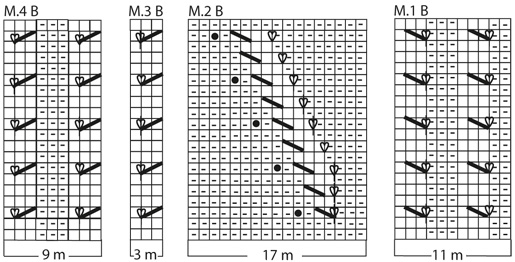
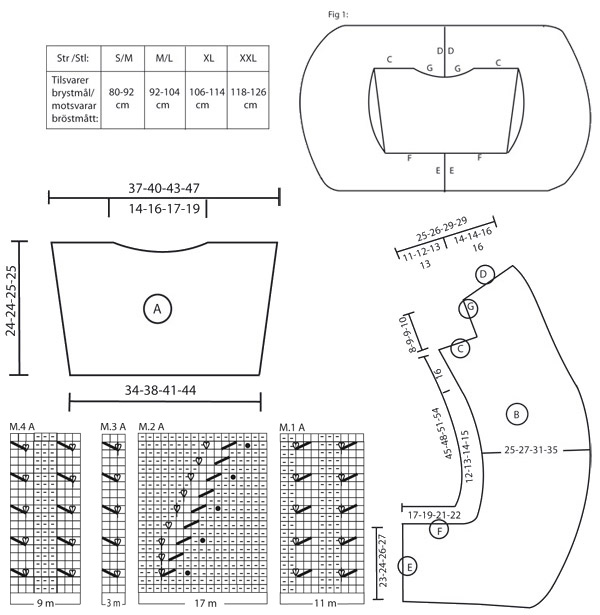
The cardigan is knitted in 3 parts: 1 back piece (A) + 2 edge pieces (B) which are knitted from the mid back and finish at the nape of the neck mid back. These edge pieces are sewn tog. to a ring and assembled to the back piece – see fig. 1. Finally sew in the sleeves. Knitting tension: 17 sts x 22 rows on needles size 4.5 mm in pattern sts and 18 sts x 38 rows on needles size 4 mm in garter sts = 10 x 10 cm Note! Make sure not to knit too loose. Pattern: See diagram M.1A, M.2A, M.3A, M.4A and diagram M.1B, M.2B, M.3B, M.4B. The diagrams are seen from the RS. Bobble: 1st row: Knit 3 sts into 1 st, turn. Now knit a total of 6 rows over these 3 sts - do not knit the other sts – as follows: 2nd row: P2, 1 yo, P1. 3rd row: Purl. 4th row: Knit. 5th row: Purl. 6th row: Knit the sts tog. 2 by 2 and pass the first st over the second sts (1 st left). Garter sts back and forth: Knit on all rows Measurement tips: Because of the weight of the yarn, all measurements should be made whilst the garment is hanging. Measurement tips-2: All measures for the edge pieces are done at the shortest side. Knitting Tips: Every time turning at the mid of a row, slip the first st as if to knit. Tighten the thread and continue as before. This is to avoid a hole in the transitions. Increasing tips (apply for edge pieces): All inc. are done from the RS. Inc. inside first garter st at the mid front and garter all new sts. Inc as follows: make a yo, on returning row twist and K the yo. (i.e. knit into back part of st instead of front part) to avoid a hole. Decreasing tips (apply for the edge piece): Dec inside first garter sts towards the mid front. Dec as follows: K2 tog. _________________________________________________________________ Back piece: Read measurement tips! Cast on 62-68-74-80 sts on needle size 4 mm with Silke- Alpaca. Knit in garter sts. When the piece measures 5 and 8 cm inc. 1 st each side= 66-72-78-84 sts. When the piece measures 22-22-23-23 cm cast off the mid 24-26-28-32 sts for neck. Cast off 1 more st each side towards the neck = 20-22-24-25 sts left for each shoulder. Cast off when the piece measures 24-24-25-25 cm. Right front edge piece: Remember measurement tips! Cast on 39-41-44-46 sts on needle size 4.5 mm with Silke-Alpaca. The casting on edge is marked with an E on the measurement drawing. Knit as follows (1st row = RS): Size M/S: 2 garter sts, M.1A, M.2A, M.3A, 6 garter sts. Size M/L: 4 garter sts, M.1A, M.2A, M.3A, 6 garter sts. Size XL: 1 garter sts, M.1A, M.2A, M.4A, 6 garter sts. Size XXL: 3 garter sts, M.1A, M.2A, M.4A, 6 garter sts. When the piece measures 10 cm inc. 1 st on every 4-4-2-2 row at the right side a total of 3-5-9-14 times – read increasing tips = 42-46-53-60 sts ( 5-9-10-17 edge sts in garter sts). When the piece measures 17-19-21-22 cm knit as follows- read Knitting tips: *2 rows over the first 16-20-21-28 sts (5-9-10-17 garter sts, M.1A), 2 rows over the first 33-37-38-45 sts (5-9-10-17 garter sts, M.1A, M.2A), 2 rows over all sts*, repeat from *-* until the piece measures 29-32-35-37 cm – read measurement tips -2. Continue over all sts. At the same time for size M/L, XL and XXL dec. 1 sts on every 4-4-2 rows at the right side a total of 2-3-10 times (= 5-7-7-7 edge sts in garter sts) – read decreasing tips = 42-44-50-50 sts (do not dec. for size S/M). When the piece measures 45-48-51-54 cm cast off the outermost 18-20-23-23 sts at the left side for the shoulder = 24-24-27-27 sts left for the neckline. Continue to measure from here onwards. Knit as follows: *2 rows over the first 16-18-18-18 sts (5-7-7-7 garter sts, M.1A), 2 rows over all sts*, repeat from *-* until finish measures – Knit remaining sts after M.1A as follows: P from the RS, K from the WS. Cast off when the piece measures 8-9-9-10 cm (measured at the shortest side). Left front: Cast on and knit as right front but mirrored. Knit as follows (1st row = RS): Size S/M: 6 garter sts, M.3B, M.2B, M.1B, 2 garter sts Size M/L: 6 garter sts, M.3B, M.2B, M.1B, 4 garter sts Size XL: 6 garter sts, M.4B, M.2B, M.1B, 1 garter sts Size XXL: 6 garter sts, M.4B, M.2B, M.1B, 3 garter sts Sleeve: Cast on 45-47-49-51 sts on needle size 4.5 mm with Silke-Alpaca. Knit 6 rows of garter sts – on the following row adjust the number of sts to 41-43-45-47. Continue in reverse stocking sts. When the piece measures 6 cm cast off 1 st each side on every row a total of 13 times as follows: K2 tog = 15-17-19-21 sts. Cast off when the piece measures approx. 12 cm. Knit another sleeve. Assembly: See measurement drawing. Sew in the most outer part of the most outer st and make sure not to sew too tight. Sew the edges pieces tog. at the bottom edge (E to E) and at the neck (D to D). Sew the edges pieces to the back piece as follows: Sew the shoulder seam and the edge piece to the bottom and top edge of the back piece (G) and (F). Sew in the sleeves. NB: The armholes are not symmetrical – make sure the sleeves are sewn in evenly at the front and the back piece. Begin as follows: Sew the sleeve cap to the shoulder seam and sew each side separately towards the armhole. 14-15-16-17-18 cm should be remaining underneath the sleeve. |
||||||||||||||||||||||||||||||||||||||||
Diagram explanations |
||||||||||||||||||||||||||||||||||||||||
|
||||||||||||||||||||||||||||||||||||||||
 |
||||||||||||||||||||||||||||||||||||||||
 |
||||||||||||||||||||||||||||||||||||||||
Have you finished this pattern?Tag your pictures with #dropspattern #willowsongbolero or submit them to the #dropsfan gallery. Do you need help with this pattern?You'll find 13 tutorial videos, a Comments/Questions area and more by visiting the pattern on garnstudio.com. © 1982-2026 DROPS Design A/S. We reserve all rights. This document, including all its sub-sections, has copyrights. Read more about what you can do with our patterns at the bottom of each pattern on our site. |
||||||||||||||||||||||||||||||||||||||||


With over 40 years in knitting and crochet design, DROPS Design offers one of the most extensive collections of free patterns on the internet - translated to 17 languages. As of today we count 324 catalogues and 12290 patterns translated into English (UK/cm). 12290
We work hard to bring you the best knitting and crochet have to offer, inspiration and advice as well as great quality yarns at incredible prices! Would you like to use our patterns for other than personal use? You can read what you are allowed to do in the Copyright text at the bottom of all our patterns. Happy crafting!
Post a comment to pattern DROPS 100-16
We would love to hear what you have to say about this pattern!
If you want to leave a question, please make sure you select the correct category in the form below, to speed up the answering process. Required fields are marked *.