
Popular categories
Looking for a yarn?


Comments / Questions (195)
![]() Anna wrote:
Anna wrote:
Ah. Also in der Rückreihe auch links stricken, damit es vorne rechts erscheint. Das ist sinnvoller als Perle zu bezeichnen. Danke
20.12.2025 - 14:28
![]() Anna wrote:
Anna wrote:
Hallo. Ich verstehe den Sinn der "Perle" nicht. Nach der Beschreibung ist es einfach eine linke Masche, die auf der Rückseite re gestrickt wird, damit sie auf der Vorderseite links erscheint. Was hat das mit einer Perle zu tun?
19.12.2025 - 00:48DROPS Design answered:
Liebe Anna, es ist ein Fehler in der Beschreibung der "Perle", es handelt sich dabei um eine kraus rechte Masche. "Perle" ist angelehnt ans Perlmuster, bei dem Sie ja abwechselnd rechte und linke Maschen stricken und in der Rück-Reihe die Maschen umgekehrt dazu stricken, wie sie erscheinen. Im Prinzip ist diese Bezeichnung hier aber etwas irreführend und wird korrigiert. Viel Spaß beim Stricken!
19.12.2025 - 09:28
![]() Anke wrote:
Anke wrote:
Hallo liebes Drops Team! Ich habe ein blödes Problem, die Jacke ist fast fertig und stellt sich jetzt als zu klein heraus. Habt ihr eine Idee, wie ich sie aus dem Grundmuster heraus vergrößern kann? Normalerweise passt meinem Mann XL, aber hier ist es zu eng. Vielleicht habt ihr ja eine Idee, ohne das ich nochmal von vorne anfangen muss? Danke und LG!
15.12.2025 - 18:33DROPS Design answered:
Liebe Anke, stimmte Ihre Maschenprobe? Haben Sie vielleicht fester gestrickt? Fragen Sie mal Ihr Wollladen, vielleicht haben Sie damit Erfahrungen um Ihnen weiter zu helfen. Viel Spaß beim Stricken!
16.12.2025 - 09:01
![]() Eveline wrote:
Eveline wrote:
De aanwijzingen voor de raglan zijn voor mij verwarrend. Zet ik de mindering voor de mouwen in gelijk na de merkdraad of 2 steken voor de merkdraad? Zet ik de mindering voor de panden in 3 steken of 5 steken voor de merkdraad? Ik minder aan de goede zijde 2 st als volgt:2 r samenbr, 1 gerstekorrelst, 1 r, 1 gerstekorrelst, 1 r afh, 1 r, afgeh st overh. Vraag : is aan deze, goede zijde, de gerstekorrel een rechtse of linkse steek? En hoe brei ik de samengebreide steken aan de achterkant?
09.12.2025 - 15:09DROPS Design answered:
Dag Eveline,
Als je op de mouw aan het breien bent, begin je met minderen 2 steken voor de merkdraad (dit is dus de overgang van een mouw naar een pand) en als je op een pand bent begin je met minderen 5 steken voor de dit is dus de overgang van een pand naar een mouw). De geminderde steken brei je in patroon.
16.12.2025 - 20:53
![]() Elin wrote:
Elin wrote:
Hvis jeg ikke vil lage dette mønstret, men strikke vrbord hele veien. Må jeg legge på eller minske maskeantallet da?
18.11.2025 - 10:37DROPS Design answered:
Hei Elin, Vrangbord har en mer elastisk struktur enn mønsteret i denne oppskriften, som betyr at du må legge opp flere masker for å beholde fasongen. Det er kanskje lettere å finne en oppskrift strikket i vrangbord enn å endre på denne oppskriften? Hilsen, Drops Team.
19.11.2025 - 07:24
![]() Michaela wrote:
Michaela wrote:
Hallo liebes Drops Team, ich hab grad voll des brett vorm Kopf bei den Zunahmen heisst es man soll einen makierungsfaden setzten (re. Masche). Und dann vor und hinter diesem eine Zunahme machen. Setze ich jetzt den faden zwischen eine rechte und linke masche und nehme davor und danach zu oder mache ich eine Zunahme hab dann die markierte Masche und mach dann noch eine Zunahme?
11.11.2025 - 08:37DROPS Design answered:
Liebe Michaela, Der Markierung am Anfang der Runde soll in eine rechte Masche eingesetzt werden, dann werden die Zunahmen im Muster gestrickt: stricken Sie die Zunahme entweder wie die 1. Masche vom Muster (wenn die vorrige Masche wie die 2. Masche gestrickt wird) - und wie die 2. Masche vom M.1 (wenn die vorrige Mache wie die 1. Masche gestrikt wird). Genauso am Anfang auf der anderen Seite vom Markierer. dh das Muster wird sich erbreitern und das Rippenmuster forsetzt wie zuvor nur über mehr Maschen. Viel Spaß beim Stricken!
21.11.2025 - 10:20
![]() Tinca Postema wrote:
Tinca Postema wrote:
Ik heb het vest gebreid. Het is mooi geworden. Maar ik heb een vraag over de hoeveelheid wol die voorgeschreven is. Ik heb bijna de helft over. Ik heb rekening gehouden met de kortere looplengte van de vernieuwde DROPS Karisma. Ik heb een proeflapje gebreid en dat is conform het patroon. Ik heb het vergeleken met andere DROPS patronen en daar wordt bij een zelfde gatencategorie minder meters wol geadviseerd. Wilt u kijken of de advies hoeveelheid klopt? Alvast dankt, Tinca Postema
10.11.2025 - 15:00DROPS Design answered:
Dag Tinca,
Bedankt voor het doorgeven, we gaan het nakijken.
10.11.2025 - 20:46
![]() Emily wrote:
Emily wrote:
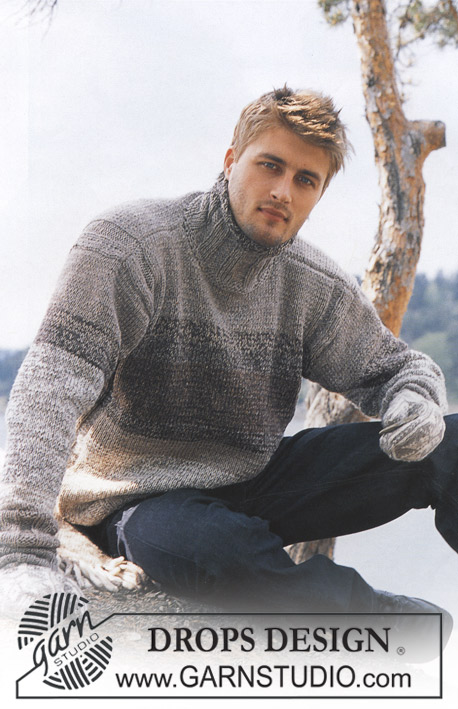
Can you please tell me the current names and numbers for the color combination in the photo? I looked up the ones listed in the pattern and cannot seem to find the natural color in karisma nor the beige in the alpaca. Are there current equivalents? Thank you!
27.10.2025 - 01:53DROPS Design answered:
Hi Emily, The Karisma yarn is colour no. 01, Off White and the Alpaca yarn is colour no 618, Nougat. Regards, Drops Team.
27.10.2025 - 06:39
![]() Françoise wrote:
Françoise wrote:
Puis rabat tous les 2 rangs : 2-0-0-2-4 fois 2 m et 2-6-6-4-2 fois 1 m Pouvez - vous aussi préciser s'il faut " rabattre" les mailles tous les 2 rangs ou plutôt diminuer ces mailles? Dans la suite des explications, il est noté :"Quand toutes les diminutions du raglan et de l’encolure sont finies, on obtient 59-63-65-71-75 m."
23.10.2025 - 17:56DROPS Design answered:
Bonjour Françoise, on rabat 2 mailles de chaque côté = en début de rang sur l'endroit + en début de rang sur l'envers; vous pouvez aussi rabattre 1 m de chaque côté de la même façon, en début de rang de chaque côté. Bon tricot!
29.10.2025 - 14:44
![]() Françoise wrote:
Françoise wrote:
"Encolure : à 49-57-59-60-62 cm de hauteur totale, mettre en attente 3-4-5-6-6 m de chaque côté pour l’encolure." De chaque côté ? Où ? de chaque côté de tous les marqueurs ? Puis rabat tous les 2 rangs : 2-0-0-2-4 fois 2 m et 2-6-6-4-2 fois 1 m Je ne comprends pas non plus où le faire ! Je tricote la taille S/M Merci d'avance pour votre aide
23.10.2025 - 17:45DROPS Design answered:
Bonjour Françoise, ces mailles sont mises en attente de chaque côté autrement dit au début de chaque rang: au début du devant droit puis au rang suivant sur l'envers au début du devant gauche. On rabat ensuite les mailles de l'encolure en début de rang sur l'endroit = devant droit et en début de rang sur l'envers = devant gauche; veillez à bien rabattre le même nombre de mailles de chaque côté. Bon tricot!
29.10.2025 - 14:43
|
|||||||
Richard |
|||||||
|
|
|||||||
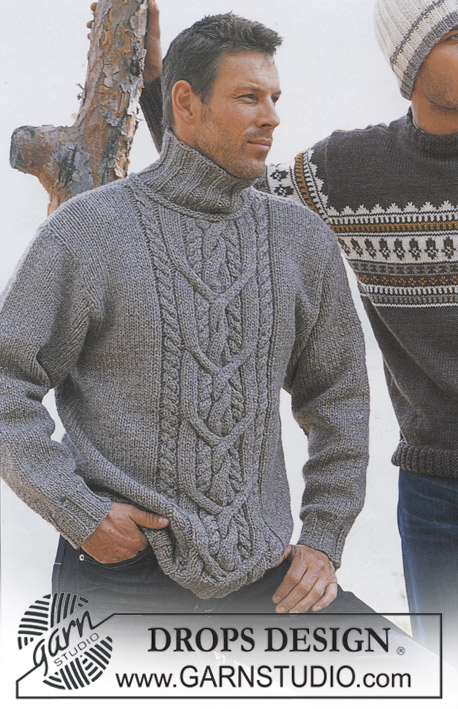
Knitted jacket for men, with raglan, high neck and zipper in DROPS Karisma and DROPS Alpaca
DROPS 85-13 |
|||||||
|
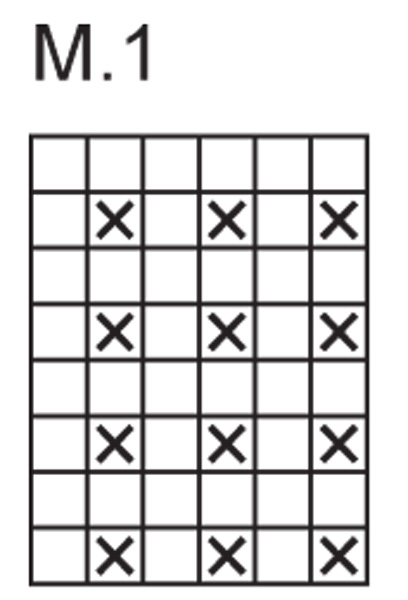
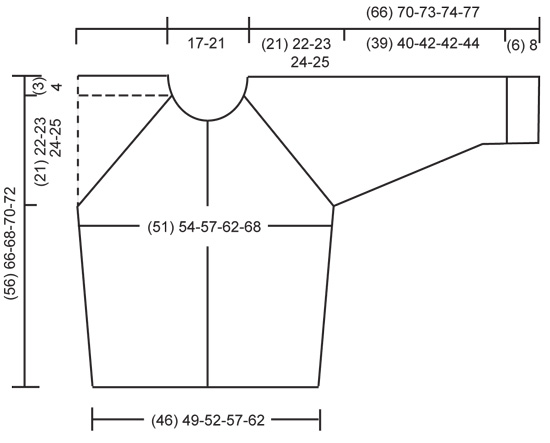
Gauge: 15 sts x 21 rows with 1 strand of each yarn on larger needles in stockinette st = 10 x 10 cm. Rib: *K 1, P 1*, repeat from *-*. Pattern: The diagrams are showing all rows seen from the right side. Decreasing tips (for raglan): All decs are made on the right side. On front- and back piece dec before the 3 sts before/after the marker, and on the sleeves dec right beside the marker. Start 2 sts before the marker on the sleeves and 5 sts before the marker on front and back, and work as follows: K 2 tog, 1 st in seed st, K 1, 1 st in seed st, slip 1 st as if to knit, K 1, psso. ___________________________________________________________________ BODY The cardigan are worked back and fort on circular needle. Cast on 137-147-155-171-187 sts on smaller circular needles with 1 strand Karisma + 1 strand Alpaca. Knit rib, keeping 3 sts in garter st at each side for front edges, and begin and end rib with K 1 (seen from the right side). When the piece measures 3-4-4-4-4 cm change to larger circular needles and Pattern 1, keeping 3 sts in garter st at each side for front edges. See that the K rib in the pattern is above the K rib in ribbing. Place a marker in the 36-38-40-44-48th st in from each side (it will be a K 1), there are 65-71-75-83-91 sts between markers on back. When the piece measures 10-12-12-12-12 cm inc 1 st at each side of both sts with markers. Inc every 5-6-6-6-6 cm a total of 4 times = 153-163-171-187-203 sts – knit the increased sts into the pattern as you go along. When the piece measures 32-40-41-42-43 cm bind off 7 sts at each side for armholes (= bind off the st with the marker + 3 sts each side of that st) = 67-73-77-85-93 sts on back and 36-38-40-44-48 sts on each front. Lay piece aside and knit the sleeves. SLEEVES Sleeves knitted in the round. Cast on 32-34-36-36-40 sts on smaller double-pointed needles with 1 strand Karisma + 1 strand Alpaca; join and place a marker at the join. Knit rib – start with K 1 at marker. When the piece measures 6-8-8-8-8 cm change to larger double-pointed needles and Pattern 1 – see that the K rib in the pattern is above the K rib in the ribbing. When the piece measures 10-14-10-14-10 cm inc 1 st each side of the K st at marker every 2.5-2-2.5-2-2.5 cm a total of 14-16-16-17-17 times = 60-66-68-70-74 sts – knit the increased sts in the pattern as you go along. When the piece measures 45-48-50-50-52 cm bind off 7 sts at marker (bind off the the K st at marker + 3 sts each side of it) = 53-59-61-63-67 sts. Lay piece aside and knit second sleeve. YOKE Put the sleeves in on the same circular needles as Body where you bound off for armholes = 245-267-279-299-323 sts Put a marker in each transition between Body and sleeves = 4 markers. Knit 3-1-1-1-0 rows before beginning shaping. Read entire section before knitting: Raglan shaping: Dec at each side of all markers (= 8 decs) – see Decreasing tips above – every other row 21-23-24-25-27 times. Neck: When the piece measures 49-57-59-60-62 cm put 3-4-5-6-6 sts at each center front edge on st holders for the neck. Then bind off at each neck edge every other row: 2 sts 2-0-0-2-4 times and 1 st 2-6-6-4-2 times. After all shaping is complete 59-63-65-71-75 sts remain. Neckband: Pick up and knit approx. 10-16 sts at each side of neck on fronts (including sts on st holders) with 1 strand of each yarn and put all sts on smaller circular needles. K 1 row from wrong side, then K 1 row from right side, adjusting (inc/dec) to 83-83-91-103-111 sts on 2nd row. Then knit rib, keeping 3 sts in garter st at each side and beginning rib with K 1 (as seen from the right side). When the collar measures 20-22-22-24-24 cm bind off all sts in rib. ASSEMBLY Sew opening under the sleeve. Sew in zipper – start at lower edge. Fold the collar in half to wrong side and stitch in place, covering end of zipper. |
|||||||
Diagram explanations |
|||||||
|
|||||||
 |
|||||||
 |
|||||||
Have you finished this pattern?Tag your pictures with #dropspattern or submit them to the #dropsfan gallery. Do you need help with this pattern?You'll find 24 tutorial videos, a Comments/Questions area and more by visiting the pattern on garnstudio.com. © 1982-2026 DROPS Design A/S. We reserve all rights. This document, including all its sub-sections, has copyrights. Read more about what you can do with our patterns at the bottom of each pattern on our site. |
|||||||


With over 40 years in knitting and crochet design, DROPS Design offers one of the most extensive collections of free patterns on the internet - translated to 17 languages. As of today we count 324 catalogues and 12291 patterns translated into English (UK/cm). 12291
We work hard to bring you the best knitting and crochet have to offer, inspiration and advice as well as great quality yarns at incredible prices! Would you like to use our patterns for other than personal use? You can read what you are allowed to do in the Copyright text at the bottom of all our patterns. Happy crafting!
Post a comment to pattern DROPS 85-13
We would love to hear what you have to say about this pattern!
If you want to leave a question, please make sure you select the correct category in the form below, to speed up the answering process. Required fields are marked *.