
Popular categories
Looking for a yarn?


Comments / Questions (195)
![]() Barbara wrote:
Barbara wrote:
Buongiorno, sono arrivata al modellamento del collo. Dato che è la prima volta che faccio un lavoro di questo tipo, ho qualche domanda: le maglie da lasciare in sospeso sono quelle all’inizo e alla fine del ferro, giusto? Messe in sospeso le maglie, “salto” quelle iniziali e comincio con un nuovo gomitolo? Le maglie da intrecciare ai bordi sono le prime che ho sul ferro? Grazie!
17.03.2019 - 10:12DROPS Design answered:
Buongiorno Barbara.Sì, mette in sospeso le prime e le ultime maglie sui ferri. Le maglie che intreccia sono le prime sui ferri, sempre dal lato dello scollo. Buon lavoro!
17.03.2019 - 20:08
![]() Franziska wrote:
Franziska wrote:
Hallo, ich verstehe leider den Halsausschnitt überhaupt nicht. Kann den jemand genauer erklären? Was genau heißt 'auf beiden Seiten'? Und die Abkettung der Maschen erfolgt dann immer nur auf einer oder auf beiden Seiten?
06.02.2019 - 21:04DROPS Design answered:
Liebe Franziska, die Maschen für den Halsausschnitt werden am Anfang jeder Reihe (= Hin- sowie Rückreihe = beidseitig) stillgelegt/abgekettet. Nach 49-62 cm, stricken Sie die ersten 3-4-5-6-6 M am Anfang der Hinreihe, legen Sie diese Maschen still, Reihe wie zuvor bis zur Ende stricken, wenden. Am Anfang nächster Reihe (= Rückreihe) stricken Sie die ersten 3-4-5-6-6 M und legen Sie diese Maschen still, die Reihe wie zuvor bis zur Ende stricken. Jetzt sollen Sie die Maschen am Anfang nächste 2 Reihe abketten (= Hin sowie Rückreihe): 2 M. (2) 0-0-2-4 Mal und 1 M. (2) 6-6-4-2 Mal. Viel Spaß beim stricken!
07.02.2019 - 09:56
![]() Michelle wrote:
Michelle wrote:
Bonjour , j'ai bien compris le raglan pour cela il n y a pas de soucis , c'est juste une question de mailles qui me bloque un peu.Voici mon soucis, après mes 2m ens j'ai une maille end , 1maille env , 1m end , si je suis ceci comme indiqué dans les explications: 1 m au point fantaisie, 1 m end, 1 m au point fantaisie je contrarie les mailles que j'ai que dois je faire ? merci
31.01.2019 - 11:57DROPS Design answered:
Bonjour Michelle, ces 2 m point fantaisie doivent se tricoter comme dans A.1, c'est-à-dire 1 rang à l'envers sur l'endroit et 1 rang à l'envers sur l'envers (= 1ère maille de M.1). Entre ces 2 mailles, vous avez 1 maille endroit (= m jersey). Bon tricot!
31.01.2019 - 13:24
![]() Michelle wrote:
Michelle wrote:
Bonjour , je suis arrivée à l'assemblage des manches , et je dois placer les 4 marqueurs, vous dites dans les explications de les mettre à la transition des manches au dos/devant, Dois je mettre le marqueurs plus sur la maille de transition de côté manche, ou côté dos/devant? et les diminutions du raglan doit se faire de chaque coté de ce marqueur, à combien de mailles du marqueur? merci :)
29.01.2019 - 12:20DROPS Design answered:
Bonjour Michelle, les marqueurs sont placés entre les mailles des manches et du dos/devant. Vous diminuez ensuite à chaque marqueur comme indiqué sous DIMINUTIONS Raglan au début des explications. (ce paragraphe a été modifié pour être plus clair). Bon tricot!
29.01.2019 - 12:51
![]() Dominique wrote:
Dominique wrote:
Bonjour, J\'ai résolu mon problème concernant le commencement du tricot, je suis maintenant rendu au commencement du diagramme et là, je suis perdue ! Si je le déchiffre correctement, je suis sensée tricoter deux rangs totalement à l\'envers, puis 2 rangs en côte 1/1 en m\'alignant sur les côtes du début du tricot. Et ainsi de suite... Mais si je regarde la photo, je n\'ai pas du tout l\'impression que ça correspond. Que dois-je faire ?
21.01.2019 - 08:14DROPS Design answered:
Bonjour Dominique, après les côtes, vous continuez en point fantaisie (= M.1) avec les 3 m point mousse de chaque côté comme avant. en même temps, vous devez aligner les mailles endroit et les mailles envers de M.1 au-dessus des côtes, ainsi, si vous avez commencé les côtes par 1 m end, commencez M.1 par la 2ème m du diagramme et répétez au 1er rang: (1 m end, 1 m env), au 2ème rang (sur l'envers), tricotez toutes les mailles à l'envers. Bon tricot!
21.01.2019 - 12:58
![]() Dominique wrote:
Dominique wrote:
Bonjour, A peine commencé le modèle DROPS 85-13, j'ai déjà un problème ! Il est écrit qu'il faut tricoter en côtes - jusque là, tout va bien - "avec 3 m lis au point mousse côté milieu devant" - là je ne comprends pas ! Ni "3 m lis" ni "côté milieu devant" . Merci de m'éclairer. Cordialement.
20.01.2019 - 15:05DROPS Design answered:
Bonjour Dominique, on tricote le dos et les devants en une seule pièce en commençant par le milieu du devant = côté du droit, vu sur l'endroit jusqu'au milieu du devant = côté du devant gauche, vu sur l'endroit, vous allez tricoter ainsi: 3 m point mousse, *1 m end/1 m env*, répétez de *-* et terminez par 1 m end, 3 m point mousse. Bon tricot!
21.01.2019 - 11:12
![]() Paulas wrote:
Paulas wrote:
Hallo, ich möchte diese Herrenjacke gerne im Patentmuster stricken. Muss ich das umrechnen? Brauche ich für ein Patentmuster mehr Wolle?
01.05.2018 - 13:23DROPS Design answered:
Liebe Frau Paulas, wir können leider nicht jedes Modell nach jedem Geschmack umrechnen. Um individuelle Hilfe nehmen Sie bitte Kontakt mit Ihrem DROPS Laden auf. Viel Spaß beim stricken!
02.05.2018 - 10:06
![]() Katrin wrote:
Katrin wrote:
Danke für den letzten Tipp- hat prima funktioniert! Frage heute: Maschen beim Körper stricken beidseitig der Markierungsfäden nach und nach ins Muster einarbeiten? Wie ist das gemeint?
25.02.2018 - 18:56DROPS Design answered:
Liebe Katrin, die zugenommenen Maschen sollen im Muster gestrickt sein, dh so daß M.1 auf jedem Teil wie im Diagram (auf beiden Seiten der Markierer) aussieht. Viel Spaß beim stricken!
26.02.2018 - 09:45
![]() Katrin wrote:
Katrin wrote:
Hallo es tut mir leid aber ich verstehe den Anfang nicht. Was heißt Bündchen mit 3M Krausrippe und 1Re?
19.02.2018 - 21:27DROPS Design answered:
Liebe Katrin, so stricken Sie: 3 M Kraus rechts, dann Bündchen mit 1 M glatt rechts anfangen (= 1 M re, 1 M li) von (bis) wiederholen bis 4 Maschen bleiben, und mit 1 M re (letzte Masche Bündchen) und 3 M Kraus rechts enden. Viel Spaß beim stricken!
20.02.2018 - 08:27
![]() Marion Van Spronsen wrote:
Marion Van Spronsen wrote:
Ik heb 267 st. Ik minder 23 X 8 steken. Dus 267 - 184 st. Dan heb ik 83 st. over. En dus niet de 63 die in het patroon staan. Aan de hals kant moet ik 0 X 2 en 0 X 1 st. minderen. Hoe kom ik dan aan 63 st.? Alvast bedankt voor u hulp? Het gaat over Richard DROPS 85-13
02.01.2018 - 17:21DROPS Design answered:
Hallo Marion, Je moet ook nog de 4 steken die je aan beide kanten van het voorpand afkanten er af halen, maar dan kom je nog niet op 63 steken maar op 75. Er staat dus een foutje in het patroon en ik zal dit doorgeven aan design afdeling. Om verder te kunnen zou je bv. 2 x 2 en 2 x 1 steek af kunnen kanten aan beide kanten (in plaats van 0 x 2 en 0 x 1)
05.01.2018 - 12:11
|
|||||||
Richard |
|||||||
|
|
|||||||
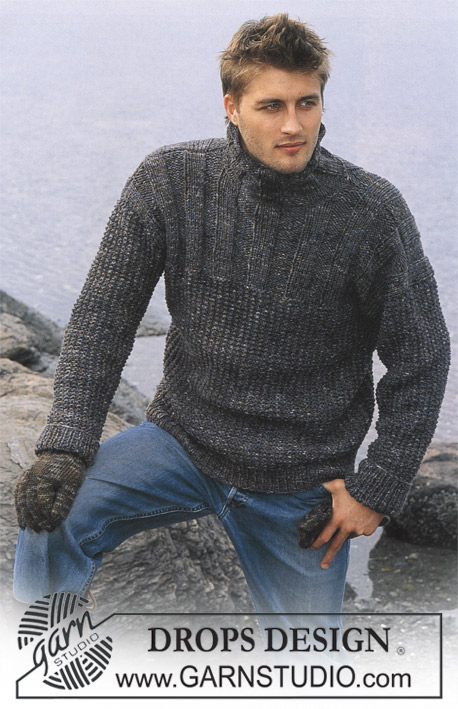
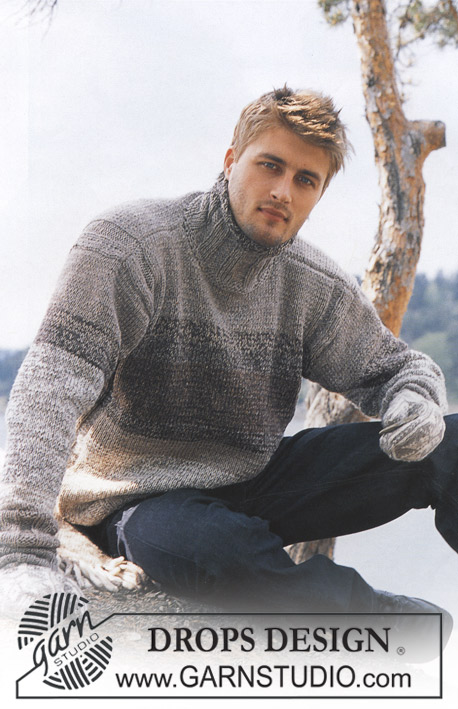
Knitted jacket for men, with raglan, high neck and zipper in DROPS Karisma and DROPS Alpaca
DROPS 85-13 |
|||||||
|
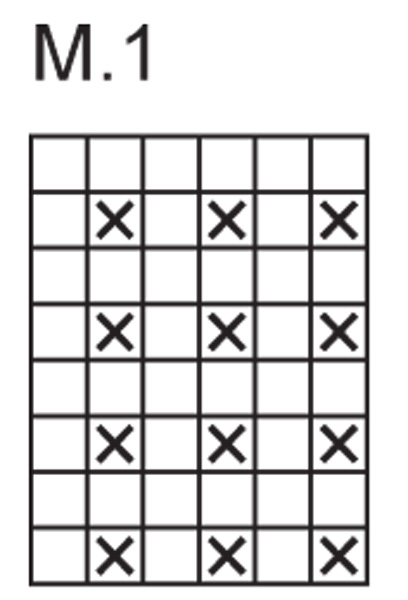
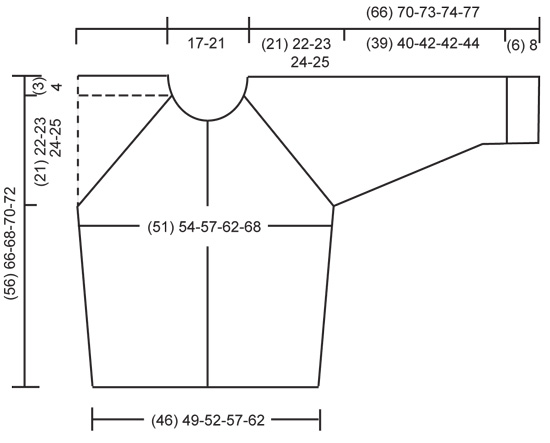
Gauge: 15 sts x 21 rows with 1 strand of each yarn on larger needles in stockinette st = 10 x 10 cm. Rib: *K 1, P 1*, repeat from *-*. Pattern: The diagrams are showing all rows seen from the right side. Decreasing tips (for raglan): All decs are made on the right side. On front- and back piece dec before the 3 sts before/after the marker, and on the sleeves dec right beside the marker. Start 2 sts before the marker on the sleeves and 5 sts before the marker on front and back, and work as follows: K 2 tog, 1 st in seed st, K 1, 1 st in seed st, slip 1 st as if to knit, K 1, psso. ___________________________________________________________________ BODY The cardigan are worked back and fort on circular needle. Cast on 137-147-155-171-187 sts on smaller circular needles with 1 strand Karisma + 1 strand Alpaca. Knit rib, keeping 3 sts in garter st at each side for front edges, and begin and end rib with K 1 (seen from the right side). When the piece measures 3-4-4-4-4 cm change to larger circular needles and Pattern 1, keeping 3 sts in garter st at each side for front edges. See that the K rib in the pattern is above the K rib in ribbing. Place a marker in the 36-38-40-44-48th st in from each side (it will be a K 1), there are 65-71-75-83-91 sts between markers on back. When the piece measures 10-12-12-12-12 cm inc 1 st at each side of both sts with markers. Inc every 5-6-6-6-6 cm a total of 4 times = 153-163-171-187-203 sts – knit the increased sts into the pattern as you go along. When the piece measures 32-40-41-42-43 cm bind off 7 sts at each side for armholes (= bind off the st with the marker + 3 sts each side of that st) = 67-73-77-85-93 sts on back and 36-38-40-44-48 sts on each front. Lay piece aside and knit the sleeves. SLEEVES Sleeves knitted in the round. Cast on 32-34-36-36-40 sts on smaller double-pointed needles with 1 strand Karisma + 1 strand Alpaca; join and place a marker at the join. Knit rib – start with K 1 at marker. When the piece measures 6-8-8-8-8 cm change to larger double-pointed needles and Pattern 1 – see that the K rib in the pattern is above the K rib in the ribbing. When the piece measures 10-14-10-14-10 cm inc 1 st each side of the K st at marker every 2.5-2-2.5-2-2.5 cm a total of 14-16-16-17-17 times = 60-66-68-70-74 sts – knit the increased sts in the pattern as you go along. When the piece measures 45-48-50-50-52 cm bind off 7 sts at marker (bind off the the K st at marker + 3 sts each side of it) = 53-59-61-63-67 sts. Lay piece aside and knit second sleeve. YOKE Put the sleeves in on the same circular needles as Body where you bound off for armholes = 245-267-279-299-323 sts Put a marker in each transition between Body and sleeves = 4 markers. Knit 3-1-1-1-0 rows before beginning shaping. Read entire section before knitting: Raglan shaping: Dec at each side of all markers (= 8 decs) – see Decreasing tips above – every other row 21-23-24-25-27 times. Neck: When the piece measures 49-57-59-60-62 cm put 3-4-5-6-6 sts at each center front edge on st holders for the neck. Then bind off at each neck edge every other row: 2 sts 2-0-0-2-4 times and 1 st 2-6-6-4-2 times. After all shaping is complete 59-63-65-71-75 sts remain. Neckband: Pick up and knit approx. 10-16 sts at each side of neck on fronts (including sts on st holders) with 1 strand of each yarn and put all sts on smaller circular needles. K 1 row from wrong side, then K 1 row from right side, adjusting (inc/dec) to 83-83-91-103-111 sts on 2nd row. Then knit rib, keeping 3 sts in garter st at each side and beginning rib with K 1 (as seen from the right side). When the collar measures 20-22-22-24-24 cm bind off all sts in rib. ASSEMBLY Sew opening under the sleeve. Sew in zipper – start at lower edge. Fold the collar in half to wrong side and stitch in place, covering end of zipper. |
|||||||
Diagram explanations |
|||||||
|
|||||||
 |
|||||||
 |
|||||||
Have you finished this pattern?Tag your pictures with #dropspattern or submit them to the #dropsfan gallery. Do you need help with this pattern?You'll find 24 tutorial videos, a Comments/Questions area and more by visiting the pattern on garnstudio.com. © 1982-2026 DROPS Design A/S. We reserve all rights. This document, including all its sub-sections, has copyrights. Read more about what you can do with our patterns at the bottom of each pattern on our site. |
|||||||


With over 40 years in knitting and crochet design, DROPS Design offers one of the most extensive collections of free patterns on the internet - translated to 17 languages. As of today we count 324 catalogues and 12291 patterns translated into English (UK/cm). 12291
We work hard to bring you the best knitting and crochet have to offer, inspiration and advice as well as great quality yarns at incredible prices! Would you like to use our patterns for other than personal use? You can read what you are allowed to do in the Copyright text at the bottom of all our patterns. Happy crafting!
Post a comment to pattern DROPS 85-13
We would love to hear what you have to say about this pattern!
If you want to leave a question, please make sure you select the correct category in the form below, to speed up the answering process. Required fields are marked *.