
Popular categories
Looking for a yarn?


Comments / Questions (195)
![]() Marina wrote:
Marina wrote:
Salve, e' probabilmente una domanda banale ma sto lavorando il maglione con i ferri circolari in tondo piuttosto che avanti e indietro e con una lavorazione rasata piuttosto che con schema. Mi potreste dire dove vanno inseriti i segnapunti per i fianchi? Non capisco dove li devo mettere, quindi quanti punti devo avere rispettivamente sul davanti e sul dietro dopo che ho fatto il bordo iniziale a coste 1/1. Grazie in anticipo. Marina
14.02.2020 - 15:21DROPS Design answered:
Buongiorno Marina. Generalmente si dividono le maglie in due per il davanti e il dietro. Se ha avviato un numero dispari di maglie, su una delle due parti avrà una maglia in più. Per un aiuto più personalizzato, può rivolgersi al suo rivenditore Drops di fiducia. Buon lavoro!
17.02.2020 - 12:58
![]() Uschi wrote:
Uschi wrote:
Hallo, Ich habe die Jacke gestrickt und sie ist toll. Das Muster zieht sich stark zusammen und spannt daher um den Bauch. Kann ich die Jacke auch glatt rechts stricken? Stimmen dann die Größenangaben in der Anleitung? Oder wird sie dann riesig? Danke für die Antwort
10.02.2020 - 08:52DROPS Design answered:
Lieber Uschi, um dieselben Maßnahmen wie bei der Maßskizze zu haben, soll Ihre Maschenprobe wirklich stimmen, dh in der Breite sowie in der Höhe - hier lesen Sie mehr über Maschenprobe - Seien Sie sicher, Sie die richtige Größe wählen: messen Sie eine ähnliche Jacke die Sie gerne haben, und vergleichen Sie mit der Maßskizze (hier lesen Sie mehr. Viel Spaß beim strickekn!
10.02.2020 - 10:18
![]() Natalia wrote:
Natalia wrote:
Quiero hacer la chaqueta con drops Alaska, no sé cuantos gramos comprar para la talla XL porque al estar hecha originalmente con 2 hilos diferentes no me sirve el convertidor que tenéis en la página. Gracias
26.12.2019 - 09:20DROPS Design answered:
Hola Natalia. Bajo este link puedes ver cómo calcular las cantidades de las lanas: https://www.garnstudio.com/lesson.php?id=14&cid=23. Según estos cálculos vas a necesitar aprox. 24 ovillos de la calidad Alaska para la talla XL
26.12.2019 - 23:44
![]() Amelia wrote:
Amelia wrote:
Is an English translation available for this pattern? I tried using Google translate, but the results confused me. Many thanks!
22.09.2019 - 14:21DROPS Design answered:
Dear Amelia, you can choose the language on the drop menu under the picture. You can find the English translation here. Happy knitting!
22.09.2019 - 19:21
![]() Carolien wrote:
Carolien wrote:
Ik heb ondertussen het antwoord op mijn vraag gelezen in een ander bericht 🙈Nu kan ik morgen het garen gaan bestellen🤗
16.09.2019 - 20:59
![]() Kurt Jürgen Schmitt wrote:
Kurt Jürgen Schmitt wrote:
Sind Vorder- u. Rückenteil ein Teil? Entsprechen die Abnahmen (7 M) die Achseln u. den Armen? Warum werden in der letzen Ärmelreihe die 7 mittl. M abgekettet (Schulter?) ? Ich verstehe nicht wie die drei Teile zs. auf die Nadel gelegt werden und die Raglannaht gestrick wird. Das Video selbst zum Raglan habe ich verstanden.
16.09.2019 - 17:56DROPS Design answered:
Lieber Her Schmitt, die Jacke wird von unten nach oben in nur einem Teil (= also von dem rechten Vorderteil bis zum linken Vorderteil, von der Vorderseite gesehen) bis zum Armausschnitt gestrickt, dann werden die Maschen für die Ärmel abgekettet und alle Maschen stillgelegt. Die Ärmel jetzt stricken (bis zum Armausschnitt), und dann alle Teilen zusammen stricken - siehe Video. Viel Spaß beim stricken!
17.09.2019 - 10:28
![]() Carolien wrote:
Carolien wrote:
Ik wil dit vest graag breien maar ik begrijp dat dit vest met twee verschillende garens samen gebreid wordt? En van de Karisma Superwash heb ik meer nodig dan de Alcalpa?
16.09.2019 - 16:24DROPS Design answered:
Dag Carolien,
Ja dat klopt. Het vest wordt met 2 draden gebreid en omdat Alpaca meer uitloopt (er zitten meer meters op 50 gram) heb je daar minder bollen van nodig.
17.09.2019 - 08:04
![]() Ana Barreiro wrote:
Ana Barreiro wrote:
Me gustaria tejer este chaleco pero no con aguja circular. Me podrian enviar el patron. Desde ya mil gracias
22.08.2019 - 16:45DROPS Design answered:
Hola Ana. No enviamos los patrones personalizados. Aquí puedes consultar como trabajar el patrón para una aguja circular con agujas rectas: https://www.garnstudio.com/lesson.php?id=13&cid=23
28.08.2019 - 20:55
![]() Manja wrote:
Manja wrote:
Hallo, ich würde die Jacke gerne von oben stricken. Wie stelle ich das am einfachsten an? Anleitung rückwärts lesen? Ich stricke generell lieber von oben. Dann muss ich nix zusammen nähen und ich kann die Länge des Rumpfes und der Ärmel schöner anpassen. Ich hoffe Sie können mir weiterhelfen. Vielen Dank Manja
31.03.2019 - 17:36DROPS Design answered:
Liebe Manja, leider können wir nicht jede Anleitung nach jeder Anfrage anpassen am besten nehmen Sie bitte Kontakt mit Ihrem DROPS Laden auf - auch telefonisch oder per E-Mail oder einen Strickforum. Viel Spaß beim stricken!
01.04.2019 - 13:50
![]() Dominique wrote:
Dominique wrote:
Bonjour, j'ai commencé le raglan comme indiqué : 5 m avant le marqueur pour le dos/devant et 2 m avant le marqueur pour les manches. Dois-je continuer ainsi pour les 3ème, 5ème (etc) rangs, ou continuer les diminutions en passant à 3 m avant les marqueurs pour le dos/devant et juste avant le marqueur pour les manches comme indiqué au début ? D'autre part, les diminutions sont-elles à exécuter dans le même ordre, qu'on arrive sur les manches ou qu'on les quitte ? Merci.
22.03.2019 - 18:51DROPS Design answered:
Bonjour Dominique, vous commencez à diminuer pour le raglan 5 m avant le marqueur du dos/du devant mais 2 mailles avant le marqueur des manches (= les 2 dernières mailles du devant droit/du dos). Ces diminutions sont à répéter à chaque marqueur (= 8 diminutions par rang). Bon tricot!
25.03.2019 - 08:35
|
|||||||
Richard |
|||||||
|
|
|||||||
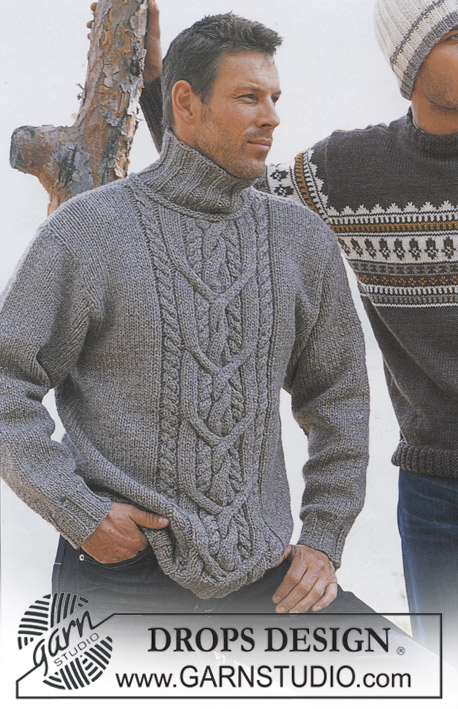
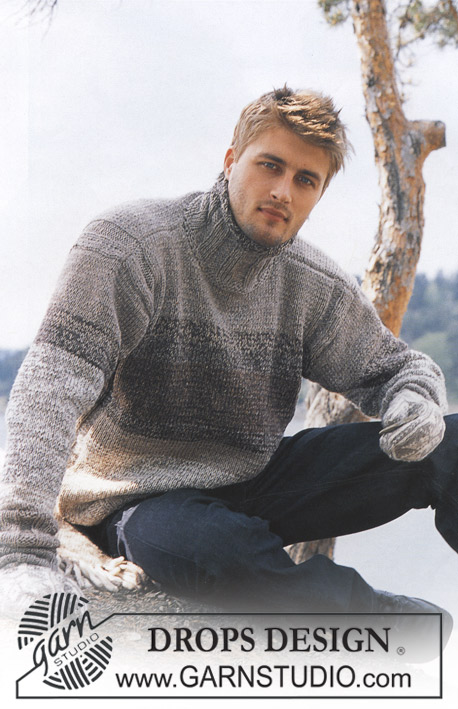
Knitted jacket for men, with raglan, high neck and zipper in DROPS Karisma and DROPS Alpaca
DROPS 85-13 |
|||||||
|
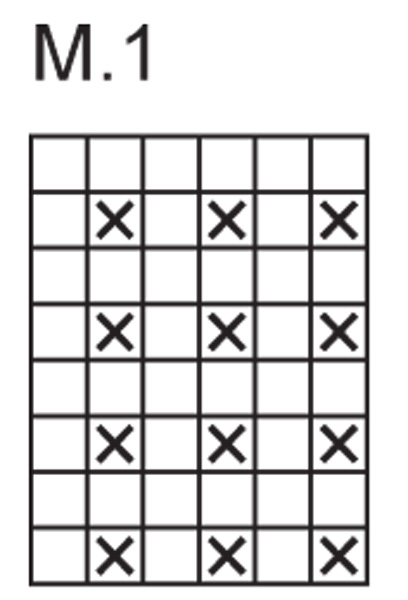
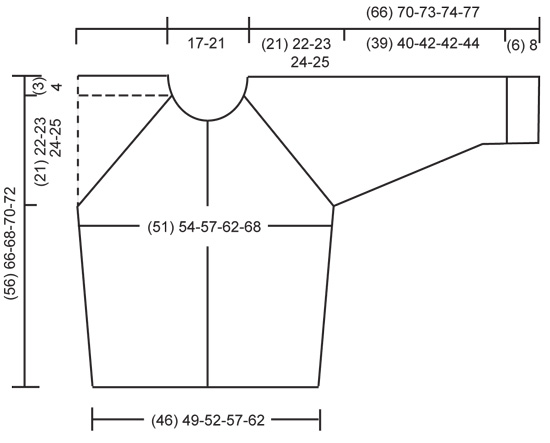
Gauge: 15 sts x 21 rows with 1 strand of each yarn on larger needles in stockinette st = 10 x 10 cm. Rib: *K 1, P 1*, repeat from *-*. Pattern: The diagrams are showing all rows seen from the right side. Decreasing tips (for raglan): All decs are made on the right side. On front- and back piece dec before the 3 sts before/after the marker, and on the sleeves dec right beside the marker. Start 2 sts before the marker on the sleeves and 5 sts before the marker on front and back, and work as follows: K 2 tog, 1 st in seed st, K 1, 1 st in seed st, slip 1 st as if to knit, K 1, psso. ___________________________________________________________________ BODY The cardigan are worked back and fort on circular needle. Cast on 137-147-155-171-187 sts on smaller circular needles with 1 strand Karisma + 1 strand Alpaca. Knit rib, keeping 3 sts in garter st at each side for front edges, and begin and end rib with K 1 (seen from the right side). When the piece measures 3-4-4-4-4 cm change to larger circular needles and Pattern 1, keeping 3 sts in garter st at each side for front edges. See that the K rib in the pattern is above the K rib in ribbing. Place a marker in the 36-38-40-44-48th st in from each side (it will be a K 1), there are 65-71-75-83-91 sts between markers on back. When the piece measures 10-12-12-12-12 cm inc 1 st at each side of both sts with markers. Inc every 5-6-6-6-6 cm a total of 4 times = 153-163-171-187-203 sts – knit the increased sts into the pattern as you go along. When the piece measures 32-40-41-42-43 cm bind off 7 sts at each side for armholes (= bind off the st with the marker + 3 sts each side of that st) = 67-73-77-85-93 sts on back and 36-38-40-44-48 sts on each front. Lay piece aside and knit the sleeves. SLEEVES Sleeves knitted in the round. Cast on 32-34-36-36-40 sts on smaller double-pointed needles with 1 strand Karisma + 1 strand Alpaca; join and place a marker at the join. Knit rib – start with K 1 at marker. When the piece measures 6-8-8-8-8 cm change to larger double-pointed needles and Pattern 1 – see that the K rib in the pattern is above the K rib in the ribbing. When the piece measures 10-14-10-14-10 cm inc 1 st each side of the K st at marker every 2.5-2-2.5-2-2.5 cm a total of 14-16-16-17-17 times = 60-66-68-70-74 sts – knit the increased sts in the pattern as you go along. When the piece measures 45-48-50-50-52 cm bind off 7 sts at marker (bind off the the K st at marker + 3 sts each side of it) = 53-59-61-63-67 sts. Lay piece aside and knit second sleeve. YOKE Put the sleeves in on the same circular needles as Body where you bound off for armholes = 245-267-279-299-323 sts Put a marker in each transition between Body and sleeves = 4 markers. Knit 3-1-1-1-0 rows before beginning shaping. Read entire section before knitting: Raglan shaping: Dec at each side of all markers (= 8 decs) – see Decreasing tips above – every other row 21-23-24-25-27 times. Neck: When the piece measures 49-57-59-60-62 cm put 3-4-5-6-6 sts at each center front edge on st holders for the neck. Then bind off at each neck edge every other row: 2 sts 2-0-0-2-4 times and 1 st 2-6-6-4-2 times. After all shaping is complete 59-63-65-71-75 sts remain. Neckband: Pick up and knit approx. 10-16 sts at each side of neck on fronts (including sts on st holders) with 1 strand of each yarn and put all sts on smaller circular needles. K 1 row from wrong side, then K 1 row from right side, adjusting (inc/dec) to 83-83-91-103-111 sts on 2nd row. Then knit rib, keeping 3 sts in garter st at each side and beginning rib with K 1 (as seen from the right side). When the collar measures 20-22-22-24-24 cm bind off all sts in rib. ASSEMBLY Sew opening under the sleeve. Sew in zipper – start at lower edge. Fold the collar in half to wrong side and stitch in place, covering end of zipper. |
|||||||
Diagram explanations |
|||||||
|
|||||||
 |
|||||||
 |
|||||||
Have you finished this pattern?Tag your pictures with #dropspattern or submit them to the #dropsfan gallery. Do you need help with this pattern?You'll find 24 tutorial videos, a Comments/Questions area and more by visiting the pattern on garnstudio.com. © 1982-2026 DROPS Design A/S. We reserve all rights. This document, including all its sub-sections, has copyrights. Read more about what you can do with our patterns at the bottom of each pattern on our site. |
|||||||


With over 40 years in knitting and crochet design, DROPS Design offers one of the most extensive collections of free patterns on the internet - translated to 17 languages. As of today we count 324 catalogues and 12291 patterns translated into English (UK/cm). 12291
We work hard to bring you the best knitting and crochet have to offer, inspiration and advice as well as great quality yarns at incredible prices! Would you like to use our patterns for other than personal use? You can read what you are allowed to do in the Copyright text at the bottom of all our patterns. Happy crafting!
Post a comment to pattern DROPS 85-13
We would love to hear what you have to say about this pattern!
If you want to leave a question, please make sure you select the correct category in the form below, to speed up the answering process. Required fields are marked *.