
Popular categories
Looking for a yarn?


Comments / Questions (30)
![]() Nancy wrote:
Nancy wrote:
Thank you for your prompt reply. Increases: On row 2, wrong side, after increase , do I count the edge stitch as 1 of the 2 stocking stitches?
31.01.2022 - 13:52DROPS Design answered:
Dear Nancy, the first 2 stitches increased (in height) will be worked in stocking stitch (= purled from WS and knitted from RS), then the next 2 stitches increased (in height) will be worked in garter stitch, so that the pattern is now matching again, repeat these 4 increases, pattern is now working on each side - same when decreasing, pattern will be broken until all decreases are done. Happy knitting!
31.01.2022 - 17:44
![]() Nancy wrote:
Nancy wrote:
When doing increases the pattern established is lost, is this correct? Once I've added 2 stitches on increase row the pattern changes in row 2 - (first 2stitches are in stocking & next 2 in garter St so now you end with 2 knits (not purl) which means you do Not end row as you started it - with 2purl ?
31.01.2022 - 02:37DROPS Design answered:
Dear Nancy, correct, until all increases are done, pattern established is lost - see also last picture where balaclava lies flat, it might help you. Happy knitting!
31.01.2022 - 10:14
![]() Aslaug Arnadottir wrote:
Aslaug Arnadottir wrote:
Update: ja, jeg har misforstået opskriften! Nu har jeg styr på det. Beklager forstyrrelsen. 😊
18.01.2022 - 15:01
![]() Aslaug Arnadottir wrote:
Aslaug Arnadottir wrote:
Jeg har et spørgsmål til antallet af masker, når alle ud- og indtagninger er foretaget. I opskriften står der at maskeantallet for str. L skal være 112, men jeg vil så gerne have det til at være 120, da der først tages ud 8X2 masker, hvorefter der både tages ud og ind 4 gange, som opvejer hinanden. Har jeg mon misforstået opskriften? Mange tak og med venlig hilsen. Áslaug
18.01.2022 - 13:16
![]() Nancy wrote:
Nancy wrote:
Im back again. I have re-read the directions again and again and I may be misunderstanding what you mean in the first paragraph - short overview - from mid front and backwards ? what does this mean? Thank you
15.01.2022 - 22:15DROPS Design answered:
Dear Nancy, this means that you work from the middle of the front part (where the face is) towards the back of the head. Then you pick up stitches on each side of the central part, so you work the stitches on one side, the ones from the center, and the stitches on the other side. From there, you work down. Happy knitting!
17.01.2022 - 00:23
![]() Nancy Elizabeth Flora wrote:
Nancy Elizabeth Flora wrote:
Hello, I want so much to make this pattern but I am having a problem with the mid-section: the sides are different. I may not be working A1 correctly. I work rows I work rows 1 - 3 per the chart and for row 4 work until the last three stitches and Knit two (instead of purl) . But the two sides come out differently. I hope I have explained myself clearly. Thank you, I would love to make this hat as my grand-daughter loves it. Nancy
15.01.2022 - 21:54DROPS Design answered:
Dear Nancy, you should work row 4 as row 2, following the diagram. Don't forget that on one side of the balaclava A.1 is worked back and forth and on the other one in the round. So the diagram has to be read differently in each case. Happy knitting!
17.01.2022 - 00:26
![]() Margi wrote:
Margi wrote:
Was bedeutet: Der Mittelteil wird in Hin- und Rückreihen auf der Rundnadel ab dem vorderen Rand über den Rand nach hinten?
06.12.2021 - 16:17DROPS Design answered:
Liebe Margi, der Anschlagsrand vom Mittelteil wird gegen der Stirn/der Vordertseite sein und Sie stricken von vorne nach hinten in Reihen. Viel Spaß beim stricken!
07.12.2021 - 07:08
![]() Dea wrote:
Dea wrote:
Buonasera, alla fine della lavorazione del collo, dice di fare un giro rovescio e poi di intrecciare senza stringere a diritto...dalla foto il giro a rovescio non si nota, sembra che il lavoro venga chiuso dopo l'ultimo ferro con 3 diritti e 3 rovesci. Grazie.
23.02.2021 - 19:44DROPS Design answered:
Buonasera Dea, abbiamo inoltrato la sua segnalazione al settore design: se ci dovessero essere correzioni le troverà direttamente online nei prossimi giorni. Buon lavoro!
23.02.2021 - 23:39
![]() Dea wrote:
Dea wrote:
Un'altra domanda: nel collo dice di aumentare prima le sezioni a diritto da 2 m a 3 m e otteniamo 150 m (taglia piccola) poi di aumentare le sezioni a legaccio da 2 m a 3 m e mi dice sempre 150 m ...mi sembra strano? Ho notato che anche la versione norvegese dice gli stessi numeri, ma per me c'è un errore.
22.02.2021 - 17:50DROPS Design answered:
Buonasera Dea, abbiamo inoltrato la sua segnalazione al settore design: se ci dovessero essere correzioni le troverà direttamente online nei prossimi giorni. Buon lavoro!
23.02.2021 - 23:39
![]() Dea wrote:
Dea wrote:
Buongiorno, avrei bisogno un chiarimento. Dove parla degli aumenti (SUGGERIMENTO PER GLI AUMENTI ) dice "Aumentare all’interno delle 7 maglie più esterne a ogni lato. " , nelle 7 maglie è compresa anche la maglia di vivagno?
22.02.2021 - 11:27DROPS Design answered:
Buonasera Dea, si, sono 7 maglie in totale. Buon lavoro!
22.02.2021 - 21:51
|
|||||||
Northern Spirit#northernspiritbalaclava |
|||||||
 |
 |
||||||
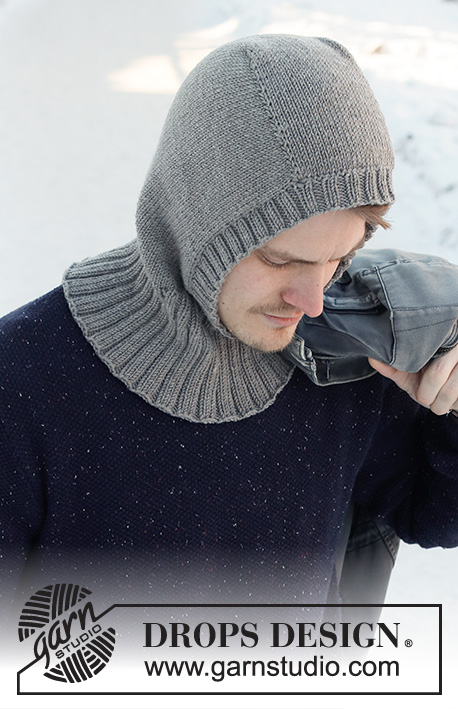
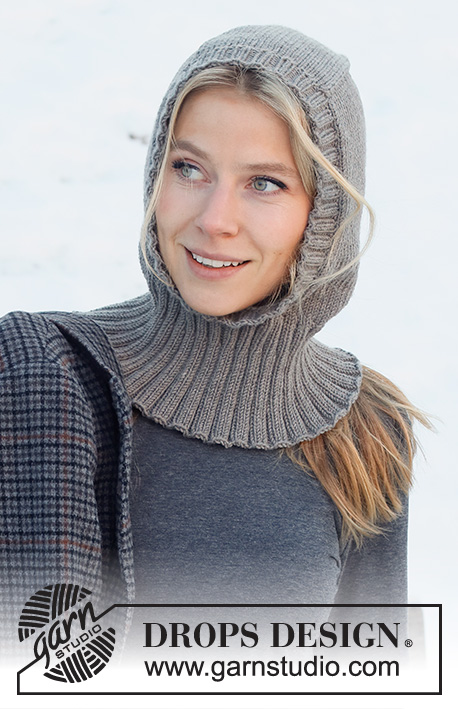
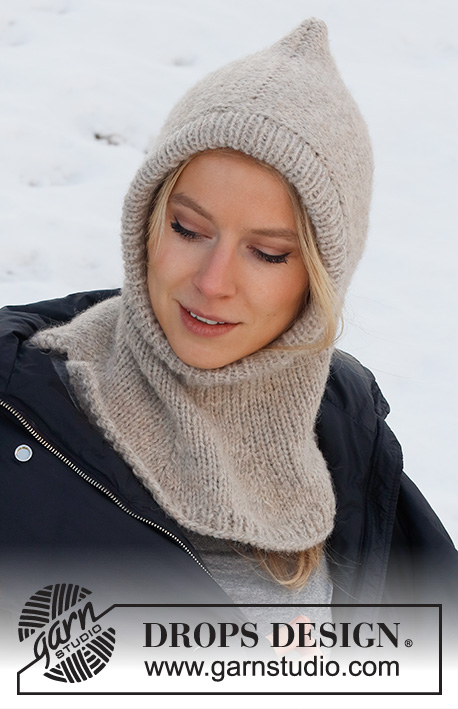
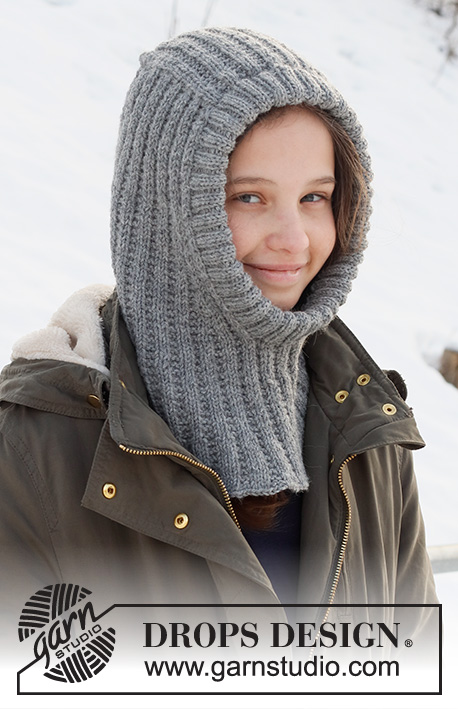
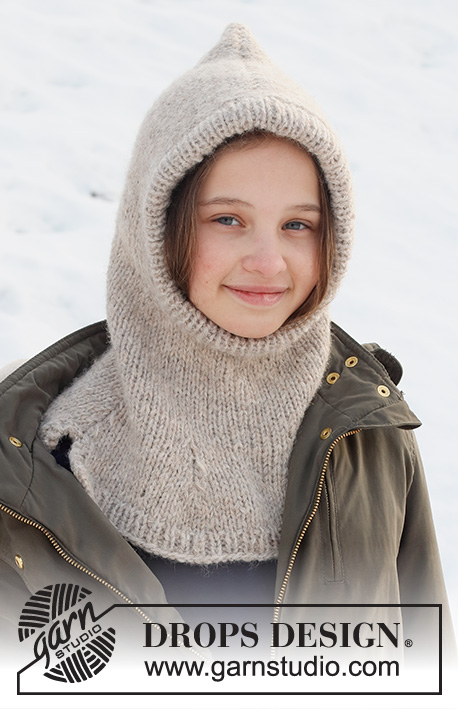
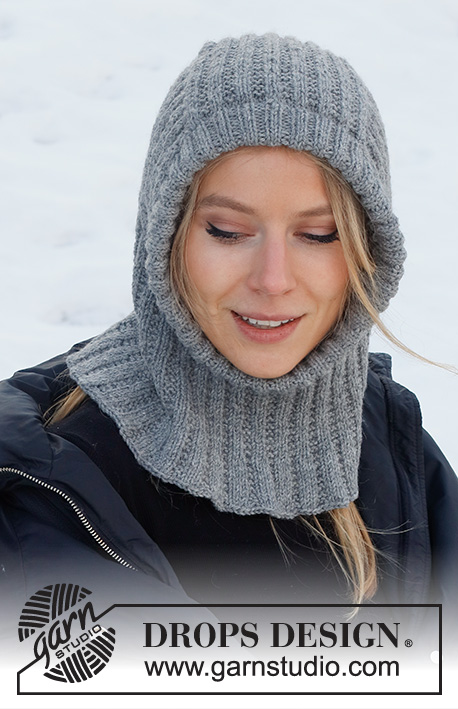
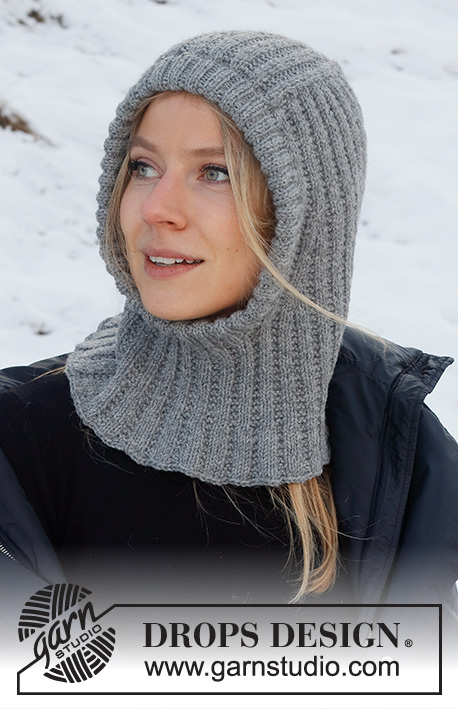
Knitted hat / balaclava in DROPS Lima. The piece is worked with textured pattern and ribbed edging.
DROPS 214-70 |
|||||||
|
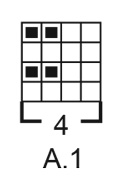
------------------------------------------------------- EXPLANATIONS FOR THE PATTERN: ------------------------------------------------------- RIDGE/GARTER STITCH (worked back and forth): Knit all rows. 1 ridge in height = Knit 2 rows. PATTERN: See diagram A.1. The diagram shows all rows in the pattern from the right side. INCREASE TIP (for sides of face-opening): Increase on the inside of the outermost 7 stitches on each side. All increases are worked from the right side! Increase 1 stitch by making 1 yarn over. On the next row (wrong side) work the yarn overs twisted to avoid holes. The increased stitches are worked into A.1, i.e. the first 2 stitches are worked in stocking stitch, the next 2 in garter stitch, the next 2 in stocking stitch, etc.. DECREASE TIP (mid-back): All decreases are worked from the right side! Start 4 stitches before the marker thread mid-back, knit 2 together, knit 4 (marker thread sits between these 4 stitches), slip 1 stitch as if to knit, knit 1 and pass the slipped stitch over the knitted stitch (= 2 stitches decreased). CASTING-OFF TIP: To avoid the cast-off edge being tight you can cast off with a larger size needle. If the edge is still tight, make 1 yarn over after approx. each 8th stitch at the same time as casting off; the yarn overs are cast off as normal stitches. ------------------------------------------------------- START THE PIECE HERE: ------------------------------------------------------- BALACLAVA – SHORT OVERVIEW OF THE PIECE: The middle section is worked back and forth with circular needle, from mid front and backwards. Stitches are knitted up on each side of this section. The piece is continued back and forth before stitches are cast on for the neck mid-front. The rest of the balaclava is finished in the round with circular needle. A ribbed edge is worked around the face-opening to finish. MID-SECTION: Cast on 32-32 stitches (including 1 edge stitch on each side) with circular needle size 3.5 mm and Lima. Purl 1 row from the wrong side. The next row is worked as follows from the right side: 1 edge stitch in GARTER STITCH – read description above, work A.1 until there are 3 stitches left, work the first 2 stitches in A.1 (so the pattern begins and finishes in the same way) and finish with 1 edge stitch in garter stitch. Continue this pattern. REMEMBER THE KNITTING TENSION! When the piece measures 14-16 cm, cast off the 1 edge stitch on each side = 30-30 stitches. Cut the strand. Then work the hood as described below. HOOD: Now knit up stitches on each side of the middle section on the next row from the right side as follows: Knit up 33-37 along the side of the mid-section inside the 1 edge stitch, continue A.1 as before over the 30-30 stitches on the needle and knit up 33-37 stitches along the other side of the mid-section inside the 1 edge stitch = 96-104 stitches. Insert 1 marker thread in the middle of the row (= mid-back). Allow the thread to follow your work onwards; it is used later when decreasing mid-back. THE PIECE IS NOW MEASURED FROM WHERE THE MARKER THREAD WAS INSERTED! Continue A.1 back and forth with 1 edge stitch in garter stitch on each side towards mid-front – the pattern should match the pattern on the middle section. Then increase on each side towards mid front and decrease mid-back as described below – read the sections on increasing and decreasing before continuing! INCREASES ON EACH SIDE TOWARDS MID FRONT: When the piece measures 10-12 cm from where the marker thread was first inserted, increase 1 stitch on each side towards mid front – read INCREASE TIP (= 2 stitches increased). Increase like this every 4th row (i.e. every 2nd row from the right side) a total of 8 times on each side. DECREASING MID-BACK: AT THE SAME TIME when you are about to increase for the 5th time, decrease 2 stitches mid-back – read DECREASE TIP. Decrease like this every 4th row a total of 4 times (the increases and decreases finish at the same time). After all the increases and decreases there are 104-112 stitches. When the piece measures 21-23 cm from where the marker thread was first inserted, cast on stitches mid-front for the neck; you can try the balaclava on and work to the desired length. Cast on 16-20 stitches at the end of the next row from the right side = 120-132 stitches. Remove the marker thread and insert 1 marker on the row. THE PIECE IS NOW MEASURED FROM THIS MARKER. Work the neck as described below. NECK: Continue working in the round with A.1 over all stitches – make sure the pattern matches the whole way round. When the piece measures 9-10 cm from the marker on the neck, increase all knit 2 sections to knit 3 by making 1 yarn over after each knit 2 (the yarn overs are knitted twisted on the next round) = 150-165 stitches. Continue working until the piece measures 12-13 cm from the marker. Now increase all 2 garter stitches to 3 garter stitches by making 1 yarn over after all 2 garter stitches = 180-198 stitches. Work 1 round with knit 3, 3 garter stitches (the yarn overs are worked twisted to avoid holes). Then cast off loosely with knit – read CASTING-OFF TIP. The piece measures approx. 41-44 cm from the middle of the mid-section and down. EDGE AROUND FACE-OPENING: Start from the right side at the bottom, where stitches were cast on for the neck, and knit up 160 TO 180 stitches around the opening, inside the 1 edge stitch using short circular needle size 3 mm and Lima. The number of stitches should be divisible by 4. Work rib in the round (knit 2, purl 2) for 6-6 cm – make sure the rib matches the stitches on the mid-section and on the cast-on stitches on the neck. Loosely cast off with knit over knit and purl over purl – read CASTING-OFF TIP. Fold the rib double to the inside and sew down. To avoid the edge being tight and rolling outwards, it is important the seam is elastic. |
|||||||
Diagram explanations |
|||||||
|
|||||||
 |
|||||||
Have you finished this pattern?Tag your pictures with #dropspattern #northernspiritbalaclava or submit them to the #dropsfan gallery. Do you need help with this pattern?You'll find 23 tutorial videos, a Comments/Questions area and more by visiting the pattern on garnstudio.com. © 1982-2026 DROPS Design A/S. We reserve all rights. This document, including all its sub-sections, has copyrights. Read more about what you can do with our patterns at the bottom of each pattern on our site. |
|||||||


With over 40 years in knitting and crochet design, DROPS Design offers one of the most extensive collections of free patterns on the internet - translated to 17 languages. As of today we count 324 catalogues and 12290 patterns translated into English (UK/cm). 12290
We work hard to bring you the best knitting and crochet have to offer, inspiration and advice as well as great quality yarns at incredible prices! Would you like to use our patterns for other than personal use? You can read what you are allowed to do in the Copyright text at the bottom of all our patterns. Happy crafting!
Post a comment to pattern DROPS 214-70
We would love to hear what you have to say about this pattern!
If you want to leave a question, please make sure you select the correct category in the form below, to speed up the answering process. Required fields are marked *.