
Popular categories
Looking for a yarn?


Comments / Questions (53)
![]() Nath wrote:
Nath wrote:
Jolie veste, réalisée sans problème, j'en suis très contente !
28.05.2013 - 21:07
![]() Ada Goldsmid wrote:
Ada Goldsmid wrote:
Geachte lezer, De maataanduidingen zijn aangegeven met s, m, l enz. Welke maat moet ik hebben voor een bovenwijdte van 102? Deze vraag geldt ook voor een aantal andere modellen. Kunt u hier een algemeen antwoord op geven? Of kan ik het zelf ergens terug vinden? Bij voorbaat dank, Met vriendelijke groet, Ada Goldsmid
02.05.2013 - 21:57DROPS Design answered:
Beste Ada. Kijk onderaan het patroon. Hier vind je de maattekening met de afmetingen in cm per maat. Vergelijk deze met je eigen afmetingen en kies je maat. Veel haakplezier!
03.05.2013 - 10:01
![]() Antoinette wrote:
Antoinette wrote:
Cette petite veste au crochet est trés jolie.
19.09.2012 - 15:49
![]() Marjo wrote:
Marjo wrote:
KBegrijp niet dat je met 41 patroonherhalingen (lijf patroon A1) op 201 steken uitkomt, moet dit niet 40 patroonherhalingen zijn? En bij lijf patroon A2 blijft na toer 2 het stekenaantal gelijk maar dit geldt blijkbaar alleen voor de kleinste drie maten en niet voor de grotere drie, hoe zit dat? Ben overigens enthousiast bezig, leuk patroon!!
18.08.2012 - 21:28DROPS Design answered:
Hoi Marjo. Het heeft eveng geduurd, maar we moesten het patroon doornemen en aanpassen. Er waren inderdaad fouten en deze zijn nu aangepast. Bedankt en veel haakplezier verder.
10.09.2012 - 12:56Melissa wrote:
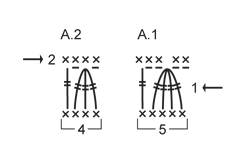
Just wondering what the pattern A.1, A.2 and A.3 are? What's the difference?
10.08.2012 - 04:18DROPS Design answered:
The charts A.1 and A.2 posted below pattern text are different, they have different numbers of sts etc, Pattern A.3 are 2 rows in pattern explained in written text in pattern.
28.08.2012 - 02:46
![]() Cindy Garlotte wrote:
Cindy Garlotte wrote:
Yes,Just what is a Bobble stitch in this pattern?
31.07.2012 - 04:06
![]() Ulrica wrote:
Ulrica wrote:
Wow! Fler så här snygga virkmönster, tack! ;)
20.07.2012 - 18:25
![]() Eve wrote:
Eve wrote:
Trés jolie attend les explquations
16.07.2012 - 07:25Kathy wrote:
I look forward to being able to make this top. MORE crochet patterns please
14.07.2012 - 17:11Pat wrote:
Simple, classy and crocheted. What more does anyone need? Thank you.
10.07.2012 - 13:53
|
||||||||||||||||||||||
Christel#christelcardigan |
||||||||||||||||||||||
|
|
||||||||||||||||||||||
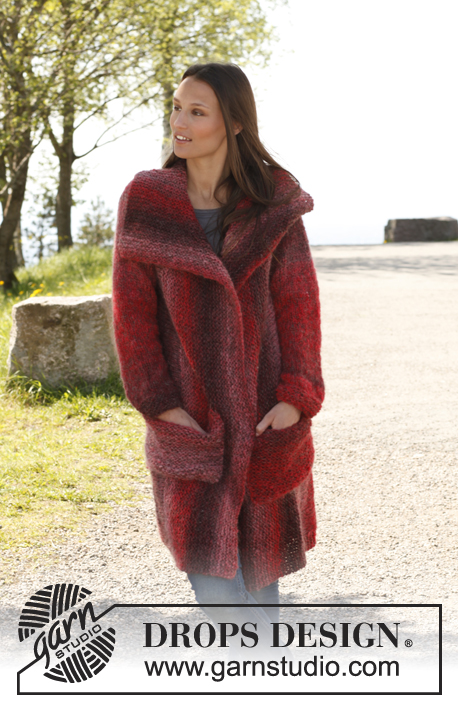
Crochet DROPS vest with round yoke in ”Lima”. Size: S - XXXL.
DROPS 140-7 |
||||||||||||||||||||||
|
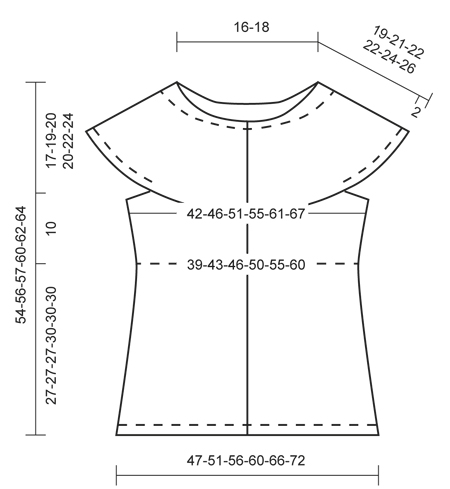
SC ROW: Beg every sc row with ch 1 (not counted as 1st sc), work 1 sc in every st the entire row, turn. PATTERN A.1 (divisible by 5 + 1): ROW 1 (= RS): Ch 4 (= 1 tr) in 1st sc, continue as follows – also see 1st row in diagram A-1: * ch 2, work 1 bobble with 4 tr, ch 2, 1 tr in next sc *, repeat from *-* the entire row, turn piece. ROW 2 (= WS): ch 1, 3 sc in 1st ch-space, skip 1st bobble, 2 sc in next ch-space, continue as follows – also see 2nd row in diagram A-1: * 1 sc in next tr, 2 sc in next ch-space, skip next bobble, 2 sc in next ch-space *, repeat from *-* the entire row, finish with 1 sc more in last ch-space on row (= same no of sc as before). PATTERN A.2 (divisible by 4 + 1): ROW 1 (= RS): Ch 4 (= 1 tr) in 1st sc, continue as follows – also see 1st row in diagram A-2: * ch 1, work 1 bobble with 3 tr, ch 1, 1 tr in next sc *, repeat from *-* the entire row, turn piece. ROW 2 (= WS): ch 1, 2 sc in 1st ch-space, 1 sc in next bobble, 1 sc in next ch-space, continue as follows – also see 2nd row in diagram A-2: * 1 sc in next tr, 1 sc in next ch-space, 1 sc in next bobble, 1 sc in next ch-space *, repeat from *-* the entire row, finish with 1 sc more in last ch-space on row (= same no of sc as before). INCREASE TIP: Inc 1 st by working 2 sts in the same st. DC ROW: Work all dc rows from RS. Beg every dc row with ch 3 (= 1st dc), skip 1st sc from previous row, work 1 dc in every sc the entire row, turn. PATTERN A.3: ROW 1 (= RS): Work 1 dc row. ROW 2 (= WS): Work 1 sc row. ROUNDS WITH SC: Beg every sc round with ch 1 (not counted as 1st sc), work 1 sc in every st the entire round, finish with 1 sl st in 1st sc. DECREASE TIP - SC: Work 1 sc but wait with last pull through (= 2 sts on hook), then work next sc but on last pull through, pull thread through all sts on hook = 1 sc dec over 2 sts -------------------------------------------------------- BODY: Worked back and forth from mid front. Ch 157-172-187-202-222-242 LOOSELY with Lima on hook size 4.5 mm/ US 7, turn and work 1 sc in 2nd ch from hook, then 1 sc in every ch the entire row = 156-171-186-201-221-241 sc, turn (1st row = RS). Work SC ROWS - read explanation above - until piece measures 2 cm / ¾". Then work PATTERN A.1 - read explanation above = 31-34-37-40-44-48 repetitions + 1 tr. When 2ND ROW has been worked, there are 156-171-186-201-221-241 sc on row. REMEMBER THE CROCHET GAUGE! Work A.1 a total of 5-5-5-6-6-6 times vertically - but work last sc row from WS as follows: ch 1, 2 sc in 1st ch-space, 1 sc in next bobble, 1 sc in next ch-space, * 1 sc in next tr, 1 sc in next ch-space, 1 sc in next bobble, 1 sc in next ch-space *, repeat from *-* the entire row, finish with 2 sc in last ch-space = 125-137-149-161-177-193 sc, turn piece. Then work PATTERN A.2 - read explanation above. When 2ND ROW has been worked, there are 125-137-149-161-177-193 sc on row. Work A.2 a total of 5 times vertically - but on last sc row from WS inc 10-10-12-14-16-18 sc evenly - READ INCREASE TIP = 135-147-161-175-193-211 sc. Piece now measures approx. 27-27-27-30-30-30 cm / 10½"-10½"-10½"-11¾"-11¾"-11¾". Continue to work PATTERN A.3 - read explanation above - AT THE SAME TIME on 1st sc row from WS inc 9-9-11-13-15-17 sts evenly = 144-156-172-188-208-228 sc. Work A.3 a total of 6 times (last row = sc row from WS), piece now measures approx. 37-37-37-40-40-40 cm / 14½"-14½"-14½"-15¾"-15¾"-15¾", cut and fasten the thread. Insert 1 marker 36-39-43-47-52-57 sc in from each side on last sc row (= 72-78-86-94-104-114 sc between markers on back piece). SLEEVE EDGE: Worked in the round. Ch 50-52-56-60-64-66 LOOSELY on hook size 4.5 mm/ US 7 with Lima and form a ring with 1 sl st in first ch. Work 1st round as follows: ch 1, then work 1 sc in every ch, finish with 1 sl st in 1st sc at beg of round (= mid under sleeve) = 50-52-56-60-64-66 sc. Continue in the round with ROUNDS WITH SC - read explanation above - until piece measures 2 cm / ¾". Now insert 1 marker on each side of the middle 12-12-12-14-16-16 sts under sleeve = 38-40-44-46-48-50 sc between markers on top of sleeve. Put piece aside and crochet another sleeve edge the same way. YOKE: Insert 1 new marker mid front on body, now measure piece from here. Work 1st row from RS as follows: Work 1 dc in each of the first 30-33-37-40-44-49 sts on right front piece, work 1 dc in each of the 38-40-44-46-48-50 sts from one sleeve edge (i.e. do not work over the 12-12-12-14-16-16 sts between markers mid under sleeve), skip 12-12-12-14-16-16 sts in the middle of the side on body (i.e. 6-6-6-7-8-8 sts on each side of marker), work 1 dc in each of the next 60-66-74-80-88-98 sts (= back piece), work 1 dc in each of the 38-40-44-46-48-50 sts from the other sleeve edge, skip 12-12-12-14-16-16 sts in the side of body (i.e. 6-6-6-7-8-8 sts on each side of marker), and work 1 dc in each of the last 30-33-37-40-44-49 sts on left front piece = 196-212-236-252-272-296 dc. Continue back and forth with A.3 as before - AT THE SAME TIME on 3rd-4th-4th-4th-5th-5th sc row from WS, dec 32-36-40-44-48-54 sc evenly - READ DECREASE TIP - SC. Repeat dec on 6th-7th-7th-7th-8th-8th sc row, then on 8th-9th-9th-9th-10th-11th sc row and finally on 9th-10th-11th-11th-12th-13th sc row = 68-68-76-76-80-80 sc remain (last row = WS), yoke now measures approx. 15-17-18-18-20-22 cm / 7"-8"-8¾" from marker. Do not cut the thread. NECK EDGE: Then work an elevation at the back of neck as follows: ROW 1 (= RS): Beg at the top of right front piece, work ch 1, 1 sc in 1st sc, * ch 1, skip 1 sc, 1 sc in next sc *, repeat from *-* around the neck, turn piece. ROW 2 (= WS): Work 1 sc in every ch and 1 ch over every sc around the neck until 12 sts remain (= 6 sc + 6 ch) on right front piece. ROW 3: Work 1 sc in every ch and 1 ch over every sc until 12 sts remain on left front piece, turn piece. ROW 4: Work 1 sc in every ch and 1 ch in every sc around the neck until 18 sts remain before edge on right front piece (= 9 sc and 9 ch), turn piece. ROW 5: Work 1 sc in every ch and 1 ch over every sc around the neck until 18 sts remain before edge on left front piece, turn piece. ROW 6: Work 1 sc in every ch and 1 ch in every sc around the neck until 24 sts remain before edge on right front piece (= 12 sc and 12 ch), turn piece. ROW 7: Work 1 sc in every ch and 1 ch over every sc until 24 sts remain before edge on left front piece. Do not cut the thread. Then work 1 row with sc in every sc and in every ch, then work sc rows until edge in sc measures 2 cm / ¾" mid front, cut and fasten the thread. ASSEMBLY: Sew the openings under the sleeves. BAND: Work from RS approx. 90 - 110 sc along the entire edge mid front on right front piece (incl neck edge). Then work 1 sc row from WS while AT THE SAME TIME adjusting no of sts to 92-94-98-102-104-108 sc. Insert 1 marker in the transition between A.2 and A.3. On next row from RS work sc - AT THE SAME TIME work 4 buttonholes evenly between marker and at the top edge in the neck (1 buttonhole = work ch 2, skip the next 2 sc) - the last buttonhole should be approx. 1 cm / ½" from the top edge. On next row work 2 sc in every ch-space for buttonhole. Work sc rows until band measures approx. 2 cm / ¾", cut and fasten the thread. Work 1 band along left front piece the same way but without buttonhole. Sew 4 buttons on to left band. |
||||||||||||||||||||||
Diagram explanations |
||||||||||||||||||||||
|
||||||||||||||||||||||
 |
||||||||||||||||||||||
 |
||||||||||||||||||||||
Have you finished this pattern?Tag your pictures with #dropspattern #christelcardigan or submit them to the #dropsfan gallery. Do you need help with this pattern?You'll find 6 tutorial videos, a Comments/Questions area and more by visiting the pattern on garnstudio.com. © 1982-2026 DROPS Design A/S. We reserve all rights. This document, including all its sub-sections, has copyrights. Read more about what you can do with our patterns at the bottom of each pattern on our site. |
||||||||||||||||||||||


With over 40 years in knitting and crochet design, DROPS Design offers one of the most extensive collections of free patterns on the internet - translated to 17 languages. As of today we count 324 catalogs and 12290 patterns - 12280 of which are translated into English (US/in).
We work hard to bring you the best knitting and crochet have to offer, inspiration and advice as well as great quality yarns at incredible prices! Would you like to use our patterns for other than personal use? You can read what you are allowed to do in the Copyright text at the bottom of all our patterns. Happy crafting!
Post a comment to pattern DROPS 140-7
We would love to hear what you have to say about this pattern!
If you want to leave a question, please make sure you select the correct category in the form below, to speed up the answering process. Required fields are marked *.