
Popular categories
Looking for a yarn?


Comments / Questions (64)
Zniker Laila wrote:
Très très joli modèle
06.01.2010 - 17:45
![]() Johanna wrote:
Johanna wrote:
Väldigt snygg! Verkar kunna bli en mysig sommarklänning, till kanske ett par korta shorts. Jättegullig design. Vill göra!
06.01.2010 - 12:19
![]() Stine Buhl wrote:
Stine Buhl wrote:
Den skal mor her da strikke
05.01.2010 - 23:24
![]() ADES wrote:
ADES wrote:
Je cherche à : - soit acheter le modèle 20 ou le modèle 44 - soit à me procurer la fournitures et les explications de ces 2 modèles Merci de votre réponse
30.12.2009 - 14:15
![]() Kristina wrote:
Kristina wrote:
Snygg modell igen!!!
27.12.2009 - 02:45
![]() Rianne wrote:
Rianne wrote:
Dit is werkelijk een mooi patroon. als hij uitkomt brei ik het meteen.
21.12.2009 - 00:10
![]() Ethel wrote:
Ethel wrote:
Fin modell. Jag tror på gladare färger. Modellen passar nog utmärkt för stora storlekar - hoppas ni ordnar det!
20.12.2009 - 16:05
![]() THeMeL wrote:
THeMeL wrote:
Mondo cute!!
16.12.2009 - 01:49
![]() Karin Edensten wrote:
Karin Edensten wrote:
Otroligt vackert fall och struktur. Min absoluta favorit! Den ska jag bära sommaren 2010.
15.12.2009 - 20:31
![]() Ramona wrote:
Ramona wrote:
Romantisch und verspielt, einfach Traumhaft
14.12.2009 - 19:53
|
|||||||
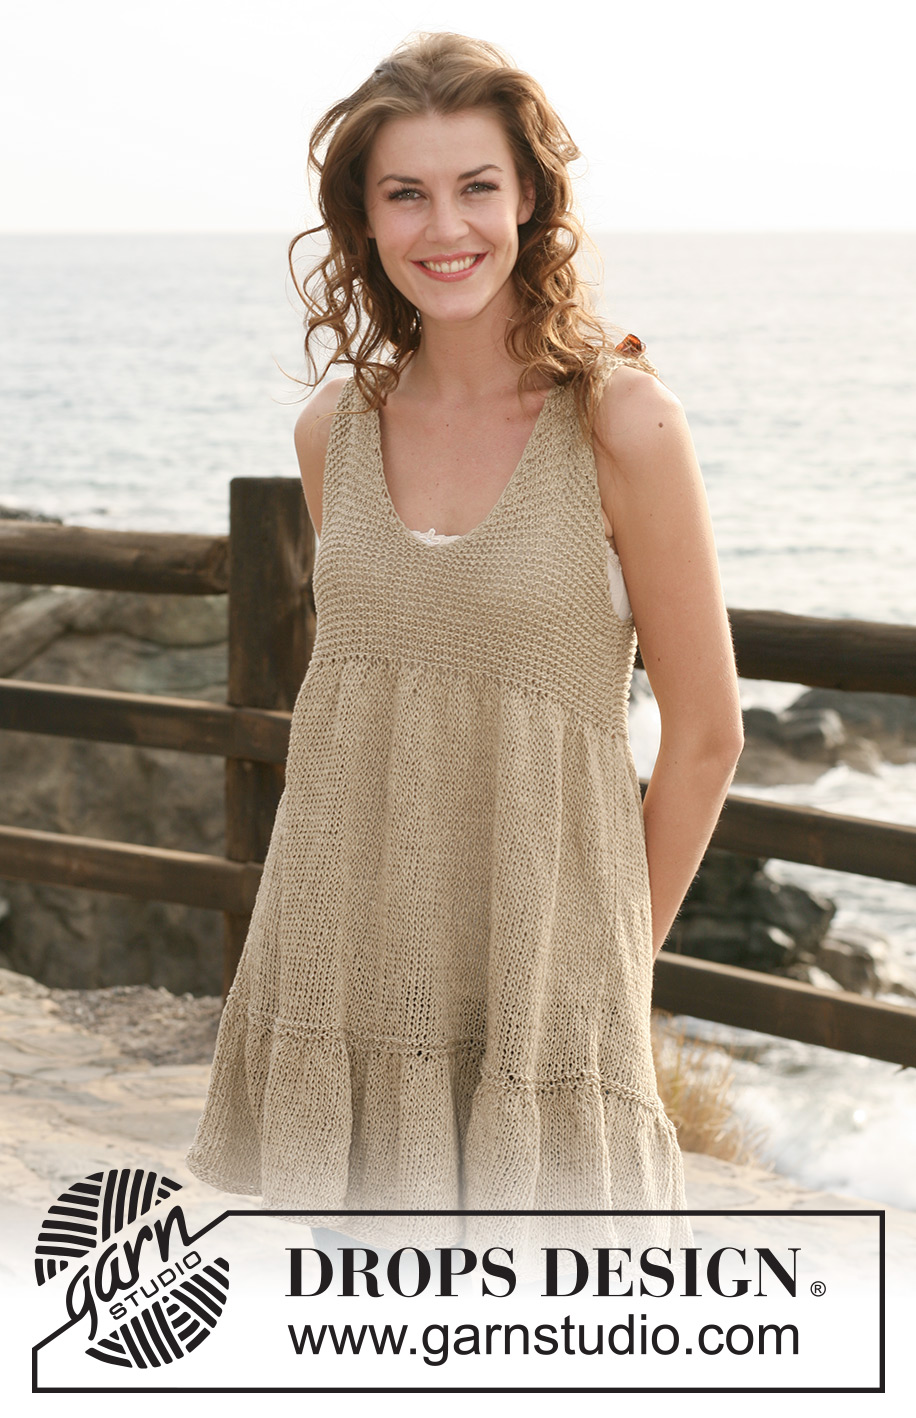
Sunday Morning Stroll#sundaymorningstrolltunic |
|||||||
 |
 |
||||||
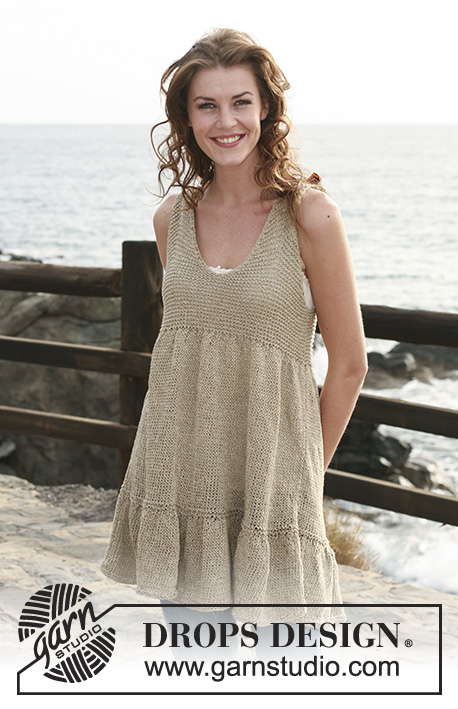
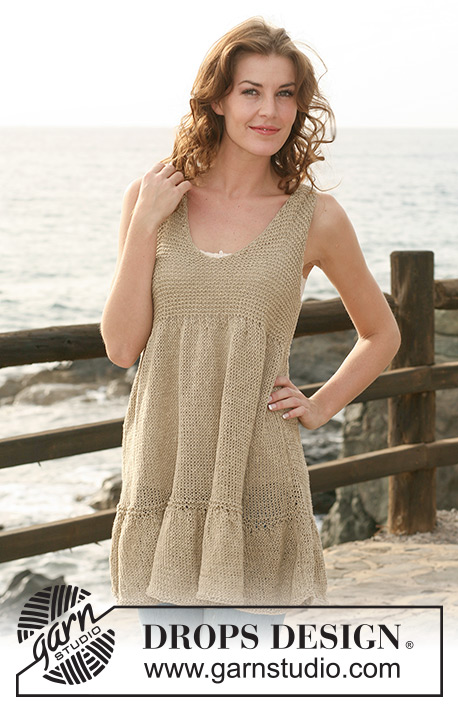
Knitted DROPS tunic with flounce border and garter st in ”Bomull-Lin”. Size S-XXXL.
DROPS 118-3 |
|||||||
|
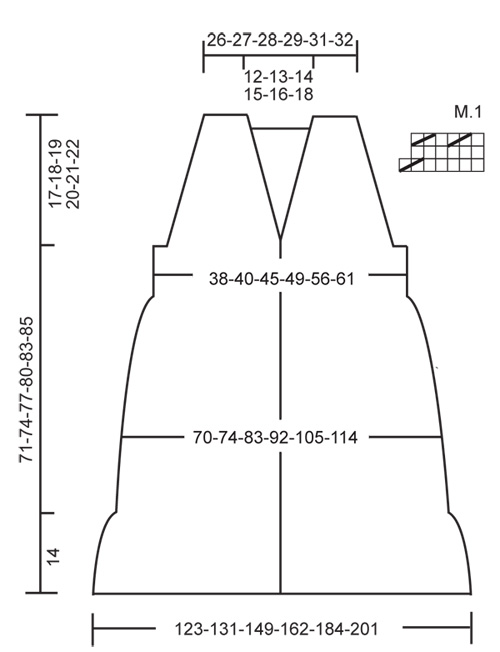
GARTER ST (back and forth on needle): K all rows. MEASUREMENT TIP: Because of the weight of the yarn make all measurements while the garment is hanging, otherwise it will be too long when worn. FLOUNCE BORDER: See diagram M.1 (= 7 sts). Diagram shows the pattern from RS. DECREASING TIP: Dec for armhole and neck on same row as follows: K1, K3 tog, work row to st with marker, 1 YO, K st with marker, 1 YO, work row until 4 sts remain, slip 1 st as if to K, K2 tog, psso, K1 (= 2 dec sts on row). K YO into back of loop on next row. -------------------------------------------------------- -------------------------------------------------------- BACK PIECE: Worked back and forth on circular needle. Cast on 198-212-240-261-296-324 sts (includes 1 edge st each side) on circular needle size 5.5 mm / US 9 with Bomull-Lin. Work 4 rows GARTER ST – see above! Continue in stockinette st. See MEASUREMENT TIP! REMEMBER THE GAUGE! When piece measures 14 cm / 5½" for all sizes work FLOUNCE BORDER on next row from RS as follows – see above: 1 edge st, M.1 on all sts until 1 st remain, finish with 1 edge st. After 1 vertical repeat of M.1 there are 114-122-138-150-170-186 sts on needle. P 1 row from WS. Change to circular needle size 4 mm / US 6. Work 4 rows garter st, AT THE SAME TIME dec 0-1-3-1-0-2 sts evenly on first row = 114-121-135-149-170-184 sts. Change back to circular needle size 5.5 mm / US 9 and continue in stockinette st. When piece measures 45 cm / 17¾" for all sizes work next row from RS as follows: 1 edge st, M.1 on all sts until 1 st remain, finish with 1 edge st. After 1 vertical repeat of M.1 there are 66-70-78-86-98-106 sts on needle. P 1 row from WS. Change to circular needle size 4 mm / US 6 and continue in garter st on all sts. When piece measures 54-56-58-60-62-63 cm / 21¼"-22"-22¾"-23⅝"-24⅜"-24¾" bind off 3 sts at the beg of the next 2 rows for armhole. Bind off to shape the armhole at beg of every row each side: 2 sts 3-3-4-5-7-8 times and 1 st 2-3-4-5-6-7 times = 44-46-48-50-52-54 sts. Bind off when piece measures 69-72-75-78-81-83 cm / 27⅛"-28⅜"-29½"-30¾"-32"-32¾". FRONT PIECE: Cast on and work like back piece until piece measures 54-56-58-60-62-63 cm / 21¼"-22"-22¾"-23⅝"-24⅜"-24¾" (= 66-70-78-86-98-106 sts). Now bind off 2-2-2-4-4-4 sts for armhole at beg of the next 2 rows = 62-66-74-78-90-98 sts. Slip half the sts on a stitch holder (= 31-33-37-39-45-49 sts) and complete each side separately. Side 1: Insert a marker in the middle st (st no 16-17-19-20-23-25). Continue in garter st, AT THE SAME TIME dec to shape the armhole at the side and dec for neck towards mid front on first row from RS – see DECREASING TIP! Repeat the dec on every 4th row a total of 10-11-12-13-14-15 times = 11-11-13-13-17-19 sts. Continue in garter st on these sts for strap and bind off when piece measures 73-76-79-82-85-87 cm / 28¾"-30"-31"-32¼"-33½"-34¼" (front piece longer than back piece because strap goes over shoulder and 2 cm / ¾" down on back piece). Side 2: Like side 1. ASSEMBLY: Sew straps from front piece to the 11-11-13-13-17-19 sts towards the side on back piece. Sew side seams inside 1 edge st. |
|||||||
Diagram explanations |
|||||||
|
|||||||
 |
|||||||
Have you finished this pattern?Tag your pictures with #dropspattern #sundaymorningstrolltunic or submit them to the #dropsfan gallery. Do you need help with this pattern?You'll find 16 tutorial videos, a Comments/Questions area and more by visiting the pattern on garnstudio.com. © 1982-2026 DROPS Design A/S. We reserve all rights. This document, including all its sub-sections, has copyrights. Read more about what you can do with our patterns at the bottom of each pattern on our site. |
|||||||


With over 40 years in knitting and crochet design, DROPS Design offers one of the most extensive collections of free patterns on the internet - translated to 17 languages. As of today we count 324 catalogs and 12290 patterns - 12280 of which are translated into English (US/in).
We work hard to bring you the best knitting and crochet have to offer, inspiration and advice as well as great quality yarns at incredible prices! Would you like to use our patterns for other than personal use? You can read what you are allowed to do in the Copyright text at the bottom of all our patterns. Happy crafting!
Post a comment to pattern DROPS 118-3
We would love to hear what you have to say about this pattern!
If you want to leave a question, please make sure you select the correct category in the form below, to speed up the answering process. Required fields are marked *.