
Popular categories
Looking for a yarn?


Comments / Questions (64)
![]() Charlotte wrote:
Charlotte wrote:
Jeg har købt garn til denne og tænker på om det ændrer noget, hvis jeg strikker den rundt? Vil den da dreje sig?
22.03.2012 - 16:06DROPS Design answered:
Hej, Normalt betyder det ikke noget om du vælger at strikke rundt istedet for frem og tilbage. Nogle gange vurderer Design at tøjet vil få bedre formstabilitet med sidesømme, men det er naturligvis en smags sag. God fornøjelse!
28.03.2012 - 14:25
![]() Beverly wrote:
Beverly wrote:
Thank you!
30.04.2011 - 14:56
![]() DROPS Design wrote:
DROPS Design wrote:
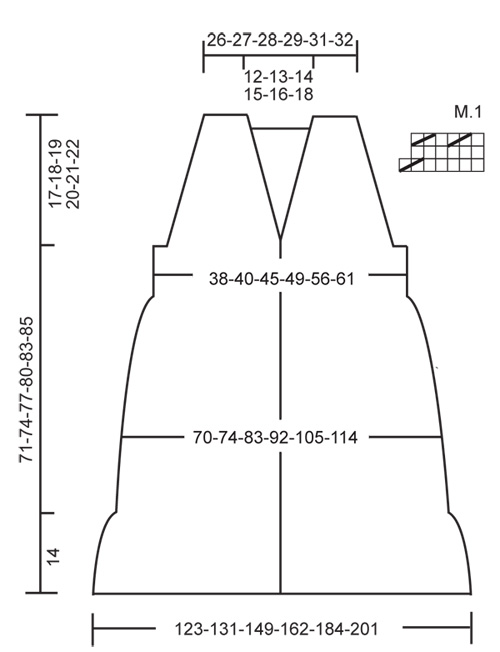
The name of the chart is M.1. The chart shows you one repeat. In first row of chart you K tog every 6th and 7th st on row. Second row no dec, third row K tog every 2nd and 3rd st on row.
29.04.2011 - 21:23
![]() Beverly wrote:
Beverly wrote:
What does M.1 mean? Chart does NOT help. Is it an increase, a decrease, something else? Help!
29.04.2011 - 21:08
![]() Henna wrote:
Henna wrote:
I can't understand that M.1 pattern, could someone clarify that? :)
29.11.2010 - 22:29
![]() Orla Treacy wrote:
Orla Treacy wrote:
This does not really help. I dont understand the pattern. wd u be able to go through the first few stitches on the needle. I cannot go to the shop as i purchased the wool on the internet. thank you , Orla
06.05.2010 - 18:07
![]() Drops Design wrote:
Drops Design wrote:
Orla, M.1 refers to the chart located after the pattern text.
06.05.2010 - 17:16
![]() Orla Treacy wrote:
Orla Treacy wrote:
Please help i cannot figure out the flounce border.What is M.1 is that not make 1 wd i therefore double my stiches instead of ending up with 122stiches on the next row.help
06.05.2010 - 12:39Manuela wrote:
Bello me gusta mucho
06.03.2010 - 21:59
![]() Trine wrote:
Trine wrote:
Er der en størrelsesguide til denne opskrift??
04.03.2010 - 10:46
|
|||||||
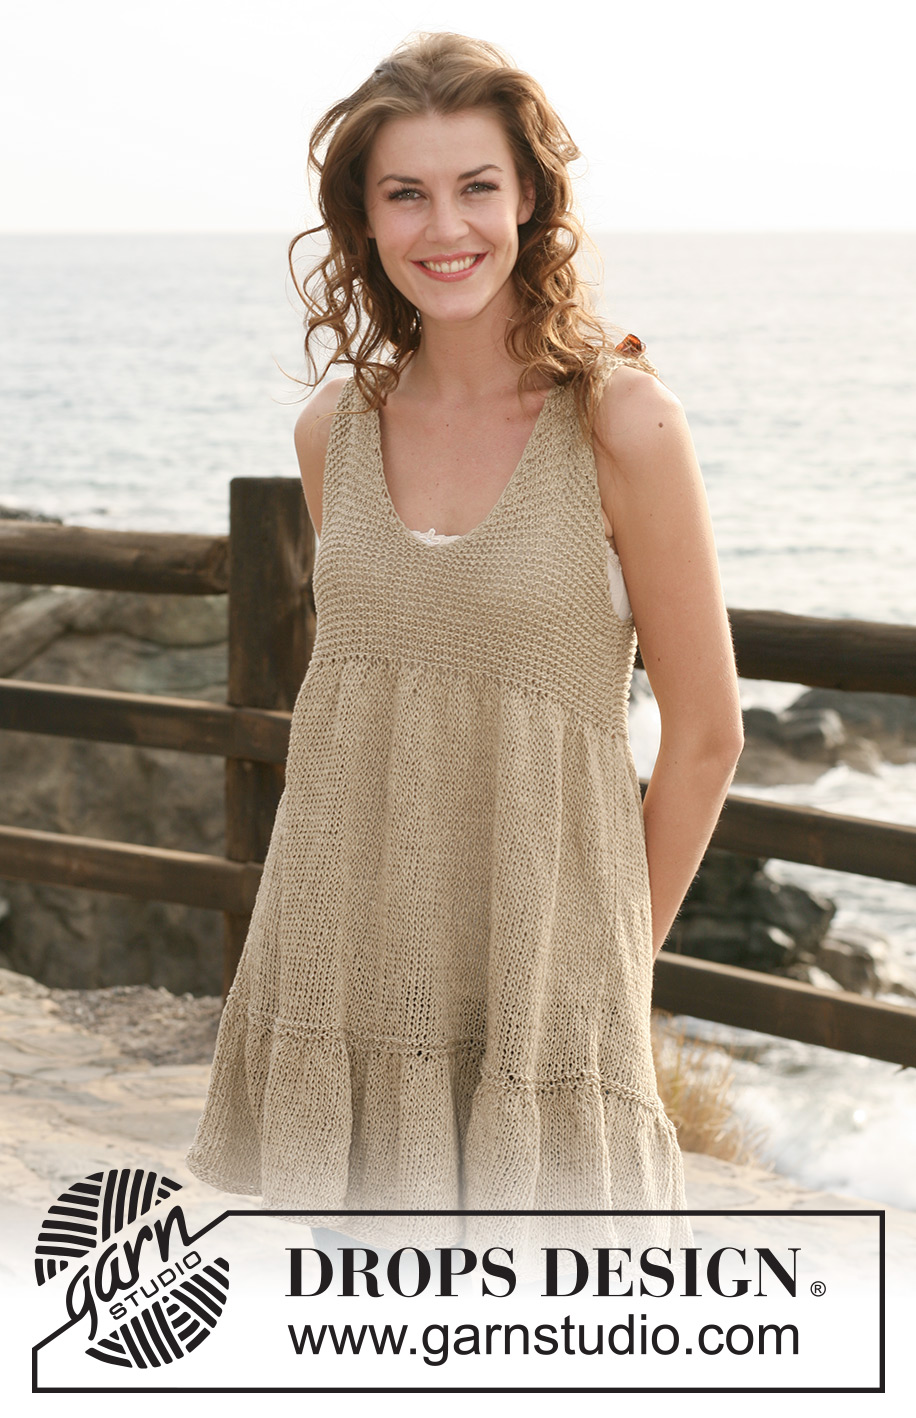
Sunday Morning Stroll#sundaymorningstrolltunic |
|||||||
 |
 |
||||||
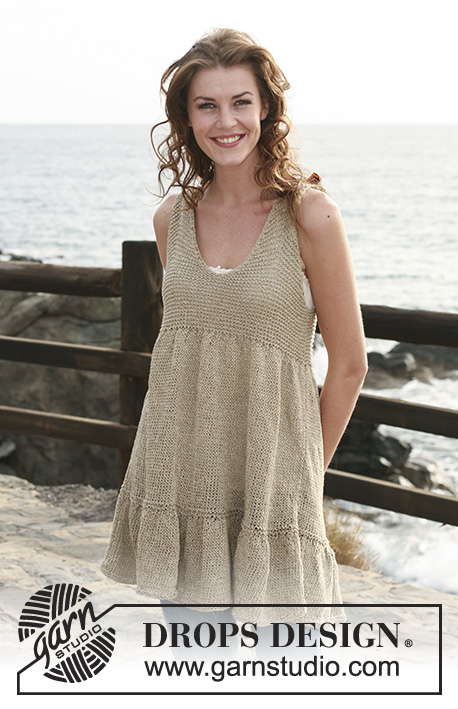
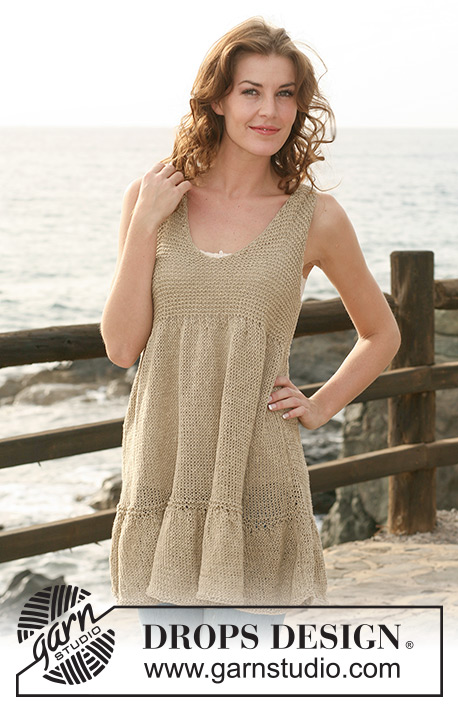
Knitted DROPS tunic with flounce border and garter st in ”Bomull-Lin”. Size S-XXXL.
DROPS 118-3 |
|||||||
|
GARTER ST (back and forth on needle): K all rows. MEASUREMENT TIP: Because of the weight of the yarn make all measurements while the garment is hanging, otherwise it will be too long when worn. FLOUNCE BORDER: See diagram M.1 (= 7 sts). Diagram shows the pattern from RS. DECREASING TIP: Dec for armhole and neck on same row as follows: K1, K3 tog, work row to st with marker, 1 YO, K st with marker, 1 YO, work row until 4 sts remain, slip 1 st as if to K, K2 tog, psso, K1 (= 2 dec sts on row). K YO into back of loop on next row. -------------------------------------------------------- -------------------------------------------------------- BACK PIECE: Worked back and forth on circular needle. Cast on 198-212-240-261-296-324 sts (includes 1 edge st each side) on circular needle size 5.5 mm / US 9 with Bomull-Lin. Work 4 rows GARTER ST – see above! Continue in stockinette st. See MEASUREMENT TIP! REMEMBER THE GAUGE! When piece measures 14 cm / 5½" for all sizes work FLOUNCE BORDER on next row from RS as follows – see above: 1 edge st, M.1 on all sts until 1 st remain, finish with 1 edge st. After 1 vertical repeat of M.1 there are 114-122-138-150-170-186 sts on needle. P 1 row from WS. Change to circular needle size 4 mm / US 6. Work 4 rows garter st, AT THE SAME TIME dec 0-1-3-1-0-2 sts evenly on first row = 114-121-135-149-170-184 sts. Change back to circular needle size 5.5 mm / US 9 and continue in stockinette st. When piece measures 45 cm / 17¾" for all sizes work next row from RS as follows: 1 edge st, M.1 on all sts until 1 st remain, finish with 1 edge st. After 1 vertical repeat of M.1 there are 66-70-78-86-98-106 sts on needle. P 1 row from WS. Change to circular needle size 4 mm / US 6 and continue in garter st on all sts. When piece measures 54-56-58-60-62-63 cm / 21¼"-22"-22¾"-23⅝"-24⅜"-24¾" bind off 3 sts at the beg of the next 2 rows for armhole. Bind off to shape the armhole at beg of every row each side: 2 sts 3-3-4-5-7-8 times and 1 st 2-3-4-5-6-7 times = 44-46-48-50-52-54 sts. Bind off when piece measures 69-72-75-78-81-83 cm / 27⅛"-28⅜"-29½"-30¾"-32"-32¾". FRONT PIECE: Cast on and work like back piece until piece measures 54-56-58-60-62-63 cm / 21¼"-22"-22¾"-23⅝"-24⅜"-24¾" (= 66-70-78-86-98-106 sts). Now bind off 2-2-2-4-4-4 sts for armhole at beg of the next 2 rows = 62-66-74-78-90-98 sts. Slip half the sts on a stitch holder (= 31-33-37-39-45-49 sts) and complete each side separately. Side 1: Insert a marker in the middle st (st no 16-17-19-20-23-25). Continue in garter st, AT THE SAME TIME dec to shape the armhole at the side and dec for neck towards mid front on first row from RS – see DECREASING TIP! Repeat the dec on every 4th row a total of 10-11-12-13-14-15 times = 11-11-13-13-17-19 sts. Continue in garter st on these sts for strap and bind off when piece measures 73-76-79-82-85-87 cm / 28¾"-30"-31"-32¼"-33½"-34¼" (front piece longer than back piece because strap goes over shoulder and 2 cm / ¾" down on back piece). Side 2: Like side 1. ASSEMBLY: Sew straps from front piece to the 11-11-13-13-17-19 sts towards the side on back piece. Sew side seams inside 1 edge st. |
|||||||
Diagram explanations |
|||||||
|
|||||||
 |
|||||||
Have you finished this pattern?Tag your pictures with #dropspattern #sundaymorningstrolltunic or submit them to the #dropsfan gallery. Do you need help with this pattern?You'll find 16 tutorial videos, a Comments/Questions area and more by visiting the pattern on garnstudio.com. © 1982-2026 DROPS Design A/S. We reserve all rights. This document, including all its sub-sections, has copyrights. Read more about what you can do with our patterns at the bottom of each pattern on our site. |
|||||||


With over 40 years in knitting and crochet design, DROPS Design offers one of the most extensive collections of free patterns on the internet - translated to 17 languages. As of today we count 324 catalogs and 12290 patterns - 12280 of which are translated into English (US/in).
We work hard to bring you the best knitting and crochet have to offer, inspiration and advice as well as great quality yarns at incredible prices! Would you like to use our patterns for other than personal use? You can read what you are allowed to do in the Copyright text at the bottom of all our patterns. Happy crafting!
Post a comment to pattern DROPS 118-3
We would love to hear what you have to say about this pattern!
If you want to leave a question, please make sure you select the correct category in the form below, to speed up the answering process. Required fields are marked *.