
Popular categories
Looking for a yarn?


Comments / Questions (45)
![]() Lotta Nordqvist wrote:
Lotta Nordqvist wrote:
Hej! Har börjat sticka mudden på koftan och inser att det är väldigt mycket maskor. Jag har förstått att jag sedan ska minska maskantalet men blir lite orolig att inte mudden ska sitta åt utan stå ut som en liten volang? Mycket tacksam för snabbt svar! Hälsningar Lotta
12.03.2017 - 21:48DROPS Design answered:
Hej Lotte. Nej, det burde den ikke göre. Ribben traekker sig mere sammen en almindelig glatstrik, saa derfor tager du ogsaa ind naar du er faerdig (saa glatstrikdelen faar samme bredde som ribben - ellers ville den pose ud over ribben). Og er din strikkefasthed korrekt, saa burde der som sagt ikke gaa noget galt :)
13.03.2017 - 12:15
![]() Jasmin wrote:
Jasmin wrote:
Mi interessava qualcosa sulle sprone.se faccio 23volte diminuzioni per taglia L.Non restano 166 maglie ma tanto meno ,per favore se potete aiutarmi,grazie
09.07.2016 - 22:28DROPS Design answered:
Buonasera Jasmin. Quando inizia lo sprone ha 396 m . Inserisce 10 segnapunti. Deve diminuire 1 m ad ogni segnapunto per 23 volte. Quindi in tutto vengono diminuite 230 m. Rimangono 396 – 230 = 166 m. La prima volta che diminuisce, diminuisce sempre prima dei segnapunti, la seconda volta diminuisce dopo i segnapunti, la terza volta prima e così via. Buon lavoro!
09.07.2016 - 23:12
![]() Marion wrote:
Marion wrote:
Bonjour, au niveau de l'encolure, taille M, faut-il diminuer 32 ou 35 mailles (vous indiquez 325)? Ensuite, il faut "diminuer 1 m alternativement à droite et à gauche de chaque marqueur", c'est-à-dire un rang on diminue tout à gauche et le suivant tout à droite ou dans le même rang il faut diminuer à gauche et à droite des marqueurs? Merci pour votre aide!
10.03.2016 - 08:37DROPS Design answered:
Bonjour Marion, il faut espacer les marqueurs de 32 m, la correction a été faite, merci. C'est exact pour les diminutions, au 1er rang, on diminue 1 m à droite de chaque marqueur, puis au rang de diminution suivant, on diminue à gauche de chaque marqueur et on continue ainsi, 1 fois à droite, 1 fois à gauche des marqueurs. Bon tricot!
10.03.2016 - 09:01
![]() Ingrid wrote:
Ingrid wrote:
Den här koftan har jag stickat.Det är den bästa koftan jag stickat ,använder den varje dag.
31.01.2015 - 14:25
![]() Elisabeth wrote:
Elisabeth wrote:
Hva er best å gjøre i forhold til trådbytte, skifte midt bak eller på sidene og klippe tråden ?
06.09.2013 - 23:40
![]() Kirsti Loe Andersen wrote:
Kirsti Loe Andersen wrote:
Jeg mener at Jytte Mielcke har helt rett. Hvis man bytter fargen midt bak vil sidene bli forskjellige fordi man da begynner rillen på forskjellig side. Jeg begynte med å bytte farge midt bak, men måtte rekke opp igjen, da det ble feil.
13.06.2013 - 10:47DROPS Design answered:
Riller er ens på retsiden og på vrangen, så det kan godt lade sig gøre at skifte farve midt bag på!
09.10.2013 - 10:38
![]() Tuva wrote:
Tuva wrote:
Det står ingenting om felling når man er ferdig med halskanten?
06.01.2013 - 15:41DROPS Design answered:
Efter 6 p rett over alle m (halskant) skal der felles af. Det mangler i mönstret, og det skal vi tilföje ;o)
06.01.2013 - 22:02
![]() Jytte Mielcke wrote:
Jytte Mielcke wrote:
Der er intet forklaret om den forskel, der er på de to sider af belægningen - eller er der ikke nogen? I foreslår, at man skifter tråd - altså starter midt bag og hvad så! I har tilføjet en fejl: strik en pind vrang fra vrangen - er det hele vejen over el. kun i ve. el. højre del. Samtidig henviser I i opskriften til: se forkl over med Fabel 1. Der er ingen forklaring! M.v.h. Jytte Mielcke
12.12.2012 - 19:46DROPS Design answered:
Jeg forstår ikke hvad du mener med forskel på belægningen? Bare følg opskriften så bliver den som på billedet. Det er på bærestykket hvor man skifter farve. Her kan det være en god ide at skifte farve midt bagpå istedet for i den ene side, da man ikke vil hæfte elle have lange tråde i kanten mod midt foran. Se forklaring over - her er det forklaringen på retstrik vi henviser til.
13.12.2012 - 09:15
![]() DROPS Design NL wrote:
DROPS Design NL wrote:
Je moet de knopen naaien op het linker voorpand. De tweede zin met het rechter voorpand is een fout - die moest er niet staan. Ik heb het nu weggehaald. Bedankt en veel plezier verder. Gr. Tine
31.03.2010 - 12:24
![]() Annie wrote:
Annie wrote:
Vraag: bij afwerking staat: naai de knopen aan op het linker voorpand. . . Vervolgens naai de knopen aan op het rechter voorpand. ? ? Moeten de knopen nu links of rechts ? Bij voorbaat dank voor de hulp. Annie van Dal
31.03.2010 - 11:27
|
|
Islen |
|
 |
 |
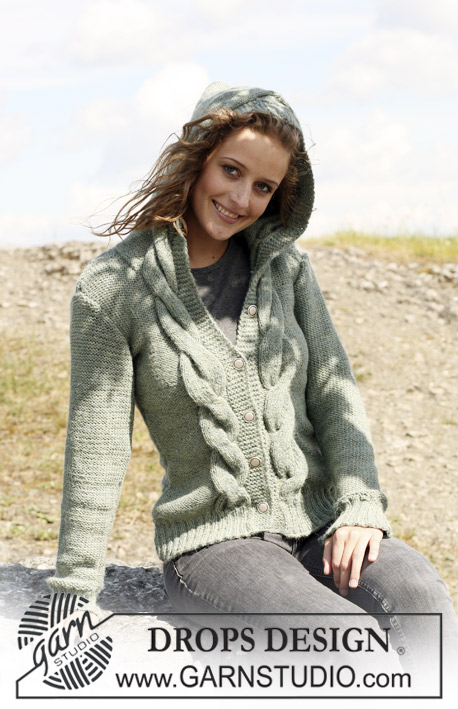
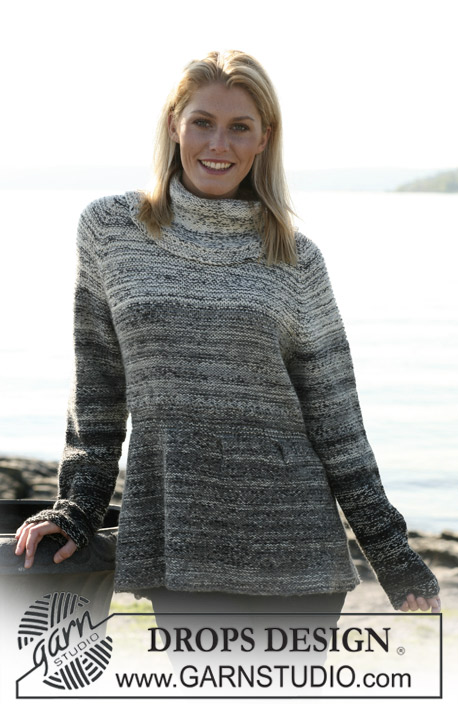
Knitted DROPS Jacket in ”Alpaca” with stripy yoke in ”Fabel”. Size S - XXXL.
DROPS 109-52 |
|
|
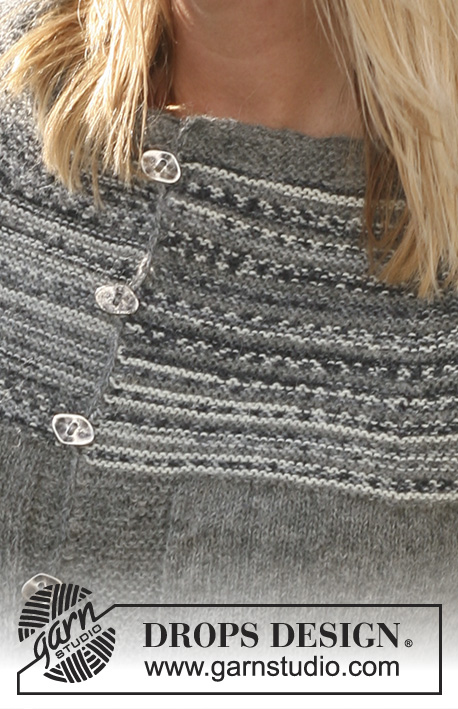
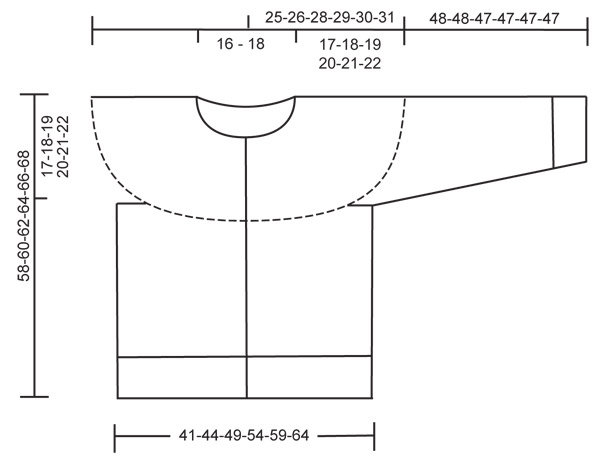
Garter st, back and forth on needle): K all rows. Knitting tip: If your knitting gauge is too tight, the raglan will be too short and the armhole too small. You may compensate for this by working 1 extra row without dec in between dec. Changing yarn tip: Change yarn mid back, and do not cut the threads for each change. JACKET Worked back and forth on circular needle from mid front. Cast on 416-452-494-542-602-656 sts (includes 12 front band sts each side towards mid front) on circular needle size 2.5 mm [US 1] with Alpaca (many sts so the rib won’t be tight-fitting). P 1 row from WS and continue in rib as follows from the RS: 12 garter sts (front band), * K2, P4 *, repeat from *-* and finish with K2 and 12 garter sts (front band). When piece measures 3 cm [1⅛"] dec 1 st in each P-section and repeat the dec when piece measures 6 cm [2⅜"] = 286-310-338-370-410-446 sts. Continue in rib, K2/P2. When rib measures 10 cm [4"] change to needle size 3 mm [US 2or3]. K 1 row from the RS, at the same time dec 66-74-78-86-102-114 sts evenly = 220-236-260-284-308-332 sts. Continue in stockinette st with 12 garter sts each side on front bands. Remember the knitting gauge! Insert 1 Marking Thread (MT) each side, 61-65-71-77-83-89 sts in from mid front (to mark the sides), back piece = 98-106-118-130-142-154 sts. Continue until piece measures 41-42-43-44-45-46 cm [16⅛"-16½"-17"-17¼"-17¾"-18"] and now bind off 12 sts each side (i.e. 6 sts on each side of both MT) = 196-212-236-260-284-308 sts. Put the piece aside and knit the sleeves. SLEEVES Worked in the round on double pointed needles. Cast on 95-95-100-105-110-115 sts on double pointed needles size 2.5 mm [US 1] with Alpaca. K 1 round and continue in rib as follows: * K2, P3 *, repeat from *-*. When piece measures 4 cm [1½"] dec 1 st in each P-section = 76-76-80-84-88-92 sts. Continue in rib, K2/P2m. When rib measures 8 cm [3⅛"] change to needle size 3 mm [US 2or3]. K 1 round, at the same time dec 16-16-20-18-22-20 sts evenly = 60-60-60-66-66-72 sts. Insert a MT at beg of round = mid under arm. When piece measures 10 cm [4"] inc 1 st on each side of MT on every 3.5-3-2-2-2-2 cm [1¼"-1⅛"-¾"-¾"-¾"-¾"] a total of 11-13-16-16-17-17 times = 82-86-92-98-100-106 sts. When piece measures 48-48-47-47-47-47 cm [19"-19"-18½"-18½"-18½"-18½"] – less on the larger sizes because of wider shoulder – bind off 12 sts mid under arm (= 6 sts on each side of MT) = 70-74-80-86-88-94 sts. Put piece aside and knit the other sleeve. YOKE Slip sleeves in on the same circular needle as body piece where bind off for armholes = 336-360-396-432-460-496 sts. Change to circular needle size 2.5 mm [US 1] and insert 10-10-10-10-11-11 marking threads/markers (MT) in piece as follows: The first MT after 33-36-36-40-40-43 sts, then the remaining 9-9-9-9-10-10 MT with 30-32-36-39-38-41 sts between each = 33-36-36-41-40-43 sts after the last MT. Work yoke as follows: See Knitting tip and Changing thread tip:* 6 rows garter st - see above – with Fabel, 2 rows garter st with Alpaca *, repeat from *-* until finished measurements. Work 5-5-2-1-4-1 rows without dec and then dec 1 st to the right and to the left alternately of each MT on every 4th row a total of 20-21-23-25-25-27 times = 136-150-166-182-185-199 sts. Neckline: K 1 row from the RS with Alpaca, at the same time dec 6-20-32-44-43-53 sts evenly = 130-130-134-138-142-146 sts. Now continue as follows to make neckline higher mid back with Alpaca. K all rows. Work next row as follows from WS: work 75-75-77-79-81-83 sts, turn piece and work 20 sts on return row. Turn piece and work 30 sts. Turn piece and work 40 sts. Turn piece and work 50 sts. Turn piece and work 60 sts. Turn piece and work 70 sts. Turn piece and work 80 sts. Turn piece and work 90 sts. Turn piece and work 100 sts. Turn piece and work 110 sts. Turn piece and work 120 sts. Turn piece and work all sts on row. K 6 rows on all sts and bind off. CROCHET BORDER Crochet a border round the opening of jacket with Alpaca on crochet hook size 3 mm [C] as follows – beg at the bottom of right front piece, round the neck and down along left front piece: 1 sc, * 2 ch, skip approx 0.5 cm [1/4"], 1 sc *, repeat from *-*. ASSEMBLY Sew openings under arms. Sew on buttons in transition between front band and stockinette st on left front piece. Place the top button right under the neckline, and the bottom one just over the rib, and distribute the remaining buttons evenly between these. Use the crochet border as buttonhole loops. |
|
 |
|
Have you finished this pattern?Tag your pictures with #dropspattern or submit them to the #dropsfan gallery. Do you need help with this pattern?You'll find 20 tutorial videos, a Comments/Questions area and more by visiting the pattern on garnstudio.com. © 1982-2026 DROPS Design A/S. We reserve all rights. This document, including all its sub-sections, has copyrights. Read more about what you can do with our patterns at the bottom of each pattern on our site. |
|


With over 40 years in knitting and crochet design, DROPS Design offers one of the most extensive collections of free patterns on the internet - translated to 17 languages. As of today we count 324 catalogs and 12290 patterns - 12280 of which are translated into English (US/in).
We work hard to bring you the best knitting and crochet have to offer, inspiration and advice as well as great quality yarns at incredible prices! Would you like to use our patterns for other than personal use? You can read what you are allowed to do in the Copyright text at the bottom of all our patterns. Happy crafting!
Post a comment to pattern DROPS 109-52
We would love to hear what you have to say about this pattern!
If you want to leave a question, please make sure you select the correct category in the form below, to speed up the answering process. Required fields are marked *.