
Leder du efter et garn?


Kommentarer / Spørgsmål (28)
![]() R N skrev:
R N skrev:
Hei! Teen XL kokoa. Ohjeissa on virhe kun kainaloista lähdetään jatkamaan alaspäin. Kuviot eivät täsmää. Voitteko auttaa?
05.07.2024 - 10:56DROPS Design svarede:
Hei, etu-/takakappaleessa neulotaan mallineuletta piirroksen A.4 mukaisesti ja mallineule jatkuu siitä, mihin se kaarrokkeessa jäi. Mikäli neuletiheys täsmää, kaarroke on valmis, kun olet neulonut ylös piirrokseen kokosi nuolella merkittyyn kerrokseen.
05.07.2024 - 17:08
![]() Mary skrev:
Mary skrev:
But that’s precisely the problem! If I start the third line A4 from the underarm (the first stitch of the new round is basically the third stitch from the underarm) I get the mismatch because the triangle will be stitched earlier: I can’t understand where I am going wrong
09.04.2023 - 14:12DROPS Design svarede:
Dear Mary, you need to adjust the stitches before starting the triangle. In this case, you need to simply knit stitches (not just the amount indicated in the pattern) so that the triangle won't be mismatched. The pattern under the arm may get slightly mismatched initially but that isn't important, since it will later on match correctly. Happy knitting!
10.04.2023 - 13:34
![]() Mary skrev:
Mary skrev:
Yes, I can see that the pattern is the same. But if I follow the instructions from A4 third line, I should start the "triangle" after 3 stitches of the body, while according to the stitches I have after the line with the arrow, A1, I should start the triangle after 5 stitches but this means that it will be "anticipated" hence the mismatch. Does it mean that I have not divided the garment accordingly? Many thanks and Happy Easter!
09.04.2023 - 11:09DROPS Design svarede:
Dear Mary, take into account that you should have adjusted the start of the round in the body; you adjust so that the beginning of the round is in the middle stitch cast on under the sleeve. This should help adjust the pattern so that the triangle in A.4 won't get mismatched with the pattern in the yoke in A.1. Happy knitting!
09.04.2023 - 13:30
![]() Mary skrev:
Mary skrev:
Thanks! But I am still confused: the instructions say that the yoke is finished when I have 168 stitches (S size). If I had not knit the last row (the one with the arrow), I would not have got 168 stitches. In any case, once I have knit the row with the arrow, if I then start A4 from the third line I still get a mismatch in the pattern and I do not know where I get it wrong. Well, I know that I do something wrong while shifting from the yoke to the body but I can't figure out what.
07.04.2023 - 10:25DROPS Design svarede:
Dear Mary, after having worked the row with the arrow, you should have knitted round, where you separated the stitches for each part of the garment. Then, you should start the body with the third row of A.4. There shouldn't be a mismatch there. You can check that the third row of A.4 is exactly like the third row in A.1 after the row with the arrow, so they should be matching. Hope this helps!
08.04.2023 - 20:58
![]() Mary skrev:
Mary skrev:
Thanks! But I am still confused: the instructions say that the yoke is finished when I have 168 stitches (S size). If I had not knit the last row (the one with the arrow), I would not have got 168 stitches. In any case, once I have knit the row with the arrow, if I then start A4 from the third line I still get a mismatch in the pattern and I do not know where I get it wrong. Well, I know that I do something wrong while shifting from the yoke to the body but I can't figure out what.
07.04.2023 - 10:20DROPS Design svarede:
Dear Mary, after having worked the row with the arrow, you should have knitted round, where you separated the stitches for each part of the garment. Then, you should start the body with the third row of A.4. There shouldn't be a mismatch there. You can check that the third row of A.4 is exactly like the third row in A.1 after the row with the arrow, so they should be matching. Hope this helps!
08.04.2023 - 20:59
![]() Mary skrev:
Mary skrev:
Sorry, I am still unclear: I have finished the yoke knitting the A1-A3-A5 line with the arrow. Then I divided the work and I went for a knitted round. Now which line should I knit first and from which diagram?
05.04.2023 - 09:04DROPS Design svarede:
Dear Mary, the arrows in the chart mean that, if the gauge is correct, you should finish the raglan/yoke when you reach the arrow for your size (before working it). If you have worked this row, then you will need to start the new part by working the third row of the new chart (A.4). Happy knitting!
06.04.2023 - 23:29
![]() Mary skrev:
Mary skrev:
Hi! "Continue the pattern from yoke on body – making sure to continue with the correct row in the diagram after the yoke. " Does this mean that if I finish A1 (S size) with the line with the arrow, the next line for the body in A4 is in fact the thirs one of the diagram?
04.04.2023 - 08:59DROPS Design svarede:
Hi Mary, Yes, if you finished the diagram before separating for the body and sleeves, you continue with the first row in the diagram. Happy Easter!
05.04.2023 - 07:01
![]() Mary skrev:
Mary skrev:
"Knit as far as the middle stitch cast on under the sleeve. The round now starts here." Does it mean that the round starts after the second or after the third stitch under the sleeve? Many thanks!
08.03.2023 - 16:03DROPS Design svarede:
Dear Mary, yes correct: work the first 2 of the 5 stitches cast on under 1st sleeve, the rounds will now start here, before the middle of the new stitches. Happy knitting!
08.03.2023 - 16:08
![]() Mary skrev:
Mary skrev:
Following from your last answer: "...you will start the next round 1 stitch eariler. So, you need to not work the last stitch of the previous round". I interpret this as moving the stitch marker one stitch behind and working that stitch as the first one of the next round rather than the last one of the previous round. Is this correct? So it is basically just a matter of moving the stitch marker?
07.03.2023 - 12:16DROPS Design svarede:
Dear Mary, you will now work the dividing round, this means you don't need the markers anymore, you start working the dividing round when the last stitch on previous round remain on left needle, slip the next 39 sts (starting with the last stitch previous round + the first 38 sts next round). Happy knitting!
07.03.2023 - 14:37
![]() Mary skrev:
Mary skrev:
Hi, I have just finished all the increases on the raglan and I have 168 stitches (S size). I'll go now go for a knitted round but what does it mean " adjust so the round now starts 1 stitch earlier"? Plus, the 39 stitches I habe to put aside, correspond to the stiches that are within the first and the second marker?
04.03.2023 - 10:25DROPS Design svarede:
Dear Mary, after finishing the increases and reaching the indicated length (21cm from the marker), you will start the next round 1 stitch eariler. So, you need to not work the last stitch of the previous round. On the other hand, the first marker was inserted in the transition between the back and the sleeve and the second marker between the sleeve and the front. Since you have to put aside the stitches which correspond to the sleeve, these stitches are all in between the first and 2nd marker. Happy knitting!
05.03.2023 - 20:45
|
|||||||||||||||||||
Diamonds in the Sky#diamondsintheskysweater |
|||||||||||||||||||
 |
 |
||||||||||||||||||
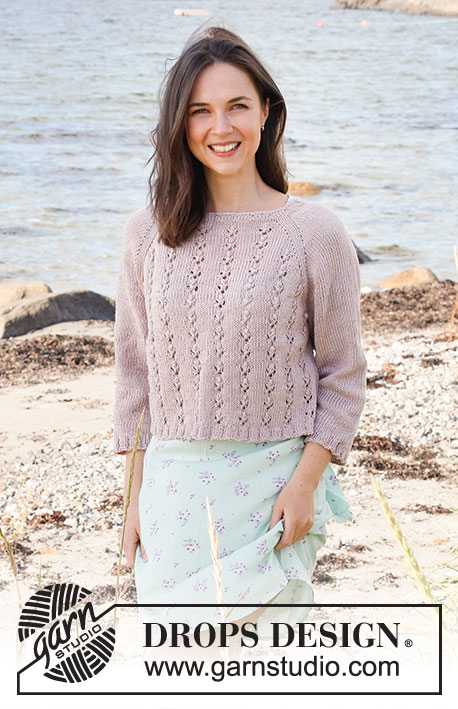
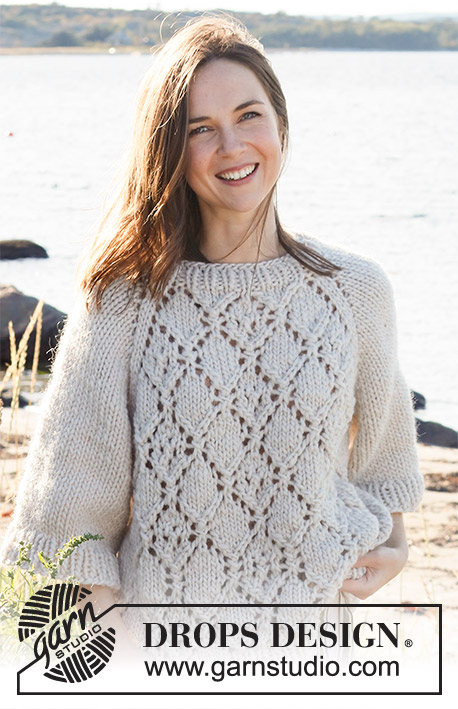
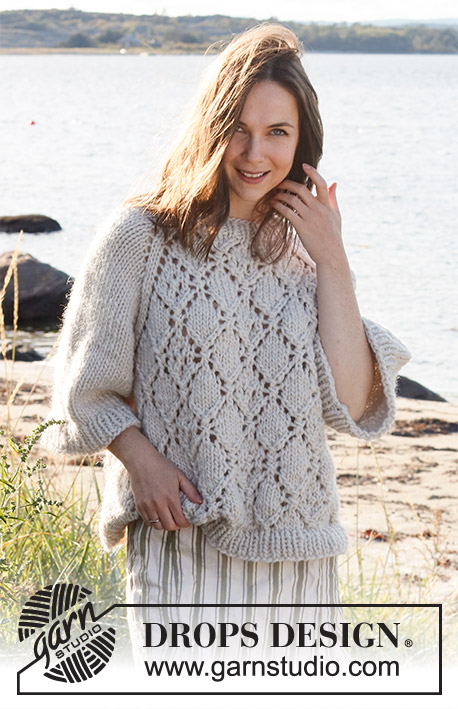
Strikket bluse i DROPS Snow eller DROPS Wish. Arbejdet strikkes oppefra og ned med raglan, hulmønster og ¾ lange, vide ærmer. Størrelse S - XXXL.
DROPS 221-29 |
|||||||||||||||||||
|
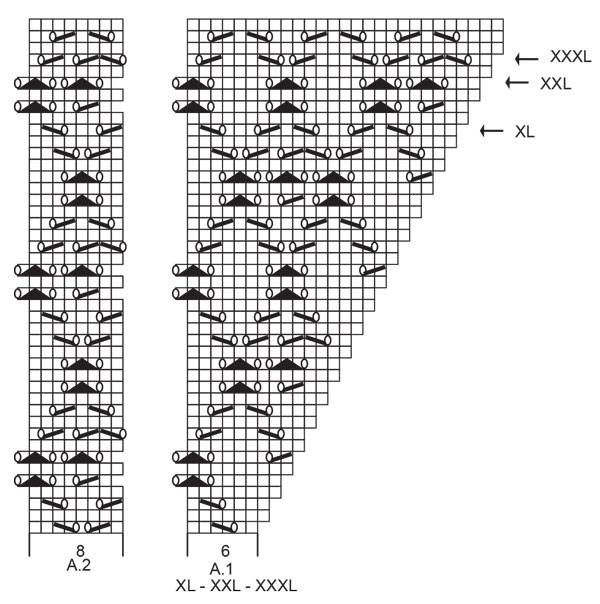
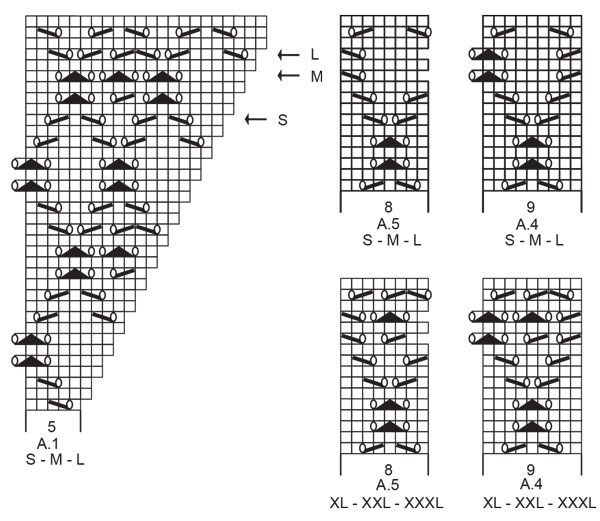
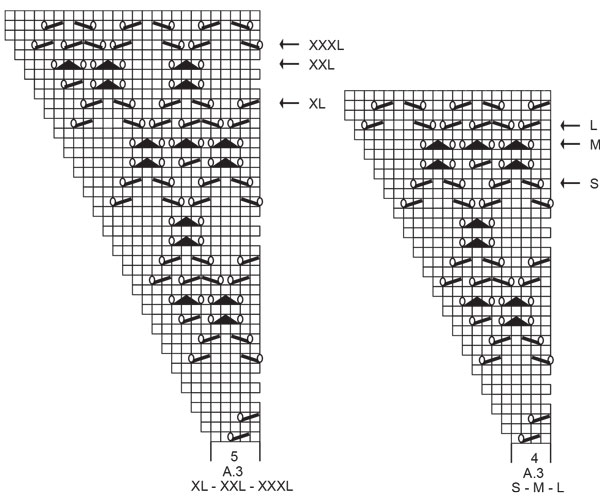
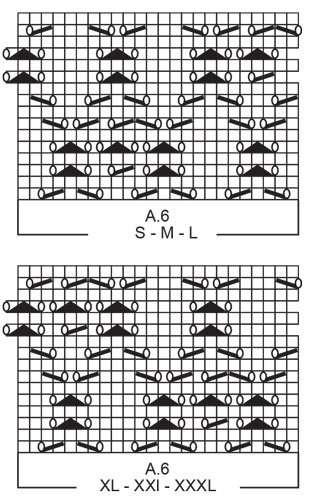
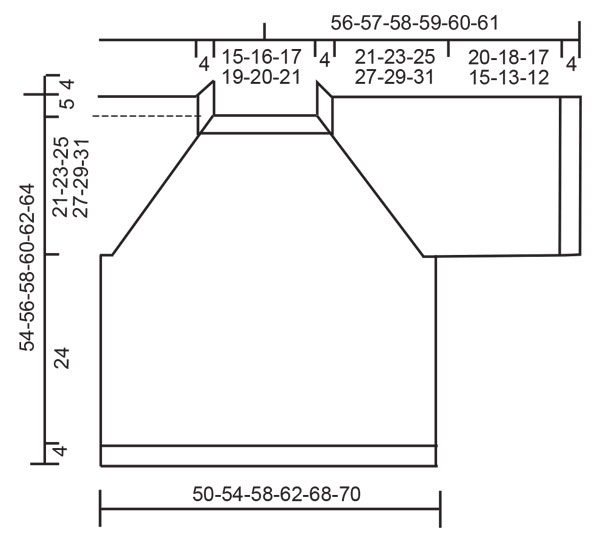
------------------------------------------------------- FORKLARING TIL OPSKRIFTEN: ------------------------------------------------------- MØNSTER: Se diagram A.1 til A.6. Vælg diagram for din størrelse. UDTAGNINGSTIPS (jævnt fordelt): For at beregne hvordan der skal tages ud jævnt fordelt, tager man det totale maskeantal på pinden (f.eks 46 masker), og deler maskerne med antal udtagninger som skal gøres (f.eks 10) = 4,6. I dette eksempel tages der ud ved at slå om efter skiftevis ca hver 4. og 5. maske. På næste omgang strikkes omslagene drejet, så der ikke bliver hul. RAGLAN: Tag 1 maske ud på hver side af 2 masker (mærket sidder midt mellem disse 2 masker) i hver overgang mellem ryg & forstykke og ærmer (= 8 masker taget ud på omgangen). Tag 1 maske ud ved at slå om. På næste omgang strikkes omslagene ret, så der bliver hul. Videre strikkes de nye masker ind i mønsteret på forstykket og bagstykket, og i glatstrik på ærmerne. AFLUKNINGSTIPS: For at undgå at aflukningskanten strammer når der lukkes af, kan der lukkes af med en tykkere pind. Hvis dette også bliver stramt, kan det laves omslag efter ca hver 4.maske samtidig med at der lukkes af (omslagene lukkes af som almindelige masker). ------------------------------------------------------- START ARBEJDET HER: ------------------------------------------------------- BLUSE – KORT OVERSIGT OVER ARBEJDET: Halskant og bærestykke strikkes rundt på rundpind, oppefra og ned. Bærestykket deles til ryg & forstykke og ærmer. Hver del strikkes rundt på rundpind hver for sig, oppefra og ned. HALSKANT: Slå 46-48-50-54-56-58 masker op på lille rundpind 8 med Snow eller Wish. Strik 1 omgang ret. Derefter strikkes der rib (= 1 ret / 1 vrang) rundt i 4 cm. Strik 1 omgang ret hvor der tages 10-8-6-6-4-2 masker ud jævnt fordelt – læs UDTAGNINGSTIPS = 56-56-56-60-60-60 masker. Strik 1 omgang ret. Skift til rundpind 9. Sæt 1 mærke efter 20-20-20-21-21-21 masker (= ca midt foran), bærestykket skal måles fra dette mærke! BÆRESTYKKE: Nu strikkes der mønster og sættes 4 mærker i arbejdet således: Sæt et mærke i begyndelsen af omgangen (= i overgangen mellem bagstykket og højre ærme), 1 ret, slå om, ret over de næste 7 masker, slå om, 1 ret, sæt et mærke her (= i overgangen mellem højre ærme og forstykke), 1 ret, slå om, A.1 over de første 5-5-5-6-6-6 masker, A.2 over de næste 8 masker, A.3 over de næste 4-4-4-5-5-5 masker, slå om, 1 ret, sæt et mærke her (i overgangen mellem forstykket og venstre ærme), 1 ret, slå om, 7 masker ret, slå om, 1 ret, sæt et mærke her (= i overgangen mellem venstre ærme og bagstykket), 1 ret, slå om, A.1 over de første 5-5-5-6-6-6 masker, A.2 over de næste 8 masker, A.3 over de næste 4-4-4-5-5-5 masker, slå om, 1 ret. HUSK PÅ STRIKKEFASTHEDEN! Første udtagning til RAGLAN – læs forklaring over, er nu færdig. Fortsæt rundt med mønster således og tag ud til raglan på hver 2.omgang totalt 14-16-17-18-20-21 gange = 168-184-192-204-220-228 masker. Efter sidste udtagning måler arbejdet ca 20-23-24-26-29-30 cm fra mærketråden efter ribben. Strik videre til arbejdet måler 21-23-25-27-29-31 cm fra mærketråden efter ribben i halsen uden at der tages flere masker ud (strik så mange masker af mønsteret der er plads til mod raglanen, men sørg for at der laves lige så mange omslag som der tages masker ind i mønsteret, så maskeantallet holdes konstant – de resterende masker strikkes i glatstrik). På næste omgang (dvs en omgang med ret) – sørg for at omgangen nu starter 1 maske før begyndelsen af omgangen, strikkes der således: Sæt de første 39-43-45-47-51-53 masker på en tråd til ærme, slå 5-5-7-7-9-9 nye masker op på pinden (= i siden under ærmet), strik de næste 45-49-51-55-59-61 masker som før (= forstykke), sæt de næste 39-43-45-47-51-53 masker på en tråd til ærme, slå 5-5-7-7-9-9 nye masker op på pinden (= i siden under ærmet), strik de næste 45-49-51-55-59-61 masker som før (= bagstykke). Videre strikkes ryg & forstykke og ærmer videre hver for sig. HERFRA MÅLES ARBEJDET VIDERE. RYG & FORSTYKKE: = 100-108-116-124-136-140 masker. Strik ret frem til den midterste maske som blev slået op under ærmet. Nu starter omgangen før denne maske. Videre skal mønsteret fra bærestykket fortsætte på ryg- og forstykke. Det er derfor vigtigt at det afpasses hvilken omgang i diagrammerne der startes på når der fortsættes med mønster. Strik mønster og glatstrik i siderne således: * Strik 1-3-5-3-6-7 masker ret, A.4 over de næste 9 masker (vælg diagram for din størrelse), strik A.6 over de næste 24 masker (vælg diagram for din størrelse), strik de første 8-8-8-16-16-16 masker i A.6, strik A.5 over de næste 8 masker (vælg diagram for din størrelse), 0-2-4-2-5-6 masker ret *, strik fra *-* 1 gang til på omgangen. Når arbejdet måler 24 cm, strikkes der 1 omgang ret hvor der tages 10-10-12-12-14-14 masker ud jævnt fordelt = 110-118-128-136-150-154 masker. Skift til rundpind 8. Strik rib (= 1 ret / 1 vrang) rundt i 4 cm. Luk af med ret over ret og vrang over vrang. Blusen måler ca 54-56-58-60-52-64 cm fra skulderen og ned. ÆRMER: Sæt de 39-43-45-47-51-53 masker fra tråden i den ene side af arbejdet tilbage på lille rundpind 9, og strik 1 maske i hver af de 5-5-7-7-9-9 nye masker som blev slået op i siden under ærmet = 44-48-52-54-60-62 masker. Strik rundt i glatstrik. Når ærmet måler 20-18-17-15-13-12 cm, tages der 4-4-4-4-6-6 masker ud jævnt fordelt = 48-52-56-58-70-68 masker. Skift til rundpind 8. Strik rib (= 1 ret / 1 vrang) rundt i 4 cm. Luk af med ret over ret og vrang over vrang. Ærmet måler ca 24-22-21-19-17-16 cm fra delingen. Strik det andet ærme på samme måde. |
|||||||||||||||||||
Diagram forklaring |
|||||||||||||||||||
|
|||||||||||||||||||
 |
|||||||||||||||||||
 |
|||||||||||||||||||
 |
|||||||||||||||||||
 |
|||||||||||||||||||
 |
|||||||||||||||||||
Har du lavet denne opskrift?Så tagger du dine billeder med #dropspattern #diamondsintheskysweater eller send dem til #dropsfan galleriet. Behøver du hjælp med opskriften?Du finder 25 instruktionsvideoer, kommentarer/spørgsmål og mere i opskriften på www.garnstudio.com © 1982-2026 DROPS Design A/S. Alle rettigheder er reserveret. Dette dokument med tilhørende underdokumenter har copyright. Læs mere om hvad du kan gøre med vore opskrifter, nedert i alle vore opskrifter på hjemmesiden. |
|||||||||||||||||||


Med over 40 år i strikke- og hæklebranchen tilbyder DROPS Design en af de mest omfattende kollektioner med gratis opskrifter på internettet - oversat til 17 sprog. Dags dato har vi 324 kataloger og 12291 opskrifter på Dansk.
Vi arbejder hårdt for at kunne tilbyde Dig det bedste man kan få af strik og hækling, inspiration og gode råd men også kvalitetsgarn til fantastiske priser! Vil du bruge vore opskrifter til andet end for privat brug? Du kan læse om hvilke regler som gælder under teksten Copyright nederst på siden i alle vore opskrifter. God fornøjelse!
Kommentere opskrift DROPS 221-29
Vi vil gerne høre din mening om denne model!
Hvis du ønsker at stille et spørgsmål, så husk at vælge rigtig kategori i menuen under - det vil give dig hurtigere svar. Obligatoriske felter er markeret med *.