
Popular categories
Looking for a yarn?


Comments / Questions (5)
Khairieh Amr wrote:
I am making the small size. I found if the edge stitches for the leg are 2 in the beginning and 1 at the end (rather than 1 beginning and 2 end) then the lace design would work better. I love your designs, unfortunately cannot get your yarns here in Jordan :(
24.07.2018 - 18:40
![]() Monika Kubičinová wrote:
Monika Kubičinová wrote:
Prosím Vás, ráda háčkuji a pletu. Můžu si své výrobky podle Vašich vzorů nafotit a dát na facebookový profil? Na výrobky nedávám visačky a když nějaký daruji nebo prodám, musím někde uvést, že jsem to upletla nebo uháčkovala podle Vašeho vzoru? Děkuji moc za odpověď. Monika Kubičinová
12.11.2017 - 15:15DROPS Design answered:
Milá Moniko, jsme moc rádi, že se vám naše modely líbí! Své výrobky klidně foťte a vystavujte! Na Facebooku a Instagramu k nim prosím do komentáře připište, podle jakého modelu a ppř. z jaké příze jste pletla/háčkovala a přidejte tag #dropsfan - díky tomu vaše kousky uvidí i další příznivci DROPS. Že je model upletený podle návrhu DROPS design by mělo být rovněž uvedeno u věcí na prodej (na visačce či v prodejním inzerátu, stačí tato stručná informace). Děkujeme a těšíme se na vaše fotky! Hana
13.11.2017 - 07:27
![]() Nathalie Sauvain wrote:
Nathalie Sauvain wrote:
La quantité de laine prescrite n'est pas correcte - il faut 3 à 4 pelottes pas deux.
23.09.2017 - 13:55
![]() Patricia wrote:
Patricia wrote:
Pourrais je avoir une vidéo svp merci
24.08.2017 - 22:09
![]() Patricia wrote:
Patricia wrote:
Très joli comme point. Je voudrais savoir combien fais le tour de la cheville car je trouve que c'est grand à ce niveau et j'ai bien peur que cela retombe !!!
23.08.2017 - 01:03
|
||||||||||||||||||||||
Mary's Place#marysplaceslippers |
||||||||||||||||||||||
|
|
||||||||||||||||||||||
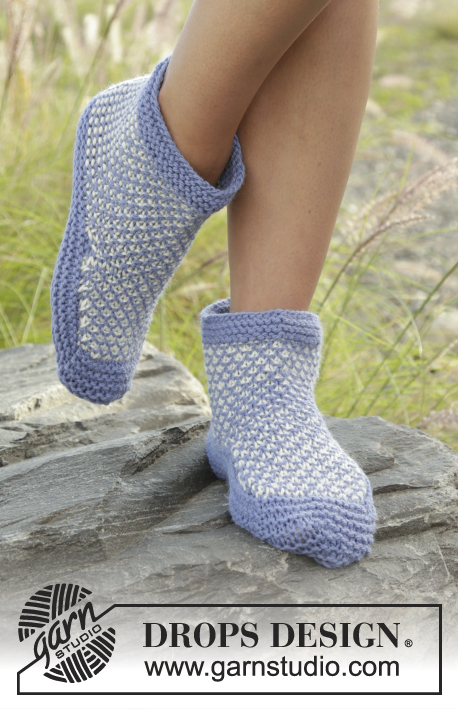
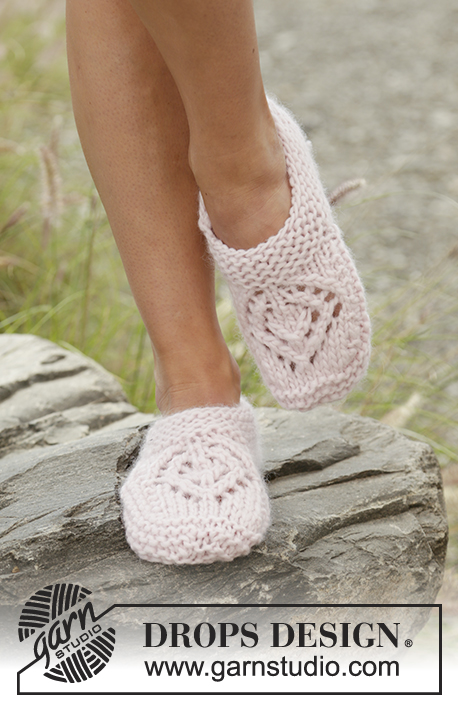
Knitted slippers with lace pattern in DROPS Nepal.
DROPS 178-51 |
||||||||||||||||||||||
|
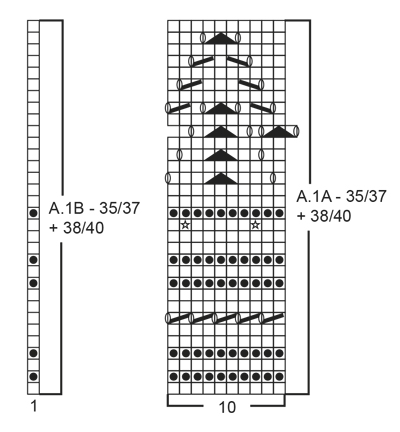
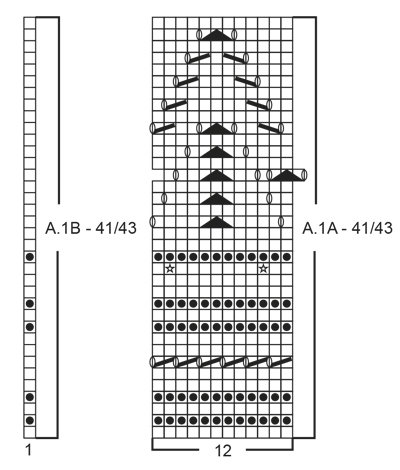
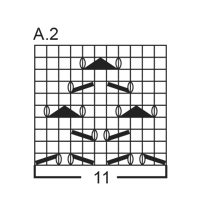
RIDGE/GARTER STITCH (worked back and forth): 1 ridge = Knit 2 rows. PATTERN: See diagrams A.1 and A.2. The diagrams show all the rows in the pattern seen from the right side. Choose the diagram for your size. DECREASE/INCREASE TIP: To work out how to decrease/increase evenly, count the total number of stitches on the needle (e.g. 63 stitches), minus the edge stitches (e.g. 2 stitches) and divide the remainder by the number of decreases/increases to be made (e.g. 6) = 10.1. In this example, you work every 9th and 10th stitches together, or you increase after every 10th stitch. DECREASE TIP: All decreases are made from the right side! Decrease as follows after the edge stitch/marker thread: Slip 1 stitch as if to knit, knit 1, pass the slipped stitch over the knitted stitch. Decrease as follows before the marker thread/edge stitch: Start 2 stitches before the marker thread/edge stitch and knit 2 together. ---------------------------------------------------------- SLIPPER: The whole slipper is worked back and forth, with circular needle and sewn together mid back and mid under foot at the end. LEG: Cast on 53-53-63 stitches with circular needle size 4 mm / US 6 and Nepal. Work the first row as follows from the right side: 1 edge stitch in GARTER STITCH – see description above, work A.1A over the next 50-50-60 stitches (= 5 repeats of 10-10-12 stitches), work A.1B (= 1 stitch) and finish with 1 edge stitch in garter stitch. Continue the pattern in this way. REMEMBER THE GAUGE! When A.1 has been completed, work stockinette stitch with 1 edge stitch in garter stitch in each side – AT THE SAME TIME on the first row from the right side decrease 2-0-6 stitches evenly along the row – READ DECREASE/INCREASE TIP = 51-53-57 stitches on the needle. Work until the piece measures 18-19-20 cm / 7"-7½"-8", but finish so that the next row is worked from the wrong side. FOOT: Work the first 19-19-20 stitches on the needle as before and then place them on a thread, cast on 1 new stitch on the needle, purl the next 13-15-17 stitches (= top piece), cast on 1 new stitch on the needle, work the last 19-19-20 stitches as before and then place them on a thread = 15-17-19 stitches on the needle. Cut the strand you have been working with. Work back and forth over the 15-17-19 stitches on the top piece as follows: 1 edge stitch in garter stitch, 1-2-3 stitches stockinette stitch, A.2 (= 11 stitches), 1-2-3 stitches stockinette stitch and 1 edge stitch in garter stitch. Continue the pattern in this way. When A.2 has been completed 2 times in height work stockinette stitch over all the stitches with 1 edge stitch in garter stitch in each side until the top piece measures 7-8½-10 cm / 2¾"-3¼"-4" – AT THE SAME TIME on the last row from the wrong side decrease 1 stitch in each side by purling the 2 first and the 2 last stitches on the row together = 13-15-17 stitches left on the needle. Place the stitches on 1 thread and cut the strand you have been working with. The next row is worked from the right side as follows: Knit the 19-19-20 stitches from the thread on the right-hand side of the piece, knit up 13-16-19 stitches along the side of the top piece (knit up inside the 1 edge stitch in garter stitch), knit the 13-15-17 stitches in the front of the top piece, knit up 13-16-19 stitches along the other side of the top piece and knit the 19-19-20 stitches from the thread on the left-hand side of the piece = 77-85-95 stitches on the needle. THE PIECE IS NOW MEASURED FROM HERE! Knit 1 row from the wrong side where you increase 11 stitches evenly along the row in all sizes = 88-96-106 stitches on the needle. Insert 1 marker thread between the middle 2 stitches at the front of the toe. Continue by working garter stitch back and forth until finished length. When the piece measures 2 cm / ¾" – adjust so that the next row is worked from the right side, decrease 1 stitch after the edge stitch at the beginning of the row, one on each side of the marker thread in front and one before the edge stitch at the end of the row – READ DECREASE TIP (= 4 stitches decreased). Decrease in this way every 4th row (i.e. every other row from the right side) until the piece measures approx. 5-5-6 cm / 2"-2"-2½" – bind off the remaining stitches. ASSEMBLY: Sew the seam mid back and continue the seam under the foot – sew in the outermost loop of the outermost stitch so that the seam is flat. Work another slipper in the same way. |
||||||||||||||||||||||
Diagram explanations |
||||||||||||||||||||||
|
||||||||||||||||||||||
 |
||||||||||||||||||||||
 |
||||||||||||||||||||||
 |
||||||||||||||||||||||
Have you finished this pattern?Tag your pictures with #dropspattern #marysplaceslippers or submit them to the #dropsfan gallery. Do you need help with this pattern?You'll find 24 tutorial videos, a Comments/Questions area and more by visiting the pattern on garnstudio.com. © 1982-2026 DROPS Design A/S. We reserve all rights. This document, including all its sub-sections, has copyrights. Read more about what you can do with our patterns at the bottom of each pattern on our site. |
||||||||||||||||||||||


With over 40 years in knitting and crochet design, DROPS Design offers one of the most extensive collections of free patterns on the internet - translated to 17 languages. As of today we count 324 catalogs and 12245 patterns - 12235 of which are translated into English (US/in).
We work hard to bring you the best knitting and crochet have to offer, inspiration and advice as well as great quality yarns at incredible prices! Would you like to use our patterns for other than personal use? You can read what you are allowed to do in the Copyright text at the bottom of all our patterns. Happy crafting!
Post a comment to pattern DROPS 178-51
We would love to hear what you have to say about this pattern!
If you want to leave a question, please make sure you select the correct category in the form below, to speed up the answering process. Required fields are marked *.