
Popular categories
Looking for a yarn?


Comments / Questions (36)
![]() CINZIA IRIDE wrote:
CINZIA IRIDE wrote:
Buongiorno, sono arrivata alla fine degli aumenti dello sprone. Cosa significa saltare? Avete eventualmente uno schema da poter seguire? Le spiegazioni sono piuttosto complicate. Grazie mille Buona giornata Cinzia
15.02.2016 - 14:58DROPS Design answered:
Buongiorno Cinzia Quando trova l’indicazione di saltare A.1 + 22-24-26-28-30-32 m.a.d + A.1 (= manica), significa che non deve lavorare nelle m del diag. A.1 + le m.a.d indicate + le m del diag. A.1. Punta quindi l’uncinetto dopo tutte queste m. Le maglie saltate, verranno lavorate successivamente e sono le m della manica. Buon lavoro!
16.02.2016 - 13:09
![]() Béatrice wrote:
Béatrice wrote:
Bonjour ! quelqu'un a t'il résolu ce fameux mystère des 6 augmentations sur 2 brides ? j'ai l'impression que le pull Priscilla suscite également les mêmes questions ...n'y a t'il pas une erreur dans les explications ? je commence à désespérer, à l'aide !
18.12.2015 - 19:30DROPS Design answered:
Bonjour Béatrice, la question a été transmise à nos stylistes. Merci d'avance pour votre patience.
21.12.2015 - 10:04
![]() Nectoux wrote:
Nectoux wrote:
Bonjour comment faire les augmentations du raglan sur les manches? la manche gauche est constituee du motif A1, 2 BB et 1 motif A1 (idem pour manche droite) Pour le 1er rang d'augmentation, il faut faire 3 augmentations de chaque cote du motif. comment faire 6 augmentations sur 2 BD Merci pour votre reponse
22.11.2015 - 17:53
![]() Arild Tømmerholt wrote:
Arild Tømmerholt wrote:
I oppskrift står det at man skal øke 3 dbl-st på begge sider av A.1. en gang, men da blir det feil med maskeantall så er det 2 dbl-st. på denne omg . hvor mange skal det økes der?
20.11.2015 - 09:38DROPS Design answered:
Hej Arild, Se gerne både rettelse og video. God fornøjelse!
01.02.2017 - 08:26
![]() Mira wrote:
Mira wrote:
Hei, jeg følger oppskriften for XL. Et spørsmål til raglan økningene. I oppskriften står det at det økes til raglan på hver side av A1, men det er 6 stk A1 felt pr. omgang? Jeg går utifra at det bare er ment for de 2 feltene som er på hver side av ermen? Jeg får også probl med å øke 3 dbl-st på hver side av A1 feltene da jeg bare har 2 dbl-st mellom disse? Oppskr. sier at det da økes 6 dbl-st på disse 2? blir ikke det litt mye? Fint hvis jeg kan få en forklaring på hvordan dette skal gjøres. :-)
19.11.2015 - 13:30DROPS Design answered:
Hej Mira, se gerne både rettelse og video. God fornøjelse!
01.02.2017 - 08:25
![]() Beatrice wrote:
Beatrice wrote:
Bonjour, très joli modèle, mais je cale complètement au niveau des augmentations pour le raglan. Serait-il possible de clarifier ? Merci
17.11.2015 - 23:01DROPS Design answered:
Bonjour Béatrice et merci. Les augmentations du raglan (cf augmentations-1) se font avant et après chaque motif A.1 (cf Point fantaisie). On va crocheter de chaque côté de chaque A.1: 1x 3DB, 3-5 fois (cf taille) 2 DB, et 0-2 fois 1 DB. Les augmentations se font sur les rangs de DB du point fantaisie. Bon crochet!
18.11.2015 - 09:36
|
|||||||||||||
Priscilla Cardigan |
|||||||||||||
|
|
|||||||||||||
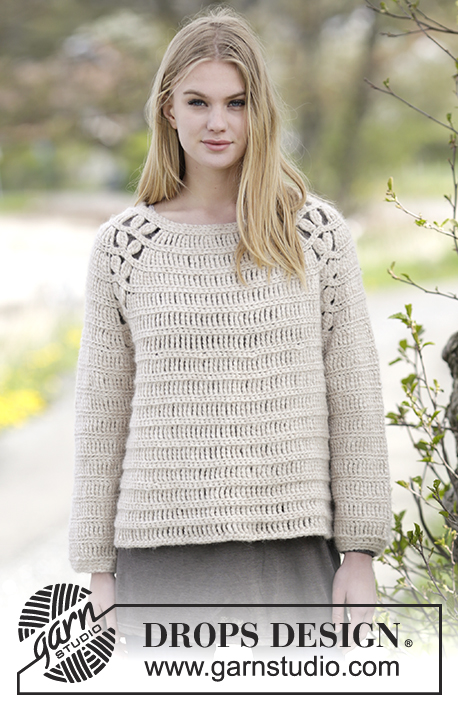
Crochet DROPS jacket with raglan and lace pattern in ”Air”. The piece is worked top down. Size: S - XXXL.
DROPS Extra 0-1182 |
|||||||||||||
|
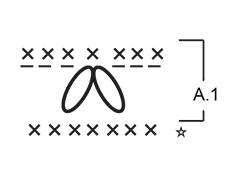
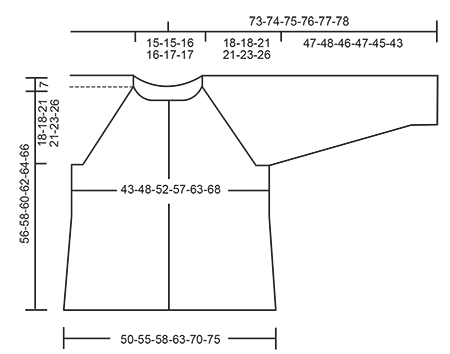
CROCHET INFO: Replace first sc at beg of every sc row with 1 ch. Replace first tr at beg of every tr row with 4 ch. Replace first dtr at beg of every dtr row with 5 ch. CROCHET TIP: If the crochet gauge vertically is not high enough switch all tr with dtr. INCREASE TIP-2: Inc 1 tr by working 2 tr in same st. In size XXL and XXXL it is necessary to inc 2 tr in same st some places. Work by making 3 tr in same st. PATTERN-1: ROW 1 (= WS): Work 1 sc in front loop of every tr. ROW 2 (= RS): Work 1 tr in back loop of every sc. Repeat rows 1 to 2 until finished measurements. PATTERN-2: ROUND 1: Work 1 tr in back loop of every sc. ROUND 2: Work 1 sc in back loop of every tr. Repeat rounds 1 to 2 until finished measurements. INCREASE TIP-1: Inc 3 tr before A.1 on BODY as follows: Work as before until 3 sc remain before A.1, work 2 tr in each of the next 3 sc. Inc 3 tr after A.1 on BODY as follows: Work 2 tr in each of the next 3 sc after A.1. Inc 3 tr before A.1 on SLEEVE as follows: Work 4 tr in 1 sc before A.1. Inc 3 tr after A.1 on SLEEVE as follows: Work 4 tr in 1st sc after A.1 Inc 2 tr before A.1 as follows: Work as before until 2 sc remain before A.1, work 2 tr in each of the next 2 sc. Inc 2 tr after A.1 as follows: Work 2 tr in each of the next 2 sc after A.1. Inc 1 tr before A.1 as follows: Work as before until 1 sc remain before A.1, work 2 tr in sc. Inc 1 tr after A.1 as follows: Work 2 tr in first sc after A.1. DECREASE TIP: Work 1 tr/sc but wait with last pull through (= 2 sts on hook), then work next tr/sc but on last pull through, pull yarn through all sts on hook = 1 sc/tr dec. PATTERN: See diagram A.1. Work A.1 as follows: ROW 1: Work ch 3, skip 1 sc, * work 1 tr in back loop of next sc but wait with last pull through (= 2 sts on hook), work 2 tr in same st the same way *, skip 3 sc, repeat from *-* 1 time, pull yarn through all 7 sts on hook, ch 3, skip 1 sc. ROW 2: Work 1 sc in each of the first ch 3, 1 sc in next st, 1 sc in each of the next 3 ch. ---------------------------------------------------------- JACKET: Worked top down, back and forth from mid front. YOKE: Work 86-86-90-90-94-94 ch (includes 5 band sts in each side of piece) on hook size 6 mm / J/10 with Air. Work next row as follows: Work 1 sc in 2nd ch from hook - READ CROCHET INFO, 1 sc in every ch = 86-86-90-90-94-94 sc. Then work as follows from RS: Work all tr in back loop of sc, and READ CROCHET TIP. Work 1 tr in each of the first 5 sc (= band), A.1 - see explanation above - over the next 7 sc, 1 tr in each of the next 4-4-5-5-6-6 sc AT THE SAME TIME inc 1-3-3-5-7-9 tr evenly - READ INCREASE TIP-2 – (= left front piece), A.1 over the next 7 sc, 1 tr in each of the next 2 sc, A.1 over the next 7 sc (= left sleeve), 1 tr in each of the next 22-22-24-24-26-26 sc AT THE SAME TIME inc 2-6-6-10-14-18 tr evenly (= back piece), A.1 over the next 7 sc, 1 tr in each of the next 2 sc, A.1 over the next 7 sc, (= right sleeve), 1 tr in each of the next 4-4-5-5-6-6 sc AT THE SAME TIME inc 1-3-3-5-7-9 tr evenly, A.1 over the next 7 sc, finish with 1 tr in each of the last 5 sc (= right front piece). Work PATTERN-1 over tr and A.1 over A.1 as before. On first row in pattern-1 there are 90-98-102-110-122-130 sc (includes A.1). Repeat pattern-1 and A.1 vertically until finished measurements. REMEMBER THE CROCHET GAUGE! On next row (= tr row) inc for raglan on every row from RS (i.e. every row with tr) on each side of A.1 – READ INCREASE TIP-1 – as follows: Inc 3 tr on each side of A.1 1 time in total, then inc 2 tr on each side of A.1 3-4-4-5-5-5 times in total, then 1 tr on each side of A.1 1-0-1-0-1-2 times in total (= 170-186-198-214-234-250 sts in total). On next row (= from WS with sc) work as follows: Work all sc in front loop of every tr. Work 1 sc in each of the first 5 tr (= band), A.1 as before, 1 sc in each of the next 15-18-20-23-27-30 tr, work 8 ch, insert 1 marker in 4th ch, skip: A.1 + 22-24-26-28-30-32 tr + A.1 (= sleeve), work 1 sc in each of the next 44-50-54-60-68-74 tr, work 8 ch, insert 1 marker in 4th ch, skip: A.1 + 22-24-26-28-30-32 tr + A.1 (= sleeve), 1 sc in each of the next 15-18-20-23-27-30 tr, A.1 as before, finish with 1 sc in each of the last 5 tr (= band) = 98-110-118-130-146-158 sc (includes A.1) and 16 ch. Move the markers upwards when working. Insert 1 marker in piece, NOW MEASURE PIECE FROM HERE. BODY: Work next row (= from RS) as follows: Pattern-1 over the first 5 sc (= band), A.1 as before, pattern-1 over the next 90-102-110-122-138-150 sts (i.e. work 1 tr in every ch under sleeve), A.1 as before, finish with pattern-1 over the last 5 sc (= band). On next row there are 114-126-134-146-162-174 sc on row (includes A.1). Work pattern-1 and A.1 over body as before. When piece measures 6 cm / 2⅜", adjust so that next row is with tr, inc 1 tr on each side of each marker in the side (= 4 sts inc), repeat inc every 8 cm / 3⅛" 3 more times. On next row with sc there are 130-142-150-162-178-190 sc on row (includes A.1). When piece measures 38-40-39-41-41-40 cm / 15"-15¾"-15¼"-16⅛"-16⅛"-15¾" from marker, adjust so that last row is with sc, fasten off. SLEEVE: = A.1 + 22-24-26-28-30-32 tr + A.1. Insert 1 marker in piece, NOW MEASURE PIECE FROM HERE. Sleeve is worked in the round, top down. Beg by working mid under sleeve as follows: Work 1 sc in the 5th ch of the 8 ch worked in armhole on body, work 1 sc in each of the next ch 3, work last round of A.1 (= sc) over A.1, 1 sc in back loop of the next 22-24-26-28-30-32 tr, last round of A.1 over A.1, before working 1 sc in each of the remaining 4 ch under sleeve = 44-46-48-50-52-54 sc. Insert 1 marker mid under sleeve, move the marker when working. Then work piece with PATTERN-2 - see explanation above. When sleeve measures 4 cm / 1½", dec 1 sc/dc on each side of marker - READ DECREASE TIP. Repeat dec every 5-4-4-4-4-3 cm / 2"-1½"-1½"-1½"-1½"-1" 7-8-8-9-9-10 more times = 28-28-30-30-32-32 sc/tr. Work until piece measures 46-47-45-46-44-42 cm / 18"-18½"-17¾"-18"-17¼"-16½" – adjust so that last round is with sc. Work 2 round with 1 sc in back loop of every sc (= 3 round in total with sc at the bottom of sleeve). Fasten off. Work the other sleeve the same way. NECK EDGE: Beg mid front and work as follows from RS: 1 sc in back loop of every sc while AT THE SAME TIME dec 4-4-5-5-6-6 sc evenly = 82-82-85-85-88-88 sc. Turn piece and work from WS. 1 sc in front loop of every sc while AT THE SAME TIME dec 4-4-5-5-6-6 sc evenly = 78-78-80-80-82-82 sc. Fasten off. ASSEMBLY: Sew the buttons on to left band. Sew on first button in 2nd sc row from neck (= approx. 2 cm / ¾" down from neck), then sew them approx. 7 cm / 2¾" apart. Button through sc rows. |
|||||||||||||
Diagram explanations |
|||||||||||||
|
|||||||||||||
 |
|||||||||||||
 |
|||||||||||||
Have you finished this pattern?Tag your pictures with #dropspattern or submit them to the #dropsfan gallery. Do you need help with this pattern?You'll find 11 tutorial videos, a Comments/Questions area and more by visiting the pattern on garnstudio.com. © 1982-2026 DROPS Design A/S. We reserve all rights. This document, including all its sub-sections, has copyrights. Read more about what you can do with our patterns at the bottom of each pattern on our site. |
|||||||||||||


With over 40 years in knitting and crochet design, DROPS Design offers one of the most extensive collections of free patterns on the internet - translated to 17 languages. As of today we count 324 catalogs and 12290 patterns - 12280 of which are translated into English (US/in).
We work hard to bring you the best knitting and crochet have to offer, inspiration and advice as well as great quality yarns at incredible prices! Would you like to use our patterns for other than personal use? You can read what you are allowed to do in the Copyright text at the bottom of all our patterns. Happy crafting!
Post a comment to pattern DROPS Extra 0-1182
We would love to hear what you have to say about this pattern!
If you want to leave a question, please make sure you select the correct category in the form below, to speed up the answering process. Required fields are marked *.