
Popular categories
Looking for a yarn?


Comments / Questions (39)
![]() DROPS Design wrote:
DROPS Design wrote:
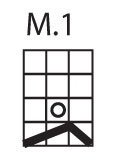
Denne rettmasken er en av de 2 rett som du har strikke på første pinne (som du løft den løse m over)
29.11.2010 - 10:34
![]() Solfrid wrote:
Solfrid wrote:
Hei! Jeg lurer på andre pinne i M1; hvor får jeg rettmasken før kastet fra, plukker jeg den opp fra runden før?
27.11.2010 - 21:14
![]() DROPS Design wrote:
DROPS Design wrote:
Du strikker 2 m ret og løfter den løse m over. Ellers stemmer oppskfiten.
25.11.2010 - 13:25
![]() Camilla Rasmussen wrote:
Camilla Rasmussen wrote:
Jeg skal lige være sikker... Skal man trække den løse maske over 2 retmasker - eller skal man strikke de to retmasker sammen, og så trække den løse maske over? Og på billedet ser det i øvrigt ikke ud til, at der er taget ud i ribben - det er kun på håndledsvarmerne, man kan se det.
23.11.2010 - 09:27
![]() LillySmuul wrote:
LillySmuul wrote:
Tingmärkide viimane seletus muudetud. Peab olema: tõsta 1 s kudumata parempidise võttega, 2 pr, tõsta kudumata silmus üle.
09.10.2010 - 12:42Tibisay Boscan wrote:
Si esposible enviarme los patrones de este modelo a mi correo le agradesco que sea en español. gracias
02.07.2010 - 05:54
![]() Sue Roth wrote:
Sue Roth wrote:
Nice! I would make this!
26.06.2010 - 14:59Ana Alice wrote:
AMEI PODERIAM TRADUZI-LO PARA O PORTUGUES?OBRIGADO
23.06.2010 - 23:42
![]() Füchsin wrote:
Füchsin wrote:
Hat die Mütze die selbe Konstruktion wie de-034? Sehr schön und interessant!
11.06.2010 - 23:11
|
||||||||||
Nieves#nievesset |
||||||||||
|
|
||||||||||
Knitted DROPS hat in ”Alpaca” and ”Kid-Silk”.
DROPS 122-12 |
||||||||||
|
PATTERN: See diagram M.1. Diagram shows the pattern from RS. KNITTING TIP: When turning mid piece, tighten thread before continuing in order to avoid a hole in transition. -------------------------------------------------------- HAT: Cast on 100 sts on circular needle size 3 mm / US 2or3 with 1 strand of each quality (= 2 strands). K 1 round and continue in rib, K2/ P2. When piece measures approx 3 cm / 1⅛" inc 1 st in the middle of each P-section by making 1 YO between the 2 P sts. Work 1 round with K over K and P over P, P YO into back of loop to avoid a hole. On next round inc 1 st in each K-section by making 1 YO = 150 sts. Work 1 round with K over K and P over P, K YO into back of loop (= K3/ P3). Change to circular needle size 3.5 mm / US 4. Continue in M.1 on all K3, work all P3 as before. Continue like this until piece measures approx 13 cm / 5⅛" (finish after row 4 in M.1). Now keep the first 30 sts on needle and slip the remaining sts on a stitch holder. Now work the top of hat in squares with shortened rows on the 30 sts as follows (row 1 = RS) - See KNITTING TIP: SQUARE-1: Work first 3 sts in M.1, turn piece and work return row. Work M.1 + 1 st, turn and work return row. Work M.1 + 2 sts, turn and work return row. Work M.1 + 3 sts, turn and work return row. Work * M.1 + 3 sts + M.1 *, turn and work return row. Work from *-* + 1 st, turn and work return row. Work from *-* + 2 sts, turn and work return row. Work from *-* + 3 sts, turn and work return row. Work ** M.1 + 3 sts + M.1 + 3 sts + M.1 **, turn and work return row. Work from **-** + 1 st, turn and work return row. Work from **-** + 2 sts, turn piece and work return row. Work from **-** + 3 sts, turn piece and work return row. Work *** M.1 + 3 sts + M.1 + 3 sts + M.1 + 3 sts + M.1 ***, turn and work return row. Work from ***-*** + 1 st, turn and work return row. Work from ***-*** + 2 sts, turn and work return row. Work from ***-*** + 3 sts, turn and work return row. Work **** M.1 + 3 sts + M.1 + 3 sts + M.1 + 3 sts + M.1 + 3 sts + M.1 ****, turn and work return row. Work from ****-**** + 1 st, turn and work return row. Work from ****-**** + 2 sts, turn and work return row. Work from ****-**** + 3 sts, turn and work return row. Work 1 row on the 30 sts on needle and leave sts on needle. Slip the next 30 sts from stitch holder back on needle and continue on these sts as follows (row 1 = RS): SQUARE 2: Work first 3 sts in M.1, turn and work return row but P tog the last st with the last st from previous square. Work M.1 + 1 st, turn piece and work return row but P tog the last st with the next st from previous square. Work M.1 + 2 sts, turn and work return row but P tog the last st with the next st from previous square. Work M.1 + 3 sts, turn piece and work return row but P tog the last st with all 3 sts in M.1 from previous square (= P4 tog). Continue in the same way as on square 1, and continue to P tog the last st with st from previous square as described above. Continue like this until you have worked all sts. Work 1 row on the 30 sts on needle and leave sts on needle. Slip the next 30 sts from stitch holder back on needle and continue on these as follows (row 1 = RS): SQUARE 3: Like square 2. SQUARE 4: Like square 2. SQUARE 5: Like square 2, but when all sts from square 4 are knitted bind off the 30 sts on square 5. ASSEMBLY: Sew tog square 1 and square 5. Sew edge to edge with small sts to create an invisible seam. |
||||||||||
Diagram explanations |
||||||||||
|
||||||||||
 |
||||||||||
Have you finished this pattern?Tag your pictures with #dropspattern #nievesset or submit them to the #dropsfan gallery. Do you need help with this pattern?You'll find 9 tutorial videos, a Comments/Questions area and more by visiting the pattern on garnstudio.com. © 1982-2026 DROPS Design A/S. We reserve all rights. This document, including all its sub-sections, has copyrights. Read more about what you can do with our patterns at the bottom of each pattern on our site. |
||||||||||


With over 40 years in knitting and crochet design, DROPS Design offers one of the most extensive collections of free patterns on the internet - translated to 17 languages. As of today we count 324 catalogs and 12290 patterns - 12280 of which are translated into English (US/in).
We work hard to bring you the best knitting and crochet have to offer, inspiration and advice as well as great quality yarns at incredible prices! Would you like to use our patterns for other than personal use? You can read what you are allowed to do in the Copyright text at the bottom of all our patterns. Happy crafting!
Post a comment to pattern DROPS 122-12
We would love to hear what you have to say about this pattern!
If you want to leave a question, please make sure you select the correct category in the form below, to speed up the answering process. Required fields are marked *.