
Popular categories
Looking for a yarn?


Comments / Questions (39)
![]() Helene wrote:
Helene wrote:
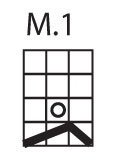
Hvordan skal man læse diagrammet på M.1
20.02.2012 - 17:15DROPS Design answered:
Du starter nederst i højre side af diagrammet. Tag 1 m løs af, strik 2 m ret, løft den løse m over. (de 2 m skal ikke strikkes sammen) du har nu 2 m i diagrammet, sådan gør du pinden ud. På næste pind laver du et omslag imellem de 2 m dvs: 1r,1oms,1r - 1r,1oms,1r - osv. God fornøjelse!
22.02.2012 - 11:04
![]() Drops Design France wrote:
Drops Design France wrote:
Bonjour Samba, pour le 1er triangle, on tricote des rangs raccourcis en commençant par 3 m (1er motif de M.1) puis en tricotant en plus à chaque nouveau rang sur l'endroit soit 1 m soit un motif complet de M.1. Bon tricot !
14.01.2012 - 17:28
![]() Samba wrote:
Samba wrote:
Je viens de démarrer ce modèle mais je suis complètement bloquée au niveau de la réalisation du 1er triangle...y aurait-il une erreur dans la traduction...Merci de bien vouloir m'éclaircir sur ce point.
14.01.2012 - 14:31
![]() Evelyne MOREAU wrote:
Evelyne MOREAU wrote:
Très joli modèle que j'ai tricoté tout en 3,5 car en 3 les côtes étaient trop serrées. Modèle un peu compliqué qui demande une expérience certaine !!! merci pour tous ces beaux modèles traduits et pour la qualité de vos laines
25.11.2011 - 11:11
![]() Sarah Z wrote:
Sarah Z wrote:
Dankeschön :) ich bin total begeistert von Ihrem schnellen Drops-Online-Service! wusste gar nicht, dass es den gibt :) gut zu wissen für zukünftige Fragen! Gruß
19.11.2011 - 13:45
![]() DROPS Deutsch wrote:
DROPS Deutsch wrote:
Die Anleitung ist angepasst.
18.11.2011 - 09:27
![]() Sarah Z wrote:
Sarah Z wrote:
Mich hatte verwirrt, dass ich zwar die Arbeit drehen soll, aber laut Anleitung danach M1+1M. stricken soll,obwohl gar keine Maschen mehr zum Abstricken vorhanden waren.... aber da fehlt einfach ein Wörtchen :)
17.11.2011 - 13:05
![]() Sarah Z wrote:
Sarah Z wrote:
Zwischen "Die ersten 3 M. in M1 stricken, die Arbeit drehen. M1 + 1 M. stricken, die Arbeit drehen und zurück stricken." fehlt einmal die Angabe "zurück stricken", wie das sonst immer extra dabei steht im weiteren Verlauf :)
17.11.2011 - 13:01
![]() DROPS Deutsch wrote:
DROPS Deutsch wrote:
Ich bin nicht ganz sicher was Sie meinen. In der Anleitung steht "die Arbeit drehen" = die Arbeit wird hin und zurück gestrickt.
17.11.2011 - 10:23
![]() Sarah Z wrote:
Sarah Z wrote:
In der DEUTSCHEN Übersetzung fehlt eine Angabe bei der Erklärung zur 1.Ecke!!! Ich habe nach stundenlanger Fehlersuche der nicht funktionierenden Anleitung schließlich mit der norwegischen und englischen Ausgabe verglichen und entdeckt: es fehlt ziemlich am Anfang die Angabe "und zurück stricken!" Sonst funktioniert nämlich das komplette System nicht weiter!
16.11.2011 - 21:18
|
||||||||||
Nieves#nievesset |
||||||||||
|
|
||||||||||
Knitted DROPS hat in ”Alpaca” and ”Kid-Silk”.
DROPS 122-12 |
||||||||||
|
PATTERN: See diagram M.1. Diagram shows the pattern from RS. KNITTING TIP: When turning mid piece, tighten thread before continuing in order to avoid a hole in transition. -------------------------------------------------------- HAT: Cast on 100 sts on circular needle size 3 mm / US 2or3 with 1 strand of each quality (= 2 strands). K 1 round and continue in rib, K2/ P2. When piece measures approx 3 cm / 1⅛" inc 1 st in the middle of each P-section by making 1 YO between the 2 P sts. Work 1 round with K over K and P over P, P YO into back of loop to avoid a hole. On next round inc 1 st in each K-section by making 1 YO = 150 sts. Work 1 round with K over K and P over P, K YO into back of loop (= K3/ P3). Change to circular needle size 3.5 mm / US 4. Continue in M.1 on all K3, work all P3 as before. Continue like this until piece measures approx 13 cm / 5⅛" (finish after row 4 in M.1). Now keep the first 30 sts on needle and slip the remaining sts on a stitch holder. Now work the top of hat in squares with shortened rows on the 30 sts as follows (row 1 = RS) - See KNITTING TIP: SQUARE-1: Work first 3 sts in M.1, turn piece and work return row. Work M.1 + 1 st, turn and work return row. Work M.1 + 2 sts, turn and work return row. Work M.1 + 3 sts, turn and work return row. Work * M.1 + 3 sts + M.1 *, turn and work return row. Work from *-* + 1 st, turn and work return row. Work from *-* + 2 sts, turn and work return row. Work from *-* + 3 sts, turn and work return row. Work ** M.1 + 3 sts + M.1 + 3 sts + M.1 **, turn and work return row. Work from **-** + 1 st, turn and work return row. Work from **-** + 2 sts, turn piece and work return row. Work from **-** + 3 sts, turn piece and work return row. Work *** M.1 + 3 sts + M.1 + 3 sts + M.1 + 3 sts + M.1 ***, turn and work return row. Work from ***-*** + 1 st, turn and work return row. Work from ***-*** + 2 sts, turn and work return row. Work from ***-*** + 3 sts, turn and work return row. Work **** M.1 + 3 sts + M.1 + 3 sts + M.1 + 3 sts + M.1 + 3 sts + M.1 ****, turn and work return row. Work from ****-**** + 1 st, turn and work return row. Work from ****-**** + 2 sts, turn and work return row. Work from ****-**** + 3 sts, turn and work return row. Work 1 row on the 30 sts on needle and leave sts on needle. Slip the next 30 sts from stitch holder back on needle and continue on these sts as follows (row 1 = RS): SQUARE 2: Work first 3 sts in M.1, turn and work return row but P tog the last st with the last st from previous square. Work M.1 + 1 st, turn piece and work return row but P tog the last st with the next st from previous square. Work M.1 + 2 sts, turn and work return row but P tog the last st with the next st from previous square. Work M.1 + 3 sts, turn piece and work return row but P tog the last st with all 3 sts in M.1 from previous square (= P4 tog). Continue in the same way as on square 1, and continue to P tog the last st with st from previous square as described above. Continue like this until you have worked all sts. Work 1 row on the 30 sts on needle and leave sts on needle. Slip the next 30 sts from stitch holder back on needle and continue on these as follows (row 1 = RS): SQUARE 3: Like square 2. SQUARE 4: Like square 2. SQUARE 5: Like square 2, but when all sts from square 4 are knitted bind off the 30 sts on square 5. ASSEMBLY: Sew tog square 1 and square 5. Sew edge to edge with small sts to create an invisible seam. |
||||||||||
Diagram explanations |
||||||||||
|
||||||||||
 |
||||||||||
Have you finished this pattern?Tag your pictures with #dropspattern #nievesset or submit them to the #dropsfan gallery. Do you need help with this pattern?You'll find 9 tutorial videos, a Comments/Questions area and more by visiting the pattern on garnstudio.com. © 1982-2026 DROPS Design A/S. We reserve all rights. This document, including all its sub-sections, has copyrights. Read more about what you can do with our patterns at the bottom of each pattern on our site. |
||||||||||


With over 40 years in knitting and crochet design, DROPS Design offers one of the most extensive collections of free patterns on the internet - translated to 17 languages. As of today we count 324 catalogs and 12290 patterns - 12280 of which are translated into English (US/in).
We work hard to bring you the best knitting and crochet have to offer, inspiration and advice as well as great quality yarns at incredible prices! Would you like to use our patterns for other than personal use? You can read what you are allowed to do in the Copyright text at the bottom of all our patterns. Happy crafting!
Post a comment to pattern DROPS 122-12
We would love to hear what you have to say about this pattern!
If you want to leave a question, please make sure you select the correct category in the form below, to speed up the answering process. Required fields are marked *.