
Popular categories
Looking for a yarn?


Comments / Questions (27)
![]() Maria Bækkelund wrote:
Maria Bækkelund wrote:
Der mangler stadig beskrivelsen i opskriften.Glæder mig til at strikke denne trøje,jakke🙃
20.08.2019 - 17:50
![]() Ann-Sofie Ekblom wrote:
Ann-Sofie Ekblom wrote:
Längtar efter mönster, så jag kan sätta igång och sticka denna snygga jacka
08.08.2019 - 11:29
![]() Rosy wrote:
Rosy wrote:
Un adorable classique style années soixante remis au goût du jour, indémodable et les motifs sont très originaux !
29.07.2019 - 09:00
![]() Eva Johnson wrote:
Eva Johnson wrote:
Ärmsluten ser väldigt klumpiga ut. Det hade varit snyggare med en likadan kant som hals- och framkant.
21.07.2019 - 07:50
![]() Lise-Lotte Ingerslev wrote:
Lise-Lotte Ingerslev wrote:
Glæder mig til at opskriften kommer så jeg kan komme igang
15.07.2019 - 16:57
![]() Geneviève wrote:
Geneviève wrote:
J'attends les explications de ce modèle avec impatience, pour ma part je le verrait bien en tons gris/écru
14.07.2019 - 14:34
![]() Soussou wrote:
Soussou wrote:
Un style chanélisant intéressant. Je le verrais bien avec des couleurs plus fondues et moins contrastées dans cette gamme.
21.06.2019 - 15:42
![]() Claire wrote:
Claire wrote:
Chanel, un clásico, siempre elegante
17.06.2019 - 21:03
![]() Marita wrote:
Marita wrote:
Smart og elegant. Spennende med andre fargevalg.
13.06.2019 - 00:03
![]() Angela wrote:
Angela wrote:
Great idea of Pauline's
11.06.2019 - 13:55
|
|||||||||||||
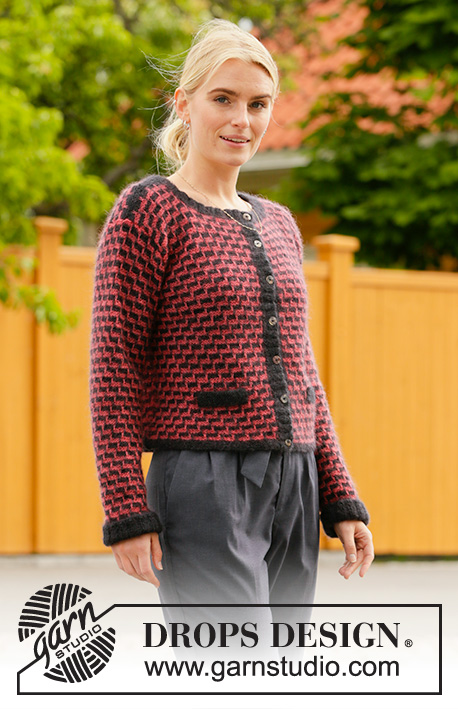
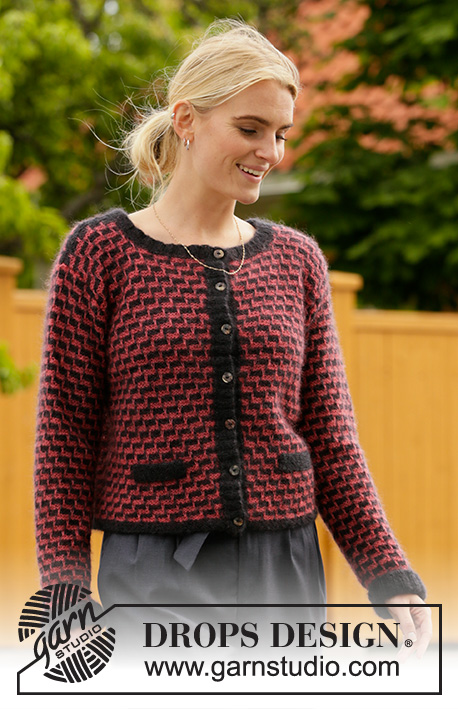
City Chic Jacket#citychicjacket |
|||||||||||||
 |
 |
||||||||||||
Knitted jacket with pepita pattern in DROPS Kid-Silk. The piece is worked with garter stitch and a square pattern with raised stitches. Sizes S – XXXL.
DROPS 206-21 |
|||||||||||||
|
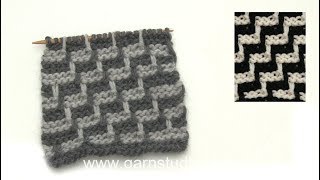
------------------------------------------------------- EXPLANATIONS FOR THE PATTERN: ------------------------------------------------------- RIDGE/GARTER STITCH (worked back and forth): Knit all rows. 1 ridge in height = Knit 2 rows. PATTERN: See diagrams A.1 to A.4. The diagrams show all rows in the pattern seen from the right side. INCREASE TIP-1 (for sides of body and sleeves). Increase on the inside of the outermost stitch on both sides on back piece and on sleeves, and on side on each front piece. Increase 1 stitch by making 1 yarn over, which is knitted twisted on the next row to avoid a hole. Then work the new stitches in garter stitch and into the pattern as you go. INCREASE TIP-2 (for neck): To work out how to increase evenly, count the total number of stitches on the needle (e.g. 104 stitches) and take away from the number of stitches you are increasing to (e.g. 122 stitches) = 18 increases. Then divide 104 stitches by 18 = 5.8. In this example, increase by making 1 yarn over after approx. each 6th stitch. On the next row work the yarn overs twisted to avoid holes. CASTING OFF TIP: To avoid the cast-off edge being tight you can cast off with a double strand or a larger size needle. BUTTONHOLES (on right band when garment is worn): Work 6-6-6-7-7-7 buttonholes. 1 buttonhole = knit 2 together and make 1 yarn over. On the next row knit the yarn over to leave a hole – NOTE the buttonholes are neatest when you purl 2 stitches together in a section of 2 purled stitches (seen from the right side). The first buttonhole is worked approx. 2 cm from the bottom edge and the last buttonhole approx. 6 to 7 cm from the top of the neck. The remaining 4-4-4-5-5-5 buttonholes are worked evenly with approx. 7 to 8 cm between each one. ------------------------------------------------------- START THE PIECE HERE: ------------------------------------------------------- JACKET – SHORT OVERVIEW OF THE PIECE: Back and front pieces and sleeves are worked separately, back and forth with circular needle and bottom up. The piece is sewn together before working the bands, the neck and false pockets. BACK PIECE: Using 2 strands of black, cast on 95-105-115-125-140-155 stitches (including 1 edge stitch on each side) with circular needle size 3 mm. Work GARTER STITCH back and forth – read description above, for approx. 2 cm, with 2 strands of black. Change to circular needle size 3.5 mm. Remove the one strand and continue working with just 1 strand of black. Now start the pepita-pattern as follows from the right side: Work A.1 over 2 stitches, repeat A.2 until there are 3 stitches left on the row, work A.3 over 1 stitch and finish with A.1 over the last 2 stitches. Continue this pattern onwards. REMEMBER THE KNITTING TENSION! When the piece measures 5 cm, increase 1 stitch on each side – read INCREASE TIP-1. Increase like this every 5-5-5-6-6-6 cm a total of 5 times on each side = 105-115-125-135-150-165 stitches. When the piece measures 31-32-33-34-35-36 cm, cast off stitches for the armholes at the beginning of each row on each side as follows: Cast off 3 stitches 1-1-1-2-3-3 time, 2 stitches 2-2-3-3-4-5 times and 1 stitch 3-3-6-8-8-11 times on each side = 85-95-95-95-100-105 stitches. Then continue the pattern as before. When the piece measures 48-50-52-54-56-58 cm, cast off the middle 33-35-35-35-34-39 stitches for neck and each shoulder is finished separately (26-30-30-30-33-33 stitches on each shoulder). Continue the pattern and cast off at the beginning of each row from the neck as follows: Cast off 1 stitch 2 times = 24-28-28-28-31-31 stitches left on shoulder. Continue working until there is ½ cm left before the piece measures 50-52-54-56-58-60 cm, but finish either after a complete stripe of black or of raspberry. Change to circular needle size 3 mm. Start from the right side and work 1 ridge back and forth over all stitches with black. Cast off with knit from the right side – read CASTING OFF TIP! Work the other shoulder in the same way. The back piece measures approx. 50-52-54-56-58-60 cm from the shoulder down. RIGHT FRONT PIECE (when the garment is worn): Using 2 strands of black, cast on 45-50-55-60-70-75 stitches (including 1 edge stitch on each side) with circular needle size 3 mm. Work garter stitch back and forth for approx. 2 cm, with 2 strands of black. Change to circular needle size 3.5 mm. Remove the one strand and continue working with just 1 strand as follows from the right side (i.e. from mid front): Work A.1 over 2 stitches, repeat A.2 until there are 3 stitches left on the row, work A.3 over 1 stitch and finish with A.1 over the last 2 stitches. Continue this pattern. When the piece measures 5 cm increase 1 stitch in the side – remember INCREASE TIP-1. Increase like this every 5-5-5-6-6-6 cm a total of 5 times = 50-55-60-65-75-80 stitches. When the piece measures 31-32-33-34-35-36 cm, cast off stitches for the armhole at the beginning of each row from the side as follows (i.e. at the beginning of each row from the wrong side): Cast off 3 stitches 1-1-1-2-3-3 times, 2 stitches 2-2-3-3-4-5 times and 1 stitch 3-3-6-8-8-11 times = 40-45-45-45-50-50 stitches. Continue the pattern as before. When the piece measures 43-45-46-48-49-51 cm, place the outermost 10-11-11-11-13-13 stitches towards mid front on 1 thread for the neck, but to avoid cutting the strand work these stitches before placing them on the thread. Continue the pattern as before and cast off at the beginning of each row from the neck as follows: Cast off 2 stitches 2 times and 1 stitch 2 times = 24-28-28-28-31-31 stitches left on the shoulder. Continue working until there is approx. ½ cm left before the piece measures 50-52-54-56-58-60 cm but finish so it matches the back piece. Change to circular needle size 3 mm. Starting from the right side work 1 ridge back and forth over all stitches with black. Cast off with knit from the right side - remember CASTING OFF TIP! LEFT FRONT PIECE (when the garment is worn): Using 2 strands of black, cast on 45-50-55-60-70-75 stitches (including 1 edge stitch on each side) with circular needle size 3 mm. Work garter stitch back and forth for approx. 2 cm, with 2 strands of black. Change to circular needle size 3.5 mm. Remove the one strand and continue working with just 1 strand from the right side as follows (i.e. from the side): Work A.1 over 2 stitches, A.3 over 1 stitch, repeat A.4 until there are 2 stitches left on the row and finish with A.1 over the last 2 stitches. Continue this pattern. When the piece measures 5 cm increase 1 stitch in the side – remember INCREASE TIP-1. Increase like this every 5-5-5-6-6-6 cm a total of 5 times = 50-55-60-65-75-80 stitches. When the piece measures 31-32-33-34-35-36 cm, cast off stitches for the armhole at the beginning of each row from the side as follows (i.e. at the beginning of each row from the right side): Cast off 3 stitches 1-1-1-2-3-3 times, 2 stitches 2-2-3-3-4-5 times and 1 stitch 3-3-6-8-8-11 times = 40-45-45-45-50-50 stitches. Continue the pattern as before. When the piece measures 43-45-46-48-49-51 cm, place the outermost 10-11-11-11-13-13 stitches towards mid front on 1 thread for the neck. Continue the pattern as before and cast off at the beginning of each row from the neck as follows: Cast off 2 stitches 2 times and 1 stitch 2 times = 24-28-28-28-31-31 stitches left on the shoulder. Continue working until there is approx. ½ cm left before the piece measures 50-52-54-56-58-60 cm but finish so it matches the other front piece and the back piece. Change to circular needle size 3 mm. Starting from the right side work 1 ridge back and forth over all stitches with black. Cast off with knit from the right side. RIGHT SLEEVE (when the garment is worn): Using 2 strands of black, cast on 58-58-62-62-66-66 stitches (including 1 edge stitch on each side) with circular needle size 3 mm. The whole of the rib is worked with 2 strands black. Purl 1 row (wrong side) then work rib (knit 2/ purl 2) with 1 edge stitch in garter stitch on each side for 6 cm. Knit 1 row from the right side where you decrease 8-8-7-7-6-6 stitches evenly spaced = 50-50-55-55-60-60 stitches. Knit 1 row from the wrong side. Remove the one strand and continue working with just 1 strand. Change to circular needle size 3.5 mm and work pattern as follows from the right side: Work A.1 over 2 stitches, repeat A.2 until there are 3 stitches left on the row, A.3 over 1 stitch and finish with A.1 over the last 2 stitches. Continue this pattern. AT THE SAME TIME when the piece measures 7-8-7-8-6-9 cm increase 1 stitch on each side – remember INCREASE TIP-1. Increase like this every 3-2½-2½-2-2-1½ cm a total of 15-17-18-21-22-24 times = 80-84-91-97-104-108 stitches. Continue working until the piece measures 51-51-51-50-49-47 cm (there is approx. 8-8-9-11-12-14 cm left for the sleeve cap and to finished length, but be aware that the bottom 3 cm will be turned up NOTE: Shorter measurements in larger sizes due to broader shoulders and longer sleeve cap. Now work the sleeve cap; i.e. cast off stitches at the beginning of every row on both sides as follows: Cast off 3 stitches 1-1-1-1-1-1 time, 2 stitches 2-2-2-3-3-3 times and 1 stitch 12-12-14-17-20-24 times on each side. Then cast off 2 stitches on each side until the sleeve measures approx. 58-58-59-60-60-60 cm. Cast off 3 stitches 1 time on each side and then cast off the remaining stitches – remember CASTING OFF TIP. The sleeve measures approx. 59-59-60-61-61-61 cm from the top down. LEFT SLEEVE: Work the left sleeve in the same way as the right sleeve, but when the pepita-pattern begins, work the first row from the right side as follows: Work A.1 over 2 stitches, A.3 over 1 stitch, repeat A.4 until there are 2 stitches left and finish with A.1 over the last 2 stitches. Continue this pattern. ASSEMBLY: Sew the shoulder seams inside the cast-off edge. Sew in the sleeves inside the 1 edge stitch. Sew the sleeve and side seams in one go inside the 1 edge stitch. Fold up the bottom 3 cm on the sleeves. RIGHT BAND (when the garment is worn): Using 2 strands of black and circular needle size 3 mm knit up from the right side approx. 109-113-117-121-125-129 stitches along the mid-front edge on the right front piece (the number of stitches must be divisible by 4 + 1). The whole band is worked with 2 strands black. Knit 1 row from the wrong side and knit 1 row from the right side. The next row is worked as follows from the wrong side (i.e. from the neck): 1 edge stitch in garter stitch, * purl 2 / knit 2 *, work from *-* until there are 4 stitches left on the row, purl 2 and finish with 2 edge stitches in garter stitch. Continue this rib, but after approx. 1-1½ cm work 6-6-6-7-7-7 BUTTONHOLES evenly spaced – read description above. Continue working until the band measures 3 cm. Cast off with knit over knit and purl over purl. LEFT BAND (when the garment is worn): Using 2 strands of black and circular needle size 3 mm knit up from the right side approx. 109-113-117-121-125-129 stitches along the mid-front edge on the left front piece. Knit 1 row from the wrong side and knit 1 row from the right side. The next row is worked as follows from the wrong side (i.e. from the bottom edge): 2 edge stitches in garter stitch, * purl 2, knit 2 *, work from *-* until there are 3 stitches left on the row, purl 2 and 1 edge stitch in garter stitch. Continue this rib for approx. 3 cm. Cast off with knit over knit and purl over purl. NECK: Using 2 strands of black and circular needle size 3 mm knit up from the right side approx. 104 to 124 stitches around the neck (including the stitches from the threads in front). Knit 1 row from the wrong side. Knit 1 row from the right side where you increase evenly to 122-126-130-130-134-142 stitches (the number of stitches must be divisible by 4 + 2) – read INCREASE TIP-2. The next row is worked as follows from the wrong side: 1 edge stitch in garter stitch, * purl 2 / knit 2 *, work from *-* until there are 3 stitches left on the row, purl 2 and finish with 1 edge stitch in garter stitch. Continue this rib, but when the neck measures approx. 1-1½ cm work the last buttonhole over the other buttonholes on the right band. Work the buttonhole by knitting together the third and fourth stitch from the edge then making 1 yarn over (the yarn over is purled on the next row to leave a hole). Continue working until the neck measures approx. 3 cm. Cast off with knit over knit and purl over purl. FALSE POCKET: The false pockets are for decoration only. Using 2 strands of black and circular needle size 3 mm cast on 20-20-22-22-24-24 stitches. Work garter stitch back and forth with 2 strands black for approx. 2 to 2½ cm. Cast off with knit from the right side. Work another false pocket in the same way. Place the pockets on the front pieces approx. 8 to 12 cm from the bottom edge and approx. 7 to 11 cm from the outermost edge on the bands (you can try the jacket on and move the pockets if you wish). Sew the false pockets on with small stitches. |
|||||||||||||
Diagram explanations |
|||||||||||||
|
|||||||||||||

|
|||||||||||||

|
|||||||||||||
Have you finished this pattern?Tag your pictures with #dropspattern #citychicjacket or submit them to the #dropsfan gallery. Do you need help with this pattern?You'll find 26 tutorial videos, a Comments/Questions area and more by visiting the pattern on garnstudio.com. © 1982-2025 DROPS Design A/S. We reserve all rights. This document, including all its sub-sections, has copyrights. Read more about what you can do with our patterns at the bottom of each pattern on our site. |
|||||||||||||


With over 40 years in knitting and crochet design, DROPS Design offers one of the most extensive collections of free patterns on the internet - translated to 17 languages. As of today we count 314 catalogues and 11820 patterns translated into English (UK/cm). 11820
We work hard to bring you the best knitting and crochet have to offer, inspiration and advice as well as great quality yarns at incredible prices! Would you like to use our patterns for other than personal use? You can read what you are allowed to do in the Copyright text at the bottom of all our patterns. Happy crafting!
Post a comment to pattern DROPS 206-21
We would love to hear what you have to say about this pattern!
If you want to leave a question, please make sure you select the correct category in the form below, to speed up the answering process. Required fields are marked *.