
Popular categories
Looking for a yarn?


Comments / Questions (36)
![]() Mathilde wrote:
Mathilde wrote:
Hejsa :) Vil blot lige høre, om denne kan strikkes i Drops Brushed Alpaca Silk? Mvh Mathilde
14.08.2019 - 21:58DROPS Design answered:
Hej Mathilde, Ja du kan bruge DROPS Brushed Alpaca Silk. Hvis du bruger garnomvandleren så vælger du DROPS Air, skriver antal gram i din størrelse, 1 tråd, så får du garnforbruget frem i DROPS Brushed Alpaca Silk. God fornøjelse!
16.08.2019 - 09:58
![]() Jessica Clenshaw wrote:
Jessica Clenshaw wrote:
Sorry, please ignore last question...I'd added up the final small amount instead of the medium, so there should indeed be 181 stitches. Now I just have to work out where I have dropped 3 stitches myself!
28.07.2019 - 14:02DROPS Design answered:
Hi Jessica! Good luck! Do not hesitate to ask if you have any questions. Happy knitting!
29.07.2019 - 17:42
![]() Jorunn Abrahamsson wrote:
Jorunn Abrahamsson wrote:
Jeg strikker str s og legger opp 88 masker. det står at jeg skal øke 8 masker jevnt fordelt og det skal da bli 97 masker totalt (jeg får 96). Når jeg starter på bærestykket står det at jeg skal strikke: 5+15+2+1+10+1+2+29+2+1+10+1+2+15+5. jeg får 101 mens i mønsteret står det at det blir 105. blir forvirret her. hva er riktig?
07.07.2019 - 10:16DROPS Design answered:
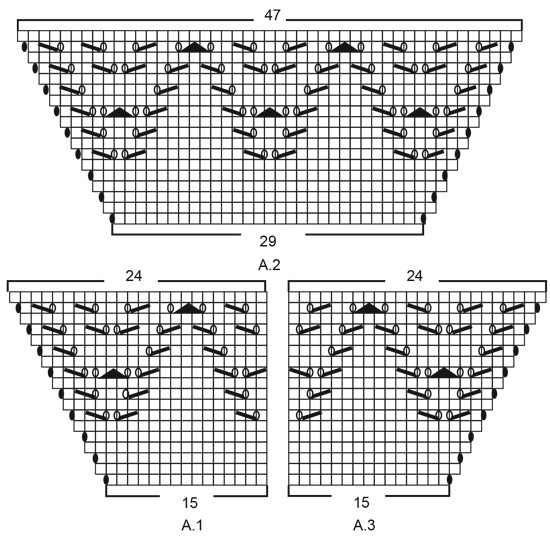
Hej. Det ska ökas 9 maskor (detta har nu korrigerats i oppskriften) och man får då 97 m i strl S. Efter första pinne får du sedan 105 m och det är inkl. 1 kast på första p i A.1, 2 kast på A.2 och 1 kast på A.3 (dessa 4 kast hade du inte räknat in). Lycka till!
08.07.2019 - 10:36
![]() Susanne Svendsen wrote:
Susanne Svendsen wrote:
Hvor finder jeg mønster A.1, A.2 og A.3
04.06.2019 - 20:12DROPS Design answered:
Hei Susanne. De ligger helt nederst på siden, sammen med resten av diagrammene. De 3 øverste diagrammene er A.1, A.2 og A.3. Om du ikke kan se dem, forsøk å bytte enhet (til feks PC / MAC). God fornøyelse
05.06.2019 - 14:46
![]() Hybynx Dnnx wrote:
Hybynx Dnnx wrote:
Wie kann ich das Strickanlritung bekommen
29.05.2019 - 10:54DROPS Design answered:
Liebe Fraun Dnnx, die Anleitung können Sie einfach drucken, wenn Sie auf "Anleitung" klicken, wird die Anleitung gedruckt. Viel Spaß beim stricken!
29.05.2019 - 11:29
![]() Maryna Cherniavska wrote:
Maryna Cherniavska wrote:
Love it.
29.01.2019 - 22:22
|
|||||||||||||||||||||||||
Berry Diamond Cardigan#berrydiamondcardigan |
|||||||||||||||||||||||||
 |
 |
||||||||||||||||||||||||
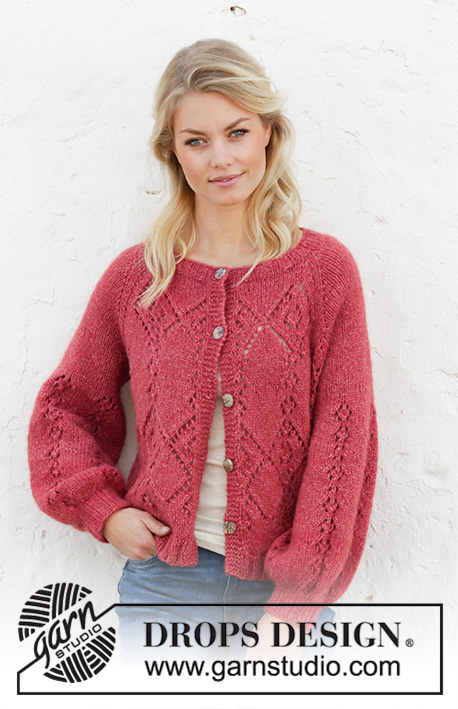
Knitted jacket with raglan and balloon sleeves in DROPS Air. Piece is knitted top down with lace pattern. Size: S - XXXL
DROPS 202-17 |
|||||||||||||||||||||||||
|
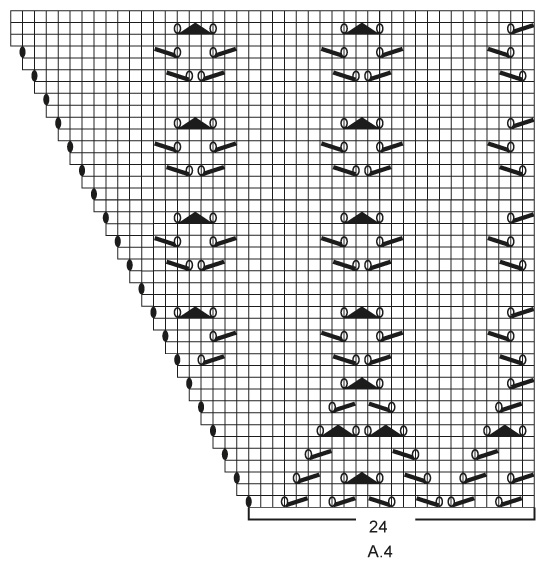
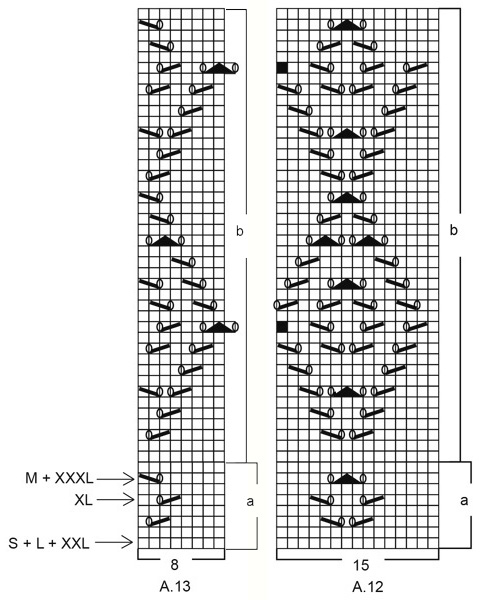
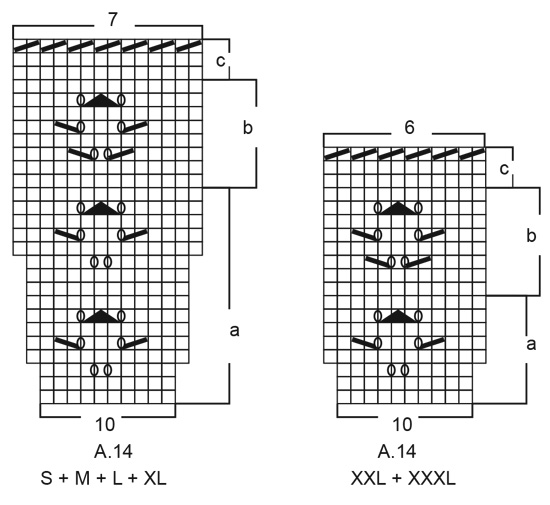
---------------------------------------------------------- EXPLANATION FOR THE PATTERN: ---------------------------------------------------------- GARTER STITCH (back and forth): K all rows. 1 ridge vertically = knit 2 rows. INCREASE/DECREASE TIP (evenly): To calculate how to increase/decrease evenly, use the total number of stitches on row (e.g. 88 stitches), minus bands (e.g. 10 stitches) and divide the remaining stitches by number of increases/decreases to be done (e.g. 9) = 8.7. In this example increase by making 1 yarn over after approx. every 9th stitch. On next row (wrong side) purl yarn overs twisted to avoid holes. Do not increase over bands. To decrease evenly in this example knit every 8th and 9th stitch together. PATTERN: See diagrams A.1 to A.14. Choose diagram for your size (applies to A.14). Diagrams show all rows in pattern seen from the right side. BUTTONHOLES: Decrease for buttonholes on right band (when garment is worn). Decrease from right side when 3 stitches remain on row as follows: Make 1 yarn over, knit the next 2 stitches together, knit last stitch. On next row knit yarn over to make holes. Decrease first buttonhole when rib in neck measures approx. 1½-2 cm. Then decrease the next 4-4-4-5-5-5 buttonholes, approx. 9½-10-10-9-9½-10 cm between each. DECREASE TIP (applies to sleeves): Decrease 1 stitch on each side of marker thread as follows: Work until 3 stitches remain before marker thread and knit 2 together, knit 2 (marker thread is between these stitches), slip 1 stitch knitwise, knit 1, pass slipped stitch over stitch worked. ---------------------------------------------------------- START THE PIECE HERE: ---------------------------------------------------------- JACKET - SHORT OVERVIEW OF THE PIECE: Work neck edge, yoke and body back and forth on circular needle from mid front, work top down. Work sleeves in the round on double pointed needles/a short circular needle, top down. NECK EDGE: Cast on 88-92-96-100-104-108 stitches (including 5 band stitches in each side towards mid front) on circular needle size 4.5 mm with Air. Purl 1 row from wrong side. Then work as follows from right side: 5 band stitches in GARTER STITCH - see explanation above - * knit 2, purl 2 *, repeat from *-* until 7 stitches remain, knit 2 and finish with 5 band stitches in garter stitch. Work rib like this for 3 cm. Knit 1 row from right side while increasing 8 stitches evenly in all sizes - read INCREASE/DECREASE TIP = 97-101-105-109-113-117 stitches. Switch to circular needle size 5.5 mm. Purl 1 row from wrong side inside 5 band stitches in garter stitch in each side. Then work yoke as explained below. YOKE: Work first row as follows from right side: 5 band stitches in garter stitch, work A.1 (= 15 stitches), work 2 stitches in stocking stitch (= raglan line), make 1 yarn over, work 10-12-14-16-18-20 stitches in stocking stitch (= sleeve), make 1 yarn over, work 2 stitches in stocking stitch (= raglan line), work A.2 (= 29 stitches), work 2 stitches in stocking stitch (= raglan line), make 1 yarn over, work 10-12-14-16-18-20 stitches in stocking stitch (= sleeve), make 1 yarn over, work 2 stitches in stocking stitch (= raglan line), work A.3 (= 15 stitches) and finish with 5 band stitches in garter stitch. There are now 105-109-113-117-121-125 stitches on needle. Continue pattern like this. I.e. on front and back piece increase in each side as shown in A.1, A.2 and A.3. On sleeves increase in each side with yarn over on each side of stitches in stocking stitch. Raglan line is always on 2 stitches in stocking stitch. Increase like this on every other row (i.e. every row from right side). On next row (wrong side) purl yarn overs twisted to avoid holes. On sleeves work the increased stitches in stocking stitch. On front and back piece work the increased stitches in pattern as shown in A.1, A.2 and A.3. REMEMBER THE KNITTING TENSION and remember BUTTONHOLES on right band - see explanation above. When A.1, A.2 and A3 have been worked vertically, there are 169-173-177-181-185-189 stitches on needle. Continue increases on sleeves and front and back piece as before but now work pattern A.4 to A.8 over A.1 to A.3 as follows: Then work A.4 (= 24 stitches) over A.1. Over the 47 stitches in A.2 work as follows: Work A.5 (= 2 stitches), work A.6 over 42 stitches (= 3 repetitions of 14 stitches) and work A.7 (= 3 stitches). Work A.8 (= 24 stitches) over A.3. Work band stitches, raglan line and sleeves as before. When row marked with arrow for your size has been worked, you have increased a total of 18-21-22-24-26-29 times from beginning of yoke, and there are now 241-269-281-301-321-349 stitches on needle. Piece measures approx. 21-24-25-27-29-32 cm from cast-on edge mid front. Work next row as follows from wrong side: Work 41-44-46-50-54-59 stitches as before (= front piece), slip the next 44-52-54-56-58-62 stitches on 1 stitch holder for sleeve, cast on 8-8-10-10-12-12 new stitches on row (= in the side under sleeve), work 71-77-81-89-97-107 stitches as before (= back piece), slip the next 44-52-54-56-58-62 stitches on 1 stitch holder for sleeve, cast on 8-8-10-10-12-12 new stitches on row (= in the side under sleeve) and work the 41-44-46-50-54-59 stitches as before (= front piece). Finish body and sleeves separately. NOW MEASURE THE PIECE FROM HERE! BODY: = 169-181-193-209-229-249 stitches. Insert 1 marker thread in each side, in the middle of the 8-8-10-10-12-12 stitches that were cast on under each sleeve. Move marker threads upwards when working, they mark the sides. Work first row as follows from right side (begin with row marked with arrow in your size to continue the pattern): 5 band stitches in garter stitch, work A.9a (= 7 stitches), work A.10a over the next 14-14-14-14-28-28 stitches (= 1-1-1-1-2-2 repetitions of 14 stitches), work A.11a (= 16 stitches), work 6-12-18-26-8-18 stitches in stocking stitch (marker thread is in the middle of these stitches), work A.12a (= 15 stitches), work A.10a over the next 42-42-42-42-70-70 stitches (= 3-3-3-3-5-5 repetitions of 14 stitches), work A.11a (= 16 stitches), work 6-12-18-26-8-18 stitches in stocking stitch (marker thread is in the middle of these stitches), work A.12a (= 15 stitches), work A.10a over the next 14-14-14-14-28-28 stitches (= 1-1-1-1-2-2 repetitions of 14 stitches), work A.13a (= 8 stitches) and finish with 5 band stitches in garter stitch. Repeat A.9a to A.13a vertically (work the remaining stitches as before) until piece measures approx. 4-5-4-6-4-4 cm from division – adjust to finish after a whole repetition vertically. Then continue on A.9b to A.13b, work the remaining stitches as before. Work until A.9b to A.13b have been worked 1 time vertically. then work in stocking stitch with 5 band stitches in garter stitch towards each side towards mid front. When piece measures 28-27-28-28-28-27 cm from division, knit 1 row from wrong side while increasing 31-35-39-39-43-51 stitches evenly = 200-216-232-248-272-300 stitches. Switch to circular needle size 4.5 mm. Work next row from right side as follows: 5 band stitches in garter stitch, * knit 2, purl 2 *, repeat from *-* until 7 stitches remain, knit 2 and finish with 5 band stitches in garter stitch. Continue rib like this for 4 cm. Cast off with knit over knit and purl over purl (to avoid a tight cast-off edge use circular needle size 5.5 mm). SLEEVE: Slip the 44-52-54-56-58-62 stitches from stitch holder in one side of piece on a short circular needle/double pointed needles size 5.5 mm and pick in addition up 1 stitch in each of the 8-8-10-10-12-12 stitches cast on under sleeve = 52-60-64-66-70-74 stitches. Insert 1 marker thread in the middle of the 8-8-10-10-12-12 stitches under sleeve and move the marker thread upwards while working, this is later used for decreasing. Begin round at the marker thread and work stocking stitch in the round. When piece measures 2 cm from division, decrease 2 stitches mid under sleeve - read DECREASE TIP. Decrease like this every other round 1-5-2-3-0-2 times in total = 50-50-60-60-70-70 stitches. When piece measures 7-8-8-6-8-6 cm, work pattern in the round as follows: Work A.14a over all stitches (= 5-5-6-6-7-7 repetitions of 10 stitches). When A.14a has been worked, there are 70-70-84-84-84-84 stitches on needle. Continue on A.14b. Repeat A.14b vertically until piece measures approx. 41-38-38-36-34-32 cm from division (shorter measurements in the larger sizes because of wider shoulders and longer sleeve cap) – adjust to finish after a whole repetition vertically. Continue on A.14c. When A.14c has been worked, there are 35-35-42-42-42-42 stitches on needle. Knit 1 round while decreasing 3-3-6-6-2-2 stitches evenly = 32-32-36-36-40-40 stitches. Switch to double pointed needles size 4.5 mm. Work rib = knit 2/purl 2 for 5 cm. Cast off with knit over knit and purl over purl (to avoid a tight cast-off edge use double pointed needles size 5.5 mm). Sleeve measures approx. 48-45-45-43-41-39 cm from division. Work the other sleeve the same way. ASSEMBLY: Sew the buttons on to the left band. |
|||||||||||||||||||||||||
Diagram explanations |
|||||||||||||||||||||||||
|
|||||||||||||||||||||||||
|
|||||||||||||||||||||||||
|
|||||||||||||||||||||||||

|
|||||||||||||||||||||||||

|
|||||||||||||||||||||||||

|
|||||||||||||||||||||||||

|
|||||||||||||||||||||||||

|
|||||||||||||||||||||||||
|
|||||||||||||||||||||||||
|
|||||||||||||||||||||||||

|
|||||||||||||||||||||||||
Have you finished this pattern?Tag your pictures with #dropspattern #berrydiamondcardigan or submit them to the #dropsfan gallery. Do you need help with this pattern?You'll find 24 tutorial videos, a Comments/Questions area and more by visiting the pattern on garnstudio.com. © 1982-2025 DROPS Design A/S. We reserve all rights. This document, including all its sub-sections, has copyrights. Read more about what you can do with our patterns at the bottom of each pattern on our site. |
|||||||||||||||||||||||||


With over 40 years in knitting and crochet design, DROPS Design offers one of the most extensive collections of free patterns on the internet - translated to 17 languages. As of today we count 314 catalogues and 11821 patterns translated into English (UK/cm). 11821
We work hard to bring you the best knitting and crochet have to offer, inspiration and advice as well as great quality yarns at incredible prices! Would you like to use our patterns for other than personal use? You can read what you are allowed to do in the Copyright text at the bottom of all our patterns. Happy crafting!
Post a comment to pattern DROPS 202-17
We would love to hear what you have to say about this pattern!
If you want to leave a question, please make sure you select the correct category in the form below, to speed up the answering process. Required fields are marked *.