
Popular categories
Looking for a yarn?


Comments / Questions (93)
![]() Gitte Stefansen wrote:
Gitte Stefansen wrote:
Forstår ikke hvad der menes med at man skal se forklaringen over når jeg skal igang med halskanten? Hvor der skiftes til pinde nr 3.
24.10.2020 - 14:16DROPS Design answered:
Hei Gitte. Det er en henvisning til hvordan RETSTRIK skal strikkes, før det fortsettes med rib. mvh DROPS design
25.10.2020 - 20:44
![]() Karin Raaen wrote:
Karin Raaen wrote:
Jeg skal strikke Davik i står L til herre. Han jeg skal strikke til liker ikke at den blir smalere etter vrangborden. Hvordan blir det hvis jeg legger opp likt antall masker til vrangborden som det antall masker som blir igjen når bolen er ferdig med å legge ut masker? Altså hvis jeg legger opp 236 masker og ikke feller og ikke øker
30.09.2020 - 12:31DROPS Design answered:
Hei Karin. Det kan du, men det at du har flere masker til vrangborden for så å felle før du begynner bolen, vil gjøre det slik at det blir en penere overgang mellom vrangbord og bol. Men om ønskelig kan du etter vrangborden kun felle det maskeantallet du må ha når du begynner på bærestykket. Slik at det ikke blir noen fellinger opp til bærestykket (sidene blir rette). Alså, i str. L, legg opp 230, strikk vrangbord, fell 34 masker = 236 masker. God Fornøyelse!
05.10.2020 - 10:20
![]() Grete wrote:
Grete wrote:
Skal det strikkes raglan annenhver omgang pluss rundfelling som angitt i mønster?
26.08.2020 - 13:18DROPS Design answered:
Hej Grete, du starter med raglan og tager derefter ind til rundfelling ifølge opskriften. God fornøjelse!
27.08.2020 - 14:51
![]() Wendy Jackson wrote:
Wendy Jackson wrote:
I’m at the point where I’m putting sleeves onto the same needle with front and back. Im struggling to knit the sleeve stitches as they are so tight (they are a curve). How do I proceed. Also where I decrease at each side of the arms how do I keep my tension from being too loose at each join? Thank you
26.08.2020 - 08:19DROPS Design answered:
Dear Mrs Jackson, this video shows how to put sleeves on the same needle as body to work yoke, the first rounds might be somewhat tricky, but after some rounds it will work nice. For the first rounds you can get helped with another circular needle (work for example with 2 circular needles in the round) - your DROPS store might have even more tips for you, don't hesitate to ask them even per mail or telephone. Happy knitting!
26.08.2020 - 08:40
![]() COURAUD wrote:
COURAUD wrote:
Bonjour, J'ai commencé le modèle Taille L pour mon mari et si je compare vos mesures avec celle de ses pulls la longueur sous bras = 37cm est courte. La hauteur totale de ses pulls est plutôt de 68cm alors que vous donner 62 pour taille L. Est ce que 62cm c'est avec les côtes ? Merci de votre réponse Laurence
01.04.2020 - 17:39DROPS Design answered:
Bonjour Mme Couraud, les 62 cm en taille L sont bien la hauteur totale: 7 cm de côtes + 30 cm avant les emmanchures + 2 cm de raglan + 19 cm d'empiècement + 4 cm d'épaules = 62 cm. Vous pouvez choisir d'allonger le pull en vous inspirant d'autres modèles de pulls du groupe B par exemple. Votre magasin devrait pouvoir également vous aider si besoin, même par mail ou téléphone. Bon tricot!
02.04.2020 - 07:40
![]() Tina Damgaard wrote:
Tina Damgaard wrote:
Er ved at strikke Dalvik sweater i str M. I diagram A1, pind 39 skal man lukke 2 masker af i diagram = 9 masker x 18 = 162 masker på pinden. På pind 40 i diagram er der en maske for meget ? 10 masker til mønstret ? Læser jeg diagrammet forkert ?
30.03.2020 - 19:32DROPS Design answered:
Hej Tina, på pind nr 39 mangler der en maske, der skal være 12 masker som på pinden før og der skal nu tages 2 masker ind for hver rapport (4 ret masker imellem hver indtagning). Tak for info, så retter vi diagrammet :)
16.04.2020 - 15:39
![]() Marja Rosenberg wrote:
Marja Rosenberg wrote:
Haluaisin tehdä Dalvik puseron Baby Merinosta, kuinka paljon silmukoita lisään kokoon XL ?
17.03.2020 - 10:15DROPS Design answered:
Hei, Baby Merino -lanka kuuluu toiseen lankaryhmään, koska se on ohuempi lanka. Lankavaihtoehtoa käytettäessäsi sinun tulee käyttää jotakin toista lankaryhmään B kuuluvaa lankaa, jonka tiheys on sama kuin ohjeessa mainittu tiheys.
19.03.2020 - 17:55
![]() Magdalena Stępień wrote:
Magdalena Stępień wrote:
Czy sweter można robić reglanem od góry?
27.02.2020 - 14:49DROPS Design answered:
Witaj Magdo! Jak najbardziej, trochę się tylko trzeba będzie pobawić z opisem. Przepraszam za późną odpowiedź. Jak będziesz w przyszłości miała pytania, to w formularzu zaznacz PYTANIE, a nie KOMENTARZ, wtedy szybciej odpowiemy. A propos, czy już zagłosowałaś na nową kolekcję DROPS Jesień/Zima, zapraszamy serdecznie!
05.06.2020 - 17:42
![]() Kirsti wrote:
Kirsti wrote:
Det står at bolen i str. L skal være 37 cm når man setter på ermene og starter på mønster, men det må da være 37 cm fra vrangbord? Ellers blir den jo alt for kort...
03.02.2020 - 19:54DROPS Design answered:
Hej Det är 37 cm totalt den ska vara, men om du önskar göra den lite längre kan du självklart göra det. Lycka till!
07.02.2020 - 10:04
![]() Bjorna wrote:
Bjorna wrote:
Ik ben de trui maat M aan het breien. Er staat dat ik bij 36cm moet afkanten voor de mouwen. Bij alle andere truien die ik op ging meten beginnen de mouwen pas bij 46 cm hoogte. Beginnen de mouwen daar echt of valt het hoger? Ik ben bang om een heel kort truitje te krijgen. Zou het afkanten moeten beginnen ter hoogte van de oksels of eerder?
08.01.2020 - 16:33DROPS Design answered:
Dag Bjorna,
Het afkanten van de mouwen begint onder de oksel. In de grotere maten kant je eerder af dan bij de kleinere maten, vanwege bredere schouders in de grotere maten.
14.01.2020 - 20:10
|
|||||||||||||||||||
Dalvik#dalviksweater |
|||||||||||||||||||
 |
 |
||||||||||||||||||
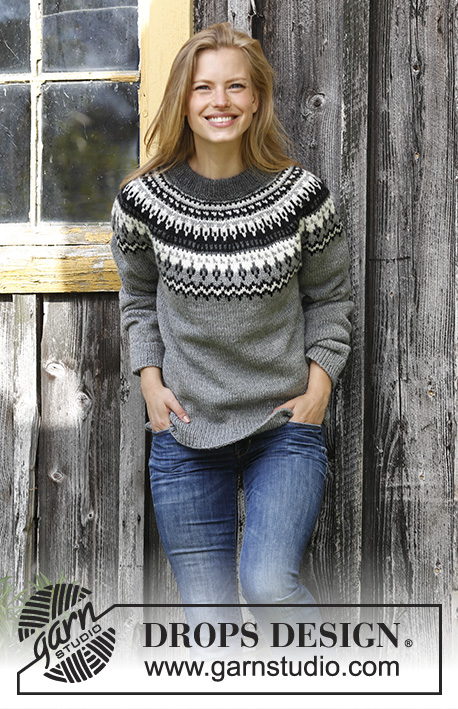
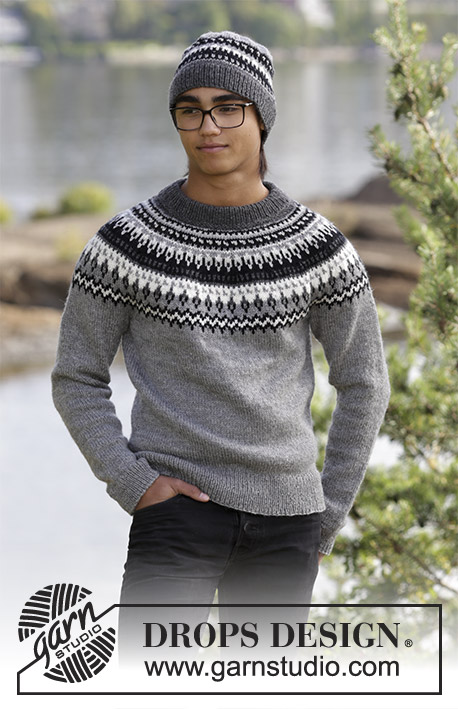
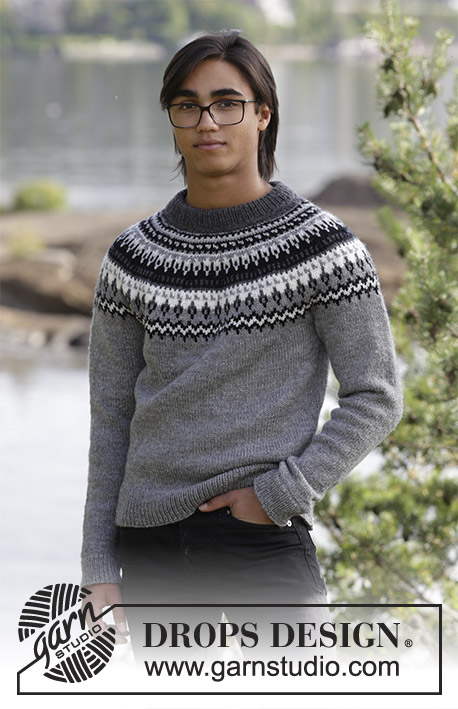
The set consists of: Men’s knitted jumper with raglan, round yoke and multi-coloured Nordic pattern and knitted hat with multi-coloured Nordic pattern. Sizes S - XXXL. The piece is worked in DROPS Karisma.
DROPS 185-1 |
|||||||||||||||||||
|
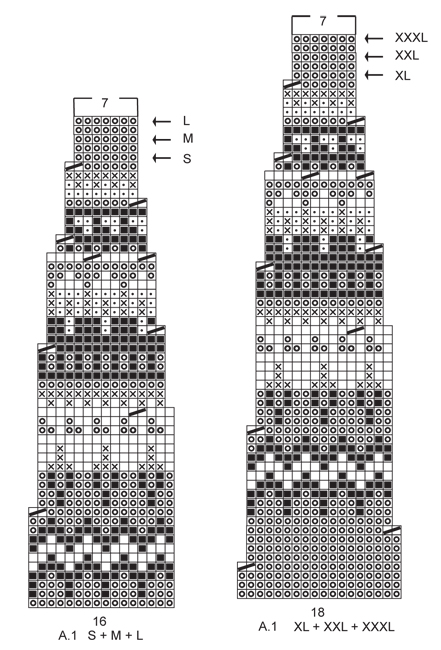
INFORMATION FOR THE PATTERN: RIDGE/GARTER STITCH (worked in the round): 1 ridge = 2 rounds. Knit 1 round and purl 1 round. INCREASE TIP (for sides of body and mid under sleeves): Start 1 stitch before the marker, make 1 yarn over, knit 2 (the marker sits in the middle of these 2 stitches), make 1 yarn over (= 2 stitches increased). On the next round knit the yarn overs twisted to avoid holes. DECREASE/INCREASE TIP: To work out how to decrease/increase evenly, count the total number of stitches on the needle (e.g. 230 stitches), and divide by the number of decreases/increase to be made (e.g. 46) = 5. In this example, when decreasing knit every 4th and 5th stitch together. If you are increasing, make 1 yarn over after every 5th stitch, on the next round knit the yarn overs twisted to avoid holes. RAGLAN: Decrease to raglan on each side of the marker in each transition between body and sleeves. Start 2 stitches before the marker, knit 2 together, marker sits here, slip 1 stitch as if to knit, knit 1, pass the slipped stitch over the knitted stitch (= 2 stitches decreased). PATTERN: Jumper: See diagram A.1. Choose diagram for your size. Hat: See diagram A.2. The diagrams show all the rows in the pattern seen from the right side. The whole pattern is worked in stocking stitch. KNITTING TIP: To avoid the knitting tension becoming tighter when working pattern with more than one colour, it is important that the strands at the back of the piece do not pull. You can increase a needle size when working pattern if this is a problem. ---------------------------------------------------------- JUMPER: The piece is worked in the round with circular needle, bottom up. The sleeves are worked in the round with double pointed needles. BODY: Cast on 230-252-270-300-332-362 stitches with circular needle size 3 mm and medium grey. Work rib (knit 1 / purl 1) for 7 cm. Knit 1 round where you decrease 46-50-50-60-70-72 stitches evenly on round – read DECREASE/INCREASE TIP = 184-202-220-240-262-290 stitches. Change to circular needle size 4 mm. Continue with stocking stitch. REMEMBER THE KNITTING TENSION! On the next round, insert 1 marker at the beginning of the round and 1 marker after 92-101-110-120-131-145 stitches (= in the sides). Now increase 1 stitch on each side of both markers – read INCREASE TIP (= 4 stitches increased on the round). Increase in each side every 22nd-23rd-24th-24th-28th-28th round a total of 4 times = 200-218-236-256-278-306 stitches. When the piece measures 35-36-37-37-39-40 cm, cast off 8-8-10-10-12-14 stitches in each side for the armholes (i.e. cast off 4-4-5-5-6-7 stitches on each side of both markers) = 92-101-108-118-127-139 stitches left on the front and back pieces. Lay the piece to one side and work sleeves. SLEEVE: Cast on 66-66-76-76-76-84 stitches with double pointed needles size 3 mm and medium grey. Work rib (knit 1 /purl 1) for 5 cm. Knit 1 round where you decrease 18-18-22-22-22-24 stitches evenly on round = 48-48-54-54-54-60 stitches. Insert 1 marker at the beginning of the round (= mid under sleeve). Change to double pointed needles size 4 mm and work stocking stitch in the round. When the piece measures 6-7-9-7-6-10 cm increase 2 stitches mid under the sleeve – read INCREASE TIP. Increase in this way every10th-8th-9th-8th-7th-6th round a total of 12-14-12-14-16-16 times = 72-76-78-82-86-92 stitches. When the piece measures 49-48-48-46-47-46 cm (NOTE: Shorter measurements in the larger sizes because of broader shoulder measurements), cast off the middle 8-8-10-10-12-14 stitches under the sleeve = 64-68-68-72-74-78 stitches left on the needle. Lay the piece to one side and work one more sleeve. YOKE: Place the sleeves on the same circular needle as the body where you cast off stitches for the armholes = 312-338-352-380-402-434 stitches on the needle. Insert 1 marker in each transition between body and sleeves (= 4 markers). Work stocking stitch with medium grey. AT THE SAME TIME on the first round decrease to RAGLAN – see description above (= 8 stitches decreased). Decrease in this way every 2nd round a total of 2-2-3-3-3-3 times = 296-322-328-356-378-410 stitches. After the last round of decreases, knit 1 round where you decrease 24-34-24-32-36-32 stitches evenly on round = 272-288-304-324-342-378 stitches left on needle. Continue by working pattern according to diagram A.1 (choose diagram for your size = 17-18-19-18-19-21 repeats on the round). Read KNITTING TIP! Continue pattern in this way and decrease as shown in the diagram. When A.1 has been completed (finish after a round marked with an arrow in the diagram for your size) there are 119-126-133-126-133-147 stitches left on the needle and the piece measures approx. 54-56-58-60-62-64 cm. Now you can work an elevation in the back of the neck or go straight to working neckline if you do not want an elevation. ELEVATION IN BACK OF NECK: For a better fit you can work an elevation in the back of the neck with dark grey. Insert 1 marker mid back of neck. Knit 14-15-16-15-16-18 stitches past the marker, turn, tighten strand and purl 28-30-32-30-32-36 stitches back. Turn and knit 42-45-48-45-48-54 stitches, turn, tighten strand and purl 56-60-64-60-64-72 stitches back. Turn and knit 70-75-80-75-80-90 stitches, turn, tighten strand and purl 84-90-96-90-96-108 stitches back. Turn, tighten strand and knit to mid back. NECKLINE: Knit 1 round with dark grey where you decrease 25-30-35-26-29-39 stitches evenly on round = 94-96-98-100-104-108 stitches around the neck. Change to short circular needle size 3 mm. Work 2 RIDGES – see description above, AT THE SAME TIME on the last round, increase 22-22-24-26-26-26 stitches evenly on round = 116-118-122-126-130-134 stitches. Continue working rib (knit 1 /purl 1). When the rib measures 8 cm work 1 ridge. Loosely cast off – Make sure the cast-off edge is not tight! Fold the collar double and fasten on the inside, ridge to ridge. ASSEMBLY: Sew the openings under the sleeves ---------------------------------------------------------- HAT: The hat is worked in the round with circular needle. Change to double pointed needles when necessary. Cast on 132-154 stitches with circular needle size 3 mm and dark grey. Work rib (knit 1 /purl 1) for 4 cm. Change to circular needle size 4 mm. Knit 1 round AT THE SAME TIME as you decrease 24-34 stitches evenly on round – read DECREASE/INCREASE TIP = 108-120 stitches. Work A.2 (= 9-10 repeats of 12 stitches) – read KNITTING TIP! REMEMBER THE KNITTING TENSION! When A.2 has been completed continue working with medium grey to finished length. When the piece measures 17-18 cm decrease 8-0 stitches evenly on round and at the same time insert 10 markers in the piece with 10-12 stitches between each marker = 100-120 stitches. On the next round decrease 1 stitch after each marker by knitting 2 stitches together (= 10 stitches decreased). Decrease in this way every 2nd round a total of 9-11 times = 10-10 stitches. On the next round knit all stitches together 2 and 2 = 5 stitches. Cut the strand, pull it through the remaining stitches and fasten well. The hat measures approx. 24-26 cm in height. |
|||||||||||||||||||
Diagram explanations |
|||||||||||||||||||
|
|||||||||||||||||||
|
|||||||||||||||||||

|
|||||||||||||||||||
Have you finished this pattern?Tag your pictures with #dropspattern #dalviksweater or submit them to the #dropsfan gallery. Do you need help with this pattern?You'll find 32 tutorial videos, a Comments/Questions area and more by visiting the pattern on garnstudio.com. © 1982-2025 DROPS Design A/S. We reserve all rights. This document, including all its sub-sections, has copyrights. Read more about what you can do with our patterns at the bottom of each pattern on our site. |
|||||||||||||||||||


With over 40 years in knitting and crochet design, DROPS Design offers one of the most extensive collections of free patterns on the internet - translated to 17 languages. As of today we count 314 catalogues and 11820 patterns translated into English (UK/cm). 11820
We work hard to bring you the best knitting and crochet have to offer, inspiration and advice as well as great quality yarns at incredible prices! Would you like to use our patterns for other than personal use? You can read what you are allowed to do in the Copyright text at the bottom of all our patterns. Happy crafting!
Post a comment to pattern DROPS 185-1
We would love to hear what you have to say about this pattern!
If you want to leave a question, please make sure you select the correct category in the form below, to speed up the answering process. Required fields are marked *.