
Looking for a yarn?


Comments / Questions (21)
![]() Victoria wrote:
Victoria wrote:
I don’t see instructions for joining the front shoulder straps to the back shoulder straps. Could you please clarify? Thank you.
09.07.2025 - 23:13DROPS Design answered:
Dear Victoria, they are sewn right over the shoulder, at the very top. Happy knitting!
14.07.2025 - 00:59
![]() Trille Hansen wrote:
Trille Hansen wrote:
Trille Hansen 01.07.2020 - 14:00: Jeg kan ikke få maske antallet til at passe på midt stk. antal af m passer ikke, på ingen af str. jeg skal have 51 i hver side og 88 i midt men det kan aldrig blive det antal masker jeg ender ud med efter at ha slået 218 m op og hæklet 1 række - 180 m. Hvordan kommer jeg videre?
01.07.2020 - 14:28DROPS Design answered:
Hej Trille, jo hvis du hopper over hver 6.maske på første række så vil du få 180 st. Det er de 180 du deler op, så du har 88 m over forstykket og 46 i hver side til bagstykker. God fornøjelse!
02.07.2020 - 11:46
![]() Trille Hansen wrote:
Trille Hansen wrote:
Jeg kan ikke få maske antallet til at passe på midt stk. antal af m passer ikke, på ingen af str. jeg skal have 51 i hver side og 88 i midt men det kan aldrig blive det antal masker jeg ender ud med efter at ha slået 218 m op og hæklet 1 række - 180 m. Hvordan kommer jeg videre?
01.07.2020 - 14:00
![]() ANTONELLA wrote:
ANTONELLA wrote:
Buonasera, ho finito la parte superiore e il davanti. Sto iniziando il DIETRO SINISTRO ma non capisco cosa intendete per 4 maglie alte verso il centro dietro...cioé dopo aver lavorato le prime 46 m (taglia L) della parte superiore dove devo lavorarle queste 4 m alte? Grazie mille per la risposta!
15.02.2020 - 17:46DROPS Design answered:
Buongiorno Antonella. Lavora le 46 maglie per il dietro sinistro. Le 4 maglie non sono in aggiunta. La tunica è aperta sul dietro e queste 4 maglie sono le 4 maglie di bordo su cui andranno attaccati i bottoni. Buon lavoro!
17.02.2020 - 12:42
![]() Sapienza Antonella wrote:
Sapienza Antonella wrote:
Buongiorno, sto iniziando la parte del dietro sinistro (ho già eseguito parte superiore e davanti) ma non ho capito cosa intendete nelle prime due righe dello schema quando dite "4 maglie alte verso il centro dietro". Inizio lavorando le 46 m (taglia L) dalla parte superiore e poi devo fare 4 m alte in più per il bordo?? Grazie per laiuto
15.02.2020 - 17:42
![]() Lene Nielsen wrote:
Lene Nielsen wrote:
Hvad menes der med de 4 stm mod midt bagpå ved venstre rygstykke ?? Jeg kan ikk lige greje den
16.07.2019 - 18:03DROPS Design answered:
Hej Lene, du skal få en kant med st mod midt bagpå. God fornøjelse!
30.09.2019 - 08:54
![]() Carmen Nevin wrote:
Carmen Nevin wrote:
I am a complete beginner and am struggling to find a simple tunic style dress pattern for my 6 year old daughter and this is the closest I have found! Any plans to convert/ alter it to suit older (not toddler) girls? Many thanks!
18.02.2019 - 13:48DROPS Design answered:
Dear Mrs Nevin, we are unfortunately not able to adjust every pattern to every single request. For any individual assistance, please contact - even per mail or telephone - the store where you bought the yarn. Happy crocheting!
18.02.2019 - 16:00
![]() Sylvie wrote:
Sylvie wrote:
Si je ne veux pas faire le dos avec des boutons mais en continu, puis-je faire comme le devant? ...ou aurais-je des problèmes pour le mettre? Merci
08.02.2019 - 14:23DROPS Design answered:
Bonjour Sylvie, il sera probablement plus seyant et plus facile à enfiler si vous conservez les boutons dans le dos. Bon crochet!
08.02.2019 - 15:07
![]() Elisabeth wrote:
Elisabeth wrote:
Hi. I started with this pattern yesterday. I'm just wondering if I understand right that the 199 chain will go around the waist when finished? I'm of normal weight and thought size M would be best. But when putting it around the waist, I have approx. 25cm left. I'm using the correct hook size and the same yarn, so I'm hesitating to continue and later have an oversized tunic.
30.07.2018 - 12:48DROPS Design answered:
Dear Elisabeth, when you add a couple of rows to a chainstitch row it will pull it together, contract ot somewhat. First you should always do a swatch and check your cochet gauge, and then start the piece, and see the length after a few rows. Happy crafting!
31.07.2018 - 08:06
![]() Mariëlle wrote:
Mariëlle wrote:
Bedankt Garnstudio voor dit leuke patroon! Inmiddels is het af. Ik wil nog wel even doorgeven dat ik zeker één bol extra verbruikt heb dan wat er volgens het patroon aangegeven staat. Wellicht handig voor andere haaksters die ook nog aan dit project willen beginnen.
24.01.2018 - 10:41
|
|
Peaceful Mind#peacefulmindtunic |
|
|
|
|
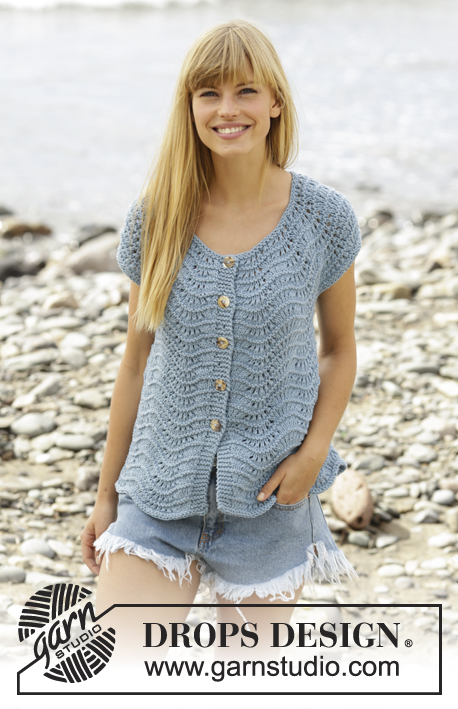
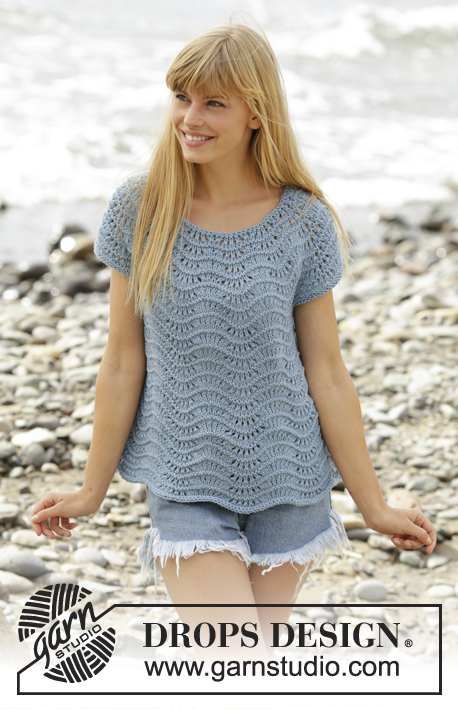
Crochet DROPS tunic with fan pattern in “Belle”. Size: S - XXXL.
DROPS 168-26 |
|
|
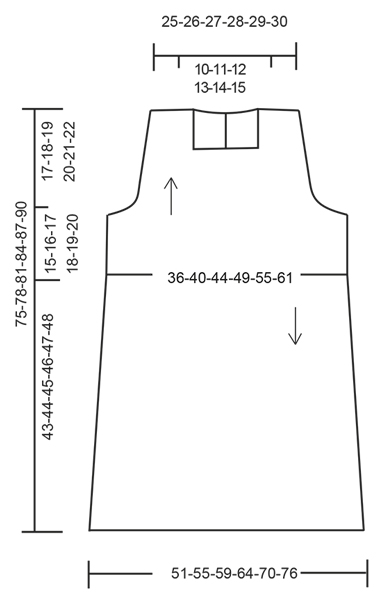
CROCHET INFO: Replace first tr at beg of every tr row/round with 3 ch. Finish a round with tr with 1 sl st in 3rd ch. DECREASE TIP: Dec at beg of round as follows: Work sl sts over no of tr to be dec. Dec at end of round as follows: When no of tr to be dec remains, turn piece. ---------------------------------------------------------- TUNIC: Worked in several part and in different directions. First work top part with front and back piece, then work body down and in the round. TOP PART: Work 180-199-218-242-271-300 ch on hook size 3.5 mm with Belle. Turn and work 1 tr in fourth ch from hook (= 2 tr), * skip 1 ch, 1 tr in each of the next 5 ch *, repeat from *-* and finish by skipping 1 ch, 1 tr in each of the last 1-2-3-3-2-1 ch = 148-164-180-200-224-248 tr. Turn and work 1 tr in every tr back and forth until piece measures 15-16-17-18-19-20 cm - READ CROCHET INFO. REMEMBER THE CROCHET TENSION! Cut the yarn. Then work front piece back and forth over the middle 72-80-88-98-110-122 tr on row (= 38-42-46-51-57-63 tr remain in each side for back piece). FRONT PIECE: = 72-80-88-98-110-112 tr. Work 1 tr in every tr AT THE SAME TIME dec for armhole in each side on every row as follows: 3 tr 1-1-1-2-2-3 times, 2 tr 2-3-4-4-6-7 times and 1 tr 4-4-4-4-4-3 times = 50-54-58-62-66-70 tr - READ DECREASE TIP. Continue to work until piece measures 24-26-28-30-32-34 cm. Now work only over the first 11-12-13-14-15-16 tr on row (= from RS). Work 1 tr in every tr until piece measures 32-34-36-38-40-42 cm. Repeat in the opposite side but now work over the last 11-12-13-14-15-16 tr on row (= from RS). The 28-30-32-34-36-38 tr not worked towards mid front = neck. LEFT BACK PIECE: Now work over the first 38-42-46-51-57-63 from top part, 4 tr towards mid back = band. Cast off for armhole in the side as on front piece = 27-29-31-33-35-37 tr. When piece measures 30-32-34-36-38-40 cm, work only over the last 11-12-13-14-15-16 tr on row (= from RS). Work 2 rows in total over these 11-12-13-14-15-16 sts, the 16-17-18-19-20-21 tr not worked towards mid back = neck. Fasten off, piece measures 32-34-36-38-40-42 cm. RIGHT BACK PIECE: Work as left piece but reversed. BODY: Worked top down, from underside of ch-row from top part. Place the outermost 4 tr from left back piece under the outermost 4 tr from right back piece (= bands), beg mid back and work 1 tr through both layers in each of the 4 tr on band, then work 1 tr in every tr from bottom edge of ch-row, finish with 1 sl st in third ch at beg of round = 144-160-176-196-220-244 tr. NOW MEASURE PIECE FROM HERE! Work 1 round with 1 tr in every tr while inc 1-0-4-4-0-1 tr = 145-160-180-200-220-245 tr. Now work fan pattern as follows: ROUND 1: 1 dc in first tr, *4 ch, skip 4 tr, 1 dc in next tr *, repeat from *-* the entire round and finish with 4 ch, skip 4 tr and 1 sl st in first dc = 29-32-36-40-44-49 ch-spaces. ROUND 2: 3 tr + 2 ch + 3 tr in every ch-space. ROUND 3: Work sl sts until first ch-space, then work 3 tr + 2 ch + 3 tr in every ch-space. Repeat 3rd round until piece measures 18 cm in all sizes. WORK NEXT ROUND AS FOLLOWS: Work sl sts until first ch-space, then work 4 tr + 2 ch + 4 tr in every ch-space. Repeat this round until piece measures 31 cm in all sizes. WORK NEXT ROUND AS FOLLOWS: Work sl sts until first ch-space, then work 4 dtr + 2 ch + 4 dtr in every ch-space. Repeat this round until piece measures 43-44-45-46-47-48 cm Fasten off. CROCHET EDGE AROUND ARMHOLE: Work an edge around the armholes as follows: ROUND 1: Work 1 ch, 1 dc, * 1 ch, skip approx. 1 cm, 1 dc *, repeat from *-* and finish with 1 sl st in ch at beg of round – make sure to work a no of dc/ch that is divisible by 4. ROUND 2: Work 1 ch, work 1 dc around first ch-space, * 1 dc around same ch-space, 3 ch, 1 tr in first ch, work 2 dc around next ch-space, 1 dc around next ch-space *, repeat from *-* and finish with 1 sl st in first ch on round. Fasten off. CROCHET EDGE AROUND NECK: Work an edge around the neck as follows: ROW 1: Work 1 ch, 1 dc, * 1 ch, skip approx. 1 cm, 1 dc *, repeat from *-* make sure to work a no of dc/ch that is divisible by 4. Turn. ROW 2: Work 1 ch, work 1 dc around first ch-space, * 1 dc around same ch-space, 3 ch, 1 tr in first ch, work 2 dc around next ch-space, 1 dc around next ch-space *, repeat from *-*. Fasten off. ASSEMBLY: Distribute 5-5-5-6-6-6 buttons on left band mid back and fasten. Button between tr on right band. |
|
 |
|
Have you finished this pattern?Tag your pictures with #dropspattern #peacefulmindtunic or submit them to the #dropsfan gallery. Do you need help with this pattern?You'll find 8 tutorial videos, a Comments/Questions area and more by visiting the pattern on garnstudio.com. © 1982-2025 DROPS Design A/S. We reserve all rights. This document, including all its sub-sections, has copyrights. Read more about what you can do with our patterns at the bottom of each pattern on our site. |


With over 40 years in knitting and crochet design, DROPS Design offers one of the most extensive collections of free patterns on the internet - translated to 17 languages. As of today we count 320 catalogues and 12094 patterns translated into English (UK/cm). 12094
We work hard to bring you the best knitting and crochet have to offer, inspiration and advice as well as great quality yarns at incredible prices! Would you like to use our patterns for other than personal use? You can read what you are allowed to do in the Copyright text at the bottom of all our patterns. Happy crafting!
Post a comment to pattern DROPS 168-26
We would love to hear what you have to say about this pattern!
If you want to leave a question, please make sure you select the correct category in the form below, to speed up the answering process. Required fields are marked *.