
Looking for a yarn?


Comments / Questions (68)
![]() Laura Holm wrote:
Laura Holm wrote:
Hej:-) Hvad menes der med: "A.2 (=2 fm) 6-7-7-8-8-9 gange i bredden"? (Linje 5 i opskriften)
17.04.2016 - 17:26DROPS Design answered:
Hej Laura. Du haekler A.2 (som er 2 fm) 6-7-8 eller 9 gange i bredden afhaengigt af hvilken str du laver
18.04.2016 - 14:20Rainbow wrote:
Thanks for helping. Is there a video tht shows how to do the below? "sew small stitches through both layers to make a tunnel to thread the tie through." Regards Rainbow
06.03.2016 - 08:59DROPS Design answered:
Dear Mrs Rainbow, there is no such video yet but your request has been added to our list - while it comes, I'll try to reword you how to process: fold 2 cm in each side towards WS (see also dotted line in chart) and sew small sts along this dotted line to keep the edge on place and you get a tunnel casing where you can then thread the string through - see chart at the very bottom, with top from WS and string through the tunnel casings on each side. Happy crocheting!
07.03.2016 - 10:08Rainbow wrote:
Then work 1 dc in every dc until piece measures 24-26-28-30-32-34 cm / 9½"-10 1/4"-11"-11 3/4"-12½"-13½" from cast-on edge mid front. Cast-on edge mid front means from beginning top?? Regards Rainbow
05.03.2016 - 06:50DROPS Design answered:
Dear Mrs Rainbow, yes you measure from cast-on edge, ie from top edge of front piece, this is the total length of top (see also measurement chart - in cm). Happy crocheting!
05.03.2016 - 18:09Rainbow wrote:
Continue with 1 dc in every dc and continue to dec lace pattern mid front into a tip. don't get this, could you please explain?? Thanks, Rainbow
02.03.2016 - 12:45DROPS Design answered:
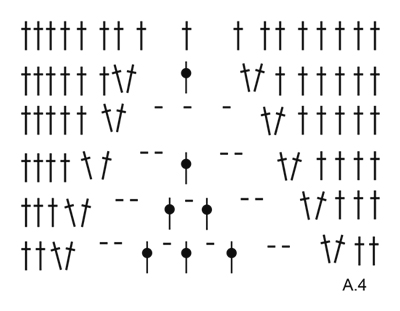
Dear Mrs Rainbow, you continue working A.1, A.2 and A.3 so that lace pattern dec as shown in A.1 and A.3. When there are only 4 ch-spaces remaining at the tip, work then diagram A.4. Happy crocheting!
02.03.2016 - 15:00Rainbow wrote:
Work 27-30-37-44-49-57 ch (includes 5 ch to turn with), turn and work as follows: Work 1 dc in 6th ch from hook, then work 1 dc in each of the next 1-4-6-3-3-6 ch, * skip ch 1, work 1 dc in each of the next 4 dc *, repeat from *-* 3-3-4-6-7-8 more times, continue pattern as before over the 71-77-77-81-85-85 dc, then work 27-30-37-44-49-57 ch (includes 5 ch to turn with). Means?? From right side once and left side once??
01.03.2016 - 09:50DROPS Design answered:
Dear Rainbow, yes you crochet 27-30-37-44-49-57 ch on one side, turn and work as explained to the end of row, then at the end of this row, crochet 27-30-37-44-49-57 ch, turn and work next row. You have now inc on both sides of top. Happy crocheting!
01.03.2016 - 13:29
![]() Lindie wrote:
Lindie wrote:
Kære jer, Denne opskrift volder mig lidt udfordringer. Skal nu begynde forfra for 3. gang. Kan ikke forstå diagrammet. Der er 33 m når A.1-A.3 påbegyndes. Men der beskrives kun de 23 af maskerne. Hvordan hækler jeg de 10 i midten? På forhånd tak Mh Lindie
01.02.2016 - 11:21DROPS Design answered:
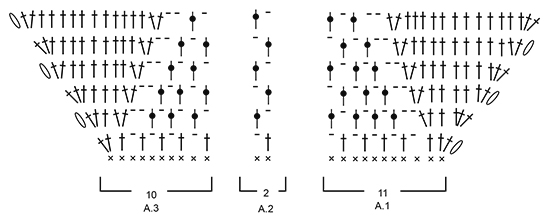
Hej Lindie. Du har 33 m og haekler: A.1 = 11 m, saa gentager du A.2 6 gange (= 12 m) og slutter af med A.3 = 10 m = 33 m haeklet
11.02.2016 - 15:25
![]() Malu De LEon wrote:
Malu De LEon wrote:
Could you please put the sizes measurements? Size S - M - L - XL and etc are for which size of bust?
26.01.2016 - 03:52DROPS Design answered:
Dear Mrs De Leon, you will find at the bottom of the pattern a measurement chart with all measurements in cm - taken flat from side to side. Compare these to a similar garment you have and like the shape to find out the matching size. Happy crocheting!
26.01.2016 - 10:32
![]() Gisele wrote:
Gisele wrote:
I love this! So original
10.12.2015 - 11:22
|
|||||||||||||||||||
Mandarina#mandarinatop |
|||||||||||||||||||
 |
 |
||||||||||||||||||
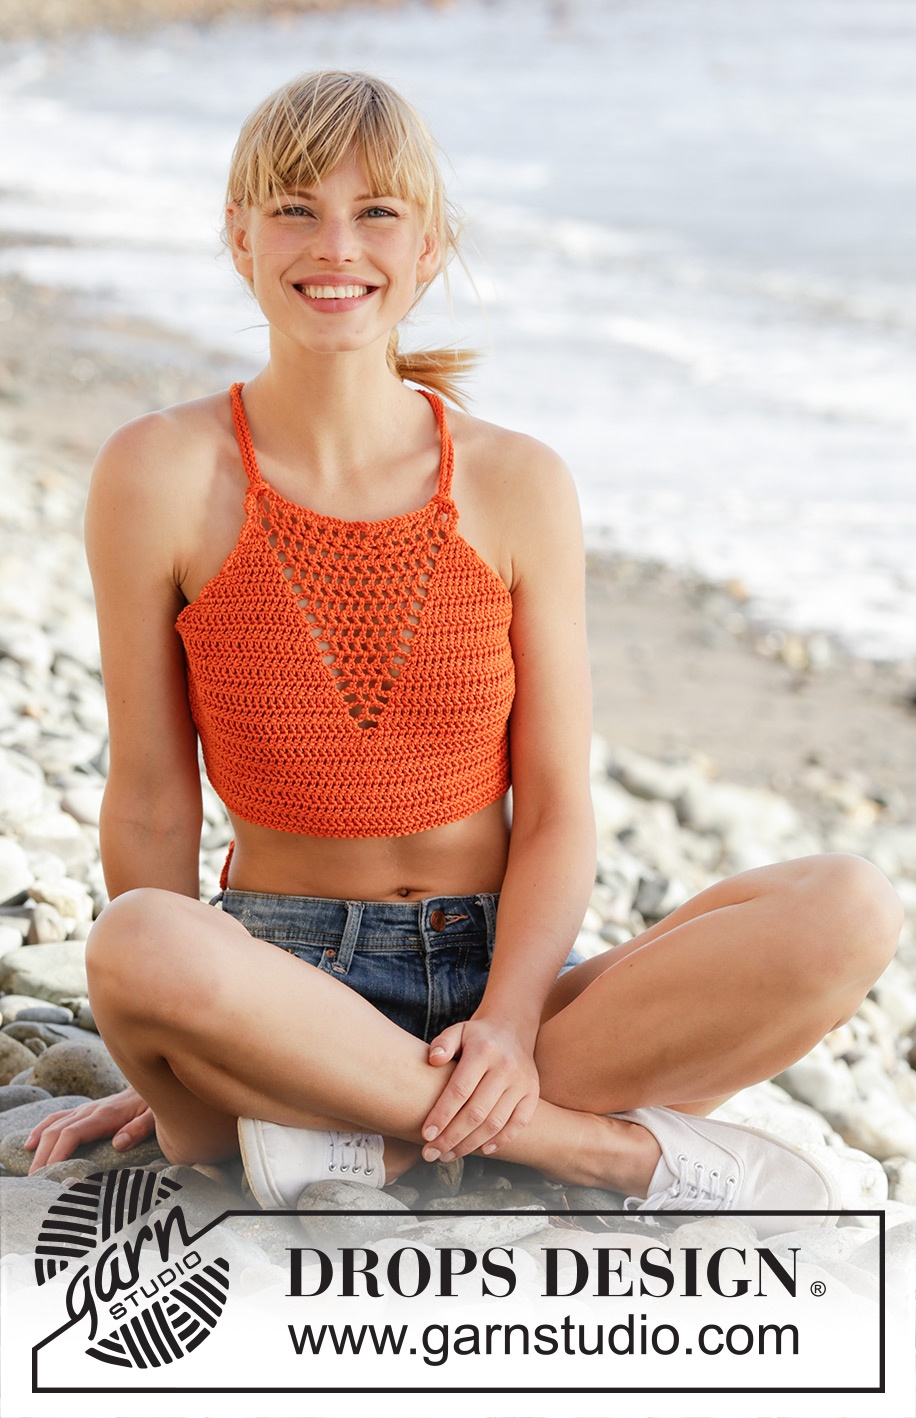
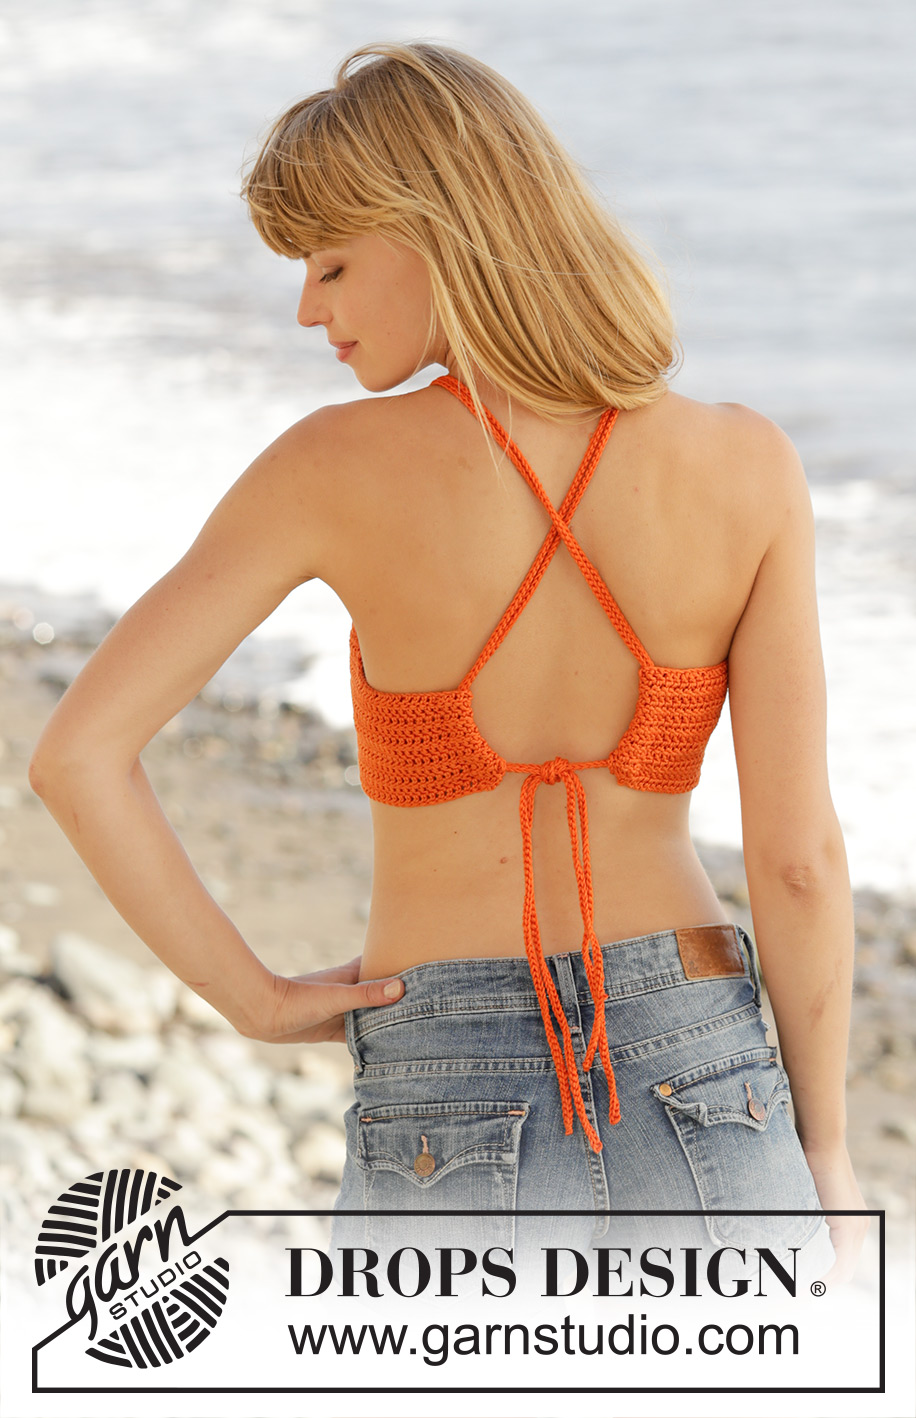
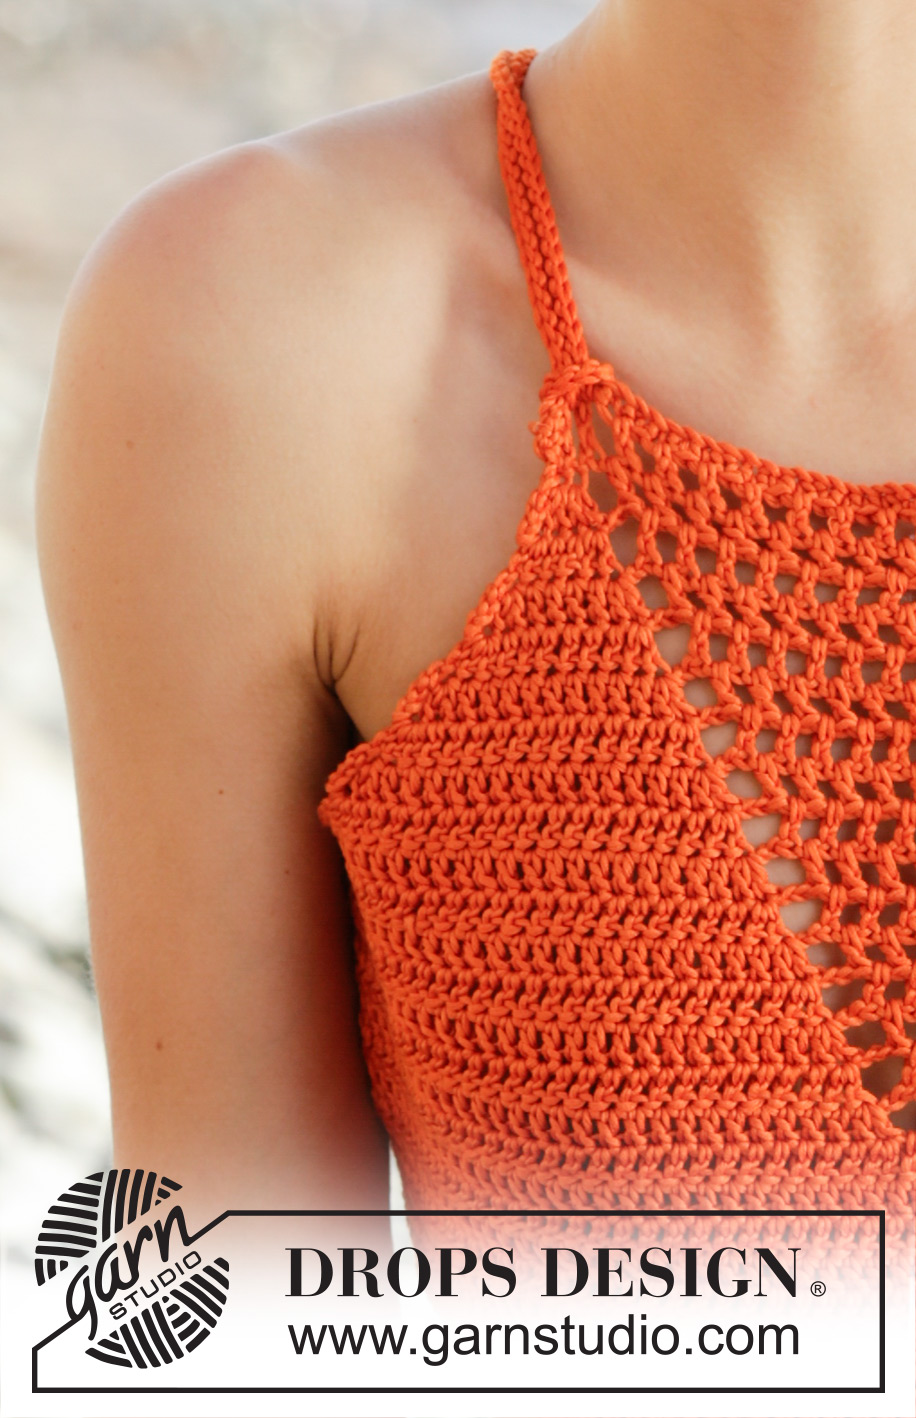
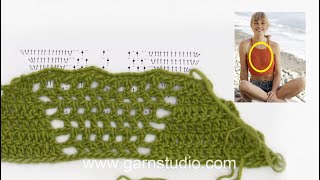
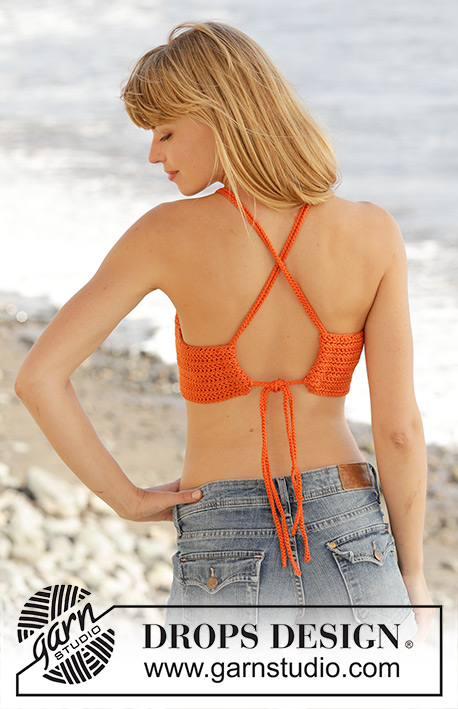
Crochet DROPS top with trebles, lace pattern and ties at the back, worked top down in ”Muskat”. Size S-XXXL.
DROPS 170-16 |
|||||||||||||||||||
|
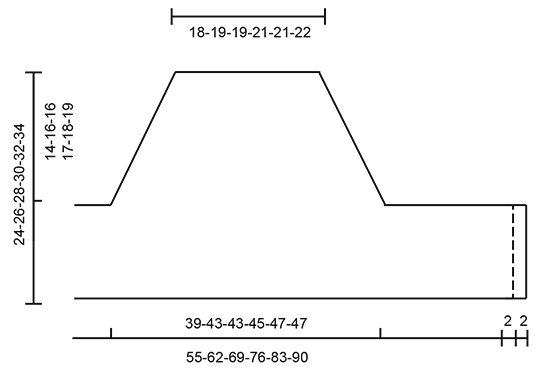
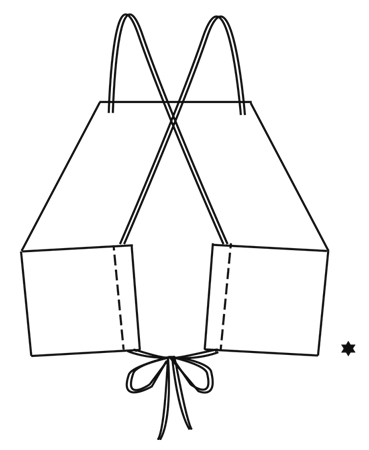
CROCHET INFO: At beg of every row with tr work 5 ch to turn with. These 5 ch do not replace first tr. PATTERN: See diagrams A.1 to A.4. ---------------------------------------------------------- TOP: Worked back and forth, top down. Work 42-44-44-47-47-49 loose ch (incl 1 ch to turn with) on hook size 4 mm with Muskat. Turn and work as follows: Work 1 dc in 2nd ch from hook (= 1 dc + 1 ch to turn with), work 1 dc in each of the next 2-4-4-2-2-4 ch, * skip 1 ch, work 1 dc in each of the next 4 ch *, repeat from *-* 6-6-6-7-7-7 more times, work 1 dc in each of the remaining 2 ch = 33-35-35-37-37-39 dc. Turn and work pattern as follows: Work A.1 over the first 11 dc, A.2 (= 2 dc) 6-7-7-8-8-9 times in width, A.3 over the remaining 10 dc - READ CROCHET TIP! REMEMBER THE CROCHET TENSION! When diagram A.1 to A.3 have been worked vertically, continue pattern and inc the same way until 13-14-14-15-16-17 rows have been worked in total. There are now 71-77-77-81-85-85 tr/ch on row. Inc in each side of A.1 and A.3 is now done but lace pattern continue to decrease inwards into a tip mid front and work as follows: Work 27-30-37-44-49-57 ch (incl 5 ch to turn with), turn and work as follows: Work 1 tr in 6th ch from hook, then work 1 tr in each of the next 1-4-6-3-3-6 ch, * skip 1 ch, work 1 tr in each of the next 4 ch *, repeat from *-* 3-3-4-6-7-8 more times, continue pattern as before over the 71-77-77-81-85-85 tr, then work 27-30-37-44-49-57 ch (incl 5 ch to turn with). Turn and work as follows: Work 1 tr in 6th ch from hook, then work 1 tr in each of the next 1-4-6-3-3-6 ch, * skip 1 ch, work 1 tr in each of the next 4 tr *, repeat from *-* 3-3-4-6-7-8 more times, continue pattern as before over the 71-77-77-81-85-85 tr, then work 1 tr in each of the remaining tr on row = 107-119-131-145-157-171 sts tr/ch. Continue with 1 tr in every tr and continue to dec lace pattern mid front into a tip. When 4 ch-spaces remain, finish pattern as shown in diagram A.4. Then work 1 tr in every tr until piece measures 24-26-28-30-32-34 cm from cast-on edge mid front. Fasten off. ASSEMBLY: Fold the outermost 2 cm in each side in on the back of top and sew small stitches through both layers to make a tunnel to thread the tie through. TIE: Work 1 loose tie as follows: Work ch with Muskat on hook size 4 mm until the tie measures 140-150-160-170-180-190 cm, turn and work 1 sl st in every ch but make sure that the sl sts are not worked tighter than ch. Fasten off. Work another tie the same way. Beg from RS and thread one of the end on tie through outermost hole, around tr and through the other hole (= 2 tie ends out towards RS). Adjust tie so that ends are the same length, then thread the 2 ends through loop on WS and tighten. Repeat in the other side. Then place ties in a cross on the back before threading them through curtain hem - see illustration. Fasten top by making a knot. |
|||||||||||||||||||
Diagram explanations |
|||||||||||||||||||
|
|||||||||||||||||||
 |
|||||||||||||||||||
 |
|||||||||||||||||||
 |
|||||||||||||||||||
 |
|||||||||||||||||||
Have you finished this pattern?Tag your pictures with #dropspattern #mandarinatop or submit them to the #dropsfan gallery. Do you need help with this pattern?You'll find 6 tutorial videos, a Comments/Questions area and more by visiting the pattern on garnstudio.com. © 1982-2025 DROPS Design A/S. We reserve all rights. This document, including all its sub-sections, has copyrights. Read more about what you can do with our patterns at the bottom of each pattern on our site. |
|||||||||||||||||||


With over 40 years in knitting and crochet design, DROPS Design offers one of the most extensive collections of free patterns on the internet - translated to 17 languages. As of today we count 320 catalogues and 12094 patterns translated into English (UK/cm). 12094
We work hard to bring you the best knitting and crochet have to offer, inspiration and advice as well as great quality yarns at incredible prices! Would you like to use our patterns for other than personal use? You can read what you are allowed to do in the Copyright text at the bottom of all our patterns. Happy crafting!
Post a comment to pattern DROPS 170-16
We would love to hear what you have to say about this pattern!
If you want to leave a question, please make sure you select the correct category in the form below, to speed up the answering process. Required fields are marked *.