
Looking for a yarn?


Comments / Questions (68)
![]() Stacey Meyer wrote:
Stacey Meyer wrote:
Hello! This is a lovely detailed pattern and I so appreciate all the assistance you've provided. I'm sorry if I've overlooked it but I can't for the gauge guide for this pattern. I just want to be sure I'm not crocheting too loosely or too tight. Thank you!
15.08.2016 - 06:17DROPS Design answered:
Dear Mrs Meyer, tension may differ with every crocheter, so remember to adjust the crochet hook size to that you get the stated gauge ie 18 dc x 9 rows = 4'' x 4'' (10 x 10 cm). Happy crocheting!
15.08.2016 - 11:21
![]() Sara Otero wrote:
Sara Otero wrote:
Buenas tardes, después de la primera ronda de puntos bajos, manda a trabajar los diagramas del 1 al 3 el 2 diagrama no lo entiendo pk solo pone dos puntos bajos, ¿entonces hay que disminuir? ¿Que significa 6 t veces? Muchas gracias
12.08.2016 - 16:08DROPS Design answered:
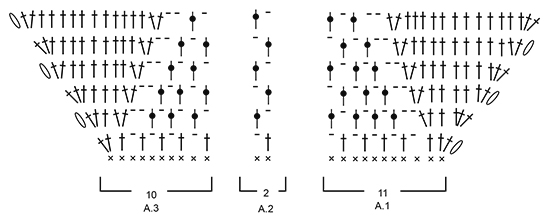
Hola Sara, el diagrama A2 se trabaja sobre un total de 12 pts, es decir, A2 (=2p.b) se repite un total de 6 veces a lo largo de la fila para la talla S.
14.08.2016 - 12:02
![]() Karen A. Hillman wrote:
Karen A. Hillman wrote:
How do you even out the rows on the side panels, there's always one extra row on one side panel ???????
16.07.2016 - 20:27DROPS Design answered:
Dear Mrs Hillmann, this will not be visible at the end - if you rather like to get both sides the same, cut the yarn and chain number of sts required for one side, work next row on the middle panel and chain number of sts required for the other side and continue as stated. Happy crocheting!
18.07.2016 - 09:15
![]() Sandy wrote:
Sandy wrote:
I am wondering about the purpose of the 5 chains at the beginning of each DC row. I can see they may be a decorative bit on the main part of the top, but why are they along the back strap since it will be folded over for the tube casing?
25.06.2016 - 01:04DROPS Design answered:
Dear Sandy, you can choose to not crochet the 5 ch at the beg of dc rows when working the last rows for tube casing if your chains are long enough to not tighten piece on the sides. Happy crocheting!
27.06.2016 - 08:33
![]() Iris wrote:
Iris wrote:
Hey Drops, I would like to use your recycled cotton, either #6 of #5 to make this top. Is it a problem as they aren't in the yarn category B? Thanks in advance
30.04.2016 - 13:47DROPS Design answered:
Dear Iris, DROPS loves you #6 belongs to group A and DROPS loves you #5 to group C so that they may be not the best alternative to a yarn group B - read more here, and contact your DROPS store for any further individual assistance choosing a yarn/a pattern. Happy crocheting!
02.05.2016 - 09:25Leona wrote:
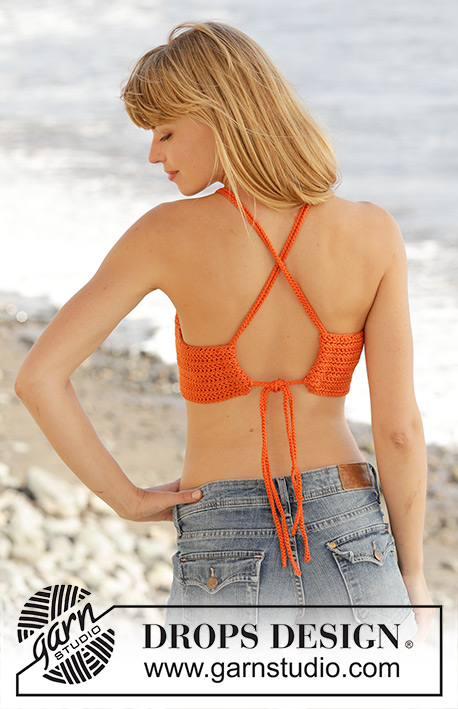
Hi! I don't understand the last part on how to thread the ties through the top at all. Is there a video for this, or a clearer explanation? I have no idea which holes and dc:s and loops the text is talking about. Please help!
24.04.2016 - 21:44DROPS Design answered:
Dear Leona, you will find at the very bottom of the page when scrolling down a chart showing top from back side and how to thread the ties. Happy assembly!
25.04.2016 - 10:18
![]() KC wrote:
KC wrote:
Hello...I'm sorry, I'm not understanding where youre getting the measurements. or how you are measuring them. I just would like to know how to had the flaps that fold to the back side? am i supposed to add more chains or do i keep dc until it reaches a a certain length? Is there a way I could send a picture of my progress?
21.04.2016 - 20:08DROPS Design answered:
Dear KC, you measure total width from the fundation chain towards last row worked. On each side of piece along fold from WS the outermost 3/4" on each side to make like a hem where you will thread tie through - see charts at the bottom of the page. For any further personnal assistance you are welcome to contact the store where you bought your yarn and then show your picture. Happy crocheting!
22.04.2016 - 08:43
![]() KC wrote:
KC wrote:
Hi! I actually don't understand what those numbers mean and where to measure then. I've completed a.1-a.4 by the diagram. I'm not sure how to read those numbers in crochet terms
21.04.2016 - 17:02DROPS Design answered:
Dear KC, you will find a measurement chart at the bottom of the written patter below the diagrams - the finished measurements are the one from the very top of the piece (fundation chains) - measurements are in cm in chart and given in inches in written pattern. Happy crocheting!
21.04.2016 - 17:05
![]() KC wrote:
KC wrote:
After I've completed A.1 to A.4 What do i do next? How do i make the rest? all i have is the chest piece done..
21.04.2016 - 01:36DROPS Design answered:
Dear Kc, After A.1-A.4 have been worked, work 1 dc in every dc until piece measures 24-26-28-30-32-34 cm / 9½"-10 1/4"-11"-11 3/4"-12½"-13½" from cast-on edge mid front. Fasten off. Happy crocheting!
21.04.2016 - 09:10
![]() Claudia Jakrlin wrote:
Claudia Jakrlin wrote:
Hallo Drops, warum muss ich eigentlich jede Reihe mit 5 Maschen beginnen? Das gibt derzeit ziemlich hässliche Bögen am Rand. Oder zeigt sich das später beim Tragen straff?
19.04.2016 - 15:03DROPS Design answered:
Liebe Claudia, normalerweise wird eine Stb-Reihe mit 3 Luftmaschen gewendet, wenn allerdings die Kante schräg ist (z.B. zurch Zunahmen), braucht man mehr Lm um die Diagonale auszugleichen. Wenn Sie sehr lockere Lm häkeln, reichen vielleicht 4 - aber die Kante darf auf keinen Fall spannen.
20.04.2016 - 07:57
|
|||||||||||||||||||
Mandarina#mandarinatop |
|||||||||||||||||||
 |
 |
||||||||||||||||||
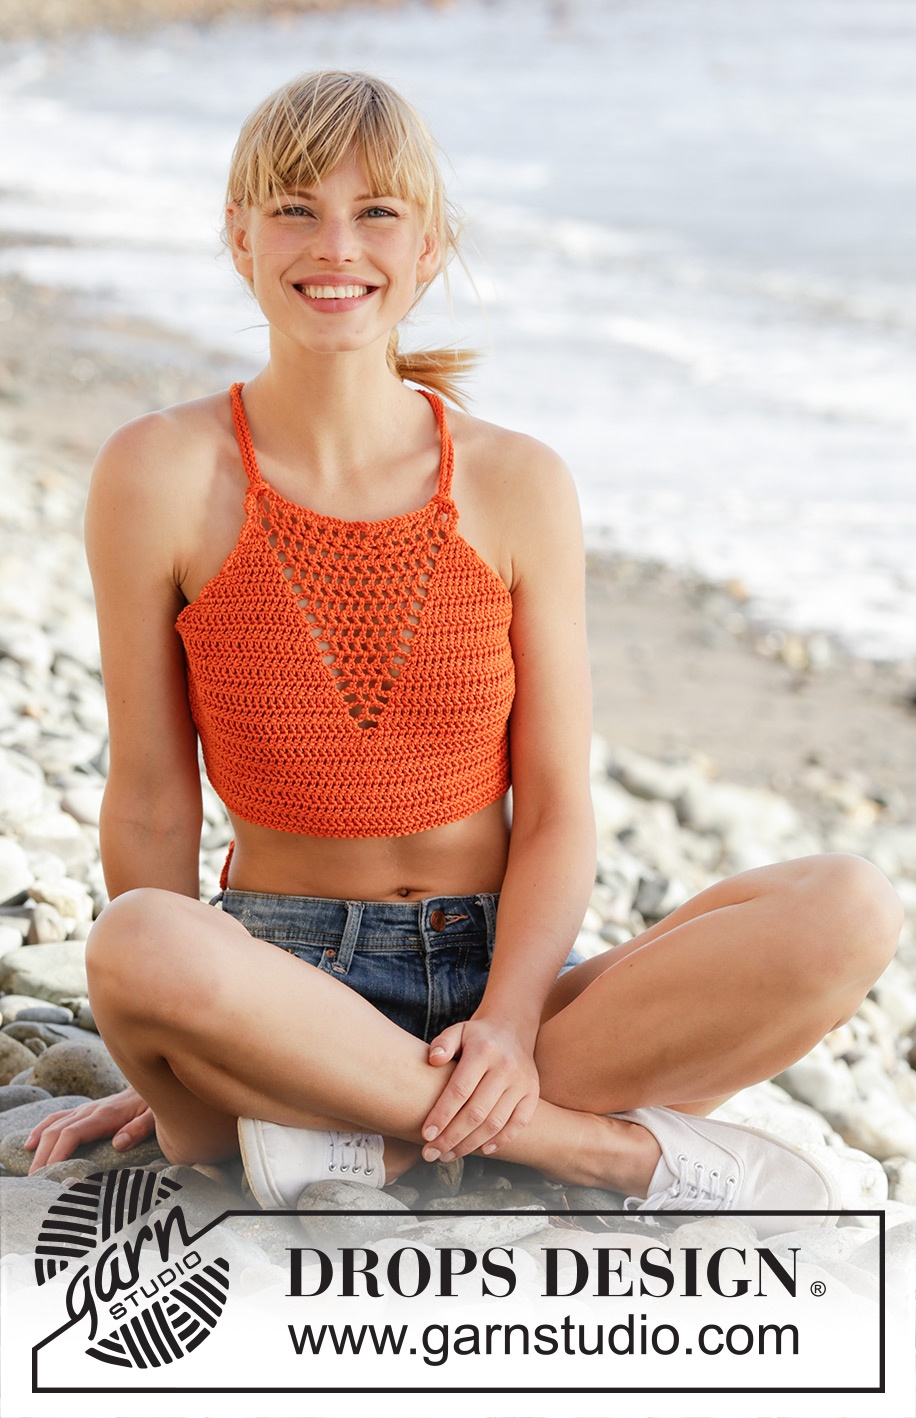
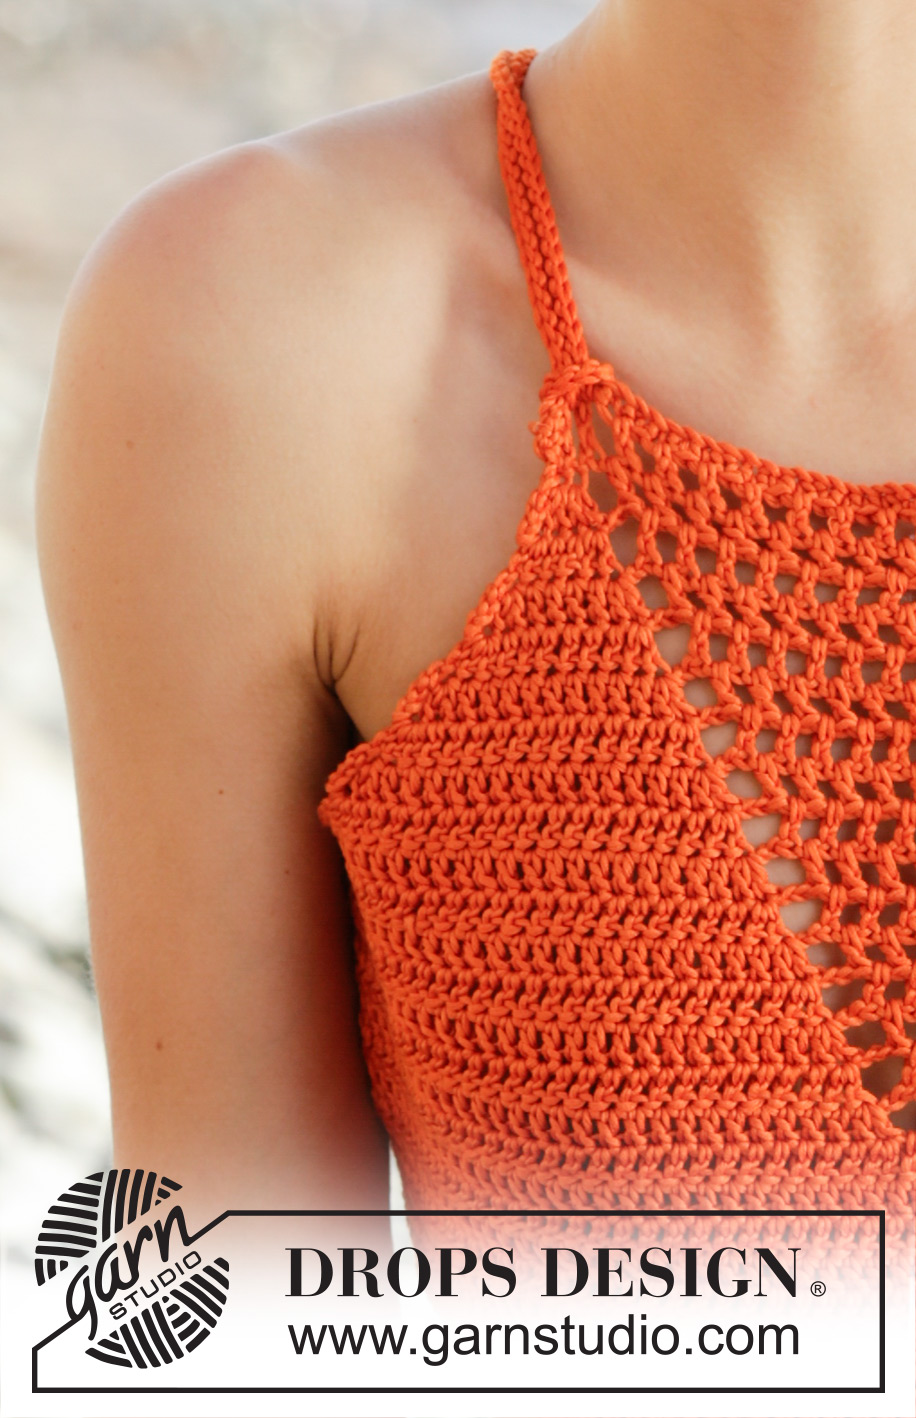
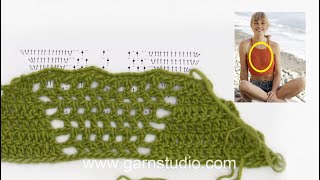
Crochet DROPS top with trebles, lace pattern and ties at the back, worked top down in ”Muskat”. Size S-XXXL.
DROPS 170-16 |
|||||||||||||||||||
|
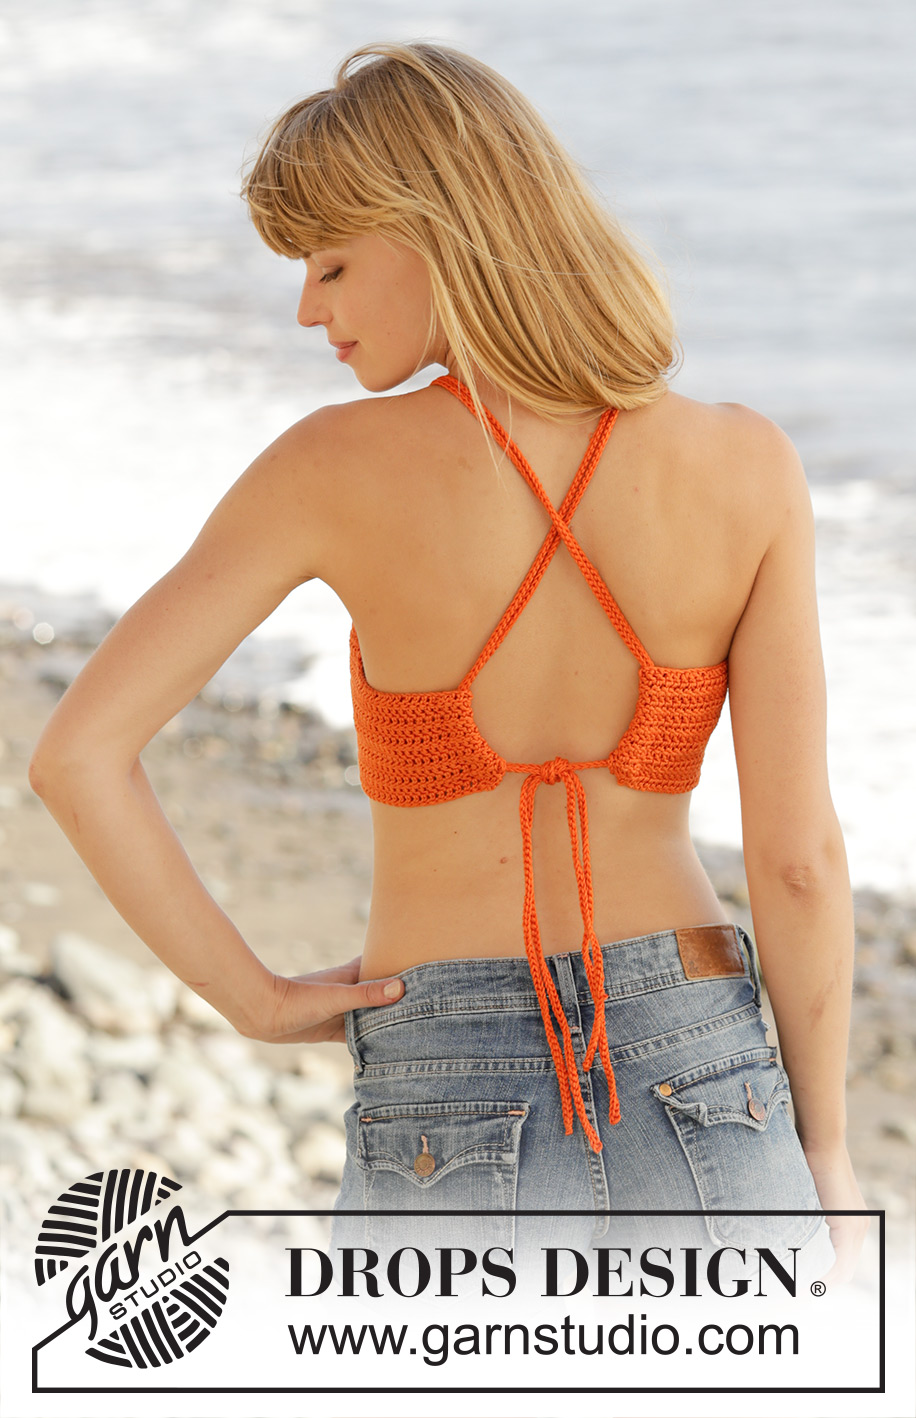
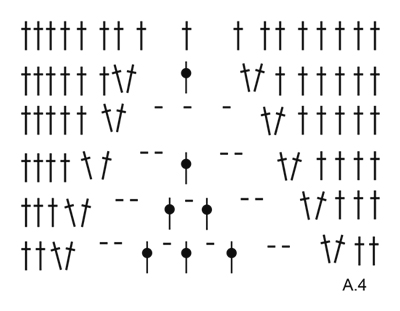
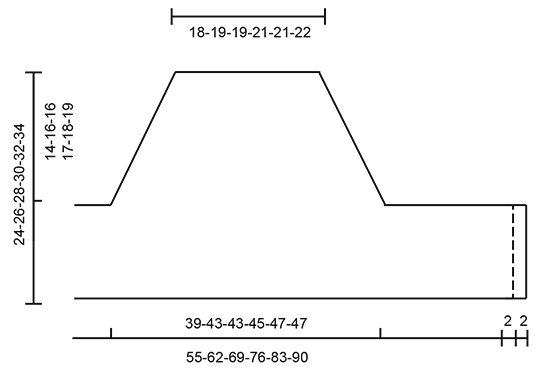
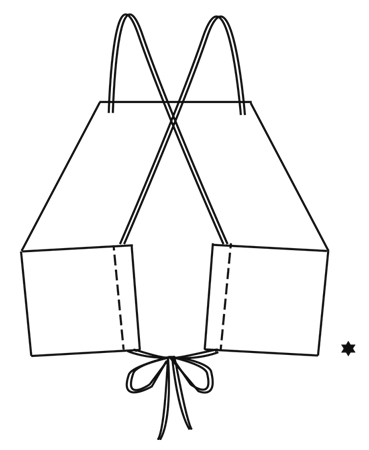
CROCHET INFO: At beg of every row with tr work 5 ch to turn with. These 5 ch do not replace first tr. PATTERN: See diagrams A.1 to A.4. ---------------------------------------------------------- TOP: Worked back and forth, top down. Work 42-44-44-47-47-49 loose ch (incl 1 ch to turn with) on hook size 4 mm with Muskat. Turn and work as follows: Work 1 dc in 2nd ch from hook (= 1 dc + 1 ch to turn with), work 1 dc in each of the next 2-4-4-2-2-4 ch, * skip 1 ch, work 1 dc in each of the next 4 ch *, repeat from *-* 6-6-6-7-7-7 more times, work 1 dc in each of the remaining 2 ch = 33-35-35-37-37-39 dc. Turn and work pattern as follows: Work A.1 over the first 11 dc, A.2 (= 2 dc) 6-7-7-8-8-9 times in width, A.3 over the remaining 10 dc - READ CROCHET TIP! REMEMBER THE CROCHET TENSION! When diagram A.1 to A.3 have been worked vertically, continue pattern and inc the same way until 13-14-14-15-16-17 rows have been worked in total. There are now 71-77-77-81-85-85 tr/ch on row. Inc in each side of A.1 and A.3 is now done but lace pattern continue to decrease inwards into a tip mid front and work as follows: Work 27-30-37-44-49-57 ch (incl 5 ch to turn with), turn and work as follows: Work 1 tr in 6th ch from hook, then work 1 tr in each of the next 1-4-6-3-3-6 ch, * skip 1 ch, work 1 tr in each of the next 4 ch *, repeat from *-* 3-3-4-6-7-8 more times, continue pattern as before over the 71-77-77-81-85-85 tr, then work 27-30-37-44-49-57 ch (incl 5 ch to turn with). Turn and work as follows: Work 1 tr in 6th ch from hook, then work 1 tr in each of the next 1-4-6-3-3-6 ch, * skip 1 ch, work 1 tr in each of the next 4 tr *, repeat from *-* 3-3-4-6-7-8 more times, continue pattern as before over the 71-77-77-81-85-85 tr, then work 1 tr in each of the remaining tr on row = 107-119-131-145-157-171 sts tr/ch. Continue with 1 tr in every tr and continue to dec lace pattern mid front into a tip. When 4 ch-spaces remain, finish pattern as shown in diagram A.4. Then work 1 tr in every tr until piece measures 24-26-28-30-32-34 cm from cast-on edge mid front. Fasten off. ASSEMBLY: Fold the outermost 2 cm in each side in on the back of top and sew small stitches through both layers to make a tunnel to thread the tie through. TIE: Work 1 loose tie as follows: Work ch with Muskat on hook size 4 mm until the tie measures 140-150-160-170-180-190 cm, turn and work 1 sl st in every ch but make sure that the sl sts are not worked tighter than ch. Fasten off. Work another tie the same way. Beg from RS and thread one of the end on tie through outermost hole, around tr and through the other hole (= 2 tie ends out towards RS). Adjust tie so that ends are the same length, then thread the 2 ends through loop on WS and tighten. Repeat in the other side. Then place ties in a cross on the back before threading them through curtain hem - see illustration. Fasten top by making a knot. |
|||||||||||||||||||
Diagram explanations |
|||||||||||||||||||
|
|||||||||||||||||||
 |
|||||||||||||||||||
 |
|||||||||||||||||||
 |
|||||||||||||||||||
 |
|||||||||||||||||||
Have you finished this pattern?Tag your pictures with #dropspattern #mandarinatop or submit them to the #dropsfan gallery. Do you need help with this pattern?You'll find 6 tutorial videos, a Comments/Questions area and more by visiting the pattern on garnstudio.com. © 1982-2025 DROPS Design A/S. We reserve all rights. This document, including all its sub-sections, has copyrights. Read more about what you can do with our patterns at the bottom of each pattern on our site. |
|||||||||||||||||||


With over 40 years in knitting and crochet design, DROPS Design offers one of the most extensive collections of free patterns on the internet - translated to 17 languages. As of today we count 320 catalogues and 12094 patterns translated into English (UK/cm). 12094
We work hard to bring you the best knitting and crochet have to offer, inspiration and advice as well as great quality yarns at incredible prices! Would you like to use our patterns for other than personal use? You can read what you are allowed to do in the Copyright text at the bottom of all our patterns. Happy crafting!
Post a comment to pattern DROPS 170-16
We would love to hear what you have to say about this pattern!
If you want to leave a question, please make sure you select the correct category in the form below, to speed up the answering process. Required fields are marked *.