
Looking for a yarn?


Comments / Questions (68)
![]() Rosy wrote:
Rosy wrote:
Per realizzare la misura S del top quanto cotone devo acquistare d voi e il tipo di cotone?
22.04.2020 - 22:49DROPS Design answered:
Buongiorno Rosy. Per la taglia S vengono indicati 150 g del filato Muskat. Buon lavoro!
23.04.2020 - 11:00
![]() Marly wrote:
Marly wrote:
Hoi! Ik ben bezig met het proeflapje, maar ik krijg geen 10cm over 9toeren (ik krijg minder cm). Zijn het vasten die je moet maken in het proeflapje of stokjes? Liefs!
17.12.2019 - 09:10DROPS Design answered:
Dag Marly,
Het proeflapje bestaat uit stokjes (net als het telpatroon). Mocht de stekenverhouding niet kloppen in de hoogte, maar wel in de breedte, dan zou je een paar extra toeren kunnen haken om op de juiste afmetingen te komen.
18.12.2019 - 19:37
![]() JANET HORNE wrote:
JANET HORNE wrote:
You say to pin them first, but it is not a straight edge? So how is this best sewn? Kind regards
15.07.2019 - 12:51
![]() JANET HORNE wrote:
JANET HORNE wrote:
I have completed this garment, but I am having trouble sewing the part that the straps go through? It says to turn in 2cm and sew, but due to the ch 5 etc. the material is sloped? How is best to do this? Kind regards
15.07.2019 - 11:36DROPS Design answered:
Dear Mrs Horne, you can first pin the edges to the inside of back pieces, then sew them nicely. Happy assembly!
15.07.2019 - 12:41
![]() JANET HORNE wrote:
JANET HORNE wrote:
I am making Mandarina in the S size. I have chained 27 each side as instructed for the back part [either side of the 71 stitches] My question is do I still ch5 each end and go into the first stitch, as before on the main part. These are the ends that will be made into tunnels for the straps? Kind regards
11.07.2019 - 01:58DROPS Design answered:
Dear Mrs Horne, correct, the 2 cm on each side of each back piece will be folded from WS and sewn to make the small tunnel for the straps. Happy crocheting!
11.07.2019 - 08:33
![]() JANET HORNE wrote:
JANET HORNE wrote:
I am making Mandarina in the S size. I have completed the charted front part and chained the 27 each side for the back part. My question is do I still ch 5 when I turn and go into the first stitch as this part will be made into a tunnel for the straps? Kind regards
11.07.2019 - 01:52DROPS Design answered:
Dear Mrs Horne, the 5 chains to turn with are included in the 27 chains on each side. Then you continue with 5 chains at the beg of each row - see CROCHET INFO. Happy crocheting!
11.07.2019 - 08:31
![]() Virginia Antonijevic wrote:
Virginia Antonijevic wrote:
Hvordan går det med oppskriften? Skulle den blir revidert?
07.09.2018 - 12:54DROPS Design answered:
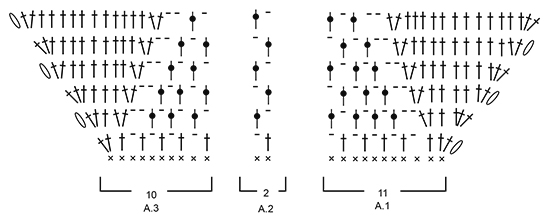
Hei Virginia. Diagrammene er korrekte. På første omg økes 2 masker: 1 på starten og 1 på slutten slutten av omg. På andre omg økes det slik: hekle 2 staver i første stav, hekle 1 stav, hekle 2 staver i neste stav (= 2 maske økt i A.3). Videre hekles uten økning frem til etter hullmønsteret i A.1og så økes slik: hekle 2 staver i neste stav, hekle 1 stav, hekle 3 staver i siste stav på omg (= 3 masker økt i A.1). På de resterende omg økes 1 stav på starten og 2 staver på slutten av hver omg – de 2 stavene som skråner mot hverandre før/etter hullmønsteret er ikke økninger (du kan telle masketallet på hver omg). God fornøyelse.
10.09.2018 - 09:11
![]() Virginia wrote:
Virginia wrote:
Hei. Fikk ikke svar 9.juli. Vil gjerne forstå økningene. Takk!
12.07.2018 - 22:29
![]() Virginia wrote:
Virginia wrote:
Takk for svaret. Men jeg forstår ikke enda. Trodde det var 5 fordi jeg ser: 1 økning i begynnelse i første m etter de 5 lm som brukes til å snu; 1 økning før hull mønster; 1 økning etter hull mønster og 2 økninger i siste m. Ser 5 per rad. Er det bare 3? Hvor? Er ikke symbolet for stav som er skeiv en økning?
09.07.2018 - 11:17DROPS Design answered:
Hei Virginia. Det kan se ut som det er noe som ikke stemmer med økingene i dette diagrammet ja. Oppskriften er videresendt til design for gjennomgang. Takk for beskjed
16.07.2018 - 14:57
![]() Virginia wrote:
Virginia wrote:
\"...totalt 13 rader. Det er nå 71 st/om på raden 71? Hvorfor? Det begynner diagram med 33. Første rad økes det 2 =35. Deretter 5 per rad (1 i begynnelse, 1 før hull mønster, 1 etter hull mønster og til slutt). Etter 12 rader er det 60 økt. 35 +60=95. Hva er det jeg regner feil?
07.07.2018 - 20:50DROPS Design answered:
Hei Virginia, Du hekler A.1 (2 masker økt hvert rad) A.2 (0 økninger) og A.3 (1 økning hvert rad) - så da øker du 3 masker hvert rad. Begynner med 33 masker og hekler diagrammene 1 gang i høyden = 18 masker økt så da har du 50 staver + 5 lm. Hekler diagrammene 7 rader videre (totalt 13 rader) = 21 masker økt. Da har du 71 st + 5 lm til slutt. God fornøyelse!
09.07.2018 - 08:10
|
|||||||||||||||||||
Mandarina#mandarinatop |
|||||||||||||||||||
 |
 |
||||||||||||||||||
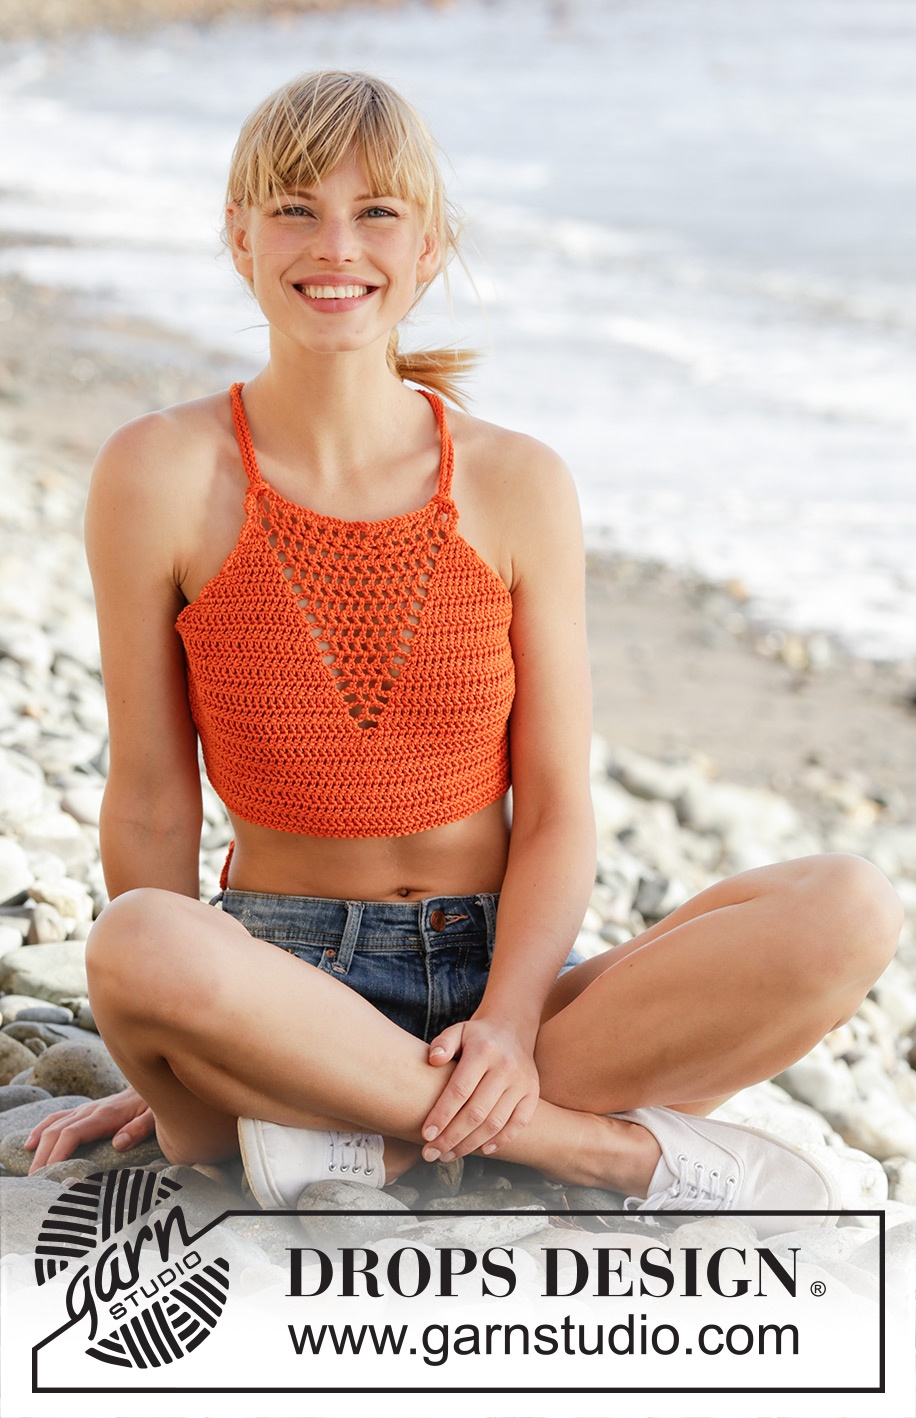
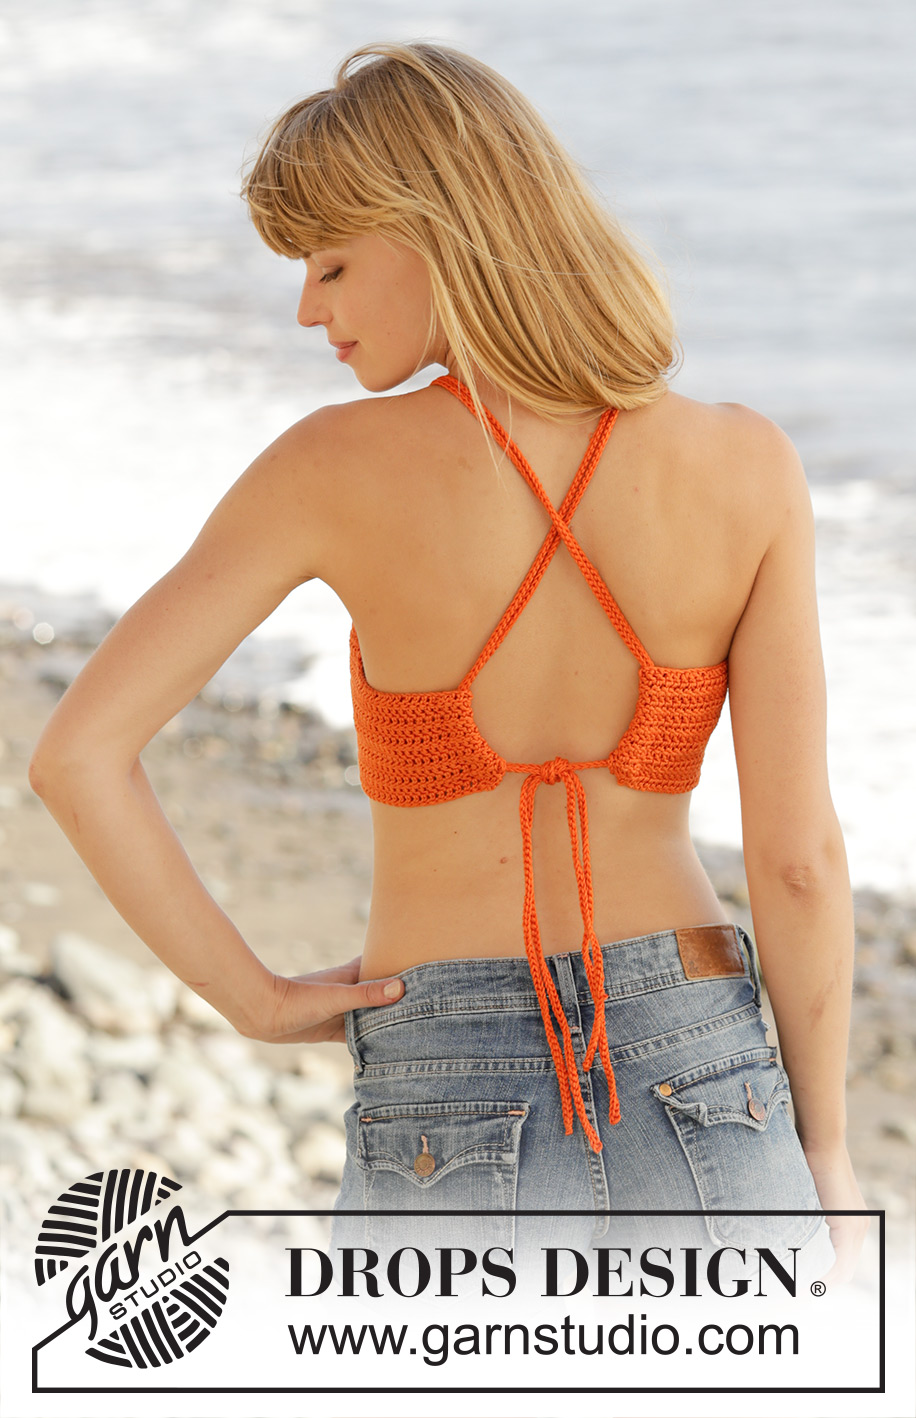
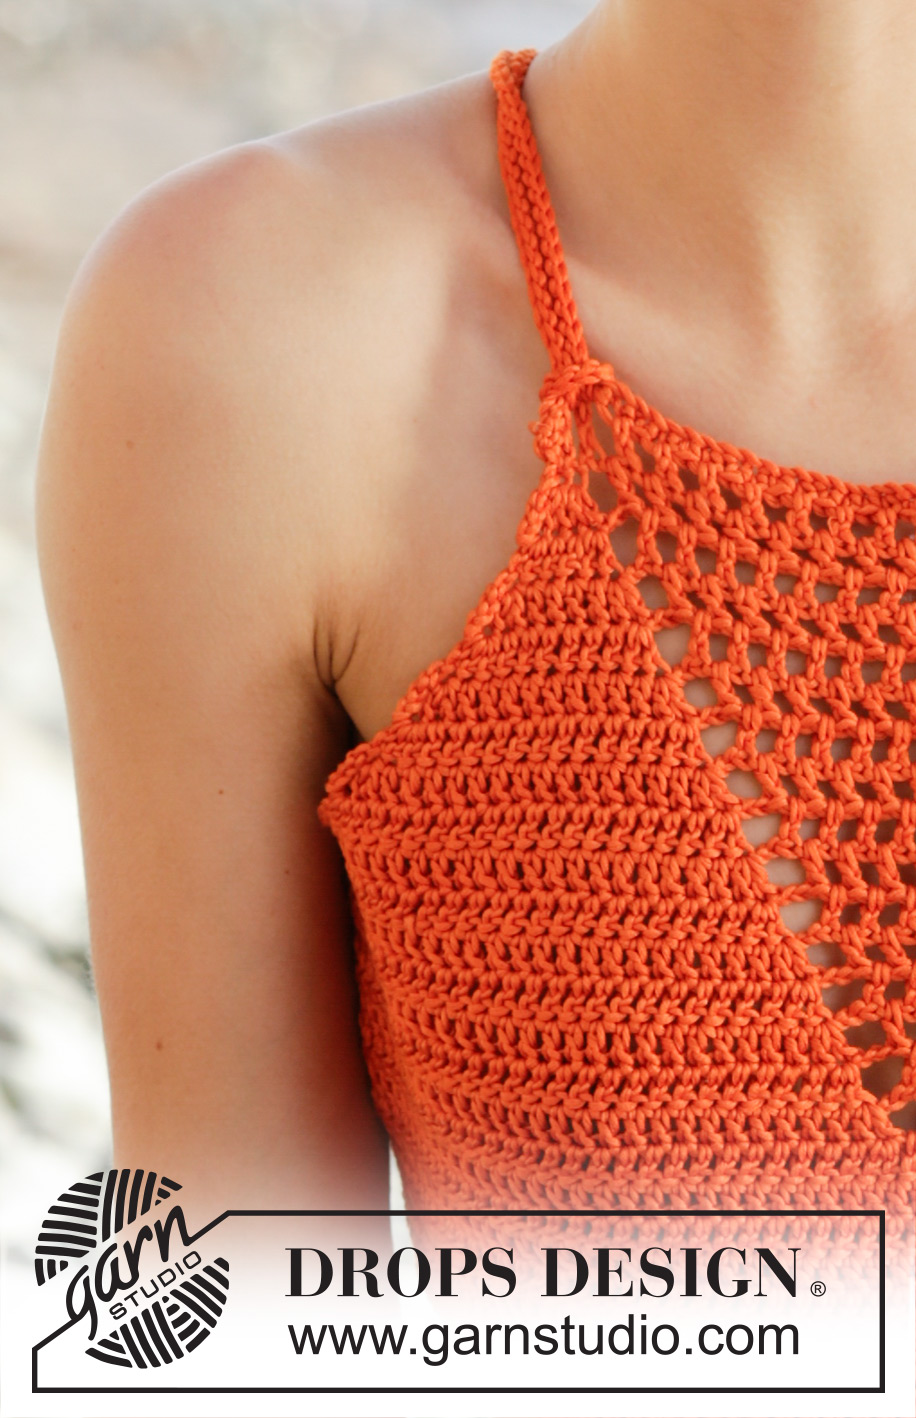
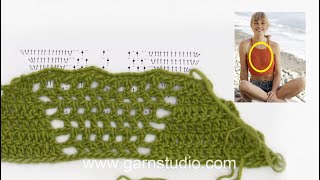
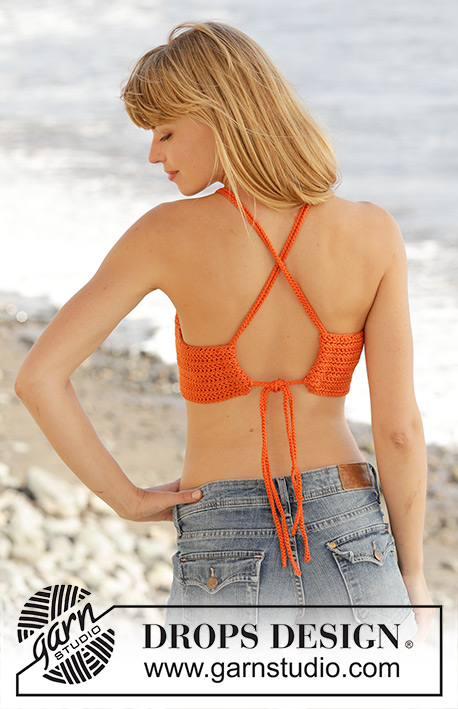
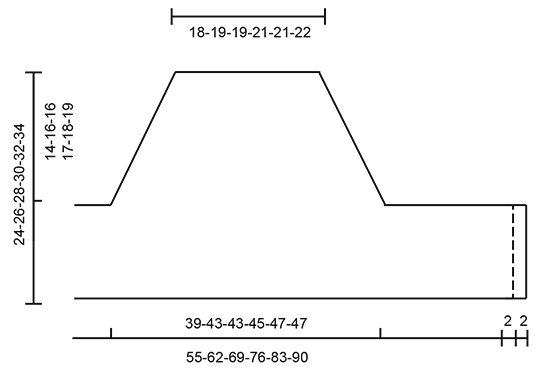
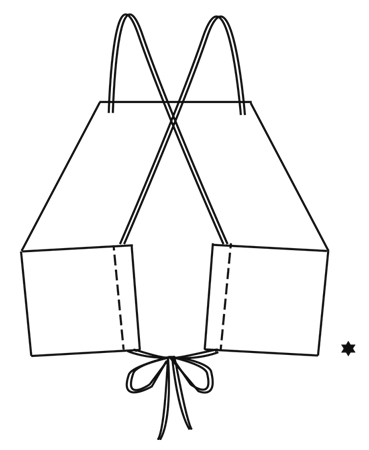
Crochet DROPS top with trebles, lace pattern and ties at the back, worked top down in ”Muskat”. Size S-XXXL.
DROPS 170-16 |
|||||||||||||||||||
|
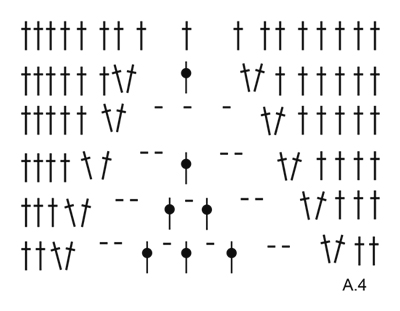
CROCHET INFO: At beg of every row with tr work 5 ch to turn with. These 5 ch do not replace first tr. PATTERN: See diagrams A.1 to A.4. ---------------------------------------------------------- TOP: Worked back and forth, top down. Work 42-44-44-47-47-49 loose ch (incl 1 ch to turn with) on hook size 4 mm with Muskat. Turn and work as follows: Work 1 dc in 2nd ch from hook (= 1 dc + 1 ch to turn with), work 1 dc in each of the next 2-4-4-2-2-4 ch, * skip 1 ch, work 1 dc in each of the next 4 ch *, repeat from *-* 6-6-6-7-7-7 more times, work 1 dc in each of the remaining 2 ch = 33-35-35-37-37-39 dc. Turn and work pattern as follows: Work A.1 over the first 11 dc, A.2 (= 2 dc) 6-7-7-8-8-9 times in width, A.3 over the remaining 10 dc - READ CROCHET TIP! REMEMBER THE CROCHET TENSION! When diagram A.1 to A.3 have been worked vertically, continue pattern and inc the same way until 13-14-14-15-16-17 rows have been worked in total. There are now 71-77-77-81-85-85 tr/ch on row. Inc in each side of A.1 and A.3 is now done but lace pattern continue to decrease inwards into a tip mid front and work as follows: Work 27-30-37-44-49-57 ch (incl 5 ch to turn with), turn and work as follows: Work 1 tr in 6th ch from hook, then work 1 tr in each of the next 1-4-6-3-3-6 ch, * skip 1 ch, work 1 tr in each of the next 4 ch *, repeat from *-* 3-3-4-6-7-8 more times, continue pattern as before over the 71-77-77-81-85-85 tr, then work 27-30-37-44-49-57 ch (incl 5 ch to turn with). Turn and work as follows: Work 1 tr in 6th ch from hook, then work 1 tr in each of the next 1-4-6-3-3-6 ch, * skip 1 ch, work 1 tr in each of the next 4 tr *, repeat from *-* 3-3-4-6-7-8 more times, continue pattern as before over the 71-77-77-81-85-85 tr, then work 1 tr in each of the remaining tr on row = 107-119-131-145-157-171 sts tr/ch. Continue with 1 tr in every tr and continue to dec lace pattern mid front into a tip. When 4 ch-spaces remain, finish pattern as shown in diagram A.4. Then work 1 tr in every tr until piece measures 24-26-28-30-32-34 cm from cast-on edge mid front. Fasten off. ASSEMBLY: Fold the outermost 2 cm in each side in on the back of top and sew small stitches through both layers to make a tunnel to thread the tie through. TIE: Work 1 loose tie as follows: Work ch with Muskat on hook size 4 mm until the tie measures 140-150-160-170-180-190 cm, turn and work 1 sl st in every ch but make sure that the sl sts are not worked tighter than ch. Fasten off. Work another tie the same way. Beg from RS and thread one of the end on tie through outermost hole, around tr and through the other hole (= 2 tie ends out towards RS). Adjust tie so that ends are the same length, then thread the 2 ends through loop on WS and tighten. Repeat in the other side. Then place ties in a cross on the back before threading them through curtain hem - see illustration. Fasten top by making a knot. |
|||||||||||||||||||
Diagram explanations |
|||||||||||||||||||
|
|||||||||||||||||||
 |
|||||||||||||||||||
 |
|||||||||||||||||||
 |
|||||||||||||||||||
 |
|||||||||||||||||||
Have you finished this pattern?Tag your pictures with #dropspattern #mandarinatop or submit them to the #dropsfan gallery. Do you need help with this pattern?You'll find 6 tutorial videos, a Comments/Questions area and more by visiting the pattern on garnstudio.com. © 1982-2025 DROPS Design A/S. We reserve all rights. This document, including all its sub-sections, has copyrights. Read more about what you can do with our patterns at the bottom of each pattern on our site. |
|||||||||||||||||||


With over 40 years in knitting and crochet design, DROPS Design offers one of the most extensive collections of free patterns on the internet - translated to 17 languages. As of today we count 320 catalogues and 12094 patterns translated into English (UK/cm). 12094
We work hard to bring you the best knitting and crochet have to offer, inspiration and advice as well as great quality yarns at incredible prices! Would you like to use our patterns for other than personal use? You can read what you are allowed to do in the Copyright text at the bottom of all our patterns. Happy crafting!
Post a comment to pattern DROPS 170-16
We would love to hear what you have to say about this pattern!
If you want to leave a question, please make sure you select the correct category in the form below, to speed up the answering process. Required fields are marked *.