
Popular categories
Looking for a yarn?


Comments / Questions (64)
![]() Joanne wrote:
Joanne wrote:
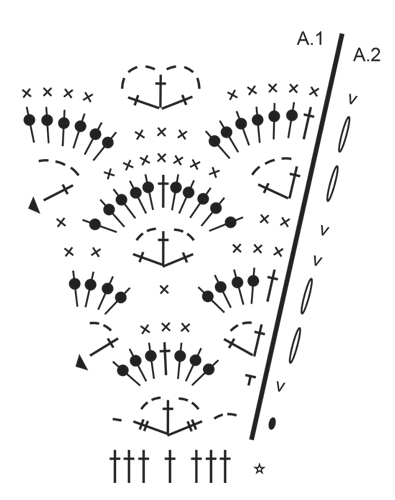
How is A1 worked?? Confusing to me.. sorry
06.02.2020 - 14:04DROPS Design answered:
Dear Joanne, please read more here how to read crochet diagrams. Happy crocheting!
06.02.2020 - 15:56
![]() Eb wrote:
Eb wrote:
Bonjour! Je suis désolée mais même après avoir parcouru toutes les questions-réponses, je n'arrive toujours pas à interpréter le passage de A1 à A2, et surtout lire A2. Après le cercle du début, 1bride 1 augmentation (A1), puis une coulée 3 en l'air et...une bride...dans la m.coulée? Puis une bride pour finir A2 et on reprend A1? Désolée, je ne comprends pas et pourtant je ne suis pas debutante...Merci bcp de votre aide! EB.
23.07.2019 - 09:49DROPS Design answered:
Bonjour Eb, A.2 montre simplement comment crocheter le début et la fin des tours, soit par ex au 1er tour, on crochète simplement A.1 et à la fin du 1er tour, on crochète 1 mc dans la ml (= A.2), au 2ème tour, on crochète 1 ml (= A.2), on répète A.1 et on termine par A.2 = 1 mc dans la 1ère ml. Et ainsi de suite. Vous trouverez ici plus d'informations sur les diagrammes. Bon crochet!
06.08.2019 - 09:43
![]() Eb wrote:
Eb wrote:
Bjr! J'ai réalisé plusieurs chapeaux dans ce genre et malheureusement aucun n'a le rendu des photos malgré le respect des fils. J'ai peur de ne pas réussir à avoir le côté ondulé de celui-ci non plus... Y aurait-il une raison pour laquelle je n'arrive pas à avoir le rendu des photos de vos chapeaux ? Merci de votre aide. Cordialement, Eb.
18.07.2019 - 16:23DROPS Design answered:
Bonjour Eb, avez-vous également la bonne tension? pour ce modèle, on doit avoir 22 brides x 11 rangs = 10 x 10 cm, si vous crochetez plus souplement,vous n'aurez pas le même résultat, il faut adapter la taille du crochet si besoin. Vous pouvez également amidonner légèrement le chapeau à la fin. Votre magasin DROPS saura vous assister si besoin, même par mail ou téléphone. Bon crochet!
19.07.2019 - 07:27
![]() Camilla Von Sparr wrote:
Camilla Von Sparr wrote:
Jag har upptäckt mitt tankefel och nu blir det rätt! 👍
23.06.2019 - 14:19
![]() Camilla Von Sparr wrote:
Camilla Von Sparr wrote:
Hejsan. Jag undrar om det inte är fel i början på mönstret. På första varvet ska man ha 12 stolpar runt ringen, nästa varv två stolpar i varje stolpe vilket skulle bli 24 stolpar. I mönstret står det att man har 22 stolpar efter varv 2! Är det jag som tänker fel eller? Har räknat och dragit upp men får det inte att stämma. Sedan får jag fel antal stolpar hela vägen! Hälsningar Camilla
23.06.2019 - 11:11DROPS Design answered:
Så bra att det löste sig! Lycka till vidare.
24.06.2019 - 08:50
![]() Connie Madsen wrote:
Connie Madsen wrote:
Jeg har et problem med målet. Jeg hækler s/m modellen. De 16 cm er det hele cirklen eller fra midten og ud inden jeg skal tage ind til skygge ? vh Connie Madsen
16.06.2019 - 18:55
![]() Gemmy Winnen wrote:
Gemmy Winnen wrote:
Ik kom steeds veel te groot uit bij de rand, volg het patroon, en bij de rand aangekomen zit ik al ver over de aangegeven 17 cm. Zijn dit wel de juiste steken? Ik haak met 3 mm haaknaald. Of moeten het halve stokjes zijn of zo? Al 4 keer alles uitgehaald, maar het klopt gewoon niet. Vriendelijke groet...
16.06.2019 - 02:07DROPS Design answered:
Dag Gemmy,
Dat is inderdaad vervelend. Heb je de stekenverhouding gecontroleerd en heb je een proeflapje gehaakt? Misschien is het nodig dat je een kleinere haaknaald gebruikt.
17.06.2019 - 14:30
![]() Connie Madsen wrote:
Connie Madsen wrote:
Jeg ved ikke hvad st står for i opskriften, har søgt på det uden held. Håber i kan fortælle mig det. Mvh Connie Madsen
02.06.2019 - 20:40DROPS Design answered:
Hei Connie. st er forkortelse for stav, lm er kort for luftmaske, km er kort for kjedemaske, fm er kort for fastmaske. God fornøyelse
03.06.2019 - 08:04
![]() Sabrina B wrote:
Sabrina B wrote:
I honestly had some issues understanding this pattern. I was thinking that perhaps others may have the same issues. I wanted to share. The hook 3.00mm is too big if you're using I love this cotton. The 6 1/4" is from the top down. I'm using a 2.5 mm with I love this cotton and the hat is larger than the written pattern s/m. The yarn is medium 4, 3.5 oz. 180/165 yd/meter. I'm going to begin again using the same yarn, smaller hook.
11.02.2019 - 19:23DROPS Design answered:
Dear Sabrina, this hat is worked with DROPS Muskat, which is approx. 109 yds/1.8 oz/50 g - see shadecard here, ie somewhat thicker than the yarn you are using. you'll find here the DROPS stores shipping in USA. Happy crocheting!
12.02.2019 - 09:44
![]() DURIEZ Sylviane wrote:
DURIEZ Sylviane wrote:
Bonjour, Je suis arrivée à la 1ere rangée de la bordure. Dans le diagramme, il est indiqué 2ml, 1 DB, 2 ml,1 B, 2ml, 1DB. Dans la vidéo on nous démontre 3 DB, ensuite si je comprends bien il faut continuer 6 B plus loin. Merci pour votre réponse.
20.08.2018 - 18:03DROPS Design answered:
Bonsoir Mme Duriez, c'est une erreur dans la vidéo, vous devez avoir, comme dans le diagramme et les explications: 1 DB, 2 ml, 1B, 2 ml, 1 DB. Merci. Bon crochet!
20.08.2018 - 21:40
|
||||||||||||||||||||||||||||||||||
Country Girl#countrygirlhat |
||||||||||||||||||||||||||||||||||
 |
 |
|||||||||||||||||||||||||||||||||
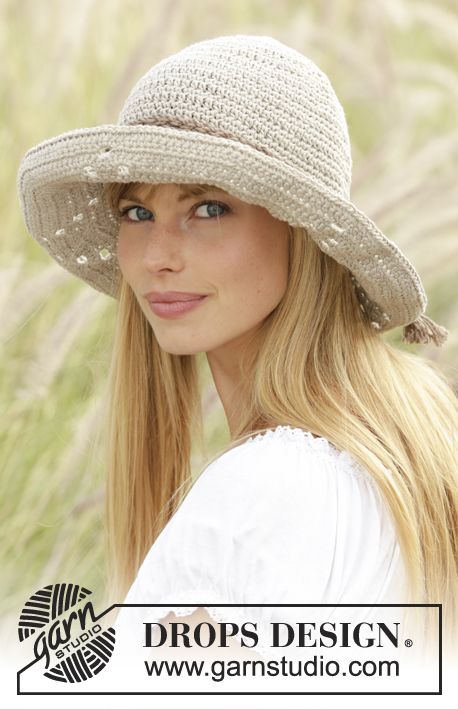
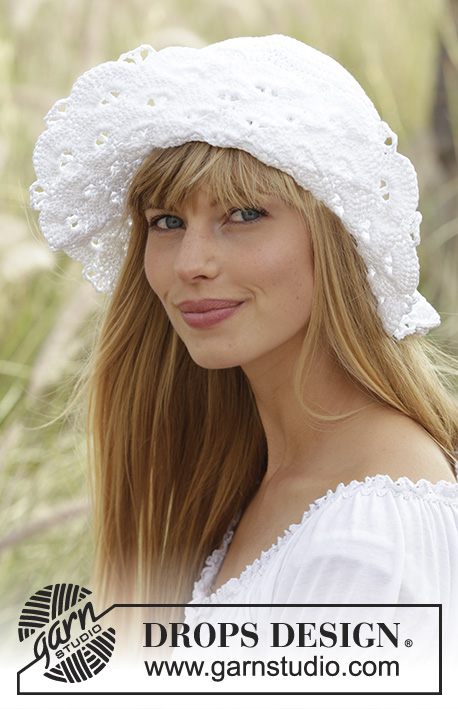
Crochet DROPS hat with fan pattern in ”Muskat”.
DROPS 167-7 |
||||||||||||||||||||||||||||||||||
|
PATTERN: See diagrams A.1 and A.2. Diagram A.2 shows how round beg and ends. CROCHET INFO: Replace first tr at beg of every round beg with tr with 3 ch. Finish round with 1 sl st in 3rd ch at beg of round. Replace first dc at beg of every dc round with 1 ch. Finish round with 1 sl st in first ch at beg of round. DECREASE TIP: Dec 1 tr by working the next 2 tr tog as follows: Work 1 tr but wait with last pull through (= 2 sts on hook), then work next tr but on last pull through, pull yarn through all 3 sts on hook. INCREASE TIP: Inc 1 tr by working 2 tr in same tr. ---------------------------------------------------------- HAT: The piece is worked top down. Work 5 ch on hook size 3 mm with Muskat and form a ring with 1 sl st in first ch. ROUND 1: Work 11 tr in ring – read CROCHET INFO. ROUND 2: Work 2 tr in every tr = 22 tr. ROUND 3: Work * 2 tr in first/next tr, 1 tr in next tr *, repeat from *-* the entire round = 33 tr. ROUND 4: Work * 2 tr in first/next tr, 1 tr in each of the next 2 tr *, repeat from *-* the entire round = 44 tr. REMEMBER THE CROCHET TENSION! ROUND 5: Work * 2 tr in first/next tr, 1 tr in each of the next 3 tr *, repeat from *-* the entire round = 55 tr. ROUND 6: Work * 2 tr in first/next tr, 1 tr in each of the next 4 tr *, repeat from *-* the entire round = 66 tr. ROUND 7: Work * 2 tr in first/next tr, 1 tr in each of the next 5 tr *, repeat from *-* the entire round = 77 tr. ROUND 8: Work * 2 tr in first/next tr, 1 tr in each of the next 6 tr *, repeat from *-* the entire round = 88 tr. ROUND 9: Work * 2 tr in first/next tr, 1 tr in each of the next 7 tr *, repeat from *-* the entire round = 99 tr. Now work differently in the different sizes. SIZE S/M: ROUND 10: Work * 2 tr in first/next tr, 1 tr in each of the next 10 tr *, repeat from *-* the entire round = 108 tr. Then work 1 tr in every tr until piece measures 16 cm. Work next round as follows: Work 1 tr in every tr AT THE SAME TIME dec 3 tr evenly READ DECREASE TIP = 105 tr. Work brim. SIZE L/XL: ROUND 10: Work * 2 tr in first/next tr, 1 tr in each of the next 8 tr *, repeat from *-* the entire round = 110 tr. ROUND 11: Work 1 tr in each of the first 2 tr, * 2 tr in next tr, 1 tr in each of the next 17 tr *, repeat from *-* the entire round = 116 tr. Then work 1 tr in every tr until piece measures 17 cm. Work next round as follows: Work 1 tr in every tr AT THE SAME TIME dec 4 tr evenly READ DECREASE TIP = 112 tr. Work brim. BRIM: Now work A.1 as follows (repeat A.1 15-16 times in total on round): ROUND 1: A.2 shows how round beg and ends - remember CROCHET INFO. Work * 2 ch, skip the first/next 3 tr, in next tr work 1 dtr + 2 ch + 1 tr + 2 ch + 1 dtr, 1 ch, skip 3 tr *, repeat from *-* the entire round, finish round with 1 sl st in first ch = 15-16 tr/dtr-groups and 16-17 ch-spaces. ROUND 2: Work * 1 dc around first/next ch-space, 3 tr around next ch-space, 1 tr in next tr, 3 tr around next ch-space *, repeat from *-* the entire round = 15-16 tr-groups and 15-16 dc. ROUND 3: Work 1 tr + 2 ch + 1 tr in first dc, skip 2 tr, 1 dc in each of the next 3 tr, skip 2 tr, * in next dc work 1 tr + 2 ch + 1 tr + 2 ch + 1 tr, skip 2 tr, 1 dc in each of the next 3 tr, skip 2 tr *, repeat from *-* the entire round, finish with 1 tr in first dc at beg of 2nd round + 2 ch = 15-16 tr-groups and 45-48 dc. ROUND 4: Work * 1 tr in first/next tr, 4 tr around first/next ch-space, skip 1 tr + 1 dc, 1 dc in next dc, skip 1 dc + 1 tr, 4 tr around next ch-space *, repeat from *-* the entire round = 15-16 tr-groups and 15-16 dc. ROUND 5: Work * 1 dc in each of the first/next 3 tr, skip 2 tr, in next dc work 1 tr + 2 ch + 1 tr + 2 ch + 1 tr, skip 2 tr, 1 dc in each of the next 2 tr *, repeat from *-* the entire round = 15-16 tr-groups and 75-80 dc. ROUND 6: Work * 1 dc in each of the first/next 2 dc, 5 tr around first/next ch-space, 1 tr in next tr, 5 tr around next ch-space, skip 1 dc, 1 dc in next dc *, repeat from *-* the entire round = 15-16 tr-groups and 45-48 dc. ROUND 7: Work 1 tr + 3 ch + 1 tr in first dc, skip 1 dc + 2 tr, 1 dc in each of the next 7 tr, skip 2 tr + 1 dc, * in next dc work 1 tr + 3 ch + 1 tr + 3 ch + 1 tr, skip 2 tr + 1 dc, 1 dc in each of the next 7 tr, skip 1 dc + 2 tr *, repeat from *-* the entire round, finish round with 1 tr in first dc at beg of 6th round + 3 ch = 15-16 tr-groups and 105-112 dc. ROUND 8: Work * 1 tr in first/next tr, 6 tr around first/next ch-space, skip 2 dc, 1 dc in each of the next 3 dc, skip 2 dc, 6 tr around next ch-space *, repeat from *-* the entire round = 15-16 tr-groups and 45-48 dc. ROUND 9: Work * 1 dc in each of the first/next 5 tr, skip 2 tr + 1 dc, in next dc work 1 tr + 3 ch + 1 tr + 3 ch + 1 tr, skip 1 dc + 2 tr, 1 dc in each of the next 4 tr *, repeat from *-* the entire round = 15-16 tr-groups and 135-144 dc. Fasten off. |
||||||||||||||||||||||||||||||||||
Diagram explanations |
||||||||||||||||||||||||||||||||||
|
||||||||||||||||||||||||||||||||||
|
||||||||||||||||||||||||||||||||||
Have you finished this pattern?Tag your pictures with #dropspattern #countrygirlhat or submit them to the #dropsfan gallery. Do you need help with this pattern?You'll find 11 tutorial videos, a Comments/Questions area and more by visiting the pattern on garnstudio.com. © 1982-2025 DROPS Design A/S. We reserve all rights. This document, including all its sub-sections, has copyrights. Read more about what you can do with our patterns at the bottom of each pattern on our site. |
||||||||||||||||||||||||||||||||||


With over 40 years in knitting and crochet design, DROPS Design offers one of the most extensive collections of free patterns on the internet - translated to 17 languages. As of today we count 314 catalogues and 11820 patterns translated into English (UK/cm). 11820
We work hard to bring you the best knitting and crochet have to offer, inspiration and advice as well as great quality yarns at incredible prices! Would you like to use our patterns for other than personal use? You can read what you are allowed to do in the Copyright text at the bottom of all our patterns. Happy crafting!
Post a comment to pattern DROPS 167-7
We would love to hear what you have to say about this pattern!
If you want to leave a question, please make sure you select the correct category in the form below, to speed up the answering process. Required fields are marked *.