
Popular categories
Looking for a yarn?


Comments / Questions (64)
![]() Laila Gad wrote:
Laila Gad wrote:
Der står På beg af hver omg som starter med st, erstattes første st med 3 lm. 1.OMG: Hækl 11 st om ringen – læs HÆKLEINFO! Betyder det så ikke at jeg hækler 3 lm og 10 st? 2.OMG: Hækl 2 st i hver st = 22 st. Hvordan kan dette blive til 22 st hvis første st skal være 3 lm og jeg kun har 10 st fra første omgang
18.03.2025 - 18:51DROPS Design answered:
Hei Laila. Jo, det betyr 3 luftmasker (=1 stav) + 10 staver = 11 staver på 1. omg. Når du skal hekle 2. omg, starter du med 3 luftmasker (=1. stav), så hekler du 2. stav der du startet å hekle de 3 luftmaskene/der det på forrige omgang avsluttet med 1 kjedemaske = 3 luftmasker + 1 stav = 2 staver i 1. stav. Så hekler du 2 staver i hver av de resterende 10 stavene = 22 staver (eller 3 luftmasker og 21 staver). mvh DROPS Design
24.03.2025 - 10:50
![]() Karen wrote:
Karen wrote:
Kan ik een vertaling krijgen van jullie patronen ? Can I get a translation on your patterns?
30.06.2024 - 20:34DROPS Design answered:
Dear Karen, our patterns are available in a number of languages. Just click on the roll down menue just above the "Pattern isntructions" title line and select the language you want. Happy Stitching!
03.07.2024 - 00:46
![]() Kirstine wrote:
Kirstine wrote:
I den første omgang i skyggen - hvordan starter den? Diagrammet siger nemlig kun hvordan den slutter (1km i første lm), men ikke hvordan den starter.
19.06.2024 - 17:26DROPS Design answered:
Hej Kirstine, 1.omg er også beskrevet i tekst. Du starter med 2 lm, spring over de første 3 st, i næste ..... osv - OG så har vi lavet en video med hvordan vi hækler skyggen :)
25.06.2024 - 12:15
![]() Birgit wrote:
Birgit wrote:
Jeg kan ikke få det til 16 samlinger der er da alt for masker der ikke bliver hæklet og der står man skal lukke 3 masker af inden skyggen så ender på 105 masker.
07.06.2024 - 17:43DROPS Design answered:
Hej Birgit, hvad mener du med 16 samlinger og masker som ikke bliver hæklet... Når du følger opskriften får du efter 10.omgang 108 st. Nu tager du 3 masker ind til 105 st og hækler skyggen :)
11.06.2024 - 11:45
![]() Tina wrote:
Tina wrote:
Hvis der er 105 masker efter 10. omgang og første runde på skyggen hækles i hver 4. maske. Hvordan kan det så blive til 15-16 samlinger af stangmasker? 105:4=26,25, hvilket passer med det antal jeg er endt med
21.03.2024 - 19:12DROPS Design answered:
Hej Tina, ifølge opskriften skal du have enten 108 st eller 110 st efter 10.omgang :)
03.04.2024 - 12:12
![]() Dolfin wrote:
Dolfin wrote:
Je tiens à préciser, après avoir lu les commentaires, que je suis dans la même laine indiquée et que mes dimensions correspondent exactement à ce qu'il est indiqué dans le modèle pour un crochet 3. Merci pour votre réponse.
06.08.2023 - 08:38DROPS Design answered:
Bonjour Mme Dolfin, il est effectivement facile de perdre sa tension en cours de route, donc pensez toujours à bien crocheter suffisamment serré/lâche pour garder cette même tension que pour l'échantillon et retrouvez la réponse ci-dessous. Bon crochet!
07.08.2023 - 10:14
![]() Dolfin wrote:
Dolfin wrote:
Comment durcir les bords d'un chapeau ? Parce que le mien ne reste pas du tout comme le modèle et retombe sur les yeux. D'ailleurs ce n'est pas le premier chapeau que je fais chez vous, et il ressemble plus à des sacs qu'à des chapeaux, alors que sur vos modèles ils sont magnifiques. Donc je suppose que vous durcissez les bords. Comment faites-vous ? Merci
05.08.2023 - 09:48DROPS Design answered:
Bonjour Mme Dolfin, vous pouvez utiliser de l'amidon en bombe ou bien crocheter le dernier tour du chapeau autour d'un fil de fer fin pour lui permettre de bien tenir. Dans cette vidéo, nous montrons comment procéder pour le fil de fer. Bon crochet!
07.08.2023 - 09:37
![]() Farida Derycke wrote:
Farida Derycke wrote:
Hoe word dit hoedje stijf aan de rand?
03.07.2023 - 16:45DROPS Design answered:
Dag Farida,
Je zou de rand op kunnen stijven door het te drenken in kleurloze frisdrank of suikerwater en daarna in vorm laten drogen (bijvoorbeeld door hem over een omgekeerde pan of kom te leggen waarbij de rand op de ondergrond ligt waar de kom op geplaatst is).
03.07.2023 - 21:12
![]() Kirsi wrote:
Kirsi wrote:
Hei, miten lieri kuuluisi käsitellä, jotta se pysyisi suorana ja terhakkaana kuten kuvissa? Omani lurpahtaa ja aaltoilee
13.05.2023 - 08:42DROPS Design answered:
Kun virkkaat lierin, on tärkeää, että silmukoita ei virkata liian löyhästi. Katso myös ohjeeseen kuuluva video: Ohjeen DROPS 167-7 hatun lierin virkkaaminen. Myös tämä video voi olla avuksi: https://www.garnstudio.com/video.php?id=1443&lang=fi
17.05.2023 - 16:34
![]() Plessis Régine wrote:
Plessis Régine wrote:
Bonjour, Pour mesurer la hauteur de 16 cm, je suppose qu'il s'agit de mesurer à partir du centre . Merci. Cordialement
19.05.2022 - 20:34DROPS Design answered:
Bonjour Mme Plessis, tout à fait, mesurez à partir du 1er rang (pas en "diamètre"). Bon crochet!
20.05.2022 - 08:05
|
||||||||||||||||||||||||||||||||||
Country Girl#countrygirlhat |
||||||||||||||||||||||||||||||||||
 |
 |
|||||||||||||||||||||||||||||||||
Crochet DROPS hat with fan pattern in ”Muskat”.
DROPS 167-7 |
||||||||||||||||||||||||||||||||||
|
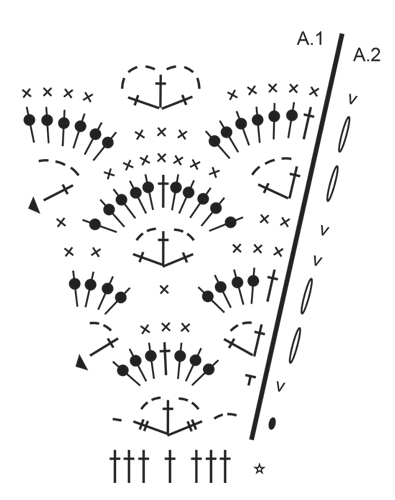
PATTERN: See diagrams A.1 and A.2. Diagram A.2 shows how round beg and ends. CROCHET INFO: Replace first tr at beg of every round beg with tr with 3 ch. Finish round with 1 sl st in 3rd ch at beg of round. Replace first dc at beg of every dc round with 1 ch. Finish round with 1 sl st in first ch at beg of round. DECREASE TIP: Dec 1 tr by working the next 2 tr tog as follows: Work 1 tr but wait with last pull through (= 2 sts on hook), then work next tr but on last pull through, pull yarn through all 3 sts on hook. INCREASE TIP: Inc 1 tr by working 2 tr in same tr. ---------------------------------------------------------- HAT: The piece is worked top down. Work 5 ch on hook size 3 mm with Muskat and form a ring with 1 sl st in first ch. ROUND 1: Work 11 tr in ring – read CROCHET INFO. ROUND 2: Work 2 tr in every tr = 22 tr. ROUND 3: Work * 2 tr in first/next tr, 1 tr in next tr *, repeat from *-* the entire round = 33 tr. ROUND 4: Work * 2 tr in first/next tr, 1 tr in each of the next 2 tr *, repeat from *-* the entire round = 44 tr. REMEMBER THE CROCHET TENSION! ROUND 5: Work * 2 tr in first/next tr, 1 tr in each of the next 3 tr *, repeat from *-* the entire round = 55 tr. ROUND 6: Work * 2 tr in first/next tr, 1 tr in each of the next 4 tr *, repeat from *-* the entire round = 66 tr. ROUND 7: Work * 2 tr in first/next tr, 1 tr in each of the next 5 tr *, repeat from *-* the entire round = 77 tr. ROUND 8: Work * 2 tr in first/next tr, 1 tr in each of the next 6 tr *, repeat from *-* the entire round = 88 tr. ROUND 9: Work * 2 tr in first/next tr, 1 tr in each of the next 7 tr *, repeat from *-* the entire round = 99 tr. Now work differently in the different sizes. SIZE S/M: ROUND 10: Work * 2 tr in first/next tr, 1 tr in each of the next 10 tr *, repeat from *-* the entire round = 108 tr. Then work 1 tr in every tr until piece measures 16 cm. Work next round as follows: Work 1 tr in every tr AT THE SAME TIME dec 3 tr evenly READ DECREASE TIP = 105 tr. Work brim. SIZE L/XL: ROUND 10: Work * 2 tr in first/next tr, 1 tr in each of the next 8 tr *, repeat from *-* the entire round = 110 tr. ROUND 11: Work 1 tr in each of the first 2 tr, * 2 tr in next tr, 1 tr in each of the next 17 tr *, repeat from *-* the entire round = 116 tr. Then work 1 tr in every tr until piece measures 17 cm. Work next round as follows: Work 1 tr in every tr AT THE SAME TIME dec 4 tr evenly READ DECREASE TIP = 112 tr. Work brim. BRIM: Now work A.1 as follows (repeat A.1 15-16 times in total on round): ROUND 1: A.2 shows how round beg and ends - remember CROCHET INFO. Work * 2 ch, skip the first/next 3 tr, in next tr work 1 dtr + 2 ch + 1 tr + 2 ch + 1 dtr, 1 ch, skip 3 tr *, repeat from *-* the entire round, finish round with 1 sl st in first ch = 15-16 tr/dtr-groups and 16-17 ch-spaces. ROUND 2: Work * 1 dc around first/next ch-space, 3 tr around next ch-space, 1 tr in next tr, 3 tr around next ch-space *, repeat from *-* the entire round = 15-16 tr-groups and 15-16 dc. ROUND 3: Work 1 tr + 2 ch + 1 tr in first dc, skip 2 tr, 1 dc in each of the next 3 tr, skip 2 tr, * in next dc work 1 tr + 2 ch + 1 tr + 2 ch + 1 tr, skip 2 tr, 1 dc in each of the next 3 tr, skip 2 tr *, repeat from *-* the entire round, finish with 1 tr in first dc at beg of 2nd round + 2 ch = 15-16 tr-groups and 45-48 dc. ROUND 4: Work * 1 tr in first/next tr, 4 tr around first/next ch-space, skip 1 tr + 1 dc, 1 dc in next dc, skip 1 dc + 1 tr, 4 tr around next ch-space *, repeat from *-* the entire round = 15-16 tr-groups and 15-16 dc. ROUND 5: Work * 1 dc in each of the first/next 3 tr, skip 2 tr, in next dc work 1 tr + 2 ch + 1 tr + 2 ch + 1 tr, skip 2 tr, 1 dc in each of the next 2 tr *, repeat from *-* the entire round = 15-16 tr-groups and 75-80 dc. ROUND 6: Work * 1 dc in each of the first/next 2 dc, 5 tr around first/next ch-space, 1 tr in next tr, 5 tr around next ch-space, skip 1 dc, 1 dc in next dc *, repeat from *-* the entire round = 15-16 tr-groups and 45-48 dc. ROUND 7: Work 1 tr + 3 ch + 1 tr in first dc, skip 1 dc + 2 tr, 1 dc in each of the next 7 tr, skip 2 tr + 1 dc, * in next dc work 1 tr + 3 ch + 1 tr + 3 ch + 1 tr, skip 2 tr + 1 dc, 1 dc in each of the next 7 tr, skip 1 dc + 2 tr *, repeat from *-* the entire round, finish round with 1 tr in first dc at beg of 6th round + 3 ch = 15-16 tr-groups and 105-112 dc. ROUND 8: Work * 1 tr in first/next tr, 6 tr around first/next ch-space, skip 2 dc, 1 dc in each of the next 3 dc, skip 2 dc, 6 tr around next ch-space *, repeat from *-* the entire round = 15-16 tr-groups and 45-48 dc. ROUND 9: Work * 1 dc in each of the first/next 5 tr, skip 2 tr + 1 dc, in next dc work 1 tr + 3 ch + 1 tr + 3 ch + 1 tr, skip 1 dc + 2 tr, 1 dc in each of the next 4 tr *, repeat from *-* the entire round = 15-16 tr-groups and 135-144 dc. Fasten off. |
||||||||||||||||||||||||||||||||||
Diagram explanations |
||||||||||||||||||||||||||||||||||
|
||||||||||||||||||||||||||||||||||
|
||||||||||||||||||||||||||||||||||
Have you finished this pattern?Tag your pictures with #dropspattern #countrygirlhat or submit them to the #dropsfan gallery. Do you need help with this pattern?You'll find 11 tutorial videos, a Comments/Questions area and more by visiting the pattern on garnstudio.com. © 1982-2025 DROPS Design A/S. We reserve all rights. This document, including all its sub-sections, has copyrights. Read more about what you can do with our patterns at the bottom of each pattern on our site. |
||||||||||||||||||||||||||||||||||


With over 40 years in knitting and crochet design, DROPS Design offers one of the most extensive collections of free patterns on the internet - translated to 17 languages. As of today we count 314 catalogues and 11820 patterns translated into English (UK/cm). 11820
We work hard to bring you the best knitting and crochet have to offer, inspiration and advice as well as great quality yarns at incredible prices! Would you like to use our patterns for other than personal use? You can read what you are allowed to do in the Copyright text at the bottom of all our patterns. Happy crafting!
Post a comment to pattern DROPS 167-7
We would love to hear what you have to say about this pattern!
If you want to leave a question, please make sure you select the correct category in the form below, to speed up the answering process. Required fields are marked *.