
Looking for a yarn?


Comments / Questions (37)
![]() Monika wrote:
Monika wrote:
Miten tuo oikea etukappale neulotaan peilikuvana? Senhän täytyy kumminkin mennä niin, että 6s ainaoikean edessä on kaavio A8. Eli 5s ainaoikein, A6, A7, A8 ja 6s ainaoikein. Muutenhan se ei toimi, kun kaikki kappaleet yhdistetään ja aletaan neuloo helmaa kohden.
10.10.2016 - 23:00
![]() Nicole wrote:
Nicole wrote:
Bei den Ärmeln sollen am Anfang der Runde für die Armausschnitte 4 Maschen 5x abgekettet werden. Dann komme ich bei xl von 68 Maschen auf 48Maschen. Zielwert ist jedoch mit 28 Maschen angegeben. Können sie mir dazu helfen? MfG Nicole
23.08.2016 - 12:51DROPS Design answered:
Liebe Nicole, Sie ketten beidseitig 5 x 4 Maschen ab, das sind dann 40 Maschen total, somit kommen Sie auf die angegebenen 28 Maschen. Viel Spass beim Stricken!
25.08.2016 - 18:21Tanja Chopra wrote:
I have to admit I knitted the cardigan with lace instead of kid silk, as I don't like mohair. It looks gorgeous, but it unfortunately slides down the shoulders when it is worn. I may try to add a kind of ribbon to prevent it from sliding?
19.06.2016 - 19:54
![]() Anne wrote:
Anne wrote:
Kan ik dit vest ook met brushed alpaca silk maken? Ik vind het model echt fantastisch!
29.04.2016 - 17:58DROPS Design answered:
Hoi Anne. Ja, je kan vervangen door 1 draad Brushed Alpaca Silk. Je kan hier lezen hoe je de hoeveelheid moet berekenen en vergeet niet om een proeflapje te breien om de stekenverhouding te controleren. Veel breiplezier!
02.05.2016 - 11:06
![]() Birgit Trede wrote:
Birgit Trede wrote:
Könnte man diese Jacke auch mit Bug Mein stricken?
08.02.2016 - 20:31DROPS Design answered:
Was meinen Sie mit Bug Mein? Big Merino? Das geht, denn Sie können 2 Fäden der Garngruppe A, in die Alpaca gehört, durch 1 Faden der Garngruppe C ersetzen, Big Merino gehört in Gruppe C. Sie stricken dann also einfädig und nicht zweifädig. Beachten Sie, dass die Maschenprobe stimmen muss und Sie den Garnverbrauch anhand der Lauflänge neu berechnen müssen.
09.02.2016 - 14:36
![]() Marita wrote:
Marita wrote:
Hihan pituus askarruttaa, tarvitseeko sen olla tosiaan xxl koossa olla 62cm?
11.01.2016 - 13:35DROPS Design answered:
Hihan sisäreunan pituus on koossa XXL 56 cm, ylimääräinen pituus tulee hihanpyöriöön, joka kiinnitetään kädentiehen. Mikäli hihasta tulee mielestäsi liian pitkä, voit toki neuloa sen hieman lyhyemmäksi.
18.01.2016 - 17:18
![]() Zissa wrote:
Zissa wrote:
Hallo liebes Team, das sieht ganz fantastisch aus! Eine Frage habe ich jedoch, es steht bei dem Jackenteil in der Anleitung nachdem man anfängt zu messen, nicht dass man Maschen abnehmen soll für die Armlöcher. Das kommt erst wenn man die Teile einzeln arbeiten soll. Ist das ein Fehler? Weil ich dann über die 22cm hinaus bin, wie es bei der Zentimeter Beschreibung steht. Oder habe ich da einen Denkfehler? Bin schon am stricken.. Liebe Grüße und vielen Dank aber für das tolle Muster!
06.01.2016 - 23:41DROPS Design answered:
Die Armausschnitte entstehen durch das Teilen der Arbeit, Sie ketten nur jeweils die mittlere M der 11 M an beiden Seiten der Jacke ab. Die 22 cm beziehen sich ab diesem neuen Messpunkt, d.h. ab der Stelle, an der Sie die Arbeit geteilt haben (d.h. die mittlere M der 11 M abgekettet haben).
08.02.2016 - 12:24
![]() Anna Nesi wrote:
Anna Nesi wrote:
Buongiorno ho problemi su questo modello mi potrebbe aiutare per favore!?ho problemi con l'inizio del lavoro,non mi trovo con 256 maglie,io sono partita con 301 maglie quindi meno 6 lavA1,poi A2,Poi A3 mi trovo a 244 m.nelle 301 m sono insert le m vigagno?la prego puo rispondere al piu presto grazie
16.12.2015 - 09:19DROPS Design answered:
Buongiorno Anna. Nelle 301 m sono comprese le m vivagno. Quindi 6 m vivagno + 16 m per il diag A.1 + 17 m per il diag A.3 + 6 m vivagno = 45 m. 301 m – 45 m = 256 m su cui lavorare il diag A.2 (ripete il diag A.2 in tutto 16 volte). Ci riscriva se ancora in difficoltà. Buon lavoro!
16.12.2015 - 09:40
![]() Stéphanie wrote:
Stéphanie wrote:
Merci de votre réponse, juste une précision, si je tricote en rond les manches dois-je faire les 2 m lis ?
10.12.2015 - 20:58DROPS Design answered:
Bonjour Stéphanie, vous n'avez pas besoin des 2 m lis des manches si vous les tricotez en rond. Montez 2 m en moins que le nbe indiqué. Bon tricot!
11.12.2015 - 09:55
![]() Stéphanie wrote:
Stéphanie wrote:
Bonjour, est-il possible de tricoter en rond les manches? et si oui faut-il modifier quelques chose dans les explications? Merci
01.12.2015 - 09:02DROPS Design answered:
Bonjour Stéphanie, vous pouvez tout à fait tricoter les manches en rond, lisez simplement le diagramme sur l'endroit (pas de rang sur l'envers) et formez ensuite l'arrondi en allers et retours comme indiqué. Bon tricot!
01.12.2015 - 16:00
|
||||||||||||||||||||||
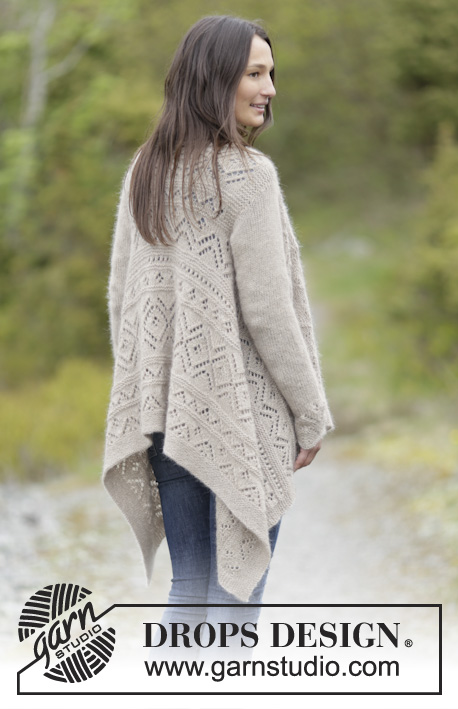
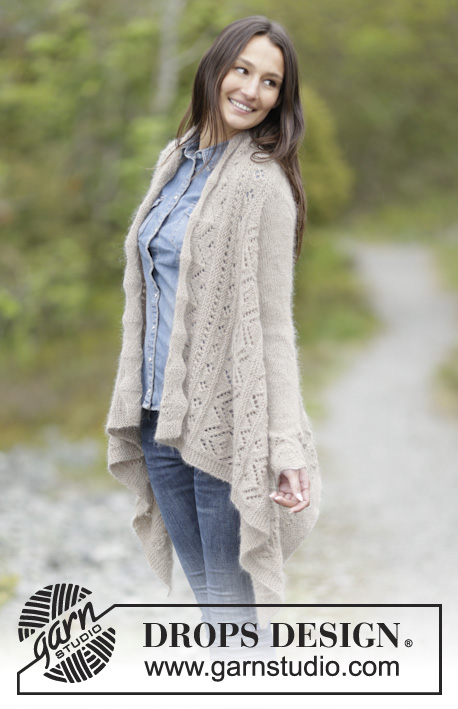
Falling Leaves#fallingleavescardigan |
||||||||||||||||||||||
 |
 |
|||||||||||||||||||||
Knitted DROPS jacket worked in a square in garter st with lace pattern, worked top down in ”Alpaca” and ”Kid-Silk”. Size: S - XXXL.
DROPS 164-3 |
||||||||||||||||||||||
|
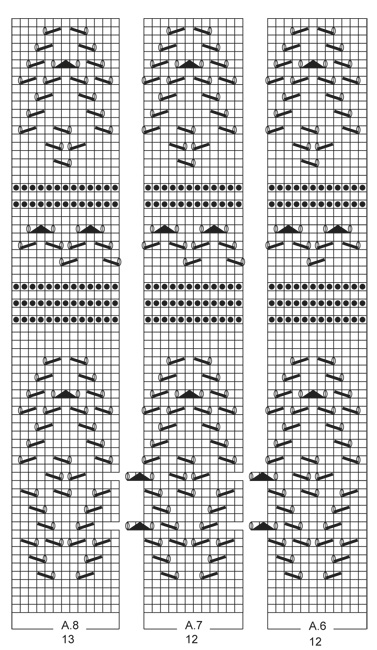
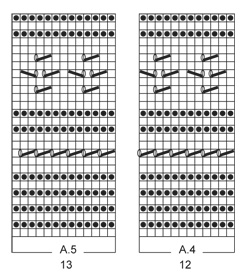
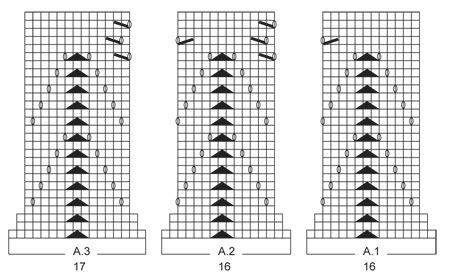
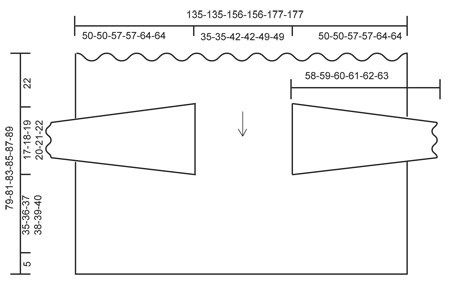
GARTER ST (back and forth): K all rows. 1 ridge = 2 rows K. PATTERN: See diagrams A.1-A.9. The diagrams shows all rows in pattern seen from RS. INCREASE TIP: Inc 1 st by making 1 YO, on next row P YO twisted to avoid holes. ---------------------------------------------------------- JACKET: Cast on 301-301-349-349-397-397 sts on circular needle size 4 mm with 1 strand of each yarn (= 2 strands). Work 1 ridge in GARTER ST - see explanation above. On next row from RS switch to circular needle size 5 mm and work as follows: Work 6 sts in garter st, A.1 (= 16 sts), A.2 (= 16 sts) over the next 256-256-304-304-352-352 sts, A.3 (= 17 sts) over the next 17 sts, finish with 6 sts in garter st. REMEMBER THE KNITTING TENSION When A.1-A.3 have been worked 1 time vertically, there are 229-229-265-265-301-301 sts on needle. Work next row as follows from RS: 6 sts in garter st, A.4 (= 12 sts) over the next 204-204-240-240-276-276 sts, A.5 (= 13 sts), finish with 6 sts in garter st. When A.4-A.5 have been worked 1 time vertically, piece measures approx. 22 cm. Insert 1 marker in piece, NOW MEASURE PIECE FROM HERE. Work next row as follows from RS: 6 sts in garter st, A.6 (= 12 sts), A.7 (= 12 sts) over the next 48-48-60-60-72-72 sts, A.8 (= 13 sts), 11 sts in garter st, A.6, A.7 over the next 24-24-36-36-48-48 sts, A.8, 11 sts in garter st, A.6, A.7 over the next 48-48-60-60-72-72 sts, A.8, 6 sts in garter st. Work like this for 4 rows AT THE SAME TIME on last row cast off the middle of the 11 sts in garter st in each side = 227-227-263-263-299-299 sts. Now divide piece and work opening for armhole: LEFT FRONT PIECE: Slip the last 143-143-167-167-191-191 sts on needle (seen from RS) on a stitch holder, only work over the first 84-84-96-96-108-108 sts. Continue pattern as before, i.e. work as follows from RS: 6 sts in garter st, A.6-A.8 as before, finish with 5 sts in garter st. Work until piece measures 17-18-19-20-21-22 cm from where piece was divided. NOTE: Adjust so that last row is from WS. Slip sts on a stitch holder and work right front piece. RIGHT FRONT PIECE: Slip the last 84-84-96-96-108-108 sts back on needle (= 59-59-71-71-83-83 sts remain on stitch holder), work as left front piece. Slip sts on 1 stitch holder and work back piece. BACK PIECE: Slip the remaining 59-59-71-71-83-83 sts from stitch holder back on needle. Continue pattern, work the 5 sts in each side in garter st. When back piece measures 17-18-19-20-21-22 cm, slip all sts back on the same circular needle size 5 mm. NOTE: Adjust according to pattern on front piece (last row is from WS). Then work as follows from RS: 6 sts in garter st, A.6, A.7 over the next 48-48-60-60-72-72 sts, A.8, 5 sts in garter st, cast on 1 new st, 5 st in garter st, A.6, A.7 over the next 24-24-36-36-48-48 sts, A.8, 5 sts in garter st, cast on 1 new st, 5 sts in garter st, A.6, A.7 over the next 48-48-60-60-72-72 sts, A.8, 6 sts in garter st = 229-229-265-265-301-301 sts on needle. Work the new sts in garter st. Work 4 rows like this. Then work pattern as follows (from RS): 6 sts in garter st, A.6, A.7 over the next 192-192-228-228-264-264 sts, A.8, finish with 6 sts in garter st. When A.6-A.8 have been worked 1 time vertically, work as follows from RS: 6 sts in garter st, A.4 over the next 204-204-240-240-276-276 sts, A.5, finish with 6 sts in garter st. When A.4-A.5 have been worked 1 time vertically, repeat A.6-A.8 until piece measures 74-76-78-80-82-84 cm, adjust neatly according to pattern. Switch to circular needle size 4 mm. Work in garter st for 5 cm. Cast off. SLEEVE: Worked back and forth on circular needle. Cast on 50-50-50-56-56-56 sts (incl 1 edge st in each side of piece) on circular needle size 4 mm with 1 strand of each yarn (= 2 strands). Work 1 ridge. Switch to circular needle size 5 mm. SIZE S-M-L: Work 1 st in garter st, A.2 over the next 48 sts and finish with 1 edge st in garter st. When A.2 has been worked 1 time vertically, there are 38 sts on needle and piece measures approx. 12 cm. SIZE XL-XXL-XXXL: Work 1 st in garter st, A.9 (= 18 sts) over the next 54 sts, finish with 1 edge st in garter st. When A.9 has been worked 1 time vertically, there are 44 sts on needle and piece measures approx. 14 cm. ALL SIZES: Now work piece in stocking st, work edge sts in garter st until finished measurements. When piece measures 14-14-14-16-16-16 cm, inc 1 st inside 1 edge st in each side of piece – READ INCREASE TIP, repeat inc every 3½-3-3-3-2½-2½ cm 10-12-13-12-14-15 more times = 60-64-66-70-74-76 sts. Work in stocking st until piece measures 52-53-54-55-56-57 cm. Cast off edge st in each side of piece at beg of the next 2 rows = 58-62-64-68-72-74 sts. Then cast off for sleeve cap in each side of piece at beg of every row as follows: Cast off 4 sts 5 times in total in each side = 18-22-24-28-32-34 sts. Cast off the remaining sts. Piece measures approx. 58-59-60-61-62-63 cm. ASSEMBLY: Sew in sleeves. Sew underarm seams inside 1 edge st. |
||||||||||||||||||||||
Diagram explanations |
||||||||||||||||||||||
|
||||||||||||||||||||||
 |
||||||||||||||||||||||
 |
||||||||||||||||||||||
 |
||||||||||||||||||||||
 |
||||||||||||||||||||||
 |
||||||||||||||||||||||
Have you finished this pattern?Tag your pictures with #dropspattern #fallingleavescardigan or submit them to the #dropsfan gallery. Do you need help with this pattern?You'll find 20 tutorial videos, a Comments/Questions area and more by visiting the pattern on garnstudio.com. © 1982-2025 DROPS Design A/S. We reserve all rights. This document, including all its sub-sections, has copyrights. Read more about what you can do with our patterns at the bottom of each pattern on our site. |
||||||||||||||||||||||


With over 40 years in knitting and crochet design, DROPS Design offers one of the most extensive collections of free patterns on the internet - translated to 17 languages. As of today we count 320 catalogues and 12093 patterns translated into English (UK/cm). 12093
We work hard to bring you the best knitting and crochet have to offer, inspiration and advice as well as great quality yarns at incredible prices! Would you like to use our patterns for other than personal use? You can read what you are allowed to do in the Copyright text at the bottom of all our patterns. Happy crafting!
Post a comment to pattern DROPS 164-3
We would love to hear what you have to say about this pattern!
If you want to leave a question, please make sure you select the correct category in the form below, to speed up the answering process. Required fields are marked *.