
Popular categories
Looking for a yarn?


Comments / Questions (83)
![]() Jessica wrote:
Jessica wrote:
Bonjour, Je n'arrive pas à savoir quelle taille je dois choisir pour les modèles? Y a t il un guide des tailles? Merci
02.08.2015 - 09:43DROPS Design answered:
Bonjour Jessica, vous trouverez à la fin des explications un schéma avec les mesures finales pour chaque taille, en cm, prises à plat, d'un côté à l'autre. Comparez les à un vêtement similaire que vous avez et dont vous aimez la taille pour trouver la taille qui vous convient. Bon tricot!
03.08.2015 - 10:11
![]() Silvi wrote:
Silvi wrote:
Ist jetzt das neue Diagramm schon geschaltet, oder die Anleitung ausgebessert ? Das Muster sieht so hübsch aus. LG
28.07.2015 - 13:32DROPS Design answered:
Das Muster und die Anleitung müssten korrekt sein, so wie sie sind. Auf welchen Fehler beziehen Sie sich genau?
29.07.2015 - 10:08
![]() Hanne Pedersen wrote:
Hanne Pedersen wrote:
Er lige blevet værdig med min bluse. Den var sjov at strikke og jeg er super glad for den.
12.07.2015 - 01:13
![]() Hanne Gunnertoft Pedersen wrote:
Hanne Gunnertoft Pedersen wrote:
Jeg har bøvlet meget med det sted, hvor ærmestykker skal samles med resten af trøjen. Mine problemer bunder i de nye masker, som er taget ud ved at strikke to masker i een, synes der bliver hul når man strikker den ekstra masker på næste pind. Da man, så vidt jeg forstår, på den første pind, hvor det hele er samlet skal strikke mønster A 2, bliver det bare for svært med de mærkelige nye masker?
03.07.2015 - 11:30DROPS Design answered:
Hej Hanne, Nej men de udtagniger du gør på første p efter det retstrikkede på ærmet vil du ikke komme til at se. Prøv bare at fortsætte ifølge diagrammet. God fornøjelse!
08.07.2015 - 15:32
![]() Sonja Vaanholt wrote:
Sonja Vaanholt wrote:
Waarom kan ik het patroon maar half uitprinten???
06.06.2015 - 19:04
![]() Martha wrote:
Martha wrote:
Ein wunderschönes Modell, fertig gestrickt ist es noch schöner :)
26.05.2015 - 18:24Ann-mari Hansen wrote:
Er i tvivl om længden på blusen der står 52 cm til ærmegab plus 14 cm ?eller er længden kun 52 cm ?
19.05.2015 - 10:49DROPS Design answered:
Hej Ann-Mari. Höjden er 52 cm totalt, altsaa inclusiv de 14 cm til aermegab
19.05.2015 - 14:21
![]() Brigitte wrote:
Brigitte wrote:
Der Pulli ist super geworden, vielen Dank ☺
07.05.2015 - 13:13
![]() Beatriz Silva wrote:
Beatriz Silva wrote:
Estou a fazer o modelo 159-4, tendo comparado as explicações em francês, português e inglês. Relativamente à explicação do diagrama em português, mais propriamente a "deslizar 1m/p em meia, 2 ms/pts meia, passar a malha deslizada por cima da m/p tricotada", existe um nome em português para este tipo de ponto, o que, se for acrescentado à explicação, poderá facilitar a confecção do trabalho. Trata-se da malha acavalada dupla, uma vez que emprega 2 ms/pts meia e não 1 ms/pts.
03.04.2015 - 12:40
![]() Gonet Yvette wrote:
Gonet Yvette wrote:
J'ai terminé ce tricot et le résultat est magnifique ! Bravo
20.02.2015 - 10:39
|
|||||||||||||||||||
Call It Spring#callitspringtop |
|||||||||||||||||||
 |
 |
||||||||||||||||||
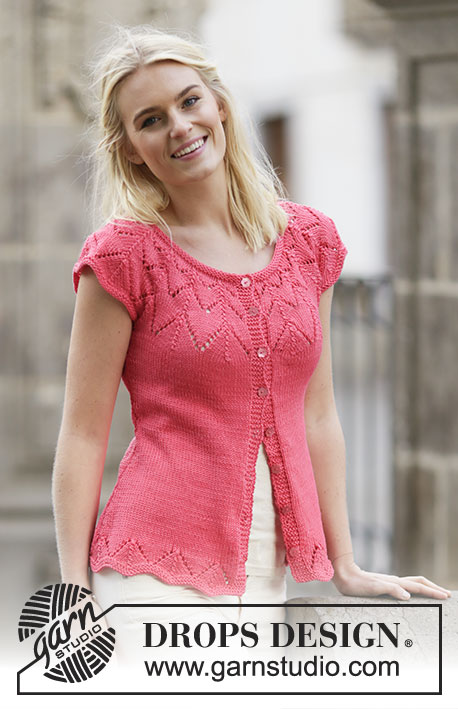
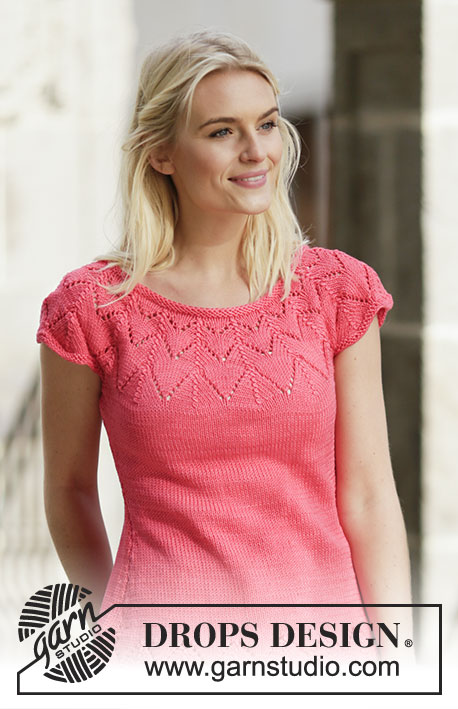
Knitted DROPS top in stocking st with lace pattern and round yoke in ”Muskat”. Size: S - XXXL.
DROPS 159-4 |
|||||||||||||||||||
|
GARTER ST (back and forth): K all rows. 1 ridge = 2 rows K. GARTER ST (worked in the round): 1 ridge = 2 rounds. * K 1 round and P 1 round *, repeat from *-*. PATTERN: See diagrams A.1 to A.4. The diagrams show all rounds in pattern seen from RS. DECREASE TIP: Dec as follows before marker: Work until 2 sts before marker: K 2 tog. Dec as follows after marker: Slip 1 st as if to K, K 1, psso. INCREASE TIP: Inc 1 st by making 1 YO, on next round K YO twisted (i.e. work in back loop of st instead front) to avoid holes. ---------------------------------------------------------- TOP: Worked in the round on circular needle. Cast on 210-224-238-266-294-322 sts on circular needle size 4 mm with Muskat. Work 2 ridges in GARTER ST in the round - see explanation above. Then work PATTERN A.1 (= 14 sts on 1st round) from mid back (= beg of round) = 180-192-204-228-252-276 sts. REMEMBER THE KNITTING TENSION When entire A.1 has been worked vertically, insert a marker in each side as follows: Work the first 45-48-51-57-63-69 sts, insert a marker, work the next 90-96-102-114-126-138 sts, insert a marker and work the remaining 45-48-51-57-63-69 sts on round. Then continue in stocking st. When piece measures 7 cm, dec 1 st on each side of each marker - READ DECREASE TIP. Repeat dec every 2-2½-4-2½-2-2½ cm 6-5-3-5-5-5 more times = 152-168-188-204-228-252 sts. When piece measures 24 cm, inc 1 st on each side of the 2 markers - READ INCREASE TIP! Repeat inc every 1-1-1½-2-2-2 cm 7-6-5-4-6-6 more times = 184-196-212-224-256-280 sts. When piece measures 35-37-38-40-41-43 cm, cast off sts for armhole as follows on next round: Work the first 42-45-49-51-59-65 sts, cast off the next 8-8-8-10-10-10 sts for armhole, work the next 84-90-98-102-118-130 sts, cast off the next 8-8-8-10-10-10 sts for armhole, work the remaining 42-45-49-51-59-65 sts = 168-180-196-204-236-260 sts. Put piece aside and knit the sleeve edges. SLEEVE EDGE: Worked back and forth on circular needle. Cast on 62-64-65-71-72-76 sts on circular needle size 4 mm with Muskat. K 3 rows back and forth (1st row = WS). Work next row as follows: Cast off the first 4-4-4-5-5-5 sts, K the next 54-56-57-61-64-66 sts while AT THE SAME TIME inc 6-6-5-5-4-4 sts evenly (inc by working 2 sts in 1 st), cast off the last 4-4-4-5-5-5 sts, cut the yarn = 60-62-62-66-66-70 sts. Put piece aside and knit another sleeve edge. YOKE: Slip sleeve edges on to same circular needle as body where armholes were cast off = 288-304-320-336-368-400 sts. Then work and dec according to A.2 (= 18-19-20-21-23-25 repetitions). NOTE: See arrow in diagram A.2 and A.3 for correct size. When A.2 has been worked vertically, continue with A.3. When A.3 has been worked vertically, continue with A.4. There are now 108-114-120-126-138-150 sts on round. Work 1 ridge while AT THE SAME TIME dec 6-4-2-0-4-8 sts evenly = 102-110-118-126-134-142 sts. Work 1 more ridge and loosely cast off. ASSEMBLY: Sew sleeve seams tog edge to edge in front loop of outermost sts. Sew the openings under the sleeves. |
|||||||||||||||||||
Diagram explanations |
|||||||||||||||||||
|
|||||||||||||||||||

|
|||||||||||||||||||

|
|||||||||||||||||||
Have you finished this pattern?Tag your pictures with #dropspattern #callitspringtop or submit them to the #dropsfan gallery. Do you need help with this pattern?You'll find 24 tutorial videos, a Comments/Questions area and more by visiting the pattern on garnstudio.com. © 1982-2025 DROPS Design A/S. We reserve all rights. This document, including all its sub-sections, has copyrights. Read more about what you can do with our patterns at the bottom of each pattern on our site. |
|||||||||||||||||||


With over 40 years in knitting and crochet design, DROPS Design offers one of the most extensive collections of free patterns on the internet - translated to 17 languages. As of today we count 314 catalogues and 11820 patterns translated into English (UK/cm). 11820
We work hard to bring you the best knitting and crochet have to offer, inspiration and advice as well as great quality yarns at incredible prices! Would you like to use our patterns for other than personal use? You can read what you are allowed to do in the Copyright text at the bottom of all our patterns. Happy crafting!
Post a comment to pattern DROPS 159-4
We would love to hear what you have to say about this pattern!
If you want to leave a question, please make sure you select the correct category in the form below, to speed up the answering process. Required fields are marked *.