
Popular categories
Looking for a yarn?


Comments / Questions (83)
![]() Annelise Andersen wrote:
Annelise Andersen wrote:
Jeg har svært ved at forstå begyndelsen på ærmet. Der står strik 3pinde ret. Så står der at på første pind lunnes der 5 m af. Er der den første pind af de tre ret pinde. Eller er det den første pind efter ret pindene? Mvh Annelise Andersen
13.11.2023 - 18:15
![]() Assunta wrote:
Assunta wrote:
Buongiorno, ho già eseguito questo modello , ma se volessi fare questo modello con maniche lunghe come dovrei procedere,?grazie.
17.07.2022 - 14:12DROPS Design answered:
Buonasera Assunta, per un aiuto così personalizzato può rivolgersi al suo rivenditore DROPS di fiducia. Buon lavoro!
20.07.2022 - 21:23
![]() Manon wrote:
Manon wrote:
Bonjour Le model 159-4 se tricote de bas vers haut OU encolure vers le bas? Merci Manon
23.05.2022 - 08:19DROPS Design answered:
Bonjour Manon, ce modèle se tricote de bas en haut, vous tricotez d'abord le bas du dos/devant en rond jusqu'aux emmanchures et vous mettez en attente; vous tricotez ensuite la bordure des deux manches et vous reprenez ensuite toutes les mailles pour tricoter l'empiècement arrondi. Bon tricot!
23.05.2022 - 08:56
![]() Annick wrote:
Annick wrote:
Bonjour,\r\npour le modèle 138-3 Mirabell je ne vois pas dans les explication quand commence le diagramme ??\r\ndès le début après les 4 rangs de point mousse ??\r\nMerci de votre réponse
18.04.2022 - 17:04DROPS Design answered:
Bonjour Annick, le top Mirabell se tricote de bas en haut. Vous tricotez le diagramme M.1 dès le début de l'empiècement lorsque vous avez réuni les mailles du dos, des manches et du devant sur la même aiguille circulaire. Bon tricot!
19.04.2022 - 11:38
![]() Carina wrote:
Carina wrote:
Hola. Pues como tengo un poco de barriga no lo voy a entallar, lo voy a dejar recto, entonces cuando llegue a la pechera cuántos puntos tendría que tener o qué múltiplo sería? Muchas gracias.
18.04.2022 - 15:01DROPS Design answered:
Hola Carina, para trabajar bien el canesú según el patrón, tienes que llegar con 184-196-212-224-256-280 pts (dependiendo de la talla). Es decir, Por lo tanto, tienes que ajustar el número de puntos después del patrón A.1 para trabajar el canesú sin problemas.
18.04.2022 - 19:31
![]() Carina wrote:
Carina wrote:
Hola. Sí quiero hacer la manga más larga, hago punto jersey después de la orilla en punto de musgo y luego ya lo de rematar y aumentar? Gracias
14.04.2022 - 00:02DROPS Design answered:
Hola Carina, sí, puedes alargar la manga trabajando en punto jersey, pero tendrías que empezar la manga con menos puntos, porque tienes que trabajar aumentos repartidos en el punto jersey extra, hasta alcanzar el número de puntos de la manga.
14.04.2022 - 17:26
![]() Carin Boetzkes wrote:
Carin Boetzkes wrote:
Hallo breisterren, Ik heb een vraag m.b.t. het breien van de mouwranden… Moeten deze persé op een rondbreinaald heen en weer gebreid worden of kan dit ook op gewonde breinaalden? Alvast bedankt voor de reactie. Carin
11.04.2022 - 20:03DROPS Design answered:
Dag Carin,
Deze moeten inderdaad met de rondbreinaald gebreid worden. Je zou ook sokkenbreinaalden kunnen gebruiken.
14.04.2022 - 11:42
![]() Femke Burnet wrote:
Femke Burnet wrote:
Goedemorgen, ik heb een aantal keren geprobeerd om de mouw randjes ertussen te zetten maar de 8 afgekante steken geven me nauwelijks ruimte. Vooral tijdens het breien van de patroonnaald is het lastig. De steken zitten superstrak op elkaar. Er is geen ruimte om ze op te schuiven. Doe ik iets fout? Zo niet hebben jullie een tip?
30.03.2022 - 22:32DROPS Design answered:
Dag Femke,
Bij de overgang onder de oksel kan het inderdaad soms erg strak zijn. Hiervoor kun je de magic loop techniek gebruiken. Zie deze video.
04.04.2022 - 13:18
![]() Anette Westermark wrote:
Anette Westermark wrote:
Hej! Enligt beskrivningen stickas den på rundsticka men om man tittar på bilden ser det ut som den är ihopsydd i sidorna?
17.03.2022 - 09:46DROPS Design answered:
Hej Anette. Jag ser att det ser ut som den är ihopsydd på bilden, men det är meningen att den ska stickas runt på rundsticka som det står i beskrivningen. Mvh DROPS Design
17.03.2022 - 11:59
![]() Carina wrote:
Carina wrote:
Otra pregunta: cómo es que en la foto el modelo tiene una costura lateral si se teje en redondo? Gracias
26.02.2022 - 00:47DROPS Design answered:
Hola Carina, efectivamente, se trabaja en redondo, sin costuras. La línea lateral contiene las disminuciones y aumentos, que pueden dar lugar a un efecto visual similar a una costura.
27.02.2022 - 18:05
|
|||||||||||||||||||
Call It Spring#callitspringtop |
|||||||||||||||||||
 |
 |
||||||||||||||||||
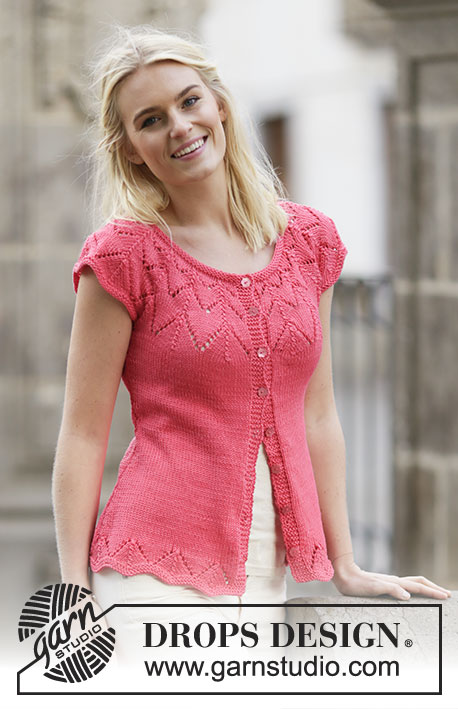
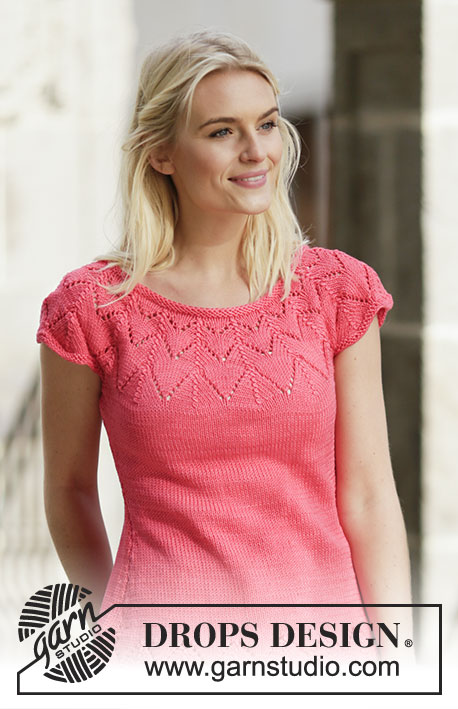
Knitted DROPS top in stocking st with lace pattern and round yoke in ”Muskat”. Size: S - XXXL.
DROPS 159-4 |
|||||||||||||||||||
|
GARTER ST (back and forth): K all rows. 1 ridge = 2 rows K. GARTER ST (worked in the round): 1 ridge = 2 rounds. * K 1 round and P 1 round *, repeat from *-*. PATTERN: See diagrams A.1 to A.4. The diagrams show all rounds in pattern seen from RS. DECREASE TIP: Dec as follows before marker: Work until 2 sts before marker: K 2 tog. Dec as follows after marker: Slip 1 st as if to K, K 1, psso. INCREASE TIP: Inc 1 st by making 1 YO, on next round K YO twisted (i.e. work in back loop of st instead front) to avoid holes. ---------------------------------------------------------- TOP: Worked in the round on circular needle. Cast on 210-224-238-266-294-322 sts on circular needle size 4 mm with Muskat. Work 2 ridges in GARTER ST in the round - see explanation above. Then work PATTERN A.1 (= 14 sts on 1st round) from mid back (= beg of round) = 180-192-204-228-252-276 sts. REMEMBER THE KNITTING TENSION When entire A.1 has been worked vertically, insert a marker in each side as follows: Work the first 45-48-51-57-63-69 sts, insert a marker, work the next 90-96-102-114-126-138 sts, insert a marker and work the remaining 45-48-51-57-63-69 sts on round. Then continue in stocking st. When piece measures 7 cm, dec 1 st on each side of each marker - READ DECREASE TIP. Repeat dec every 2-2½-4-2½-2-2½ cm 6-5-3-5-5-5 more times = 152-168-188-204-228-252 sts. When piece measures 24 cm, inc 1 st on each side of the 2 markers - READ INCREASE TIP! Repeat inc every 1-1-1½-2-2-2 cm 7-6-5-4-6-6 more times = 184-196-212-224-256-280 sts. When piece measures 35-37-38-40-41-43 cm, cast off sts for armhole as follows on next round: Work the first 42-45-49-51-59-65 sts, cast off the next 8-8-8-10-10-10 sts for armhole, work the next 84-90-98-102-118-130 sts, cast off the next 8-8-8-10-10-10 sts for armhole, work the remaining 42-45-49-51-59-65 sts = 168-180-196-204-236-260 sts. Put piece aside and knit the sleeve edges. SLEEVE EDGE: Worked back and forth on circular needle. Cast on 62-64-65-71-72-76 sts on circular needle size 4 mm with Muskat. K 3 rows back and forth (1st row = WS). Work next row as follows: Cast off the first 4-4-4-5-5-5 sts, K the next 54-56-57-61-64-66 sts while AT THE SAME TIME inc 6-6-5-5-4-4 sts evenly (inc by working 2 sts in 1 st), cast off the last 4-4-4-5-5-5 sts, cut the yarn = 60-62-62-66-66-70 sts. Put piece aside and knit another sleeve edge. YOKE: Slip sleeve edges on to same circular needle as body where armholes were cast off = 288-304-320-336-368-400 sts. Then work and dec according to A.2 (= 18-19-20-21-23-25 repetitions). NOTE: See arrow in diagram A.2 and A.3 for correct size. When A.2 has been worked vertically, continue with A.3. When A.3 has been worked vertically, continue with A.4. There are now 108-114-120-126-138-150 sts on round. Work 1 ridge while AT THE SAME TIME dec 6-4-2-0-4-8 sts evenly = 102-110-118-126-134-142 sts. Work 1 more ridge and loosely cast off. ASSEMBLY: Sew sleeve seams tog edge to edge in front loop of outermost sts. Sew the openings under the sleeves. |
|||||||||||||||||||
Diagram explanations |
|||||||||||||||||||
|
|||||||||||||||||||

|
|||||||||||||||||||

|
|||||||||||||||||||
Have you finished this pattern?Tag your pictures with #dropspattern #callitspringtop or submit them to the #dropsfan gallery. Do you need help with this pattern?You'll find 24 tutorial videos, a Comments/Questions area and more by visiting the pattern on garnstudio.com. © 1982-2025 DROPS Design A/S. We reserve all rights. This document, including all its sub-sections, has copyrights. Read more about what you can do with our patterns at the bottom of each pattern on our site. |
|||||||||||||||||||


With over 40 years in knitting and crochet design, DROPS Design offers one of the most extensive collections of free patterns on the internet - translated to 17 languages. As of today we count 314 catalogues and 11820 patterns translated into English (UK/cm). 11820
We work hard to bring you the best knitting and crochet have to offer, inspiration and advice as well as great quality yarns at incredible prices! Would you like to use our patterns for other than personal use? You can read what you are allowed to do in the Copyright text at the bottom of all our patterns. Happy crafting!
Post a comment to pattern DROPS 159-4
We would love to hear what you have to say about this pattern!
If you want to leave a question, please make sure you select the correct category in the form below, to speed up the answering process. Required fields are marked *.