
Looking for a yarn?


Comments / Questions (91)
![]() Marjanna wrote:
Marjanna wrote:
Patroon klopt van geen kant. Kom hierdoor nu niet meer uit met het haakgaren dat ik bij Drops gekocht heb. Heb voor maat s garen gekocht, en moet maat l maken om aan de afmetingen te komen. Dit is ontzettend jammer!
25.11.2014 - 21:17DROPS Design answered:
Hoi Marjanna. Let op, dat haak je van het patroon in het boek, dat je de juiste teltekening moet hebben (die hier op de site staat - zie ook CORRECTIES). Verder hebben wij geen foutmeldingen gehad. Klopt jouw haakstekenverhouding? (heb je 4 keer 4 herhalingen van het patroon op 10 x 10 cm). Door een verkeerde stekenverhouding krijg je ook verkeerde afmetingen.
27.11.2014 - 13:49
![]() Iris wrote:
Iris wrote:
Hallo, ik ben bezig een proeflapje te haken voor dit patroon, maar ik kom niet op de juiste afmeting uit. Als ik haaknaald 4 gebruik krijg ik 4 x 4 patroonherhalingen = 10 cm breed x 8 cm lang in plaats van 10 x 10 cm. In de werkbeschrijving staat dat het werk langer wordt als het hangt vanwege het patroon. Kan ik het beste doorgaan met naald 4 of kan ik beter toch 4,5 proberen?
19.05.2014 - 11:17DROPS Design answered:
Hoi Iris. Je kan ook het proeflapje even wassen en dan meten. Twijfel je nog, dan haak en een lapje met 4.5 (ook wassen) en kijk welke van de twee het beste past.
21.05.2014 - 17:28
![]() Emma wrote:
Emma wrote:
Das Ende der Ärmel ist mir leider unverständlich: " Dann auf jeder Seite insgesamt 0-0-0-0-2-2 x in jeder 2. R ½ Rapport abk und schliesslich in jeder R 6-7-8-8-6-6 x = 5-6-6-6-7-7 Rapporte ." Was kommt nach dem x? Wie nehme ich da ab? Ab wann mache ich das bei den kleinen Größen und wie viele Rapporte sollte ich dann am Ende haben? Ich hoffe sehr, dass Sie mir dabei helfen können, damit ich bald mit dieser wunderschönen Jacke anfangen kann.
23.02.2014 - 23:26DROPS Design answered:
Die Abnahmen arbeiten Sie wie am Rückenteil. "in jeder R 6-7-8-8-6-6 x" - d.h. nun nehmen Sie in jeder R an beiden Seiten je 1/2 Rapport ab (also insgesamt 1 Rapport pro R). Bei den kleinen Größen nehmen Sie aber gar nicht in jeder 2. R ab (also 0 x), sondern direkt in jeder R. Die restliche Zahl der Rapporte steht in Ihrem Zitat: "5-6-6-6-7-7 Rapporte". Über diese Rapporte häkeln Sie bis zur angegebenen Länge. Viel Spaß beim Häkeln!
24.02.2014 - 01:49
![]() Emma wrote:
Emma wrote:
Bei den Ärmeln ist noch ein Fehler drin. Es muss heißen: Nach 6cm auf beiden Seiten je 1/2 Rapport aufnehmen.
23.02.2014 - 23:25DROPS Design answered:
Danke für den Hinweis, das war ein Übersetzungsfehler und die Anleitung wurde an dieser Stelle nun korrigiert.
24.02.2014 - 01:36
![]() Emma wrote:
Emma wrote:
Und ich komme irgendwie auch nicht auf die 6 Rapporte, die übrig bleiben sollen: Ich habe 12 am Anfang, dann nehme ich bei 15/25cm links und rechts einen halben R. ab (12-4*1/2=10). Dann wird zum Hals 4mal ein halber abgenommen(10-2=8) und außen wie bei dem Rückenteil 2x1 R. und 2x 1/2 R.. Also nochmal 8-3=5.
23.02.2014 - 23:25DROPS Design answered:
Sie nehmen bei den Vorderteilen nur an der einen Seite einen halben Rapport ab (nämlich an der Seite der Jacke, nicht am vorderen Rand), d.h. 12-2*1/2=11, somit bleiben am Ende wie beschrieben 6 Rapporte übrig, nicht 5.
24.02.2014 - 01:35
![]() Emma wrote:
Emma wrote:
Hallo, habe mich gerade an das Verstehen der Anleitung ran gemacht und ein paar Probleme: Warum wird beim Rückenteil bei 10cm und 20cm abgenommen und bei den Vorderseiten bei 15cm und 25cm? Soll das wirklich so? Wenn ja, warum?
23.02.2014 - 23:24DROPS Design answered:
Liebe Emma, ja, das ist so richtig, auf diese Weise wird über die gesamte Jacke gleichmäßiger abgenommen und es entstehen keine "Stufen" an den Abnahmestellen.
24.02.2014 - 01:32
![]() Brittany wrote:
Brittany wrote:
Dec for armholes in each side on every row as follows: 1 repetition 1-1-2-2-2-2 times, then ½ repetitions 0-2-2-2-4-4 times = 15-15-15-17-17-19 repetitions. When piece measures 52-54-56-58-60-62 cm / 20½''-21¼''-22''-22¾''-23 5/8''-24 3/8'', work 1 row only over the outermost 6-6-6-6-6-7 repetitions in each side (do not work over the middle 3-3-3-5-5-5 repetitions = neck line). Work 1 more row, cut and . Now this whole piece is confusing me. Can someone help? Please lol
10.12.2013 - 22:50DROPS Design answered:
Dear Brittany, you dec for armhole each side 1 repetition (see diag. X.1) or 1/2 repetition (see diag. X2) as stated under Decreasing tips. 15-19 repetitions remain (see size). Then work for shoulders separately: 2 rows over the 6-7 repetitions towards side - the middle sts unworked = neckline on back piece. Happy crocheting!
11.12.2013 - 09:17
![]() Ian wrote:
Ian wrote:
Hello! As a newcomer to crochet I keep running into problems, the latest is with this part of the pattern - "work 1 row only over the outermost 6-6-6-6-6-7 repetitions in each side (do not work over the middle 3-3-3-5-5-5 repetitions = neck line). Work 1 more row," How do I crochet one side, skip the middle, then crochet the other side? And when I work the 1 more row, what about the missing middle bit? Thanks for any help.
05.11.2013 - 20:15DROPS Design answered:
Dear Ian, each shoulder will then be worked separately, by crocheting 2 rows over the outermost 6-6-6-6-6-7 repetitions each side, keep the middle 3-3-3-5-5-5 repetitions unworked for neckline. Happy crocheting!
06.11.2013 - 09:32
![]() Heike wrote:
Heike wrote:
Hallo! In der deutschen Anleitung fehlt die Übersetzung für die Armkugel. Es wäre toll, wenn Ihr die schnellstmäglich hinzufügen könntet. Danke
02.08.2013 - 08:54DROPS Design answered:
Liebe Heike, oh da hat unsere damalige Übersetzerin wohl einen Teil vergessen, Entschuldigung. Wird gleich ergänzt!
02.08.2013 - 14:47
![]() Tayeb Bey wrote:
Tayeb Bey wrote:
J'ai fini ce gilet il ets superbe !
25.07.2013 - 16:56
|
||||||||||
Whispers#whisperscardigan |
||||||||||
 |
 |
|||||||||
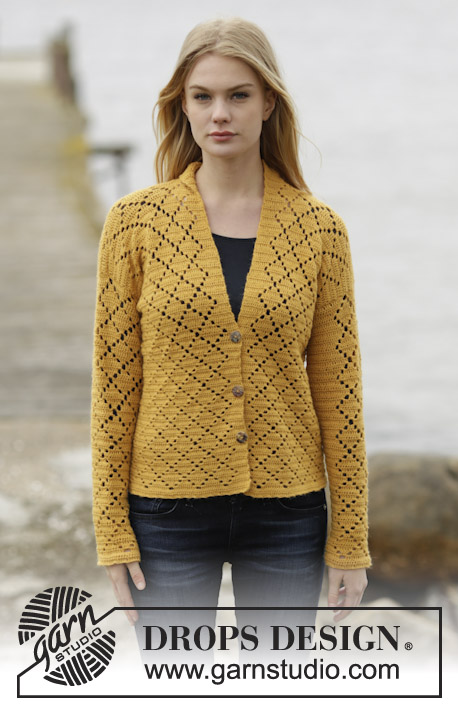
Crochet DROPS jacket in ”Alpaca”. Size: S - XXXL.
DROPS 136-13 |
||||||||||
|
CROCHET INFO: Replace first tr at beg of row with 3 ch. PATTERN: See diagram M.1. Repeat row 1 and 2. M.1 shows 3 repeats in width and 1 repeat in height. MEASURING TIP: The garment will be longer because of pattern. All measurements must therefore be done while holding up the garment. DECREASE TIP: Dec 1 repetition in diagram X.1, or ½ repetition in diagram X.2. Dec at beg of row as follows: Replace 1 repetition with 6 sl st and ½ repetition with 3 sl st. Dec at end of row as follows: Turn piece when either 1 or ½ repetition remains. INCREASE TIP (applies to sleeve): Inc ½ repetition. Inc by turning with 6/7 ch instead of 3, see diagram X.3. -------------------------------------------------------- -------------------------------------------------------- BACK PIECE: Work 120-132-144-156-168-180 ch (incl 8 ch to turn with) on hook size 3.5 mm with blue. Work 1 tr in the 9th ch from hook, * 2 ch, skip 2 ch, 1 tr in next ch *, repeat from *-* = 39-43-47-51-55-59 tr. Continue to work diagram M.1 (1st row is now done, beg on 2nd row) = 19-21-23-25-27-29 repetitions. When piece measures 10 and 20 cm - Read MEASURING TIP, dec ½ repetition in each side – read DECREASE TIP and see diagram X.2 = 17-19-21-23-25-27 repetitions. When piece measures 35-36-37-38-39-40 cm, dec for armholes in each side on every row as follows: 1 repetition 1-1-2-2-2-2 times, then ½ repetitions 0-2-2-2-4-4 times = 15-15-15-17-17-19 repetitions. When piece measures 52-54-56-58-60-62 cm, work 1 row only over the outermost 6-6-6-6-6-7 repetitions in each side (do not work over the middle 3-3-3-5-5-5 repetitions = neck line). Work 1 more row, cut and fasten the thread, the piece measures approx. 54-56-58-60-62-64 cm. RIGHT FRONT PIECE: READ ALL OF THE FOLLOWING SECTION BEFORE CONTINUING! Work 66-72-78-84-90-96 ch (incl 8 ch to turn with) on hook size 3.5 mm with blue. Beg from mid front and work towards the side. Work 1 tr in the 9th ch from hook, * 2 ch, skip 2 ch, 1 tr in next ch *, repeat from *-* = 21-23-25-27-29-31 tr. Continue to work diagram M.1 (1st row is now done, beg on 2nd row) = 10-11-12-13-14-15 repetitions. When piece measures 15 and 25 cm, dec in the side as on back piece. AT THE SAME TIME when piece measures 23-24-25-26-27-28 cm, dec for neck on every other row towards mid front as follows: Dec ½ repetition 4-4-4-6-6-6 times. AT THE SAME TIME when piece measures 35-36-37-38-39-40 cm, dec for armhole in the side as on back piece. After all dec, 6-6-6-6-6-7 repetitions remain for shoulder. Work until piece measures 54-56-58-60-62-64 cm, cut and fasten the thread. LEFT FRONT PIECE: Work as right front piece. SLEEVE: Work 60-60-66-66-72-72 ch (incl 8 ch to turn with) on hook size 3.5 mm with blue. Work 1 tr in the 9th ch from hook, * 2 ch, skip 2 ch, 1 tr in next ch *, repeat from *-* = 19-19-21-21-23-23 tr. Continue to work diagram M.1 (1st row is now done, beg on 2nd row) = 9-9-10-10-11-11 repetitions. When piece measures 6 cm, inc ½ repetition in each side, repeat inc every 12-7-7-7-7-7 cm 3-5-5-5-5-5 more times - read INCREASE TIP = 13-15-16-16-17-17 repetitions. When piece measures 48-47-47-46-46-45 cm (shorter measurements in the larger sizes because of longer sleeve cap and broader shoulder width) dec 1 repetition in each side for sleeve cap. Then dec ½ repetition in each side on every other row a total of 0-0-0-0-2-2 times, then on every row 6-7-8-8-6-6 times = 5-6-6-6-7-7 repetitions. Work until piece measures 57-57-58-58-59-59 cm, cut and fasten the thread. ASSEMBLY: Sew the shoulder seams. Sew in sleeves. Sew sleeve and side seams in one - sew edge to edge with neat, little stitches. CROCHET EDGE: Work an edge on hook size 3.5 mm with light grey up along right front piece, around the neckline, down along left front piece, around the bottom edge and then around the sleeves as follows: Work 1 dc, * skip 2 cm, 4 dtr in next ch, 2 ch, 4 dtr in same st, skip 2 cm, 1 dc in next st *, repeat from *-* and finish with one sl st in first dc. BUTTON COVER: Work cover for 1 button on hook size 3.5 mm with light grey as follows: Work 2 ch, then work 16 tr in the first of the 2 ch worked, finish with 1 sl st at top of first tr (= 1ST ROUND). ROUND 2: Work 1 dc in every tr and finish with 1 sl st in first dc on round. ROUND 3: Work 1 tr in every other dc and finish with 1 sl st in first tr on round = 8 tr. Place button inside the cover, sew around the edge and tighten tog. Sew button on to left front piece, directly before neck dec beg. Use holes in the pattern as button hole. |
||||||||||
Diagram explanations |
||||||||||
|
||||||||||
 |
||||||||||
 |
||||||||||
Have you finished this pattern?Tag your pictures with #dropspattern #whisperscardigan or submit them to the #dropsfan gallery. Do you need help with this pattern?You'll find 6 tutorial videos, a Comments/Questions area and more by visiting the pattern on garnstudio.com. © 1982-2025 DROPS Design A/S. We reserve all rights. This document, including all its sub-sections, has copyrights. Read more about what you can do with our patterns at the bottom of each pattern on our site. |
||||||||||


With over 40 years in knitting and crochet design, DROPS Design offers one of the most extensive collections of free patterns on the internet - translated to 17 languages. As of today we count 320 catalogues and 12094 patterns translated into English (UK/cm). 12094
We work hard to bring you the best knitting and crochet have to offer, inspiration and advice as well as great quality yarns at incredible prices! Would you like to use our patterns for other than personal use? You can read what you are allowed to do in the Copyright text at the bottom of all our patterns. Happy crafting!
Post a comment to pattern DROPS 136-13
We would love to hear what you have to say about this pattern!
If you want to leave a question, please make sure you select the correct category in the form below, to speed up the answering process. Required fields are marked *.