
Popular categories
Looking for a yarn?


Comments / Questions (94)
![]() Lebrun wrote:
Lebrun wrote:
Merci pour la hauteur des cotes mais ds vos explications vous ne noter ps la hauteur en jersey avant le jacqard je suis bien ennuiéede vs deranger mais je ne peu continuer ce modelequi me plait enormement merci d'avance l'ennui c'est la hauteur avnt de faire le jacquard merci
04.02.2014 - 12:50DROPS Design answered:
Bonjour Mme Lebrun, le jacquard M.1 se commence sur le dos et les devants à 32-37 cm de hauteur totale (cf taille). Bon tricot!
04.02.2014 - 14:43
![]() Lebrun wrote:
Lebrun wrote:
Pour ce modèle je ne trouve pas la hauteur des cotesvous seriez tres aimable de renseigner merci d'avance
29.01.2014 - 16:17DROPS Design answered:
Bonjour Mme Lebrun, on tricote d'abord 1 rang env sur l'envers et on continue en côtes jusqu'à ce que l'ouvrage mesure 6 cm de hauteur totale (dos & devants). Pour les manches, tricotez d'abord 1 tour end, puis continuez en cotes jusqu'à 6 cm de hauteur totale également. Bon tricot!
29.01.2014 - 16:24
![]() Teresa wrote:
Teresa wrote:
Cuello chal: virar la pieza. Qué vídeo puede enseñarme esta parte del patrón?
28.01.2014 - 13:01DROPS Design answered:
Hola Teresa. Virar = girar. Lo siento, los únicos vídeos que tiene este patrón están en el apartado "Vídeos". El departamento de vídeos está trabajando para añadir más vídeos explicativos. Les pasaré tu sugerencia.
03.02.2014 - 19:44
![]() Sabine wrote:
Sabine wrote:
Hallo, Beim Ärmelbündchen Gr. S 52 M, das ergibt 30 cm Breite. D'as ist sehr groß. Kann das sein?
08.01.2014 - 08:09DROPS Design answered:
Liebe Sabine, es werden nach dem Bündchen wieder Maschen abgenommen. Wir stricken die Bündchen oft mit mehr Maschen, damit sie sich nicht so fest zusammenziehen (52 M im Bündchenmuster ergeben weniger Breite als in der Mschenprobe angegeben, diese bezieht sich auf glatt rechts). Wenn Sie lieber eine engeres Bündchen möchten, können Sie natürlich mit weniger Maschen stricken und später nicht abnehmen. Achten Sie darauf, dass die Maschenzahl mit den Rippen aufgeht.
08.01.2014 - 09:12
![]() Rebecca wrote:
Rebecca wrote:
Liebes Drops Team Ich habe eine Frage zur Berechnung der Grössen, gerne möchte ich diese Jacke für meinen Freund stricken, aber welcher Umfang ergibt welche Grösse? Ich habe Angst das sie ihm am Ende nicht passt und muss wissen wieviel Wolle ich bestellen muss. Vielen Dank und liebe Grüsse
20.11.2013 - 10:37DROPS Design answered:
Liebe Rebecca, Sie sehen unten in der Schnittübersicht die genauen Masse in cm - so können Sie die passende Grösse aussuchen.
21.11.2013 - 08:04
![]() Heidi Willems wrote:
Heidi Willems wrote:
Hoe kan ik de knopen bestellen die bij patroon drops extra 813 (houten duffelknopen nr 520) bestellen?? Ze staan wel op de website bij assortiment vermeld, maar er is geen bestelmodule voor!
15.11.2013 - 10:54DROPS Design answered:
Hoi Heidi. Je kan het aangeven in de opmerkingen als je gebruik maakt van de bestelformulier. Bestel je in een webshop van één van onze verkooppunten, neem dan contact op met het verkooppunt.
15.11.2013 - 15:44
![]() Tiffany Stutzman wrote:
Tiffany Stutzman wrote:
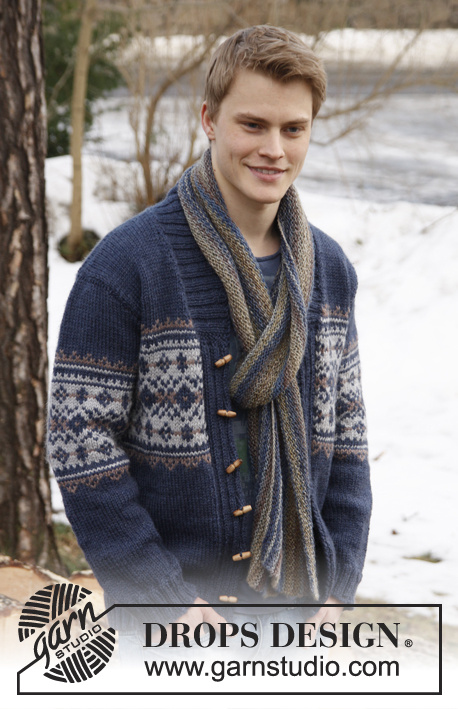
Where is the pattern for the scarf in this photo? I would really like to make the scarf. Thank you!
06.10.2013 - 03:03Sara answered:
Scarf: Drops 135-29
06.10.2013 - 09:19
![]() Teresa wrote:
Teresa wrote:
Cómo elijo la talla? Què medida de pecho corresponde a la talla M ?
16.09.2013 - 11:04DROPS Design answered:
Hola Teresa! Para escoger la talla correcta sigue las medidas de la prenda que tienes siempre debajo del patrón. Talla M=82 cm.
16.09.2013 - 15:21
![]() Lina Pinkster wrote:
Lina Pinkster wrote:
Kan ik in dit patroon ook een rits maken ipv knopen, zonder dat het patroon verander moet worden?
30.06.2013 - 13:01DROPS Design answered:
Ik denk niet dat het mooi wordt met deze soort bies om nog een rits in te zetten. Je kan zoeken op een patroon met een rits en dan de bies van dat patroon hier aan dit patroon toepassen.
02.07.2013 - 11:41
![]() Barbara wrote:
Barbara wrote:
Hoeveel gram wol heb je nodig als je deze vest effen, dus zonder patroon, wilt maken? Alvast bedankt!
27.06.2013 - 20:27DROPS Design answered:
Ik kan dat helaas niet zeggen - ik heb ook alleen het patroon met het motief. Ik zou vanuit gaan van de aangegeven hoeveelheid in het patroon, misschien 1 bol minder. Bij twijfel neem contact op met je verkooppunt.
02.07.2013 - 12:02
|
||||||||||
Harald#haraldjacket |
||||||||||
 |
 |
|||||||||
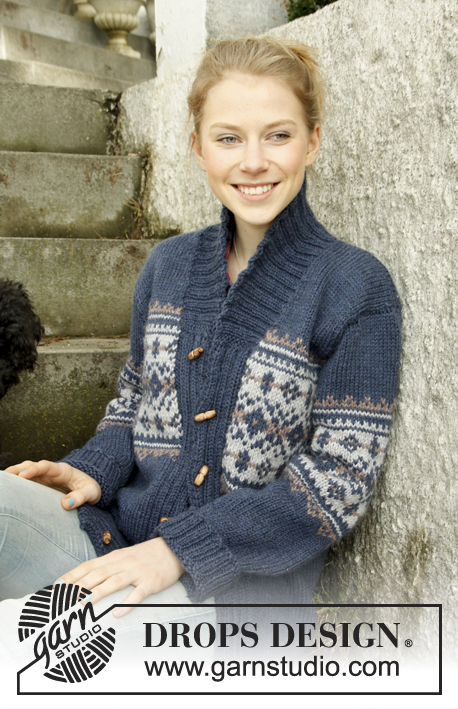
Men's knitted jacket in DROPS Alaska, with pattern and shawl collar. Size: S - XXXL.
DROPS Extra 0-813 |
||||||||||
|
GARTER ST (back and forth on needle): K all rows. BUTTON HOLES: Cast off for button holes on left band, all cast offs are done from RS. 1 button hole = P tog 5th and 6th st from mid front and make 1 YO. On next row K the YO. Cast off for button holes when piece measures: SIZE S: 6, 14, 23, 31, 40 and 48 cm. SIZE M: 6, 15, 24, 32, 41 and 49 cm. SIZE L: 6, 15, 24, 33, 42 and 50 cm. SIZE XL: 6, 13, 21, 28, 36, 43 and 51 cm SIZE XXL: 7, 14, 22, 29, 37, 44 and 52 cm SIZE XXXL: 7, 15, 22, 30, 37, 45 and 53 cm PATTERN: See diagram M.1 – the diagram shows 2 repetitions in breadth. Work entire pattern in stocking st. DECREASE TIP (applies to neckline at the front): Dec inside 1 edge st in garter st. All dec are done from RS. Dec after 1 edge st as follows: Slip 1 st as if to K, K 1, psso. Dec before 1 edge st as follows: K 2 tog. -------------------------------------------------------- BODY: Worked back and forth on circular needle from mid front. Cast on 226-246-262-286-302-330 sts on circular needle size 4 mm with dark blue Alaska. P 1 row from WS. Then work next row as follows from RS: 2 edge sts in GARTER ST - see explanation above - * K 2/P 2 *, repeat from *-* until 4 sts remain and finish with K 2 and 2 edge sts in GARTER ST. Continue rib like this until piece measures 6 cm. AT THE SAME TIME when piece measures 6-6-6-6-7-7 cm, cast off for BUTTON HOLES on left band - see explanation above. After rib, switch to circular needle size 5 mm and work next row from RS as follows: 2 sts in garter st, K 2, P 2, K 2, P 2, K 2, P 2 (= 14 band sts), work in stocking st until 14 sts remain while AT THE SAME TIME dec 53-61-65-65-69-73 sts evenly (do not dec over bands), finish with P 2, K 2, P 2, K 2, P 2, K 2 and 2 sts in garter st = 173-185-197-221-233-257 sts. Insert a marker 47-50-53-59-62-68 sts in from each side (= 79-85-91-103-109-121 sts between markers on back piece). Then work in stocking st with 14 band sts in each side towards mid front as before. REMEMBER THE KNITTING TENSION! When piece measures 32-33-34-35-36-37 cm, work diagram M.1 as follows: Work 14 band sts as before with dark blue, work diagram M.1 until 15 sts remain, work 1st st in diagram M.1 (so that pattern beg and ends the same way on each side of band) and finish with 14 band sts in dark blue as before. When piece measures 49-50-51-52-53-54 cm, work next row from RS as follows: Cast off the first 13 sts, insert a marker (this marks where to start the knit up for collar), work 31-34-37-42-45-51 sts (= right front piece), cast off 6-6-6-8-8-8 sts for armhole, work 73-79-85-95-101-113 sts (= back piece), cast off 6-6-6-8-8-8 sts for armhole and work the rest of row (= 44-47-50-55-58-64 sts on left front piece). Turn and cast off the first 13 sts, insert a marker (this marks where to end the knit up for collar), work the rest of row = 31-34-37-42-45-51 sts. Finish each part separately. BACK PIECE: = 73-79-85-95-101-113 sts. Continue diagram M.1 (when diagram M.1 has been worked 1 time vertically, continue with dark blue until finished measurements) – AT THE SAME TIME cast off for armholes at beg of every row in each side: 3 sts 0-0-0-1-1-2 times, 2 sts 1-1-2-2-3-4 times and 1 st 1-3-3-4-4-4 times = 67-69-71-73-75-77 sts remain on needle. When piece measures 68-70-72-74-76-78 cm, cast off the middle 21-21-23-23-25-25 sts for neck. Now finish each shoulder separately. Continue to cast off 1 st on next row from neck = 22-23-23-24-24-25 sts remain on the shoulder. Cast off when piece measures 70-72-74-76-78-80 cm. RIGHT FRONT PIECE: = 31-34-37-42-45-51 sts. Continue diagram M.1 as on back piece with 1 edge st in garter st towards mid front. AT THE SAME TIME cast off for armhole in the side as on back piece. AT THE SAME TIME when piece measures 50-51-52-53-54-55 cm, dec 1 st towards the neck - SEE DECREASE TIP! Repeat dec on every 4th row a total of 3-3-4-4-6-6 times, and on every 8th row a total of 3-3-3-3-2-2 time. After all cast offs and dec are done, 22-23-23-24-24-25 sts remain on shoulder. Cast off when piece measures 70-72-74-76-78-80 cm. LEFT FRONT PIECE: Work as right front piece but reversed. SLEEVE: Worked in the round on double pointed needles, switch to circular needle when needed. Cast on 52-52-56-56-60-60 sts on double pointed needles size 4 mm with dark blue. K 1 round, then work rib = K 2/P 2. When piece measures 6 cm, switch to double pointed needles size 5 mm. K 1 round while AT THE SAME TIME dec 11-9-11-11-13-13 sts evenly = 41-43-45-45-47-47 sts. Insert a marker at beg of round (= mid under sleeve). Then work in stocking st. When piece measures 7-7-7-7-9-10 cm, inc 1 st on each side of marker mid under sleeve. Repeat inc a total of 11-13-14-16-17-19 times in Size S: On every 10th round, Size M: Every 8th round, Size L: Every 7th round, Size XL: Every 6th round, Size XXL: Every 5th round and Size XXXL: Every 4th round = 63-69-73-77-81-85 sts. AT THE SAME TIME when piece measures 30-30-29-27-26-24 cm, insert a marker in the middle st on round (= mid on top of shoulder). Work diagram M.1 – NOTE: St marked with arrow in diagram should be the st with marker mid on top of sleeve. When diagram M.1 has been worked 1 time vertically, continue with dark blue until finished measurements. AT THE SAME TIME when piece measures 54-54-53-51-50-48 cm (shorter measurements in the larger sizes because of longer sleeve cap and broader shoulder width), cast off 6-6-6-8-8-8 sts mid under sleeve. Then work back and forth on needle until finished measurements. AT THE SAME TIME cast off for sleeve cap at beg of every row in each side: 2 sts 3-3-3-3-3-4 times and 1 st 2-2-2-4-4-5 times. Then cast off 2 sts in each side until piece measures 61 cm in all sizes, then cast off 3 sts 1 time in each side. Cast off the remaining sts, the piece measures approx. 62 cm in all sizes. ASSEMBLY: Sew the shoulder seams. SHAWL COLLAR: Knit up sts (inside 1 edge st) on circular needle size 4 mm with dark blue - start mid front at marker on right front piece: Knit up approx. 34 to 44 sts up to shoulder, then 22 to 28 sts along the neck, and 34 to 44 sts down along left front piece until marker = 90 to 116 sts. K 1 row from WS while AT THE SAME TIME inc no of sts to 126-130-138-142-150-154. Then work rib as follows (seen from RS): 2 sts in garter st, * K 2, P 2 *, repeat from *-* and finish with K 2 and 2 sts in garter st. Continue like this until collar measures approx. 5 cm. Now inc 1 st in each of the middle 12 P-sections, seen from RS (= back of neck) = 138-142-150-154-162-166 sts. Then work K over K and P over P until collar measures approx. 7 cm. Now work as follows: Work 1 row as before and slip the first 10 sts worked on a stitch holder, turn piece, work the rest of row and slip the first 10 sts worked at the beg of row on another stitch holder. Turn piece, work the rest of row and slip the first 10 sts worked at the beg of row on the first stitch holder, turn piece, work the rest of row and slip the first 10 sts worked at the beg of row on the other stitch holder. Continue like this until there are a total of 40 sts on the stitch holders in each side. Then slip sts from stitch holders back on needle and work 1 row as before over all the 138-142-150-154-162-166 sts – NOTE: To avoid holes in every transition where piece was turned, slip loop before next st twisted on needle and work tog with first st on needle. Cast off with K over K and P over P. Neatly fasten collar with stitches in each side towards band – sew edge to edge to avoid a chunky seam. MORE ASSEMBLY: Sew in sleeves and sew on buttons. |
||||||||||
Diagram explanations |
||||||||||
|
||||||||||

|
||||||||||

|
||||||||||
Have you finished this pattern?Tag your pictures with #dropspattern #haraldjacket or submit them to the #dropsfan gallery. Do you need help with this pattern?You'll find 28 tutorial videos, a Comments/Questions area and more by visiting the pattern on garnstudio.com. © 1982-2025 DROPS Design A/S. We reserve all rights. This document, including all its sub-sections, has copyrights. Read more about what you can do with our patterns at the bottom of each pattern on our site. |
||||||||||


With over 40 years in knitting and crochet design, DROPS Design offers one of the most extensive collections of free patterns on the internet - translated to 17 languages. As of today we count 314 catalogues and 11820 patterns translated into English (UK/cm). 11820
We work hard to bring you the best knitting and crochet have to offer, inspiration and advice as well as great quality yarns at incredible prices! Would you like to use our patterns for other than personal use? You can read what you are allowed to do in the Copyright text at the bottom of all our patterns. Happy crafting!
Post a comment to pattern DROPS Extra 0-813
We would love to hear what you have to say about this pattern!
If you want to leave a question, please make sure you select the correct category in the form below, to speed up the answering process. Required fields are marked *.