
Popular categories
Looking for a yarn?


Comments / Questions (94)
![]() Eva Simó wrote:
Eva Simó wrote:
No acabo de saber el número de puntos para los delanteros y la espalda. Gracias!
07.05.2018 - 20:59DROPS Design answered:
Hola Eva, este patrón se trabaja entero, es decir, la espalda y el delantero juntos de una pieza. Por lo tanto, si quieres trabajarlos por separado tienes que hacer tú los cálculos.
13.05.2018 - 12:33
![]() Eva Simó wrote:
Eva Simó wrote:
Hola de nuevo! Puedo encontrar el patron a dos agujas? Gracias!
03.05.2018 - 20:52DROPS Design answered:
Hola Eva. ¿Puedes concretar tu pregunta? Esta chaqueta se puede trabajar con agujas rectas. Tienes que hacer los cálculos para la espalda y los delanteros añadiendo siempre 1 punto de orillo a cada lado para las costuras.
06.05.2018 - 13:06
![]() Eva Simó wrote:
Eva Simó wrote:
Que significa \"hasta completar las medidas\".\r\nGracias!
26.03.2018 - 21:28DROPS Design answered:
Hola Eva. Trabajar hasta completar las medidas significa en este caso, que tienes que trabajar con el color azul hasta alcanzar el largo de la manga según la talla.
29.03.2018 - 18:26
![]() Ingrid wrote:
Ingrid wrote:
Wunderschöne Jacke, ich hab mich mal drangewagt. Kein allzudrängende Frage, aber was ich nicht verstehe: warum muss man beim Rücken/Vorderteil stricken Markierungen anbringen, wenn hinterher doch abgezählt wird? Vielleicht verstehe ich auch was falsch. Trotzdem danke für die wunderbaren Anleitungen, ist mein viertes DropsProjekt!!
23.02.2018 - 17:17DROPS Design answered:
Liebe Ingrid, die Teilen werden nur für die Armlöcher verteilt, dh nach 49-54 cm (siehe Größe) misst. Viel Spaß beim stricken!
26.02.2018 - 07:32
![]() Anna wrote:
Anna wrote:
Hejsan Jag är osäker på vilken storlek jag ska välja och undrar om ni skulle kunna skriva måtten på storlekarna medium och large, alltså måtten över midja,bröst, axlar och längd? Mvh anna
29.11.2017 - 09:49DROPS Design answered:
Hei Anna. Ta en titt på målskissen nederst på siden, under diagrammet. Der finner du de målene for de ulike størrelsene. Både til midjen/bryst, ermene og lengden. God Fornøyelse.
29.11.2017 - 13:46
![]() Barbara Day wrote:
Barbara Day wrote:
I'm finishing the 262 stitches for the bottom ribbing for the body and notice that there is a decrease of 65 sts when we switch to stockinette. I'm unclear about the reason for such a large decrease, and wonder if you could please clarify it for me. I've never done a decrease of this size when beginning the body of a sweater, and am confused. Thanks!
28.11.2016 - 02:18DROPS Design answered:
Dear Mrs Day, ribbing is tightening and to keep correct width you will have to dec sts evenly over rib to get correct width in stocking st. Work the first and last 14 sts as written (= front band sts), and dec 65 sts evenly over the middle 234 sts. Read more here how to dec evenly. Happy knitting!
28.11.2016 - 09:52
![]() Natalie Ferencik wrote:
Natalie Ferencik wrote:
Ich habe nun die erste Reihe des Rückenteils gestrickt, in dem die 2. Farbe dazu kommt. Leider verstehe ich die Anleitung an der Stelle nicht, in der es heißt, man solle 15 Maschen vor den 14 Blendenmaschen Muster 1 stricken. Wie ist das gemeint? Fange ich dann einfach ab dieser Stelle an M1 von vorne zu stricken? Das Muster geht dann bei mir nicht auf, ich hätte dann an einer Stelle 6 graublaue Maschen zwischen denen in beige.
11.10.2016 - 18:36DROPS Design answered:
Liebe Frau Ferencik, es gibt 14 Blendenmaschen beidseitig, die letzte Masche der Reihe (von der Vorderseite) wird wie die 1. Masche in A.1 gestrickt (= 1 M. beige mix an der 1. Reihe), so daß die Muster gleich zwischen den Blendenmaschen ist.
12.10.2016 - 09:23
![]() Nadia wrote:
Nadia wrote:
Hej! I instr. står det "Baksstycke: SAMTIDIGT maskas det nu av till ärmhål i början av varje v i varje sida: 3 m 0-0-0-1-1-2 gånger, 2 m 1-1-2-2-3-4 gånger och 1 m 1-3-3-4-4-4 gånger = 67-69-71-73-75-77 m kvar på st." Jag stickar nu bakstycket från AVIGs och det är en Stl L, betyder det då att det första jag gör är att minska 2 m i början, sen 2 m i slutet, vänder och minskar 2 m från rätsidan, sen 2 m i slutet, vänder o minskar 1m i början o slutet o gör det 3 ggr? Tack på förhand! Nadia
13.09.2016 - 16:59DROPS Design answered:
Hej Nadia. Nej, du starter med at lukke 2 m af i starten af pinden, strik pinden ud, vend, luk 2 m af i starten af naeste p, strik pinden ud, vend, gentag dette 1 gang til (saa har du lukket 2 m af 2 gange i hver side).
14.09.2016 - 11:45
![]() Jennifer wrote:
Jennifer wrote:
All done! I love the finished product! Thank you so much for all of your help. Did a pretty good job for my first fair isle. I love all the patterns in this website.
20.12.2015 - 03:18
![]() Jennifer wrote:
Jennifer wrote:
I feel like a terrible knitter. I counted outwards to figure out where to start with the pattern and it does fall correct with the mid on toper of sleeve st. The problem I encountered in the first row is that I get a section of 8 sts in the mid under sleeve. Is this correct? should I end up with an uneven pattern in the mid under sleeve. I have the right amount of sts for the row that I am in. I appreciate all of your help. This sweater is turning out so beautiful
01.12.2015 - 02:01DROPS Design answered:
Dear Jennifer, it may happen that the pattern doesn't match beg/end of round, that's why it is important to keep that arrow on mid top of sleeve to get the pattern be nice around the sleeve. Happy knitting!
01.12.2015 - 08:49
|
||||||||||
Harald#haraldjacket |
||||||||||
 |
 |
|||||||||
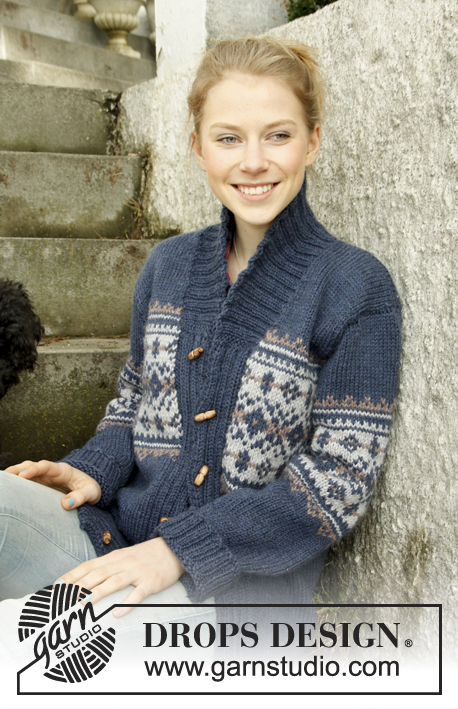
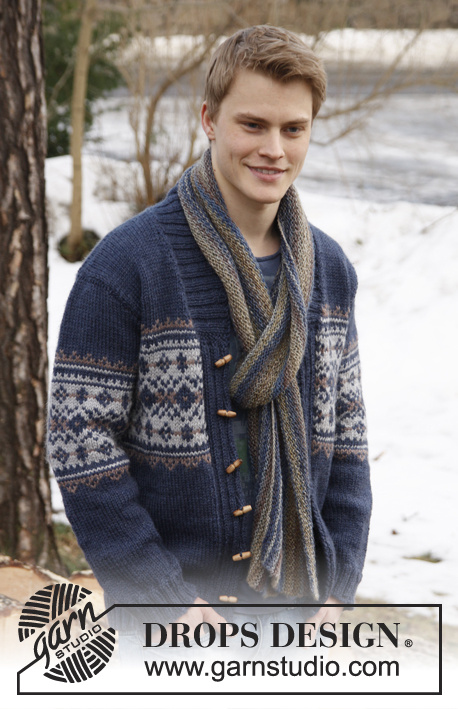
Men's knitted jacket in DROPS Alaska, with pattern and shawl collar. Size: S - XXXL.
DROPS Extra 0-813 |
||||||||||
|
GARTER ST (back and forth on needle): K all rows. BUTTON HOLES: Cast off for button holes on left band, all cast offs are done from RS. 1 button hole = P tog 5th and 6th st from mid front and make 1 YO. On next row K the YO. Cast off for button holes when piece measures: SIZE S: 6, 14, 23, 31, 40 and 48 cm. SIZE M: 6, 15, 24, 32, 41 and 49 cm. SIZE L: 6, 15, 24, 33, 42 and 50 cm. SIZE XL: 6, 13, 21, 28, 36, 43 and 51 cm SIZE XXL: 7, 14, 22, 29, 37, 44 and 52 cm SIZE XXXL: 7, 15, 22, 30, 37, 45 and 53 cm PATTERN: See diagram M.1 – the diagram shows 2 repetitions in breadth. Work entire pattern in stocking st. DECREASE TIP (applies to neckline at the front): Dec inside 1 edge st in garter st. All dec are done from RS. Dec after 1 edge st as follows: Slip 1 st as if to K, K 1, psso. Dec before 1 edge st as follows: K 2 tog. -------------------------------------------------------- BODY: Worked back and forth on circular needle from mid front. Cast on 226-246-262-286-302-330 sts on circular needle size 4 mm with dark blue Alaska. P 1 row from WS. Then work next row as follows from RS: 2 edge sts in GARTER ST - see explanation above - * K 2/P 2 *, repeat from *-* until 4 sts remain and finish with K 2 and 2 edge sts in GARTER ST. Continue rib like this until piece measures 6 cm. AT THE SAME TIME when piece measures 6-6-6-6-7-7 cm, cast off for BUTTON HOLES on left band - see explanation above. After rib, switch to circular needle size 5 mm and work next row from RS as follows: 2 sts in garter st, K 2, P 2, K 2, P 2, K 2, P 2 (= 14 band sts), work in stocking st until 14 sts remain while AT THE SAME TIME dec 53-61-65-65-69-73 sts evenly (do not dec over bands), finish with P 2, K 2, P 2, K 2, P 2, K 2 and 2 sts in garter st = 173-185-197-221-233-257 sts. Insert a marker 47-50-53-59-62-68 sts in from each side (= 79-85-91-103-109-121 sts between markers on back piece). Then work in stocking st with 14 band sts in each side towards mid front as before. REMEMBER THE KNITTING TENSION! When piece measures 32-33-34-35-36-37 cm, work diagram M.1 as follows: Work 14 band sts as before with dark blue, work diagram M.1 until 15 sts remain, work 1st st in diagram M.1 (so that pattern beg and ends the same way on each side of band) and finish with 14 band sts in dark blue as before. When piece measures 49-50-51-52-53-54 cm, work next row from RS as follows: Cast off the first 13 sts, insert a marker (this marks where to start the knit up for collar), work 31-34-37-42-45-51 sts (= right front piece), cast off 6-6-6-8-8-8 sts for armhole, work 73-79-85-95-101-113 sts (= back piece), cast off 6-6-6-8-8-8 sts for armhole and work the rest of row (= 44-47-50-55-58-64 sts on left front piece). Turn and cast off the first 13 sts, insert a marker (this marks where to end the knit up for collar), work the rest of row = 31-34-37-42-45-51 sts. Finish each part separately. BACK PIECE: = 73-79-85-95-101-113 sts. Continue diagram M.1 (when diagram M.1 has been worked 1 time vertically, continue with dark blue until finished measurements) – AT THE SAME TIME cast off for armholes at beg of every row in each side: 3 sts 0-0-0-1-1-2 times, 2 sts 1-1-2-2-3-4 times and 1 st 1-3-3-4-4-4 times = 67-69-71-73-75-77 sts remain on needle. When piece measures 68-70-72-74-76-78 cm, cast off the middle 21-21-23-23-25-25 sts for neck. Now finish each shoulder separately. Continue to cast off 1 st on next row from neck = 22-23-23-24-24-25 sts remain on the shoulder. Cast off when piece measures 70-72-74-76-78-80 cm. RIGHT FRONT PIECE: = 31-34-37-42-45-51 sts. Continue diagram M.1 as on back piece with 1 edge st in garter st towards mid front. AT THE SAME TIME cast off for armhole in the side as on back piece. AT THE SAME TIME when piece measures 50-51-52-53-54-55 cm, dec 1 st towards the neck - SEE DECREASE TIP! Repeat dec on every 4th row a total of 3-3-4-4-6-6 times, and on every 8th row a total of 3-3-3-3-2-2 time. After all cast offs and dec are done, 22-23-23-24-24-25 sts remain on shoulder. Cast off when piece measures 70-72-74-76-78-80 cm. LEFT FRONT PIECE: Work as right front piece but reversed. SLEEVE: Worked in the round on double pointed needles, switch to circular needle when needed. Cast on 52-52-56-56-60-60 sts on double pointed needles size 4 mm with dark blue. K 1 round, then work rib = K 2/P 2. When piece measures 6 cm, switch to double pointed needles size 5 mm. K 1 round while AT THE SAME TIME dec 11-9-11-11-13-13 sts evenly = 41-43-45-45-47-47 sts. Insert a marker at beg of round (= mid under sleeve). Then work in stocking st. When piece measures 7-7-7-7-9-10 cm, inc 1 st on each side of marker mid under sleeve. Repeat inc a total of 11-13-14-16-17-19 times in Size S: On every 10th round, Size M: Every 8th round, Size L: Every 7th round, Size XL: Every 6th round, Size XXL: Every 5th round and Size XXXL: Every 4th round = 63-69-73-77-81-85 sts. AT THE SAME TIME when piece measures 30-30-29-27-26-24 cm, insert a marker in the middle st on round (= mid on top of shoulder). Work diagram M.1 – NOTE: St marked with arrow in diagram should be the st with marker mid on top of sleeve. When diagram M.1 has been worked 1 time vertically, continue with dark blue until finished measurements. AT THE SAME TIME when piece measures 54-54-53-51-50-48 cm (shorter measurements in the larger sizes because of longer sleeve cap and broader shoulder width), cast off 6-6-6-8-8-8 sts mid under sleeve. Then work back and forth on needle until finished measurements. AT THE SAME TIME cast off for sleeve cap at beg of every row in each side: 2 sts 3-3-3-3-3-4 times and 1 st 2-2-2-4-4-5 times. Then cast off 2 sts in each side until piece measures 61 cm in all sizes, then cast off 3 sts 1 time in each side. Cast off the remaining sts, the piece measures approx. 62 cm in all sizes. ASSEMBLY: Sew the shoulder seams. SHAWL COLLAR: Knit up sts (inside 1 edge st) on circular needle size 4 mm with dark blue - start mid front at marker on right front piece: Knit up approx. 34 to 44 sts up to shoulder, then 22 to 28 sts along the neck, and 34 to 44 sts down along left front piece until marker = 90 to 116 sts. K 1 row from WS while AT THE SAME TIME inc no of sts to 126-130-138-142-150-154. Then work rib as follows (seen from RS): 2 sts in garter st, * K 2, P 2 *, repeat from *-* and finish with K 2 and 2 sts in garter st. Continue like this until collar measures approx. 5 cm. Now inc 1 st in each of the middle 12 P-sections, seen from RS (= back of neck) = 138-142-150-154-162-166 sts. Then work K over K and P over P until collar measures approx. 7 cm. Now work as follows: Work 1 row as before and slip the first 10 sts worked on a stitch holder, turn piece, work the rest of row and slip the first 10 sts worked at the beg of row on another stitch holder. Turn piece, work the rest of row and slip the first 10 sts worked at the beg of row on the first stitch holder, turn piece, work the rest of row and slip the first 10 sts worked at the beg of row on the other stitch holder. Continue like this until there are a total of 40 sts on the stitch holders in each side. Then slip sts from stitch holders back on needle and work 1 row as before over all the 138-142-150-154-162-166 sts – NOTE: To avoid holes in every transition where piece was turned, slip loop before next st twisted on needle and work tog with first st on needle. Cast off with K over K and P over P. Neatly fasten collar with stitches in each side towards band – sew edge to edge to avoid a chunky seam. MORE ASSEMBLY: Sew in sleeves and sew on buttons. |
||||||||||
Diagram explanations |
||||||||||
|
||||||||||

|
||||||||||

|
||||||||||
Have you finished this pattern?Tag your pictures with #dropspattern #haraldjacket or submit them to the #dropsfan gallery. Do you need help with this pattern?You'll find 28 tutorial videos, a Comments/Questions area and more by visiting the pattern on garnstudio.com. © 1982-2025 DROPS Design A/S. We reserve all rights. This document, including all its sub-sections, has copyrights. Read more about what you can do with our patterns at the bottom of each pattern on our site. |
||||||||||


With over 40 years in knitting and crochet design, DROPS Design offers one of the most extensive collections of free patterns on the internet - translated to 17 languages. As of today we count 314 catalogues and 11820 patterns translated into English (UK/cm). 11820
We work hard to bring you the best knitting and crochet have to offer, inspiration and advice as well as great quality yarns at incredible prices! Would you like to use our patterns for other than personal use? You can read what you are allowed to do in the Copyright text at the bottom of all our patterns. Happy crafting!
Post a comment to pattern DROPS Extra 0-813
We would love to hear what you have to say about this pattern!
If you want to leave a question, please make sure you select the correct category in the form below, to speed up the answering process. Required fields are marked *.