
Looking for a yarn?


Comments / Questions (147)
![]() Lacroixémilie wrote:
Lacroixémilie wrote:
Bonjour, en faisant mes diminutions sur ma manche je me retrouve avec moins de mailles que prévues(j'ai rabattu et couper le fil),je voudrai donc me rattraper en ne rabattant pas de "2 mailles de chaque côté...59 cm de HT".En revanche pour cela j'aurai besoin de savoir environ combien de mailles il doit rester sur l'aiguille à la fin de la réalisation de la manche, soit avant de rabattre définitivement? Pouvez vous m'aider SVP? Merci d'avance,bonne journée!
27.11.2012 - 10:29DROPS Design answered:
Bonjour Madame Lacroix, pour l'arrondi de la manche, le nombre de fois "2 m jusqu'à 59 cm" dépend de votre nombre de rangs pour 10 cm, si vous voulez connaître le nombre précis de mailles, vous pouvez le calculer avec ces paramètres en fonction de votre nombre de mailles. Bon tricot !
27.11.2012 - 10:37
![]() Doro wrote:
Doro wrote:
Hej, für größe L soll ich 212M anschlagen, wenn ich dann je 20M für die Blenden abziehe habe ich noch 172M für das Muster M1. M1 muss aber doch durch drei teilbar sein oder? Vielen Dank
06.11.2012 - 21:44DROPS Design answered:
Hallo Doro, Sie müssen mit 171 M (=teilbar durch 3 ) rechnen, da noch 1 M zum Muster dazukommt. " (von der Vorderseite wird M1 mit 1 M. re. begonnen und abgeschlossen)". Gutes Gelingen!
12.11.2012 - 15:24
![]() Jadeboule wrote:
Jadeboule wrote:
C'est encore moi! J'ai fait comme vous m'avez dit: 1er rang 1end, 1env, 1end, 2ème rang 2end 1env. Mais maintenant je me rend compte que le motif que j'obtient ne ressemble pas à la photo... Sur mon tricot il n'y a pas de cotes... Je ne comprend pas pourquoi? Pourtant j'ai déjà fait 8 rangs, il me semble que je devrais voir apparaître le motif, non?
25.10.2012 - 04:37DROPS Design answered:
Bonjour Madame Jadeboule, le 1er rang de point fantaisie se termine par 1 m end, cette m end, sur l'envers doit se tricoter à l'envers (jersey env) comme la 1ère m du diagramme. Vous avez donc : (*1 m end, 2 m env*, répétez de *-*, 1 m end) qui va se tricoter sur l'envers : 1 m env, *2 m end, 1 m env*, répétez de *-*. N'hésitez pas à essayer sur un échantillon avant de reprendre les mailles de la veste. Bon tricot !
25.10.2012 - 09:36
![]() Jadeboule wrote:
Jadeboule wrote:
Je suis en train de tricoter le "dos & devants" et suis rendu a 4 cm de hauteur donc prete a commencer le diagrame M1. Mes mailles se presente ainsi: 20m de bordure, 1 end, 2 env. Je ne comprend pas comment faire le diagramme M1, dois-je faire une maille end avant de commencer le diagramme? Et 1 (ou 2) maille end apres avoir fait les 3 mailles du diagramme? Svp aidez moi!
23.10.2012 - 20:49DROPS Design answered:
Bonsoir Madame Jadeboule, au-dessus des côtes (1 m end, 2 m env), tricotez M1 ainsi : 1er rang(sur l'endroit) : 1 m end au-dessus de la m end, 1 m env et 1 m end au-dessus des 2 m env. 2ème rang(sur l'envers) : 2 m end, 1 m env (= 1 m jersey end vu sur l'end). Bon tricot !
23.10.2012 - 20:56
![]() Frieda wrote:
Frieda wrote:
Grazie!! in pratica gli schemi drop si leggono normalmente da destra a sinistra sul dritto del lavoro e da sinistra a destra sui ferri al rovescio, ho capito?
10.10.2012 - 12:49DROPS Design answered:
YES!
13.10.2012 - 12:17
![]() Tore wrote:
Tore wrote:
Second row: 2 k, 1 p! You read from left to right of course!
03.10.2012 - 18:56
![]() Frieda wrote:
Frieda wrote:
Hello how one reads the pattern of stitches? 1 row: 1k-1p-1k (it's ok) 2 row (working on the back of the work)1k-2p OR 1p-2k? Thanksssss
03.10.2012 - 15:03DROPS Design answered:
Dear Frieda, you read first row from right to left, and second row from left to right. So repeat is : K1,P1,K1 from RS, and K2,P1 from RS Happy Knitting !
29.11.2012 - 15:08
![]() Frieda wrote:
Frieda wrote:
Hello how do you read the pattern? 1row: 1k-1p-1k (it's ok) 2row (working on back): 1k-2p OR 1p-2k??? THANKS!!
03.10.2012 - 13:50DROPS Design answered:
Rispondo in italiano? 1° ferro (diritto del lavoro): 1 m dir, 1 m rov, 1 m dir. 2° ferro (rovescio del lavoro): 2 m dir, 1 m rov 3° ferro (dir del lav): 1 dir, 1 rov, 1 dir 4° ferro (rov del lav): 2 m dir, 1 m rov
09.10.2012 - 11:23Katharina wrote:
Oh now the chart shows for me. found it =)
11.09.2012 - 16:30
![]() Birgit Wahls wrote:
Birgit Wahls wrote:
Hallo, da dieses Modell mit zwei Materialien gestrickt wird, einmal maschinenwäschegeeignet, einmal handwäsche (kid-silk) stellt sich mir die Frage, geht Maschinenwäsche dann? Da sich die Jacke mein Sohn ausgesucht hat, möchte ich klare Waschanweisungen erteilen können; Danke im Voraus
10.09.2012 - 16:18DROPS Design answered:
Sofern ein Material dabei ist, das nicht waschmaschinenfest ist, muss das Stück von Hand gewaschen werden.
11.09.2012 - 07:50
|
|||||||
Lewis#lewisjacket |
|||||||
|
|
|||||||
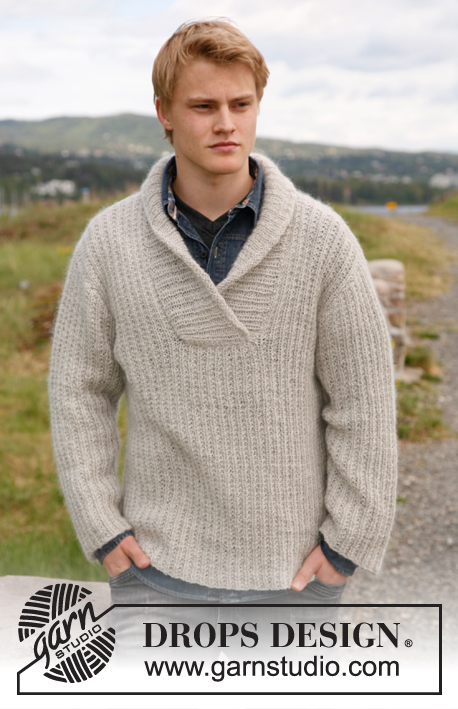
Knitted jacket for men with broad bands and shawl collar in DROPS Karisma and DROPS Kid-Silk. Size: S to XXXL.
DROPS 135-20 |
|||||||
|
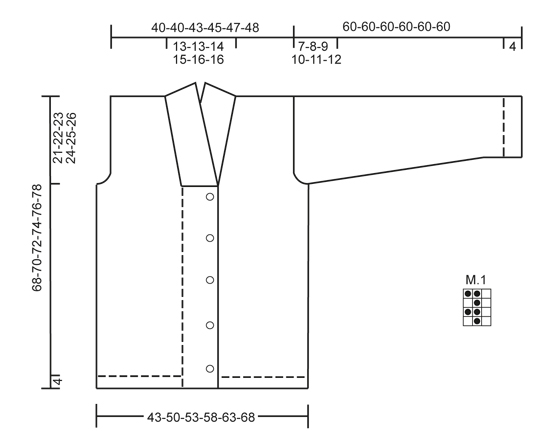
GARTER ST (back and forth on needle): K all rows. PATTERN: See diagram M.1 – diagram shows pattern from RS. BUTTON HOLES: Cast off for 5 button holes from RS on left front band. 1 button hole = cast off 5th st from mid front and cast on 1 new st on next row over this st. Cast off for button holes when piece measures: SIZE S: 14, 22, 30, 38 and 46 cm SIZE M: 15, 23, 31, 39 and 47 cm SIZE L: 16, 24, 32, 40 and 48 cm SIZE XL: 17, 25, 33, 41 and 49 cm SIZE XXL: 18, 26, 34, 42 and 50 cm SIZE XXXL: 19, 27, 35, 43 and 51 cm DECREASE TIP (applies to neck): Dec from RS inside 1 edge st in garter st. Dec AFTER 1 st as follows: Slip 1 st as if to K, K 1, psso. Dec BEFORE 1 st as follows: K 2 tog. ---------------------------------------------------------- BODY: Worked back and forth on circular needle from mid front. Cast on 176-200-212-227-248-263 sts (incl 20 band sts in each side towards mid front) on needle size 4.5 mm with 1 thread Karisma and 1 thread Kid-Silk. Work rib as follows (seen from from RS): 20 band sts in GARTER ST - see explanation above - * K 1, P 2 *, repeat from *-* until 21 sts remain, K 1 and 20 band sts in garter st. Then work K over K and P over P and band sts in garter st. When piece measures 4 cm, switch to needle size 5.5 mm. Continue with diagram M.1 and band sts in garter st – diagram M.1 starts and ends with 1 K st (seen from RS). When piece measures 14-15-16-17-18-19 cm, cast off for BUTTON HOLES on left front band - see explanation above! When piece measures 47-48-49-50-51-52 cm, work next row as follows: Cast off the first 19 sts, insert a marker (this marks where to start the knit up for collar), work 27-33-36-39-45-48 sts (= right front piece), cast off 6 sts for armhole, work 72-84-90-99-108-117 sts (= back piece), cast off 6 sts for armhole and work the rest of row (= 46-52-55-58-64-67 sts on left front piece). Turn and cast off the first 19 sts, insert a marker (this marks where to end the knit up for collar), work the rest of row = 27-33-36-39-45-48 sts. Finish each part separately. LEFT FRONT PIECE: = 27-33-36-39-45-48 sts. Continue with diagram M.1 as before and outermost st towards mid front in garter st. AT THE SAME TIME cast off for armhole at beg of every row from the side: 2 sts 0-2-2-3-4-5 times and 1 st 0-2-2-3-4-5 times. AT THE SAME TIME when piece measures 49-50-51-52-53-54 cm, dec 1 st towards the neck - SEE DECREASE TIP! Repeat dec every 5-5-5-5-3-4 cm a total of 3-3-4-3-5-4 times. After all cast offs and dec are done, 24-24-26-27-28-29 sts remain on needle. Cast off when piece measures 68-70-72-74-76-78 cm. RIGHT FRONT PIECE: Work as left front piece but reversed. BACK PIECE: = 72-84-90-99-108-117 sts. Continue with diagram M.1 while at the same time casting off for armholes at the beg of every row in each side as on front piece = 72-72-78-81-84-87 sts. When piece measures 66-68-70-72-74-76 cm, cast off the middle 22-22-24-25-26-27 sts for neck and finish each shoulder separately. At beg of next row from neck, dec 1 st = 24-24-26-27-28-29 sts remain on shoulder. Cast off when piece measures 68-70-72-74-76-78 cm. SLEEVE: Worked back and forth on needle. Cast on 50-53-53-56-56-59 sts (incl 1 edge st in each side) on needle size 4.5 mm with 1 thread Karisma and 1 thread Kid-Silk. Work as follows (seen from from RS): 1 edge st in garter st, * K 1, P 2 *, repeat from *-* and finish with 1 edge st in garter st. When piece measures 4 cm, switch to needle size 5.5 mm. Continue with diagram M.1 with 1 edge st in each side in garter st. AT THE SAME TIME when piece measures 10 cm, inc 1 st in each side. Repeat inc every 5-5-3½-3-2½-2½ cm a total of 9-9-12-12-15-15 times = 68-71-77-80-86-89 sts – work the inc sts gradually in diagram M.1. When piece measures 53-52-51-50-49-48 cm (shorter measurements in the larger sizes because of longer sleeve cap and broader shoulder width) cast off at beg of every row in each side: 4 sts 1 time, 2 sts 3 times and 1 st 1-2-4-5-7-8 times. Then cast off 2 sts in each side until piece measures 59 cm, then cast off 3 sts 1 time in each side. Cast off, the piece measures approx. 60 cm in all sizes. ASSEMBLY: Sew the shoulder seams. SHAWL COLLAR: Knit up sts (inside 1 edge st) on circular needle size 4.5 mm with 1 thread Karisma and 1 thread Kid-Silk - start mid front at marker on right front piece: Knit up approx. 40 to 50 sts up to shoulder, then 26 to 32 sts along the neck, and 40 to 50 sts down along left front piece until marker = 106 to 132 sts. K 1 row from WS while AT THE SAME TIME inc no of sts to 132-138-144-150-156-162. Then work rib as follows (seen from RS): 1 st in garter st, * K 1, P 2 *, repeat from *-* and finish with K 1 and 1 st in garter st. Continue like this until collar measures approx. 5 cm. Now inc 1 st in each of the middle 12 P-sections, seen from RS (= back of neck) = 144-150-156-162-168-174 sts. Continue with K over K and P over P until collar measures approx. 10 cm - adjust so that next row is from WS. K 3 rows over all sts, then cast off all sts with K from RS. Fasten collar with stitches in each side towards band – sew edge to edge to avoid a chunky seam. MORE ASSEMBLY: Sew in sleeves and sew on buttons. |
|||||||
Diagram explanations |
|||||||
|
|||||||
 |
|||||||
Have you finished this pattern?Tag your pictures with #dropspattern #lewisjacket or submit them to the #dropsfan gallery. Do you need help with this pattern?You'll find 14 tutorial videos, a Comments/Questions area and more by visiting the pattern on garnstudio.com. © 1982-2025 DROPS Design A/S. We reserve all rights. This document, including all its sub-sections, has copyrights. Read more about what you can do with our patterns at the bottom of each pattern on our site. |
|||||||


With over 40 years in knitting and crochet design, DROPS Design offers one of the most extensive collections of free patterns on the internet - translated to 17 languages. As of today we count 320 catalogues and 12091 patterns translated into English (UK/cm). 12091
We work hard to bring you the best knitting and crochet have to offer, inspiration and advice as well as great quality yarns at incredible prices! Would you like to use our patterns for other than personal use? You can read what you are allowed to do in the Copyright text at the bottom of all our patterns. Happy crafting!
Post a comment to pattern DROPS 135-20
We would love to hear what you have to say about this pattern!
If you want to leave a question, please make sure you select the correct category in the form below, to speed up the answering process. Required fields are marked *.