DROPS Super Sale - SAVE 30% on 5 wonderful yarns!
Product image DROPS Karisma yarn
DROPS Karisma
100% Wool
from 2.50 € /50g
Product image DROPS Kid-Silk yarn
DROPS Kid-Silk
75% Mohair, 25% Silk
from 5.05 € /25g
Get the yarn to make this pattern from 47.80€.

The yarn cost is calculated from the pattern’s smallest size and the yarn’s cheapest product type. Looking for an even better price? You might find it on the DROPS Deals!

DROPS Super Sale

Lewis

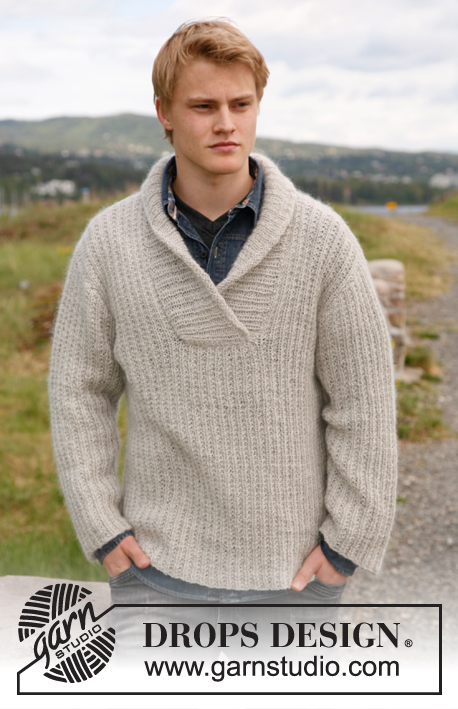
Knitted jacket for men with broad bands and shawl collar in DROPS Karisma and DROPS Kid-Silk. Size: S to XXXL.

DROPS 135-20

#lewisjacket

DROPS design: Pattern no U-648
Yarn group A and B
----------------------------------------------------------
Size: S - M - L - XL - XXL - XXXL

Materials: DROPS KARISMA from Garnstudio
Colour no 21, medium grey:
600-650-750-800-900-950 g
And use: DROPS KID-SILK from Garnstudio
Colour no 10, grey:
150-150-175-200-225-250 g

DROPS STRAIGHT NEEDLES AND CIRCULAR NEEDLE SIZE 5.5 mm – or size needed to get 18 sts x 24 rows in pattern with 1 thread Karisma and 1 thread Kid-Silk = 10 x 10 cm.
DROPS STRAIGHT NEEDLES AND CIRCULAR NEEDLE SIZE 4.5 mm - for rib

DROPS Wood buttons Duffle no 520: 5 pieces
----------------------------------------------------------

-------------------------------------------------------

Alternative Yarn – See how to change yarns here
Yarn Groups A to F – Use the same pattern and change the yarn here
Yarn usage using an alternative yarn – Use our yarn converter here

-------------------------------------------------------

You might also like...

Product image DROPS Karisma
DROPS Karisma
100% Wool
from 2.50 € /50g
Product image DROPS Kid-Silk yarn
DROPS Kid-Silk
75% Mohair, 25% Silk
from 5.05 € /25g
Get the yarn to make this pattern from 47.80€.

The yarn cost is calculated from the pattern’s smallest size and the yarn’s cheapest product type. Looking for an even better price? You might find it on the DROPS Deals!

Pattern instructions

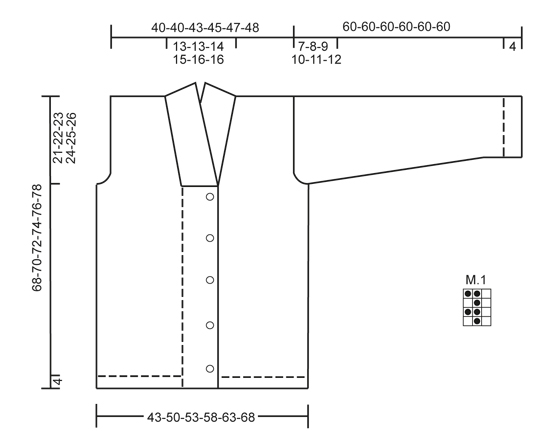
GARTER ST (back and forth on needle): K all rows.

PATTERN:
See diagram M.1 – diagram shows pattern from RS.

BUTTON HOLES:
Cast off for 5 button holes from RS on left front band. 1 button hole = cast off 5th st from mid front and cast on 1 new st on next row over this st. Cast off for button holes when piece measures:
SIZE S: 14, 22, 30, 38 and 46 cm
SIZE M: 15, 23, 31, 39 and 47 cm
SIZE L: 16, 24, 32, 40 and 48 cm
SIZE XL: 17, 25, 33, 41 and 49 cm
SIZE XXL: 18, 26, 34, 42 and 50 cm
SIZE XXXL: 19, 27, 35, 43 and 51 cm

DECREASE TIP (applies to neck):
Dec from RS inside 1 edge st in garter st. Dec AFTER 1 st as follows: Slip 1 st as if to K, K 1, psso. Dec BEFORE 1 st as follows: K 2 tog.
----------------------------------------------------------

BODY:
Worked back and forth on circular needle from mid front.
Cast on 176-200-212-227-248-263 sts (incl 20 band sts in each side towards mid front) on needle size 4.5 mm with 1 thread Karisma and 1 thread Kid-Silk. Work rib as follows (seen from from RS): 20 band sts in GARTER ST - see explanation above - * K 1, P 2 *, repeat from *-* until 21 sts remain, K 1 and 20 band sts in garter st. Then work K over K and P over P and band sts in garter st. When piece measures 4 cm, switch to needle size 5.5 mm. Continue with diagram M.1 and band sts in garter st – diagram M.1 starts and ends with 1 K st (seen from RS).
When piece measures 14-15-16-17-18-19 cm, cast off for BUTTON HOLES on left front band - see explanation above! When piece measures 47-48-49-50-51-52 cm, work next row as follows: Cast off the first 19 sts, insert a marker (this marks where to start the knit up for collar), work 27-33-36-39-45-48 sts (= right front piece), cast off 6 sts for armhole, work 72-84-90-99-108-117 sts (= back piece), cast off 6 sts for armhole and work the rest of row (= 46-52-55-58-64-67 sts on left front piece). Turn and cast off the first 19 sts, insert a marker (this marks where to end the knit up for collar), work the rest of row = 27-33-36-39-45-48 sts. Finish each part separately.

LEFT FRONT PIECE:
= 27-33-36-39-45-48 sts. Continue with diagram M.1 as before and outermost st towards mid front in garter st. AT THE SAME TIME cast off for armhole at beg of every row from the side: 2 sts 0-2-2-3-4-5 times and 1 st 0-2-2-3-4-5 times. AT THE SAME TIME when piece measures 49-50-51-52-53-54 cm, dec 1 st towards the neck - SEE DECREASE TIP! Repeat dec every 5-5-5-5-3-4 cm a total of 3-3-4-3-5-4 times. After all cast offs and dec are done, 24-24-26-27-28-29 sts remain on needle.
Cast off when piece measures 68-70-72-74-76-78 cm.

RIGHT FRONT PIECE:
Work as left front piece but reversed.

BACK PIECE:
= 72-84-90-99-108-117 sts. Continue with diagram M.1 while at the same time casting off for armholes at the beg of every row in each side as on front piece = 72-72-78-81-84-87 sts. When piece measures 66-68-70-72-74-76 cm, cast off the middle 22-22-24-25-26-27 sts for neck and finish each shoulder separately. At beg of next row from neck, dec 1 st = 24-24-26-27-28-29 sts remain on shoulder. Cast off when piece measures 68-70-72-74-76-78 cm.

SLEEVE:
Worked back and forth on needle.
Cast on 50-53-53-56-56-59 sts (incl 1 edge st in each side) on needle size 4.5 mm with 1 thread Karisma and 1 thread Kid-Silk. Work as follows (seen from from RS): 1 edge st in garter st, * K 1, P 2 *, repeat from *-* and finish with 1 edge st in garter st.
When piece measures 4 cm, switch to needle size 5.5 mm. Continue with diagram M.1 with 1 edge st in each side in garter st. AT THE SAME TIME when piece measures 10 cm, inc 1 st in each side. Repeat inc every 5-5-3½-3-2½-2½ cm a total of 9-9-12-12-15-15 times = 68-71-77-80-86-89 sts – work the inc sts gradually in diagram M.1. When piece measures 53-52-51-50-49-48 cm (shorter measurements in the larger sizes because of longer sleeve cap and broader shoulder width) cast off at beg of every row in each side: 4 sts 1 time, 2 sts 3 times and 1 st 1-2-4-5-7-8 times. Then cast off 2 sts in each side until piece measures 59 cm, then cast off 3 sts 1 time in each side. Cast off, the piece measures approx. 60 cm in all sizes.

ASSEMBLY:
Sew the shoulder seams.

SHAWL COLLAR:
Knit up sts (inside 1 edge st) on circular needle size 4.5 mm with 1 thread Karisma and 1 thread Kid-Silk - start mid front at marker on right front piece: Knit up approx. 40 to 50 sts up to shoulder, then 26 to 32 sts along the neck, and 40 to 50 sts down along left front piece until marker = 106 to 132 sts. K 1 row from WS while AT THE SAME TIME inc no of sts to 132-138-144-150-156-162. Then work rib as follows (seen from RS): 1 st in garter st, * K 1, P 2 *, repeat from *-* and finish with K 1 and 1 st in garter st.
Continue like this until collar measures approx. 5 cm.
Now inc 1 st in each of the middle 12 P-sections, seen from RS (= back of neck) = 144-150-156-162-168-174 sts. Continue with K over K and P over P until collar measures approx. 10 cm - adjust so that next row is from WS. K 3 rows over all sts, then cast off all sts with K from RS. Fasten collar with stitches in each side towards band – sew edge to edge to avoid a chunky seam.

MORE ASSEMBLY:
Sew in sleeves and sew on buttons.

This pattern has been corrected.

Updated online: 29.01.2013
SHAWL COLLAR:
....
Continue like this until collar measures approx. 5 cm.
Now inc 1 st in each of the middle 12 P-sections, seen from RS (= back of neck) = 144-150-156-162-168-174 sts.

Diagram

K from RS, P from WS = K from RS, P from WS
P from RS, K from WS = P from RS, K from WS
Diagram for DROPS 135-20
Do you have a question? See a list of frequently asked questions (FAQ)

Knitting tension is what determines the final measurements of your work, and is usually measured per 10 x 10 cm. It is provided like so: number of stitches in width x number of rows in height - eg: 19 stitches x 26 rows = 10 x 10 cm.

The knitting tension is very individual; some people knit/crochet loosely while others work tightly. You adjust the knitting tension with the needle size, which is why the suggested needle size is only meant as a guide! You need to adjust this (up or down) to ensure that YOUR knitting tension matches the knitting tension provided in the pattern. If you work with a different knitting tension than provided you will have a different yarn consumption, and your work will have different measurements than what the pattern suggests.

The knitting tension also determines which yarns can replace each other. As long as you achieve the same knitting tension you can replace one yarn with another.

See DROPS lesson: How to measure your tension/gauge

See DROPS video: How to make a gauge tension swatch

The required amount of yarn is provided in grams, eg: 450 g. To calculate how many balls you’ll need you first need to know how many grams are in 1 ball (25g, 50g or 100g). This information is available if you click on the individual yarn quality on our pages. Divide the amount required with the amount of each ball. For example, if each ball is 50g (the most common amount), the calculation will be as follows: 450 / 50 = 9 balls.

The important thing when changing from one yarn to another is that the knitting/crochet tension remains the same. This is so that the measurements of the finished piece will be the same as on the sketch provided. It is easier to achieve the same knitting tension using yarns from the same yarn group. It is also possible to work with multiple strands of a thinner yarn to achieve the knitting tension of a thicker one. Please try our yarn converter. We recommend you to always work a test swatch.

Please NOTE: when changing yarn the garment might have a different look and feel to the garment in the photo, due to individual properties and qualities of each yarn.

See DROPS lesson: Can I use a different yarn than the one mentioned in the pattern?

All our yarns are categorised into yarn groups (from A to F) according to thickness and knitting tension – group A contains the thinnest yarns and group F the thickest. This makes it easier for you to find alternative yarns to our patterns, should you wish to switch yarn. All yarns within the same group have a similar knitting tension and can easily replace each other. However, different yarn qualities have different structures and properties which will give the finished work a unique look and feel.

Click here for an overview of the yarns in each yarn group

At the top of all our patterns you’ll find a link to our yarn calculator, which is a helpful tool should you wish to use a different yarn than suggested. By filling in the yarn quality you wish to replace, the amount (in your size) and number of strands, the calculator will present good alternative yarns with the same knitting tension. Additionally it will tell you how much you’ll require in the new qualities and whether you’ll need to work with multiple strands. Most skeins are 50g (some are 25g or 100g).

If the pattern is worked with multiple colours, every colour will have to be calculated separately. Similarly, if the pattern is worked with several strands of different yarns (for example 1 strand Alpaca and 1 strand Kid-Silk) you will have to find alternatives for each, individually.

Click here to see our yarn calculator

Since different yarns have different qualities and textures we have chosen to keep the original yarn in our patterns. However, you can easily find options among our available qualities by using our yarn calculator, or simply pick a yarn from the same yarn group.

It is possible that some retailers still have discontinued yarns in stock, or that someone has a few skeins at home that they would like to find patterns for.

The yarn calculator will provide both alternative yarn as well as required amount in the new quality.

If you think it's hard to decide what size to make, it can be a good idea to measure a garment you own already and like the size of. Then you can pick the size by comparing those measures with the ones available in the pattern's size chart.

You'll find the size chart at the bottom of the pattern.

See DROPS lesson: How to read size chart

The needle size provided in the pattern serves only as a guide, the important thing is to follow the knitting tension. And since knitting tension is very individual, you will have to adjust the needle size to ensure that YOUR tension is the same as in the pattern – maybe you’ll have to adjust 1, or even 2 needle sizes, up or down to achieve the correct tension. For this, we recommend that you work test swatches.

Should you work with a different knitting tension than the one provided, the measurements of the finished garment might deviate from the measurement sketch.

See DROPS lesson: How to measure your tension/gauge

See DROPS video: How to make a tension/gauge swatch

Working a garment top-down provides more flexibility and room for personal adjustment. For example it is easier to try the garment on while working, as well as making adjustments to length of yoke and shoulder caps.

The instructions are carefully explaining every step, in the correct order. Diagrams are adjusted to the knitting direction and are worked as usual.

The diagram depicts all rows/rounds, and every stitch seen from the right side. It is read from bottom to top, from right to left. 1 square = 1 stitch.

When working back and forth, every other row is worked from the right side and every other row is worked from the wrong side. When working from the wrong side, the diagram will have to be worked reversed: from left to right, knit stitches are purled, purl stitches are knit etc.

When working in the round every round is worked from the right side and the diagram are worked from right to left on all rounds.

See DROPS lesson: How to read knitting diagrams

The diagram depicts all rows/rounds, and every stitch seen from the right side. It is worked from bottom to top, from right to left.

When working back and forth every other row is worked from the right side: from right to left and every other row is worked from the wrong side: from left to right.

When working in the round, every row in the diagram are worked from the right side, from right to left.

When working a circular diagram you start in the middle and work your way outwards, counter clockwise, row by row.

The rows usually start with a given number of chain stitches (equivalent to the height of the following stitch), this will either be depicted in the diagram or explained in the pattern.

See DROPS lesson: How to read crochet diagrams

Instructions for working several diagrams after each other on the same row/round, will often be written like so: “work A.1, A.2, A.3 a total of 0-0-2-3-4 times". This means you work A.1 once, then A.2 is worked once, and A.3 is repeated (in width) the number of times provided for your size – in this case like so: S = 0 times, M = 0 times, L=2 times, XL= 3 times and XXL = 4 times.

The diagrams are worked as usual: begin with the first row in A.1, then work the first row in A.2 etc.

See DROPS lesson: How to read knitting diagrams

See DROPS lesson: How to read crochet diagrams

The total width of the garment (from wrist-to-wrist) will be larger in the larger sizes, despite the actual sleeves being shorter. The larger sizes have longer sleeve caps and wider shoulders, so there will be a good fit in all sizes.

The measurement sketch/schematic drawing provides information regarding the full length of the garment. If it’s a jumper or a jacket the length is measured from the highest point on the shoulder closest to the neckline, and straight down to the bottom of the garment. It is NOT measured from the tip of shoulder. Similarly, the length of yoke is measured from the highest point on the shoulder and down to where yoke is split into body and sleeves.

On a jacket measures are never taken along bands, unless specifically stated. Always measure inside band stitches when measuring the length.

See DROPS lesson: How to read a schematic drawing

Diagrams are often repeated on the round or in height. 1 repeat is the diagram the way it appears in the pattern. If it says to work 5 repeats of A.1 in the round, then you work A.1 a total of 5 times after/next to each other in the round. If it says to work 2 repeats of A.1 vertically/in height you work the entire diagram once, then begin again at the start and work the entire diagram one more time.

Chain stitches are slightly narrower than other stitches and to avoid working the cast-on edge too tight, we simply chain more stitches to begin with. The stitch count will be adjusted on the following row to fit the pattern and measurement sketch.

The rib edge is more elastic and will contract slightly compared to, for example, stocking stitch. By increasing before the rib edge, you avoid a visible difference in width between the rib edge and the rest of the body.

It’s very easy to cast off too tightly, and by making yarn overs while casting off (and simultaneously casting these off) you avoid a too tight cast off edge.

See DROPS video: How to bind off with yarn overs (yo)

To achieve an even increase (or decrease) you can increase on, for example: every 3rd and 4th row alternately, like so: work 2 rows and increase on the 3rd row, work 3 rows and increase on the 4th. Repeat this until the increase is complete.

See DROPS lesson: Increase or decrease 1 st on every 3rd and 4th row alternately

Should you prefer to work in the round instead of back and forth, you may of course adjust the pattern. You’ll need to add steeks mid-front (usually 5 stitches), and follow the instructions. When you would normally turn and work from the wrong side, simply work across the steek and continue in the round. At the end you’ll cut the piece open, pick up stitches to work bands, and cover the cut edges.

See DROPS video: How to knit steeks and cut open

Should you prefer to work back and forth instead of in the round, you may of course adjust the pattern so you work the pieces separately and then assemble them at the end. Divide the stitches for the body in 2, add 1 edge stitch in each side (for sewing) and work the front and back pieces separately.

See DROPS lesson: Can I adapt a pattern for circular needles into straight needles?

Pattern repeats can vary slightly in the different sizes, in order to get the correct proportions. If you’re not working the exact same size as the garment in the photo, yours might deviate slightly. This has been carefully developed and adjusted so that the complete impression of the garment is the same in all sizes.

Make sure to follow instructions and diagrams for your size!

If you have found a pattern you like which is available in women’s size it’s not very difficult to convert it to men’s size. The biggest difference will be the length of sleeves and body. Start working on the women size that you think would fit across the chest. The additional length will be worked right before you cast off for the armhole/sleeve cap. If the pattern is worked top-down you can add the length right after the armhole or before the first decrease on sleeve.

Regarding additional yarn amount, this will depend on how much length you add, but it is better with a skein too many than too few.

All yarns will have excess fibres (from production) that might come off as lint or shedding. Brushed yarns (ie hairier yarns) have more of these loose, excess fibres, causing more shedding.

Shedding also depends on what is worn under or over the garment, and whether this pulls at the yarn fibres. It’s therefore not possible to guarantee that there will be no shedding

Below are some tips on how to get the best result when working with hairier yarns:

1. When the garment is finished (before you wash it) shake it vigorously so the looser hairs come off. NOTE: do NOT use a lint roller, brush or any method that pulls at the yarn.

2. Place the garment in a plastic bag and put it in your freezer - the temperature will cause the fibres to become less attached to each other, and excess fibres will come off easier.

3. Leave in the freezer for a few hours before taking it out and shaking it again.

4. Wash the garment according to the instructions on the yarn label.

Pilling is a natural process that happens to even the most exclusive of fibers. It's a natural sign of wear and tear that is hard to avoid, and that is most visible in high friction areas of your garment like a sweater's arms and cuffs.

You can make your garment look as new by removing the pilling, using a fabric comb or a pill/lint remover.

Still can't find the answer you need? Then scroll down and leave your question so one of our experts can try to help you. This will be done normally within 5 to 10 working days.
In the meantime, you can read the questions and answers that others have left to this pattern or join the DROPS Workshop on Facebook to get help from fellow knitters/crocheters!

Post a comment to pattern DROPS 135-20

We would love to hear what you have to say about this pattern!

If you want to leave a question, please make sure you select the correct category in the form below, to speed up the answering process. Required fields are marked *.

Comments / Questions (145)

country flag Stefan Nordmark wrote:

Vill veta hu många garnnystan det går åt till en small...

08.12.2014 - 11:45

DROPS Design answered:

Hei Stefan. Du skal bruge 650 gr Karisma og 150 gr Kid Silk (Se överst i mönstret).

08.12.2014 - 14:27

country flag FULCONIS wrote:

Bonjour, mon fils de 11 ans (stature 148 cm) adore ce modèle :-) Mais il n'existe pas en version enfant :-( Y a t-il une solution pour le tricoter pour un enfant de son âge? Comment faire pour transformer les consignes de tricot de ce modèle adulte en consignes de tricot pour un modèle enfant? La laine utilisée serait de la big mérino. Merci pour votre réponse ;-) Fulconis Natercia

23.10.2014 - 21:19

DROPS Design answered:

Bonjour Mme Fulconis, vous pouvez recalculer pour la taille souhaitée en vous basant sur votre échantillon et un modèle (mesures) pour sa taille. Pour toute aide individuelle, vous pouvez également vous adresser à votre magasin DROPS et/ou sur le forum DROPS. Bon tricot!

24.10.2014 - 09:41

Sally wrote:

Knitting the sleeves for XL size and reached the cast off stitches at beginning of each row. How many stitches should be left for the final cast off when sleeve reaches the required length? Thank you.

21.10.2014 - 19:00

DROPS Design answered:

Dear Sally, number of remaining sts may vary depending on your tension in height. In size XL, you will have to cast off each side on every other row (= at beg of every row in each side) : 4 sts 1 time, 1st 5 times then cast off 2 sts each side until sleeve measures 59 cm (take care to cast off same number of sts each side, ie both at beg of RS and WS row) and finally 3 sts 1 time in each side. Happy knitting!

22.10.2014 - 09:30

country flag Stijn Bonte wrote:

Ik brei maat small. Dit zijn 176 steken opzetten. Na mijn boord van 4cm staat er beginnen met patroon m1. Dus 20st voorbies, 1r 1av 1r . (3x45) geeft 135st + (2x20): 40st. Maar dan zit ik nog met 1st over! Wat doe ik daarmee?? Brei ik die mee in mijn 20st (21st in totaal)? Want anders klopt mijn patroon m1 niet meer! Bedankt.

05.09.2014 - 17:06

country flag Fred wrote:

I think I am misunderstanding the pattern M.1. in the part of the body it says it starts and ends with 1 K stitch as seen from the right side. Does that mean I begin the right side as M.1 and begin the wrong side with 1P then follow the pattern? I did the math for the pattern and the body excluding the band stitches works out to a multiple of 3 plus one stitch. This will cause a column of garter stitch on one side and a column of stockinette stitch on the other side.

26.07.2014 - 15:11

DROPS Design answered:

Dear Fred, you start M1 from RS with K1 (this st will be P from WS) and and with K1 (to be P from WS) after repeating diagram, so that you will have from RS K1 (=1 st in st st) inside front bands. Happy knitting!

28.07.2014 - 09:17

country flag Danielle wrote:

How many balls of each type of yarn are needed for size XL?

22.05.2014 - 02:51

DROPS Design answered:

Dear Danielle, total amount of yarn is given at the right side of the picture, ie in size XL: 800 g Karisma/50 g a ball = 16 balls + 200 g Kid-Silk/25 g a ball = 8 balls. So that you will need in size XL 16 balls Karisma + 8 balls Kid-Silk. Happy knitting!

22.05.2014 - 08:47

Malina wrote:

When do I stop using 1 thread Karisma and 1 thread Kid-Silk? Is all the pattern using these two threads? Because it says to use 600 gr Karisma and only 100 gr Kid-Silk. Thanks

09.02.2014 - 09:42

DROPS Design answered:

Dear Malina, whole jacket is worked with 1 thread Karisma + 1 thread Kid-Silk. Both qualities do not have same meterage, Karisma is approx. 100 m/50 g and Kid-Silk is approx. 200 m/25 g. So that you need in size S 600 g Karisma (= 12 balls) and 150 g Kid-Silk (= 6 balls), which is a total of 1200 m each. Happy knitting!

10.02.2014 - 09:50

country flag Franzi wrote:

Hi, ich bin leider was Anleitungen lesen geht blutiger Anfänger. Habe ich das richtig verstanden für den Bund unten stricke ich erst die Blende kraus rechts und danach von vorne 1 rechts, 2links usw. bis zur zweiten Blende? Oder was heißt *-* ? Danke schon mal überhaupt für diese Anleitung!!

04.02.2014 - 13:03

DROPS Design answered:

Liebe Franzi, nach den 20 M kraus re der Blende wird das Rippenmuster 1 re, 2 li gestrickt und zum Schluss wieder 20 M kraus re. *-* bedeutet von Symbol * bis Symbol * wiederholen.

05.02.2014 - 10:35

country flag Hilde Schmit Jongbloed wrote:

Hoi, ik begrijp het bijgevoegde patroon niet. Als ik begin met 1 recht, 1 averecht en dan 2 recht en dan terug op de terugnaald 1 recht 2 averecht en weer 1 recht, dan krijg ik een mengelmoes van steken. Wat doe ik fout?

31.01.2014 - 15:37

DROPS Design answered:

Hoi Hilde. Je breit telpatroon M.1 als volgt: 1e rij, goede kant, van rechts naar links: 1 r, 1 av, 1 r. 2e rij, verkeerde kant, van links naar rechts: 2 r, 1 av en zo voort. Je kan hier ook lezen hoe je onze telpatronen moet lezen (Punt 2).

07.02.2014 - 10:52

country flag Zora wrote:

Werden alle 3 letzten Reihen am Kragen rechts gestrickt oder die erste (Rückseite)- rechts, die zweite (vorne) - links und die dritte (Rückseite) - wieder rechts? Vielen Dank für die Hilfe Zora

21.01.2014 - 20:54

DROPS Design answered:

Liebe Zora, es werden 3 Reihen rechts gestrickt wie in der Anleitung beschrieben.

22.01.2014 - 08:21