
Popular categories
Looking for a yarn?


Comments / Questions (12)
![]() DROPS Design NL wrote:
DROPS Design NL wrote:
Hoi. Je hebt in totaal 28 st op de nld voor de kraag. Vervolgens moet u de kraag breien met verkorte naalden als volgt: * brei 2 nld op de eerste 18-19-20-20-21 st aan het middenvoor, en brei nog 2 nld over alle st...*. Herhaal *-*. Dwz, eerst 2 nld over de eerste 21 st, vervolgens 2 nld over alle 28 st. Gr. Tine
18.11.2010 - 15:24
![]() Bianca wrote:
Bianca wrote:
Ik ben van plan deze jas te breien zou er in makkelijke taal uitgelegd kunnen worden wat er met de kraag bedoeld wordt als men spreekt over: de kraag over 21 steken breien, terwijl de kraag uit 28 steken bestaat!? "Help...een grote Drops bewonderaar!!!!" (keep up the good work!)
18.11.2010 - 02:21
|
|
DROPS 92-6 |
|
|
|
|
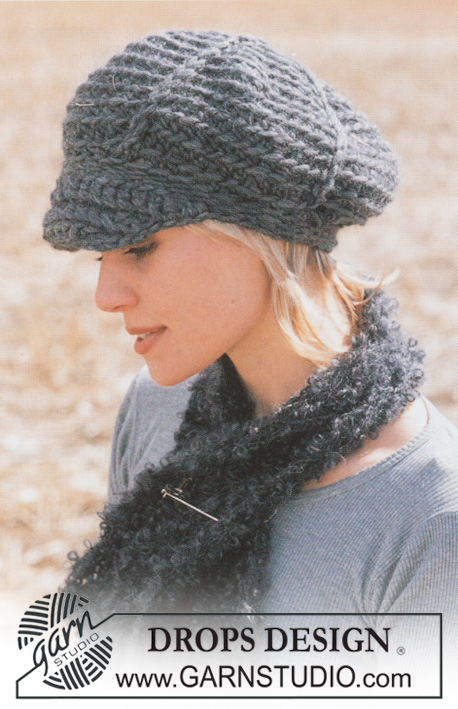
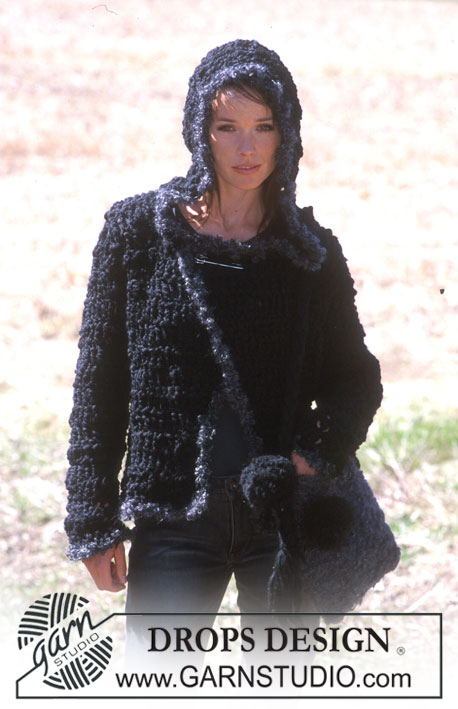
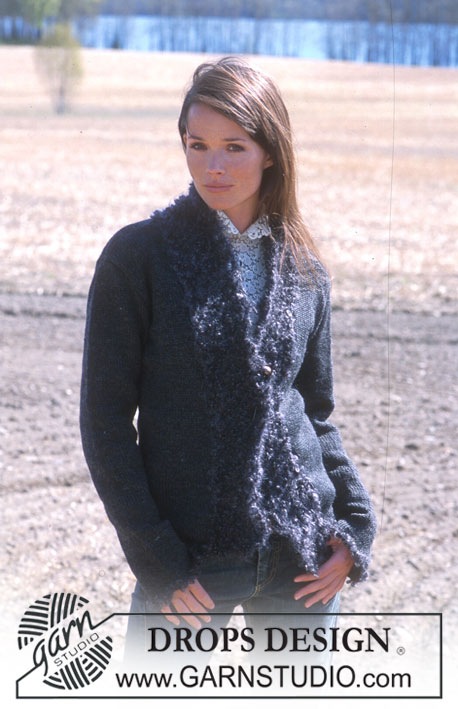
DROPS Cardigan with large collar, scarf & crochet cap.
DROPS 92-6 |
|
|
CARDIGAN: Knitting Gauge: 10 sts x 14 rows on needles size 9 mm in stocking sts. = 10 x 10 cm. Rib: *K4, P4*, repeat from *-* Back piece: Cast on 52-56-60-65-70 sts (inclusive of 1 seam sts at each side – all seam sts are knitted in garter st) on needles size 9 in Snow and knit 2 rows garter sts. Continue in stocking sts. Remember to check your knitting gauge! When piece measures 15, 30 and 45 cm bind off 1 st each side = 46-50-54-59-64 sts. When piece measures 52-53-54-44-56 cm bind off for armhole at each side on every other row as follows: 3 sts 1 time, 2 sts. 0-0-1-2-3 times, 1 st 2-3-3-3-3 times = 36-38-38-39-40 sts. When piece measures 70-72-74-76-78 cm bind off the centre 10-10-10-11-12 sts for collar. On the next row bind off at each neck edge 1 sts = 12-13-13-13-13 sts left for shoulder. Bind off when piece measures 72-74-76-78-80 cm. Right front: Cast on 10-10-12-13-15 sts (inclusive of 1 seam sts at the side) on needles size 9 in Snow and knit 2 rows of garter sts. Please read all of this section before you continue: Continue in stocking sts except for the outermost st centre front which is knitted in garter st. Rounded edge and shawl collar: When the garter sts rows are done, inc at the centre side on every other row as follows: 3 sts 1 time, 2 sts 1-2-2-2-2 times and 1 st 7-7-8-10-10 times. Then on every 4th row - 1 st 6-6-5-5-5- times (= rounded edge). When piece measures 34-34-36-36-36 cm inc at the centre front on every other row as follows: 1 st 2 times, 2 sts 2 times. Then on every 4th row - 2 sts 5 times and 1 st 0-1-2-2-3 times (= shawl collar). At the same time, when piece measures 15, 30 and 45 cm bind off 1 st at the side. Armhole: At the same time when piece measures 52-53-54-55-56 cm bind off for armhole as described for the back piece. After all decreases and increases are made there are 36-38-39-40-14 sts left. Continue in stocking sts until piece measures 72-74-76-78-80 cm and bind off at the side for shoulder 12-13-13-13-13 sts = 24-25-26-27-28 sts left for the collar. Collar: Continue to knit the collar in stocking sts as described below. The collar is sewn to the back during assembly. Knit 2 rows over all sts - *knit 2 rows over the centre outermost 18-19-20-20-21 sts, knit 2 rows over all sts but on the first row - when the first 18-19-20-20-21 sts are knitted - pick up the thread in between sts,turn the thread and knit it tog. with the next st on left needle (this is done to avoid making a hole in the knitting)*, repeat from *-* until the collar measures 6 -7 cm at the neck side (it will now measure 12-14 cm at the outer side). Put sts on a thread. Left front: Knit as right front, but reverse. Sleeve: Cast on 26-26-34-34-34 sts (inclusive of 1 seam st each side) on needles size 9 in Snow. Purl the 1st row from the wrong side. Continue in Rib – as described above, with a seam st each side. When sleeve measures 14 cm continue in stocking sts. At the same time adjust the no of sts to 26-28-28-30-30 sts. When sleeve measures 16 cm inc. at each side as follows: 1 st on every 6-6-5-4.5-3 cm a total of 6-6-7-7-9 times = 38-40-42-44-48 sts. When sleeve measures 48-48-48-46-45 cm bind off for the sleeve cap each side on every other row: 3sts 1 time, 2 sts 1-2-2-2-2 times and 1 st 1-1-2-3-4 times. Continue to bind off 2 sts each side until sleeve measures 55-56-57-57-57 cm. Then bind off each side 3 sts 1 time. When sleeve measures approx 56-57-58-58-58 cm bind off the remaining sts. Knit the other sleeve. Assembly: Sew the shoulder seams. Sew the collar together in the middle as shown on “fig. 1”. Sew the collar to the back neck edge, remember the seam points to the right side – then it will be hidden when you bend the collar. Set in the sleeves. Finally sew the sleeves and the sides together in the seam sts. Tassels: Attach tassels to all sides of the cardigan including the collar. 1 Tassel = 2 threads of Snow and 2 threads of puddel each 35-40 cm long. Fold the threads in half and pull the folded end through the outer st., then pull the ends and the yarn left hanging through the loop. Leave 5 cm space between each tassel. Button hole: Crochet a button loop at the right front piece on the wrong side as follows: the loop should be placed approx 38-40-40-40-42-44 cm from the shoulder, and approx 4-6 cm from the centre front edge. Try it wearing the cardigan. Crochet 1 dc in a st. 4 sl st. 1 dc in the same st. as before. Cut and sew thread tight. Sew the button to the left front piece. CAP Size: One size Materials: Snow 150 g colour no. 14, Coal grey Drops crochet hook no. 8 mm Crochet Gauge: 8 htr on hook size 6 = width 10 cm NB: Because of different crochet techniques used by the individual, the gauge may vary, so you might have to drop a size up or down in hook size to obtain the correct gauge. Crochet info: Replace the 1st htr on each round with 2 ch. Finish each round with a sl st in the 2nd ch from beg of round. How to bind off crochet st: Crochet together 2 st to 1 st. Crochet 1 htr, but wait with the last “pull through” leaving 3 loops on your hook. Crochet another htr, but on the last “pull through” - pull the yarn through all 6 loops. 1 st is now bound off. Cap: Crochet 4 ch on hook size 8, in Snow and form a ring with a sl st. 1st row; Crochet 8 htr in loop - see crochet info above. 2nd row; Crochet 2 htr in each st. From now on only pull the hook through the back part of st – to get the special texture =16 htr 3rd row; *1htr in the first st, 2 htr in next st* repeat *-* = 24 htr 4th row; *1htr in the first 2 st, 2 htr in next st* repeat *-* = 32 htr 5th row; *1htr in first 3 st, 2 htr in next st* repeat *-* = 40 htr 6th row; *1htr in first 4 st, 2 htr in next st* repeat *-* = 48 htr 7th. row; *1htr in first 5 st, 2 htr in next st* repeat *-* = 56 htr 8th. row; *1htr in first 6 st, 2 htr in next st* repeat *-* = 64 htr 9 – 12th row; 1htr in every st = 64 htr 13th row; *Crochet 6 htr, crochet htr no 7 & 8 together (see explanation: How to bind off crochet st.)* repeat from *-* = 56 htr. 14th row; *Crochet 5 htr, crochet htr no 6 & 7 together* repeat from *-* = 48 htr. 15th row; *Crochet 4 htr, crochet htr no 5 & 6 together* repeat from *-* = 40 htr. 16-18th row;1dc in every st = 40 dc The peak: Continue to crochet the peak of the cap in 2 threads of Snow on the front 18 st. 1st. row; Crocket 1 htr in every st = 18 htr. 2–4th row; Turn, crochet 2 ch, crochet the next 2 htr. tog. (see explanation: How to bind off crochet st.) continue in htr, but crochet the last 2 htr together = 16 st. 5th row; Crochet a row of sl sts around the hat and the peak (1 sl st in each st) Decoration stripes: Insert a marking thread either side of the cap in row 16. Crochet 1 sl st in a st nesr the marking thread, make the sl st 1–1.5 cm long, crochet another sl st in row 15, make the sl st 1–1.5 cm long, crochet a sl st in row 14 - and so on . Continue to the other marking thread. Make 2 more stripes. SCARF: Size: Approx 15 x 80 cm Materials: Puddel 100 g colour no. 08 coal Drops pointed needles size 7 mm Knitting Gauge: 10 sts x 14 rows on needles size 7mm in stocking sts. = 10 x 10 cm. Scarf: Cast on 15 sts using 2 needles size 7 in Puddel (use both needles to make sure the edge will be stretchy). Remove one needle and knit l row from the wrong side. Continue in stocking sts until the scarf measures 79 cm. Knit 1 row from the wrong side and bind off. |
|

|
|
Have you finished this pattern?Tag your pictures with #dropspattern or submit them to the #dropsfan gallery. Do you need help with this pattern?You'll find 31 tutorial videos, a Comments/Questions area and more by visiting the pattern on garnstudio.com. © 1982-2025 DROPS Design A/S. We reserve all rights. This document, including all its sub-sections, has copyrights. Read more about what you can do with our patterns at the bottom of each pattern on our site. |


With over 40 years in knitting and crochet design, DROPS Design offers one of the most extensive collections of free patterns on the internet - translated to 17 languages. As of today we count 314 catalogues and 11821 patterns translated into English (UK/cm). 11821
We work hard to bring you the best knitting and crochet have to offer, inspiration and advice as well as great quality yarns at incredible prices! Would you like to use our patterns for other than personal use? You can read what you are allowed to do in the Copyright text at the bottom of all our patterns. Happy crafting!
Post a comment to pattern DROPS 92-6
We would love to hear what you have to say about this pattern!
If you want to leave a question, please make sure you select the correct category in the form below, to speed up the answering process. Required fields are marked *.