
Popular categories
Looking for a yarn?


Comments / Questions (22)
![]() Jenny H wrote:
Jenny H wrote:
Jag undrar om någon av garnsorterna kan vara stickiga eller klia?
09.03.2026 - 15:21DROPS Design answered:
Hej Jenny. Båda dessa garn är mjuka och inte stickiga, men det beror såklart hur känslig man är. Mvh DROPS Design
10.03.2026 - 14:30
![]() Jenny wrote:
Jenny wrote:
Jag undrar om nån av garnsorterna kan finnas risk att vara stivkiga eller klia?
09.03.2026 - 15:19
![]() Rikke wrote:
Rikke wrote:
Hejsa, Skal denne startes med at strikke rundt på rundpind eller skal der strikke frem og tilbage så det bliver et stykke?
03.03.2026 - 17:05DROPS Design answered:
Hei Rikke. Hætten strikkes frem og tilbage på rundpind fra midt foran over panden og bagud. Derefter strikkes der masker op på hver side og der strikkes frem og tilbage oppefra og ned. Når hætten er strikket færdig, slås der masker op under hættens åbning og arbejdet strikkes videre rundt på pinden. Mvh DROPS Design
04.03.2026 - 13:53
![]() Gun Persson wrote:
Gun Persson wrote:
Har problem med dragskon. Ska man börja med avmaskningen direkt efter att maskor plockats upp runt ansiktsöppningen? Det liknar ingenting när man stickar de 9 maskorna och flyttar dem fram och tillbaka. Hur ska det bli en dragsko av detta? Jag undrar om inte någon textrad fallit bort i beskrivningen. Jag förstår att någon skrivit om samma problem på holländska men jag behöver en svensk förklaring. Tack på förhand.
13.01.2026 - 20:30DROPS Design answered:
Hei Gun. Jo, du har sticka upp ca 108-114 maskor runt öppningen från rätsidan, disse maskene har du nå på pinnen / venstre hånd. Les deretter beskrivning til I-cord avmaskning( øverst i oppskriften). Du vil da få en dragsko på baksiden av de 9 maskorna. Ta en titt på denne videoen, ikke samme maskeantallet, men den viser teknikken og du ser at det blir en slags tube som kan brukes som en dragsko. Hur man stickar en i-cord avmaskningskant her. mvh DROPS Design
29.01.2026 - 10:52
![]() Véronique wrote:
Véronique wrote:
J’ai relu un nombre incalculable de fois vos explications pour la bordure I-cord, je ne la comprends pas. Comment la rattacher aux mailles relevées autour de la cagoule ? J’ai finalement suivi des explications trouvées sur YouTube et je suis parvenue à finaliser ce projet. Mais il me semble que faire du I-cord sur 9 mailles relève réellement de l’exploit, surtout quand on est gêné par une aiguille pour des mailles de raccord relevées précédemment
13.01.2026 - 10:06
![]() Véronique wrote:
Véronique wrote:
J’ai tricoté ce modèle en laine angora. Je n’arrive pas à faire la bordure I-cord car ma laine casse à chaque fois que je tire pour fermer le tunnel. Comment puis-je faire pour éviter ce problème ?
11.01.2026 - 17:30DROPS Design answered:
Bonjour Véronique, peut-être pouvez-vous essayer d'ajouter un autre fil (pas trop épais pour ne pas changer la tension) qui apportera de la solidité à votre laine? Votre magasin pourra avoir une autre idée/suggestion, n'hésitez pas à le contacter, même par mail ou téléphone. Bon tricot!
12.01.2026 - 16:49
![]() Kumru wrote:
Kumru wrote:
Hoeveel cm wordt er gebreid voor de Tunnel, dit staat niet goed beschreven. Ook het afkanten van de punnikrand is heel onduidelijk, kunt u dit verder toelichten
07.01.2026 - 17:33DROPS Design answered:
Dag Kumru,
Je breit helemaal rondom de opening voor het gezicht volgens AFKANTEN IN PUNNIKRAND (zie bovenaan bij de beschrijving). Na het opnemen van steken, zet los daarvan 9 steken op, op de rechter naald. Deze zet je daarna op de linker naald zodat ze direct naast de opgenomen steken zitten en zodat de breidraad tussen de 9 steken en de rest van de steken zit. Nu brei je volgens afkanten in punnikrand.
07.01.2026 - 18:12
![]() Chantal wrote:
Chantal wrote:
Bonjour, Est il normal en faisant la bordure en I Cord d'avoir un fil quand on tricote de la 9eme mailles a la 1ere car il est très difficile de tirer le fil avec 9 mailles et avec des aiguilles 5,5 et de faire un tunnel ? Ou est ce que je me trompe quelque part ? Merci pour votre reponse
25.12.2025 - 18:31DROPS Design answered:
Bonjour Chantal, pour éviter que ce fil ne soit trop long sur l'envers, tirez autant que possible entre la dernière maille de la bordure (les 2 m ens à l'endroit) et la 1ère des 9 mailles tricotées; retrouvez c cette façon de faire (avec 2 au lieu de 9 m) dans cette vidéo. Bon tricot!
02.01.2026 - 12:16
![]() Daisy Magescas wrote:
Daisy Magescas wrote:
Bonjour, de combien de centimètres doit faire l’ourlet autour de la tête de la capuche pour passer ensuite le cordon. Je ne comprends pas. Et vous ne précisez pas qu’il faut coudre cet ourlet de 104 mailles. Merci pour votre réponse.
13.12.2025 - 17:07DROPS Design answered:
Bonjour Mme Magescas, cet ourlet autour de l'ouverture du visage est tricoté ainsi: vous relevez les mailles tout autour de l'ouverture, puis vous montez 9 mailles et rabattez les mailles relevées en tricotant une bordure I-cord; comme dans cette vidéo, sauf que l'on a 3 mailles pour la bordure I-cord dans la vidéo et qu'ici on doit en avoir 9, pour permettre de former ce petit ourlet où on pourra ensuite glisser le cordon de serrage. Bon tricot!
15.12.2025 - 11:57
![]() Lisbeth Margareta wrote:
Lisbeth Margareta wrote:
Hej! Har löst problemet. Stickade direkt som det stod med avmaskning I-cord och det blir nu en snygg kanal för I-cordbandet. Fick lära mig något nytt. Kul!
11.12.2025 - 15:00
|
|
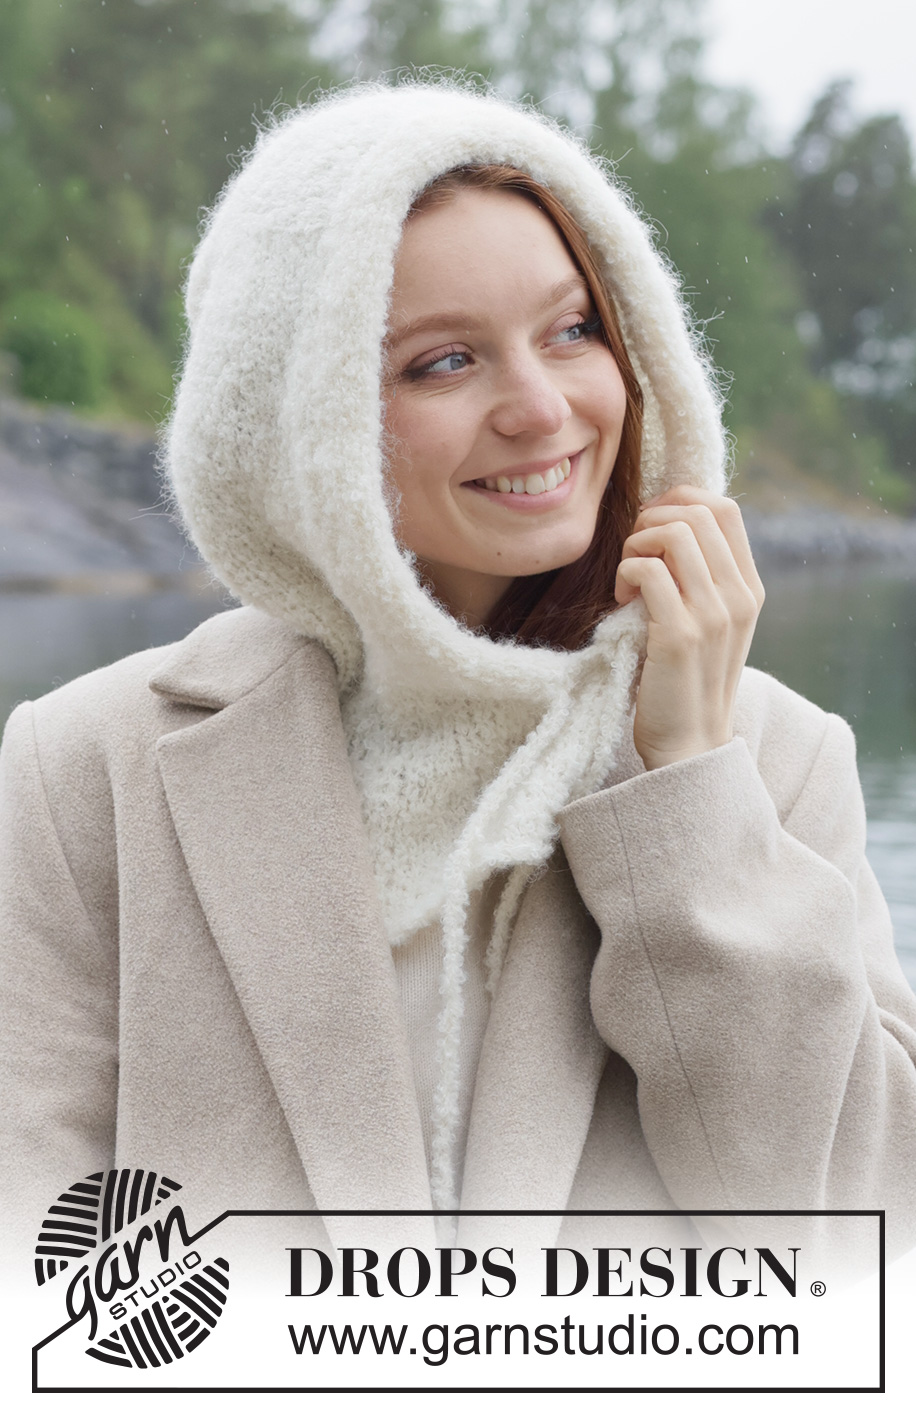
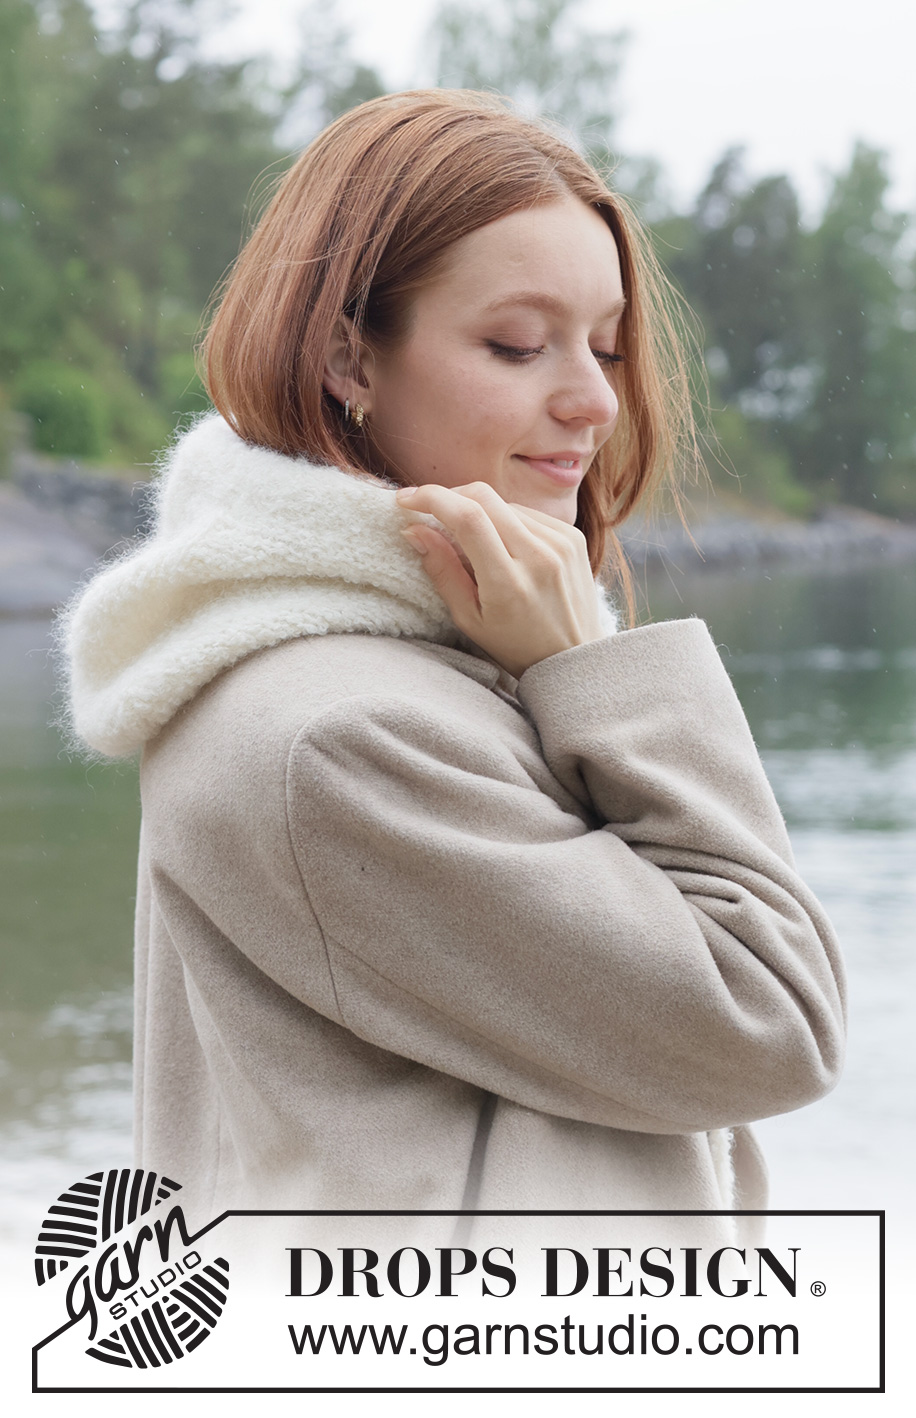
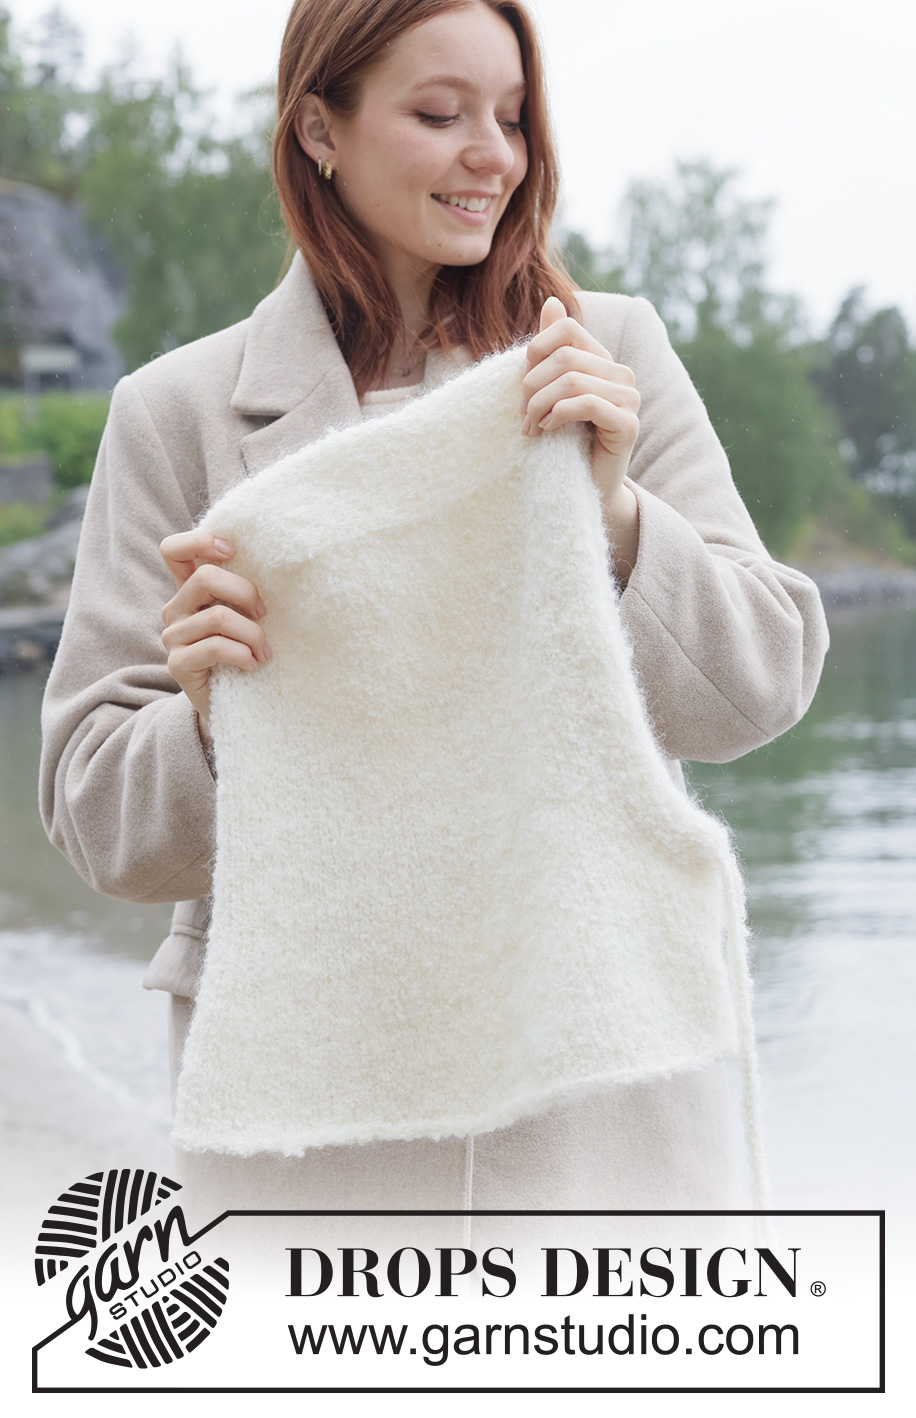
Snow White Hood#snowwhitehood |
|
 |
 |
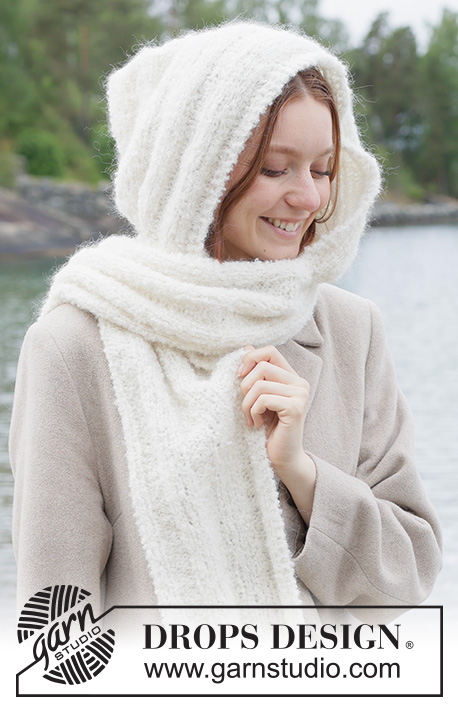
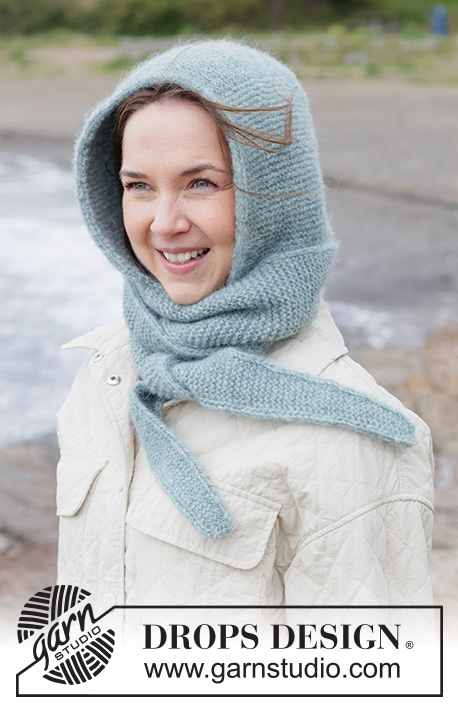
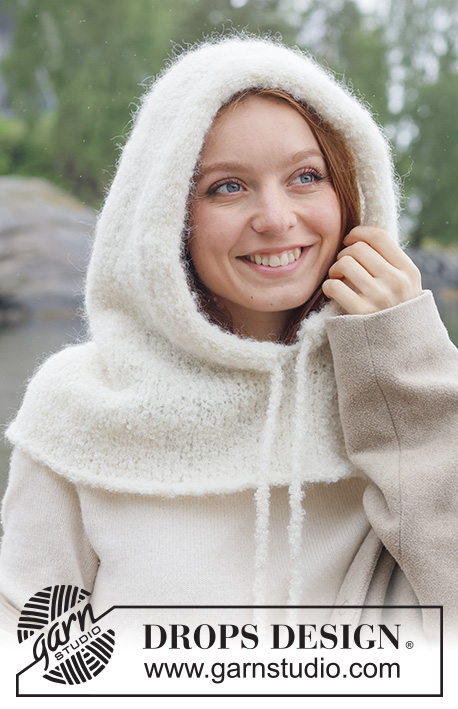
Knitted balaclava in DROPS Alpaca Bouclé and DROPS Kid-Silk. The piece is worked in stocking stitch with I-cord. Sizes S - XL.
DROPS 261-5 |
|
|
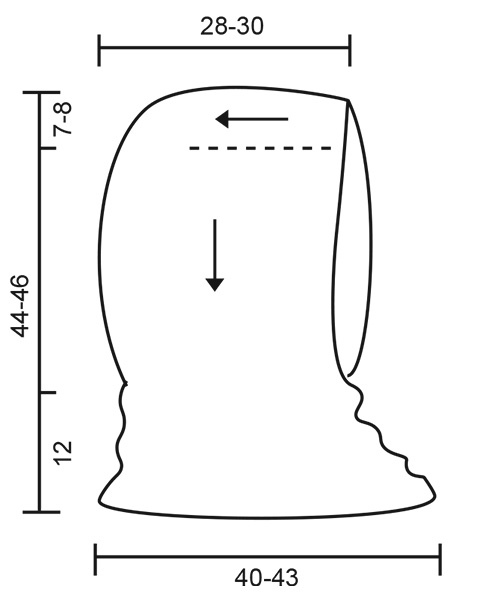
------------------------------------------------------- EXPLANATIONS FOR THE PATTERN: ------------------------------------------------------- INCREASE TIP: INCREASE ONE STITCH TOWARDS THE LEFT from right side: Use the left needle to pick up the strand between 2 stitches from the previous row, pick up the strand from the front and knit through the back loop. INCREASE ONE STITCH TOWARDS THE RIGHT from right side: Use the left needle to pick up the strand between 2 stitches from the previous row, pick up the strand from the back and knit through the front loop. I-CORD CAST-OFF: From the right side, cast on 9 stitches. Slip these 9 stitches onto the left needle, with the working-strand 9 stitches in on the needle. Work from the right side without turning as follows: * Knit 8, knit 2 twisted together, slip the 9 stitches from the right needle back onto the left needle and tighten the strand *, work from *-* until there are 9 stitches left. Cast off and fasten the strand. I-CORD CORD: Work a tube of 2 stitches using double pointed needles size 5.5 mm. Cast on 2 stitches, knit 1 row. Then work as follows: * Push the stitches to the right-hand end of the needle without turning, tighten the strand, knit the 2 stitches *, work from *-* to desired length. ------------------------------------------------------- START THE PIECE HERE: ------------------------------------------------------- BALACLAVA - SHORT OVERVIEW OF THE PIECE: The hood is worked back and forth from mid-front (forehead) and backwards. Stitches are then knitted up on each side and the piece is continued back and forth downwards. When the hood is finished, stitches are cast on under the face-opening and the piece is continued in the round. An edge is worked around the face-opening to finish. BALACLAVA: Cast on 24-26 stitches with circular needle size 5.5 mm, 1 strand DROPS Alpaca Bouclé and 1 strand DROPS Kid-Silk (2 strands). Cast-on edge = mid-front of forehead. Work stocking stitch back and forth for 21-22 cm. Cut the strand. This piece is the top of the hood. Now knit up stitches along both sides (inside the outermost stitch) as follows: From the right side, start from the right corner by the cast-on edge and knit up 30-32 stitches, along the side (right-hand side when the cast-on edge is towards you), work 24-26 stitches from the top of the hood, then knit up 30-32 stitches along the other side (left-hand side when the cast-on edge is towards you) = 84-90 stitches. The piece is now measured from here. Work stocking stitch back and forth for a further 22-22 cm. Read INCREASE TIP in explanations above and increase on each side as follows: ROW 1 (right side): Knit 3, increase 1 stitch towards the left, knit until there are 3 stitches left, increase 1 stitch towards the right, knit 3 (2 increased stitches). ROW 2 (wrong side): Purl. Work ROWS 1 and 2 a total of 3-4 times (6-8 rows worked) = 90-98 stitches. Work the next row from the right side as follows: Knit all stitches, then cast on 8 stitches = 98-106 stitches. The piece measures approx. 25-26 cm from the knitted-up row and 32-34 cm from mid-top. Insert 1 marker. The piece is now measured from here. Continue with stocking stitch in the round for 1 cm. On the next round increase 4-4 stitches evenly spaced = 102-110 stitches. Work until the piece measures 3 cm from the marker. On the next round increase 8-8 stitches evenly spaced = 110-118 stitches. Work until the piece measures 6 cm from the marker. On the next round increase 10-12 stitches evenly spaced = 120-130 stitches. Work until the piece measures 12-12 cm from the marker. Cast off a little loosely. CASTING: Use circular needle size 5.5 mm and 1 strand of each quality (2 strands). From the right side, start in the middle of the new stitches cast on for the neck mid-front and knit up 108-114 stitches around the face-opening – adjusting so there are equal numbers of stitches on each side. From the right side work I-CORD CAST-OFF – read explanation above. When you have worked round the opening, cast off. There should be an opening at each end of the I-cord tube. The cord will be threaded through the tube (= casting). CORD: Use double pointed needles size 5.5 mm and 1 strand of each quality (2 strands). Work I-CORD CORD – read explanation above. When the cord measures 144-150 cm, pull the strand through the 2 stitches and fasten it. Pull the cord slightly so it becomes thinner and tighter. Thread it through the casting. |
|
 |
|
Have you finished this pattern?Tag your pictures with #dropspattern #snowwhitehood or submit them to the #dropsfan gallery. Do you need help with this pattern?You'll find 18 tutorial videos, a Comments/Questions area and more by visiting the pattern on garnstudio.com. © 1982-2026 DROPS Design A/S. We reserve all rights. This document, including all its sub-sections, has copyrights. Read more about what you can do with our patterns at the bottom of each pattern on our site. |
|


With over 40 years in knitting and crochet design, DROPS Design offers one of the most extensive collections of free patterns on the internet - translated to 17 languages. As of today we count 324 catalogues and 12291 patterns translated into English (UK/cm). 12291
We work hard to bring you the best knitting and crochet have to offer, inspiration and advice as well as great quality yarns at incredible prices! Would you like to use our patterns for other than personal use? You can read what you are allowed to do in the Copyright text at the bottom of all our patterns. Happy crafting!
Post a comment to pattern DROPS 261-5
We would love to hear what you have to say about this pattern!
If you want to leave a question, please make sure you select the correct category in the form below, to speed up the answering process. Required fields are marked *.