
Popular categories
Looking for a yarn?


Comments / Questions (16)
![]() Blandine Lagarde wrote:
Blandine Lagarde wrote:
Bonjour, Je fais la taille XL et en jacquard j'ai 26 mailles pour 26 rangs. Est-ce normal ? En jersey tout est correct. Je travaille avec la laine Karisma. Merci
19.03.2025 - 20:59DROPS Design answered:
Bonjour Mme Lagarde, votre tension doit être la même que pour le jersey, si vous avez 26 mailles x 26 rangs au lieu de 21 mailles x 28 rangs, c'est que vous tricotez trop serré, essayez de desserrer un peu, utilisez des aiguilles plus grosses si besoin (essayez séparément sur un échantillon pour être certaine de la taille des aiguilles à utiliser). Et si votre problème de tension vient seulement au niveau du flocon, vous pouvez changer d'aiguille juste pour ces rangs là et continuer ensuite avec l'autre aiguille (pensez juste à changer). Bon tricot!
20.03.2025 - 09:59
![]() Anne Kristin Andreassen wrote:
Anne Kristin Andreassen wrote:
Strikkerff denned modellen i str 38, og opplever å få for lite farge 04, sjokoladebrunt. Ellers vil jeg kommentere mønster beskrivelsen, hvor diagrambeskrivelse og farge nr stod hjver for seg, noe som gjorde det forvirrende med så mange farger. Vennlig hilsen Anne
21.08.2024 - 09:17
![]() Marie-Martine MARC wrote:
Marie-Martine MARC wrote:
Bonjour, Je rejoins les remarques de Lucia Battisti. S\'il-vous-plaît voulez-vous jeter un oeil au modèle !\r\nLe nombre de mailles ne correspond pas.\r\nJe voudrais continuer cette veste magnifique.\r\nL\'échantillon était ok.\r\nMille mercis \r\nCordialement
25.07.2024 - 19:47DROPS Design answered:
Bonjour Mme Marc, mathématiquement parlant je trouve les mêmes nombres qu'indiqué, pouvez-vous nous indiquer à quel niveau précis vous avez un problème que nous puissions vérifier à nouveau? Merci pour votre compréhension.
29.07.2024 - 11:23
![]() Marie-Martine MARC wrote:
Marie-Martine MARC wrote:
Les indications ne correspondent pas à partir de la division de l'empiècement. Pouvez vous corriger s'il vous plait. Un grand merci
22.07.2024 - 10:55
![]() Lucia Battisti wrote:
Lucia Battisti wrote:
Buongiorno sto realizzando la taglia L sono arrivata con lo sprone a 26 cm. Ma non ho ancora terminato A 2 e mi mancano 2 freccie vado avanti oppure divido comunque le maniche calcolando la divisione delle maglie? Grazie lucia
08.12.2023 - 12:53DROPS Design answered:
Buongiorno Lucia, il suo campione corrispondeva a quello indicato? Buon lavoro!
30.12.2023 - 11:34
![]() Christine wrote:
Christine wrote:
Den här blir man glad av och ett bra restgarns projekt..
10.10.2023 - 11:59
![]() Flocaeymaex wrote:
Flocaeymaex wrote:
Colibri
05.08.2023 - 16:54
![]() HK wrote:
HK wrote:
Jellybeam
04.08.2023 - 23:41
![]() Astrid Rohacek wrote:
Astrid Rohacek wrote:
Astrid
04.08.2023 - 18:08
![]() Marina wrote:
Marina wrote:
Prideparad. En färglek, perfekt för restgarnen
04.08.2023 - 11:24
|
|||||||||||||||||||||||||||||||||||||||||||||||||||||||
December Carnival Cardigan#decembercarnivalcardigan |
|||||||||||||||||||||||||||||||||||||||||||||||||||||||
 |
 |
||||||||||||||||||||||||||||||||||||||||||||||||||||||
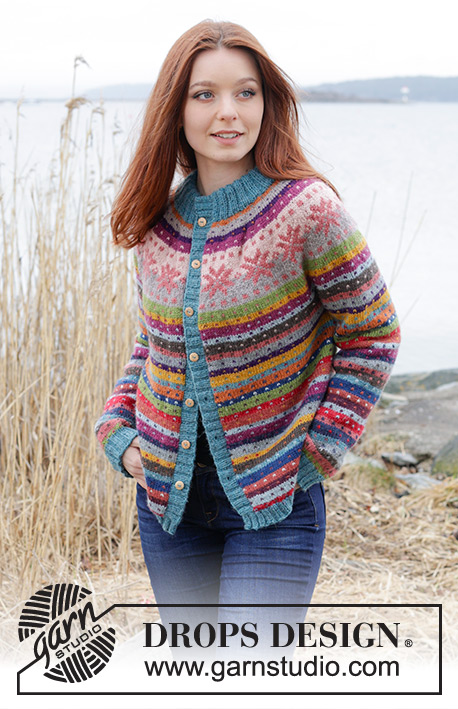
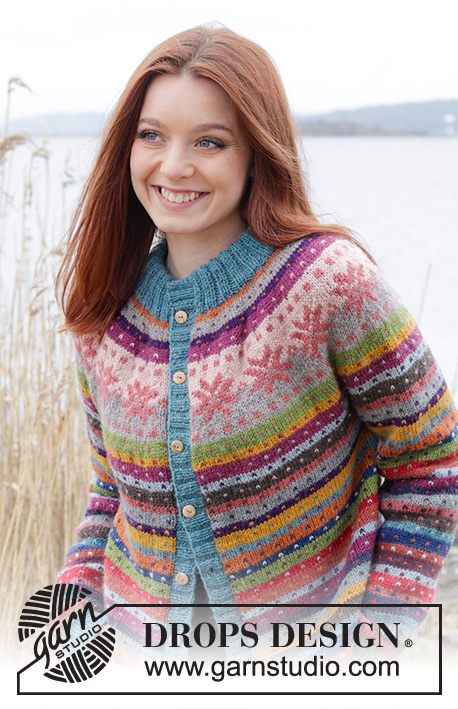
Knitted jacket in DROPS Karisma. The piece is worked top down with round yoke, Nordic pattern and double neck. Sizes XS - XXL.
DROPS 245-6 |
|||||||||||||||||||||||||||||||||||||||||||||||||||||||
|
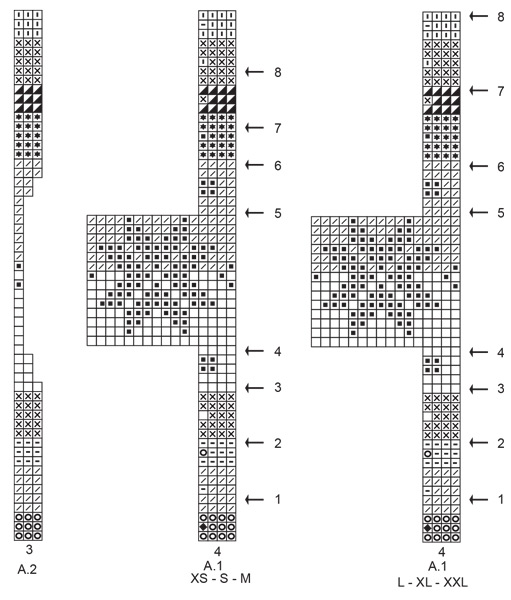
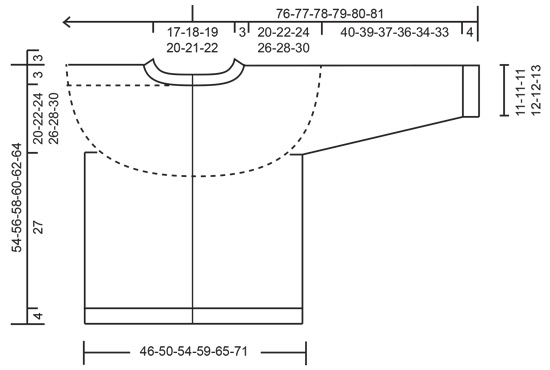
------------------------------------------------------- EXPLANATIONS FOR THE PATTERN: ------------------------------------------------------- GARTER STITCH (worked back and forth): Knit all rows. 1 ridge = knit 2 rows. PATTERN: See diagrams A.1 to A.5. Choose diagram for your size (applies to A.1). The pattern is worked in stocking stitch KNITTING TIP: To avoid the knitting tension losing its elasticity when working pattern, it is important that the strands at the back are not tight. Use a size larger needle when working pattern if the piece becomes tight. DECREASE TIP (for sleeves): Start 3 stitches before the marker-thread, knit 2 together, knit 2 (marker-thread sits between these 2 stitches), slip 1 stitch knit-wise, knit 1 and pass the slipped stitch over the knitted stitch (2 stitches decreased). BUTTONHOLES: Work buttonholes on the right band (when the garment is worn). 1 buttonhole = work 2 together, make 1 yarn over. NOTE: It is neatest if you purl 2 together in a purled section of the rib (seen from the right side). On the next row, knit the yarn over to leave a hole. The first buttonhole is worked in the transition between the neck and the yoke. The last buttonhole 1 cm from the bottom edge. The other 4-4-5-5-5-5 buttonholes are worked with approx. 9-9½-8-8½-9-9½ cm between each one. ------------------------------------------------------- START THE PIECE HERE: ------------------------------------------------------- JACKET – SHORT OVERVIEW OF THE PIECE. The neck and yoke are worked back and forth with circular needle, from mid front and top down. The yoke is divided for body and sleeves and the body continued back and forth with circular needle. The sleeves are worked in the round with double pointed needles/short circular needle, top down. DOUBLE NECK: Cast on 96-100-104-108-112-116 stitches with circular needle size 4 mm and colour sea green DROPS Karisma. Change to circular needle size 3 mm. Purl 1 row. Work as follows from the right side: 1 edge stitch in GARTER STITCH – read description above, * knit 2, purl 2 *, work from *-* until there are 3 stitches left, knit 2 and 1 edge stitch in garter stitch. Continue this rib for 10 cm – with the next row from the right side. YOKE: Knit 1 row from the right side and increase 25-29-33-37-37-37 stitches evenly spaced = 121-129-137-145-149-153 stitches. Change to circular needle size 4 mm and purl back with 1 edge stitch in garter stitch on each side. Insert 1 marker; the yoke is measured from this marker! Work as follows from the right side: 1 edge stitch in garter stitch, A.1 until there are 4 stitches left (29-31-33-35-36-37 repeats of 4 stitches), work A.2 (3 stitches) and 1 edge stitch in garter stitch. Read KNITTING TIP above. Continue this pattern. AT THE SAME TIME on each row marked with an arrow in A.1, increase as follows: Arrow-1: Increase 44-44-44-52-52-56 stitches evenly spaced = 165-173-181-197-201-209 stitches (there is now room for 40-42-44-48-49-51 repeats of A.1 with 4 stitches). REMEMBER THE KNITTING TENSION! Arrow-2: Increase 40-40-44-48-52-52 stitches evenly spaced = 205-213-225-245-253-261 stitches (there is now room for 50-52-55-60-62-64 repeats of A.1 with 4 stitches). Arrow-3: Increase 35-39-43-47-51-51 stitches evenly spaced = 240-252-268-292-304-312 stitches (there is now room for 59-62-66-72-75-77 repeats of A.1 with 4 stitches and A.2 covers 2 stitches). Arrow-4: Increase 3-7-7-15-19-27 stitches evenly spaced = 243-259-275-307-323-339 stitches (there is now room for 15-16-17-19-20-21 repeats of A.1 with 16 stitches and A.2 covers 1 stitch). Arrow-5: Increase 25-29-29-25-29-33 stitches evenly spaced = 268-288-304-332-352-372 stitches (there is now room for 66-71-75-82-87-92 repeats of A.1 with 4 stitches and A.2 covers 2 stitches). Arrow-6: Increase 13-13-17-17-17-21 stitches evenly spaced = 281-301-321-349-369-393 stitches (there is now room for 69-74-79-86-91-97 repeats of A.1 with 4 stitches and A.2 covers 3 stitches). Arrow-7: Increase 12-12-12-16-16-20 stitches evenly spaced = 293-313-333-365-385-413 stitches (there is now room for 72-77-82-90-95-102 repeats of A.1 with 4 stitches). Arrow-8: Increase 8-12-8-12-12-16 stitches evenly spaced = 301-325-341-377-397-429 stitches (there is now room for 74-80-84-93-98-106 repeats of A.1 with 4 stitches). When piece measures 20-22-24-26-28-30 cm from the marker at the neck, yoke should be divided as explained below, AT THE SAME TIME, work pattern. When A.1 is finished, work A.3 then A.4 (the stitches in A.2 are now worked ast the first 3 stitches in A.3). Divide yoke for body and sleeves as follows: Work 46-50-52-57-62-68 stitches as before (front piece), place the next 60-64-68-76-76-80 stitches on 1 thread for the sleeve, cast on 8-8-12-12-16-16 stitches (in side under sleeve), work 89-97-101-111-121-133 stitches (back piece), place the next 60-64-68-76-76-80 stitches on 1 thread for the sleeve, cast on 8-8-12-12-16-16 stitches (in side under sleeve), work the last 46-50-52-57-62-68 stitches (front piece). The body and sleeves are finished separately. The piece is now measured from here. BODY: = 197-213-229-249-277-301 stitches. Continue A.3 with 1 edge stitch on each side. When A.3 is finished, work A.4 until the body measures 27 cm from the division (4 cm left in length) – finishing after a complete stripe; repeat A.X to correct length if necessary. Place the stitches on a stitch holder. The bottom rib is worked after the bands. SLEEVES: Place the 60-64-68-76-76-80 stitches from the thread on the one side of the piece on short circular needle/double pointed needles size 4 mm and knit up 1 stitch in each of the new stitches cast on under the sleeve = 68-72-80-88-92-96 stitches. Insert a marker-thread in the middle of the new stitches under the sleeve and allow it to follow your work onwards; it is used when decreasing under the sleeve. Start at the marker-thread and continueA.3 in the round (starting at the correct place in the diagram to follow on from the yoke). Read the next section before continuing! After A.3, work A.5 to finished length. AT THE SAME TIME, when the sleeve measures 4-4-4-2-2-2 cm, decrease 2 stitches under the sleeve – read DECREASE TIP. Decrease like this every 3-3-2-1½-1½-1½ cm a total of 12-12-16-18-20-20 times = 44-48-48-52-52-56 stitches. Continue working until the sleeve measures approx. 40-39-37-36-34-33 cm, finishing after a complete stripe (approx. 4 cm left) Change to double pointed needles size 3 mm. Knit 1 round and increase 4-4-4-8-8-8 stitches evenly spaced = 48-52-52-60-60-64 stitches. Work rib (knit 2, purl 2) for 4 cm. Cast off with rib. The sleeve measures approx. 44-43-41-40-38-37 cm from the division. Work the other sleeve in the same way. RIGHT BAND: Use circular needle size 3 mm and colour sea green. Start at the bottom of the right front piece and knit up 124-128-132-136-144-148 stitches inside the 1 edge stitch until there is 5 cm left at the top (the last 5 cm will be folded down later) – stitch count must be divisible by 4. Work as follows from the wrong side: 1 edge stitch in garter stitch, * purl 2, knit 2 *, work from *-* until there are 3 stitches left, purl 2 and 1 edge stitch in garter stitch. Continue this rib for 1-1½ cm. Now work 6-6-7-7-7-7 BUTTONHOLES evenly spaced – read description above. Continue the rib until the band measures 3 cm. Cast off with rib. LEFT BAND: Use circular needle size 3 mm and colour sea green. Start at the top of the left front piece, 5 cm below the cast-on edge (the top 5 cm will be folded down later) and knit up 124-128-132-136-144-148 stitches inside the 1 edge stitch. The stitch count must be divisible by 4. Work in the same way as the right band but without buttonholes. RIB ON BODY: Place the 197-213-229-249-277-301 body stitches on needle size 3 mm. Using colour sea green, start from the right side and knit up 7 stitches (inside the 1 edge stitch) across the bottom of the left band, knit and increase 37-41-45-51-53-57 stitches over the body stitches, knit up 7 stitches inside the 1 edge stitch across the bottom of the right band = 248-268-288-314-344-372 stitches. Work as follows from the wrong side: 1 edge stitch in garter stitch, * knit 2, purl 2 *, work from *-* until there are 3 stitches left, purl 2 and 1 edge stitch in garter stitch. Work this rib for 4 cm. Cast off with rib. The jacket measures approx. 54-56-58-60-62-64 cm from the shoulder. ASSEMBLY: Fold the neck double to the inside and sew down. To avoid the neck being tight and rolling outwards, it is important that the seam is elastic. Sew the openings on the bands with small stitches. Sew the buttons onto the left band. |
|||||||||||||||||||||||||||||||||||||||||||||||||||||||
Diagram explanations |
|||||||||||||||||||||||||||||||||||||||||||||||||||||||
|
|||||||||||||||||||||||||||||||||||||||||||||||||||||||
|
|||||||||||||||||||||||||||||||||||||||||||||||||||||||

|
|||||||||||||||||||||||||||||||||||||||||||||||||||||||
|
|||||||||||||||||||||||||||||||||||||||||||||||||||||||
Have you finished this pattern?Tag your pictures with #dropspattern #decembercarnivalcardigan or submit them to the #dropsfan gallery. Do you need help with this pattern?You'll find 29 tutorial videos, a Comments/Questions area and more by visiting the pattern on garnstudio.com. © 1982-2025 DROPS Design A/S. We reserve all rights. This document, including all its sub-sections, has copyrights. Read more about what you can do with our patterns at the bottom of each pattern on our site. |
|||||||||||||||||||||||||||||||||||||||||||||||||||||||


With over 40 years in knitting and crochet design, DROPS Design offers one of the most extensive collections of free patterns on the internet - translated to 17 languages. As of today we count 314 catalogues and 11820 patterns translated into English (UK/cm). 11820
We work hard to bring you the best knitting and crochet have to offer, inspiration and advice as well as great quality yarns at incredible prices! Would you like to use our patterns for other than personal use? You can read what you are allowed to do in the Copyright text at the bottom of all our patterns. Happy crafting!
Post a comment to pattern DROPS 245-6
We would love to hear what you have to say about this pattern!
If you want to leave a question, please make sure you select the correct category in the form below, to speed up the answering process. Required fields are marked *.