
Popular categories
Looking for a yarn?


Comments / Questions (51)
![]() Chiara Anagrafica Campus wrote:
Chiara Anagrafica Campus wrote:
Buongiorno, Sono in difficoltà a dividere il corpo dalle maniche: non riesco a capire dove vadano aggiunte le 12 maglie dopo aver messo in sospeso le 70 maglie. Ho messo 70 maglie in sospeso, ma poi dove devo avviare le 12 della manica? Cosa si intende per a lato sotto? Devo continuare sempre con lo stesso filo? Grazie
15.06.2024 - 08:19DROPS Design answered:
Buonasera Chiara, le 12 maglie vanno aggiunte a livello delle maglie in sospeso, lavora fino al punto in cui mettere le maglie in sospeso, le mette in sospeso e avvia 12 maglie a nuovo. Buon lavoro!
16.06.2024 - 20:46
![]() Hélène Gervais wrote:
Hélène Gervais wrote:
Que veulent dire A.1 et A.2
30.04.2024 - 15:56DROPS Design answered:
Bonjour Mme Gervais, ce sont les noms des diagrammes correspondant aux points fantaisie que vous trouvez en bas de page. Retrouvez ici plus d'infos sur les diagrammes. Bon tricot!
02.05.2024 - 07:25
![]() Susan Gammelgaard wrote:
Susan Gammelgaard wrote:
Hej jeg vil gerne strikke denne fine bluse, men kunne godt tænke mig at få brystmål og evt andre brugbare mål på str. Xl
19.04.2024 - 07:09DROPS Design answered:
Hei Susan. Du finner alle relevante mål til denne genseren på målskissen. Målskissen ser du nederst på oppskriften. Da det ikke er økninger/fellinger i siden på genseren er målene det samme nederst som over brystet (64 cm x 2). mvh DROPS Design
22.04.2024 - 11:19
![]() Fonsegrive Myriam wrote:
Fonsegrive Myriam wrote:
Désolée je pense que tout a l'heure j'ai mis commentaire au lieu de question. C'est à propos du diagramme A2 et de la 11eme ligne puisqu'il faut commencer 2 mailles avant il faut donc commencer à la fin de la 10eme ligne ? Cordialement
07.01.2024 - 20:12DROPS Design answered:
Tout était bien juste, cf réponse ci-dessous :)
08.01.2024 - 10:37
![]() Fonsegrive Myriam wrote:
Fonsegrive Myriam wrote:
Bonjour\r\nJe suis en train de tricoter le pull Sand Piper et sur le diagramme A2 il faut au 11eme rang on doit commencer 2 mailles avant. Donc faut il commencer les 2 mailles en fin du 10eme rangs ?\r\nCordialement\r\nMyriam
07.01.2024 - 20:06DROPS Design answered:
Bonjour Myriam, tricotez le 10ème rang jusqu'à ce qu'il reste 2 mailles, puis glissez la maille suivante à l'endroit, tricotez les 2 mailles suivantes ensemble à l'endroit (= la dernière maille du tour + la 1ère maille du tour suivant) et passez la maille glissée par-dessus les mailles tricotées ensemble, faites 1 jeté et tricotez jusqu'à ce qu'il reste 2 mailles avant le A.2 suivant, et continuez ainsi en commençant par 1 jeté (= nouvelle avant-dernière maille de chaque A.2), à la fin du tour, terminez par 1 jeté et 1 m endroit pour terminer le motif. Bon tricot!
08.01.2024 - 10:37
![]() Sibylle wrote:
Sibylle wrote:
Hallo, in der Anleitung steht in Bezug auf die Abnahme bei den Ärmeln, dass (in meiner gewählten Größe) alle 8 cm insgesamt 5 x in der Höhe abgenommen werden soll. Was ist mit "5 x in der Höhe" gemeint? Danke schon mal für eine Antwort!
24.09.2023 - 22:03DROPS Design answered:
Liebe Sibylle, es ist hier "Mal" gemeint, dh es wird 5 Mal abgenommen. Viel Spaß beim stricken!
25.09.2023 - 10:47
![]() Heidi wrote:
Heidi wrote:
Hallo ich stricke gerade das Muster A2 wo zwei Ma auf die rechte Nadel komm, leider komm ich mit dem Mustersatz nicht klar,was muss ich machen bitte um hilfe
16.09.2023 - 23:52DROPS Design answered:
Liebe Heidi, diese Runde beginnen Sie, wenn 2 Maschen von der vorigen Runde auf der Nadel übrig sind, dann *1 Umschlag, 1 Masche rechts abheben, 2 Maschen rechts zusammenstricken, die abgehobene Maschen über die gestrickten Maschen ziehen ( diese beiden Maschen sind jetzt die 2 letzten Maschen der Runde), 1 Umschlag (= das ist jetzt die 1. Maschen von 1. A.2), 3 Maschen rechts*, von *bis* wiederholen, dh die 2 Maschen von jedem Rapport werden zusammen mit der 1. Maschen von nächstem Rapport gestrickt. Viel Spaß beim stricken!
18.09.2023 - 08:31
![]() Bozena wrote:
Bozena wrote:
Witam. Mam problem z rzędem 11. Dwa oczka przed zakończeniem rzędu 10 przesuwam 2 oczka w prawo? Przerabiam rząd 11. Od którego miejsca zaczynam rząd 12? Dziękuję, pozdrawiam Bozena
15.09.2023 - 18:16DROPS Design answered:
Witaj Bożeno, umieść sobie marker na początku okrążenia, a w okr. 11 zacznij przerabiać wcześniej o 2 oczka. W okr. 12 zacznij ponownie od markera. Pozdrawiamy!
19.09.2023 - 14:53
![]() Christiane wrote:
Christiane wrote:
Hallo, ich habe ein Problem mit dem Mustersatz A2. Wenn ich die Bilder ansehe, müssten es doch eigentlich 9 Runden sein, bis das Lochmuster (Raute) komplett ist. In dem Mustersatz sind es aber nur 7 Runden und das Muster sieht gestrickt auch nicht wie eine Raute aus. Mache ich etwas falsch?
18.08.2023 - 20:14DROPS Design answered:
Liebe Christiane, Diagram A.2 ist so richtig wie im Bild, das Lochmuster (Raute) wird über 7 Reihen gestrickt. Viel Spaß beim stricken!
21.08.2023 - 08:41
![]() Diane wrote:
Diane wrote:
Bonjour, oubliez ma question précédente, j’avais oublié d’augmenter au rang 5. Merci
23.06.2023 - 04:27DROPS Design answered:
Oups Super :) Bonne continuation!
23.06.2023 - 07:48
|
||||||||||||||||||||||
Sand Piper#sandpipersweater |
||||||||||||||||||||||
 |
 |
|||||||||||||||||||||
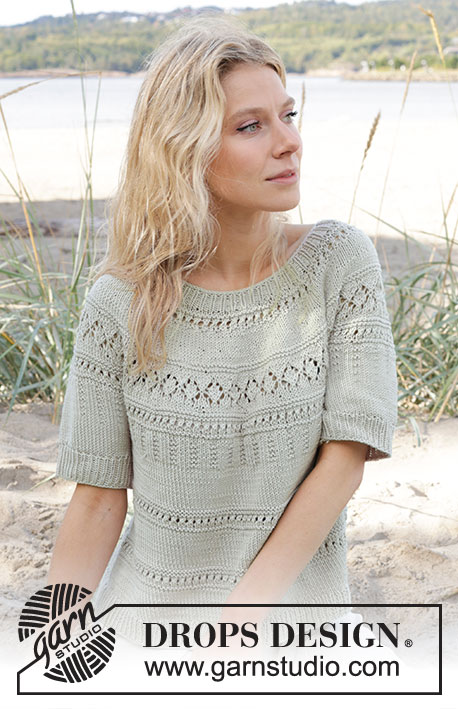
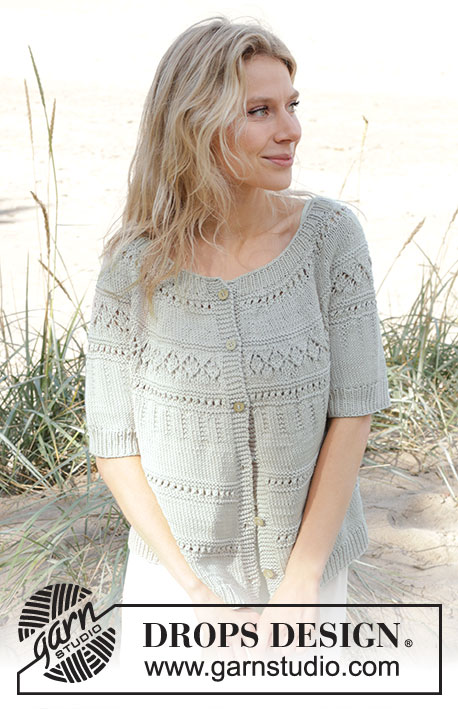
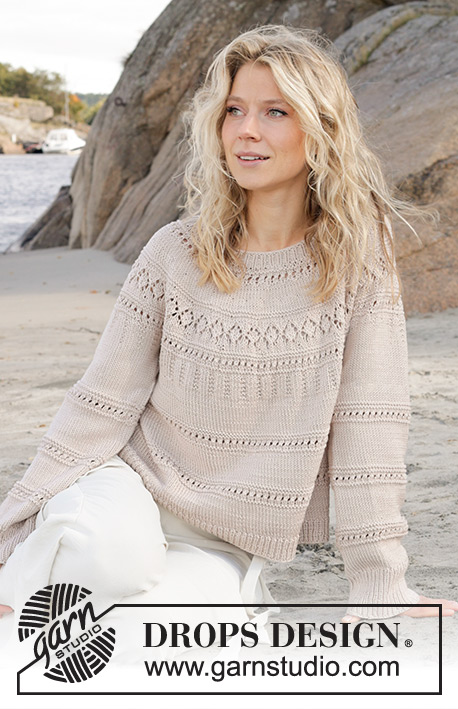
Knitted jumper in DROPS Muskat or DROPS Cotton Merino. The piece is worked top down, with round yoke and lace pattern. Sizes S - XXXL.
DROPS 239-4 |
||||||||||||||||||||||
|
------------------------------------------------------- EXPLANATIONS FOR THE PATTERN: ------------------------------------------------------- INCREASE TIP: Increase 1 stitch by making 1 yarn over, which is worked twisted on the next round to avoid a hole. PATTERN: See diagrams A.1 to A.4. DECREASE TIP (for sleeves): Decrease 1 stitch on either side of the marker-thread as follows: Work until there are 3 stitches left before the marker-thread, knit 2 together, knit 2 (marker-thread sits between these 2 stitches), slip 1 stitch as if to knit, knit 1 and pass the slipped stitch over the knitted stitch (2 stitches decreased). ------------------------------------------------------- START THE PIECE HERE: ------------------------------------------------------- JUMPER – SHORT OVERVIEW OF THE PIECE: The neck and yoke are worked in the round with circular needle, from mid back and top down. The yoke is divided for body and sleeves and the body is continued in the round. The sleeves are worked in the round with short circular needle/double pointed needles. NECK: Cast on 122-126-130-136-142-148 stitches with short circular needle size 3 mm and DROPS Muskat or DROPS Cotton Merino. Knit 1 round. Then work rib (knit 1, purl 1) for 3 cm. Knit 1 round and increase 36-38-40-44-48-52 stitches evenly spaced – read INCREASE TIP = 158-164-170-180-190-200 stitches. Insert 1 marker in the middle of the round. The yoke is measured from this marker. YOKE: Change to circular needle size 4 mm. Work A.1 around the yoke. When A.1 is finished in height, continue with stocking stitch. REMEMBER THE KNITTING TENSION! When the yoke measures 4-4-5-5-6-6 cm from the marker, increase 40-44-50-56-60-64 stitches evenly spaced = 198-208-220-236-250-264 stitches. When the yoke measures 7-7-8-8-9-10 cm from the marker, work A.2 around the yoke. NOTE: On round 11 in the diagram move the start of the round 2 stitches to the right so the pattern fits around the yoke. Then start the next round at the same place as before. On each round marked with an arrow in the diagram increase as follows: Arrow-1: Increase 42-44-50-58-62-66 stitches evenly spaced = 240-252-270-294-312-330 stitches (there is now room for 40-42-45-49-52-55 repeats of A.2 on the round). Arrow-2: Increase 38-42-48-56-58-58 stitches evenly spaced = 278-294-318-350-370-388 stitches. When A.2 is finished, work A.3 around the yoke. On the round marked with an arrow in the diagram increase as follows: Arrow-3: Increase 32-36-42-50-50-52 stitches evenly spaced = 310-330-360-400-420-440 stitches. When A.3 is finished, work A.4 around the yoke. When A.4 is finished in your size, work stocking stitch; be aware that in some sizes A.4 is not finished when you start dividing for the body and sleeves. DIVIDE FOR BODY AND SLEEVES: When the yoke measures 17-18-20-21-23-25 cm from the marker, divide for the body and sleeves; if A.4 is not finished in your size it will be finished on the body and sleeves. Work 47-51-55-61-65-69 stitches (half back piece), place the next 60-64-70-78-80-82 stitches on a thread for the sleeve, cast on 10-10-12-12-14-16 stitches (in side under sleeve), work 95-101-110-122-130-138 stitches (front piece), place the next 60-64-70-78-80-82 stitches on a thread for the sleeve, cast on 10-10-12-12-14-16 stitches (in side under sleeve), work the last 48-50-55-61-65-69 stitches (half back piece). The body and sleeves are finished separately. The piece is now measured from here. BODY: = 210-222-244-268-288-308 stitches. Finish A.4 if necessary in your size (the pattern will not fit under the sleeves – work the remaining stitches in stocking stitch; make sure the pattern continues correctly from the yoke). When A.4 is finished continue with stocking stitch. When you have worked 6-6½-7-7-7½-7½ cm stocking stitch after A.4, work A.3 around the body. When A.3 is finished, continue with stocking stitch for 6-6½-7-7-7½-7½ cm. Then work A.3 around the body again. When A.3 is finished, continue with stocking stitch. When the body measures 25-26-26-27-27-27 cm from the division, knit 1 round and increase 20-22-22-26-28-30 stitches evenly spaced = 230-244-266-294-316-338 stitches. Change to circular needle size 3 mm. Work rib (knit 1, purl 1) for 4 cm. Cast off a little loosely. The jumper measures approx. 52-54-56-58-60-62 cm from the shoulder. SLEEVES: Place the 60-64-70-78-80-82 stitches from the thread on the one side of the piece on short circular needle/double pointed needles size 4 mm and knit up 1 stitch in each of the new stitches cast on under the sleeve = 70-74-82-90-94-98 stitches. Insert a marker in the middle of the new stitches under the sleeve. Start at the marker thread. Finish A.4 if necessary in your size (the pattern will not fit under the sleeves – work the remaining stitches in stocking stitch; make sure the pattern continues correctly from the yoke). When A.4 is finished continue with stocking stitch. You will now start to decrease and work pattern. Read DECREASE and PATTERN before continuing! DECREASE: When the sleeve measures 4-4-4-4-3-3 cm from the division, decrease 2 stitches under the sleeve – read DECREASE TIP. Decrease like this every 8-8-4-3-2½-2½ cm a total of 5-5-8-11-12-13 times = 60-64-66-68-70-72 stitches. PATTERN: After working 7-8-7-6-5-5 cm stocking stitch, continue as follows: * Work A.3 around the sleeve, then work 7 cm stocking stitch *, work from *-* one more time, then work A.3 one more time. When A.3 is finished, continue with stocking stitch. When the sleeve measures 39-39-37-37-35-33 cm, knit 1 round and increase 12-12-12-12-14-14 stitches evenly spaced = 72-76-78-80-84-86 stitches. Change to double pointed needles size 3 mm. Work rib (knit 1, purl 1) for 8 cm. Cast off a little loosely. The sleeve measures approx. 47-47-45-45-43-41 cm. Work the other sleeve in the same way. |
||||||||||||||||||||||
Diagram explanations |
||||||||||||||||||||||
|
||||||||||||||||||||||

|
||||||||||||||||||||||

|
||||||||||||||||||||||

|
||||||||||||||||||||||
Have you finished this pattern?Tag your pictures with #dropspattern #sandpipersweater or submit them to the #dropsfan gallery. Do you need help with this pattern?You'll find 27 tutorial videos, a Comments/Questions area and more by visiting the pattern on garnstudio.com. © 1982-2025 DROPS Design A/S. We reserve all rights. This document, including all its sub-sections, has copyrights. Read more about what you can do with our patterns at the bottom of each pattern on our site. |
||||||||||||||||||||||


With over 40 years in knitting and crochet design, DROPS Design offers one of the most extensive collections of free patterns on the internet - translated to 17 languages. As of today we count 314 catalogues and 11821 patterns translated into English (UK/cm). 11821
We work hard to bring you the best knitting and crochet have to offer, inspiration and advice as well as great quality yarns at incredible prices! Would you like to use our patterns for other than personal use? You can read what you are allowed to do in the Copyright text at the bottom of all our patterns. Happy crafting!
Post a comment to pattern DROPS 239-4
We would love to hear what you have to say about this pattern!
If you want to leave a question, please make sure you select the correct category in the form below, to speed up the answering process. Required fields are marked *.