Comments / Questions (48)
![]() Kuecken wrote:
Kuecken wrote:
I str s. Skal jeg ifl opskriften strikke Diagr. A1 til A5 til at starte med indtil A4 og A5 er strikket færdigt og så skal jeg bland andet strikke A6 og A7. Men A4og A5 er meget højere end A1, A2 og A3. Skal jeg strikke A1 A2 A3 to gange i højden indtil A4 og A5 er færdige eller skal jeg skifte til A6 og A7 halvvejs igennem A4 og A5?
20.10.2022 - 14:31DROPS Design answered:
Hej, ja du gentager de andre diagrammer til du er færdig med A.4 og A.5 :)
25.10.2022 - 11:47
![]() Fanny wrote:
Fanny wrote:
Bonjour, je suis scrupuleusement les diagrammes mais je n'obtiens pas suffisamment de mailles pour les diagrammes A4 et A5, Pouvez-vous m'expliquer pourquoi, faut-il réaliser une augmentation en dehors de ces diagrammes ? Merci
05.08.2022 - 19:15DROPS Design answered:
Bonjour Fanny, vous devez augmenter pour les raglans après les marqueurs -1 (fin du devant gauche), avant le marqueur-2 (début du dos) et après le marqueur-3 (fin du dos) et avant le marqueur -4 (début du devant droit) - cf RAGLAN, ainsi vous allez augmetner votre nombre de mailles progressivement dans A.4 et A.5 - les augmentations figurent dans les diagrammes - il vous faudra parfois augmenter en plus des jetés des raglans (cf ovales noirs). Bon tricot!
08.08.2022 - 08:24
![]() Anja wrote:
Anja wrote:
Ik wil graag deze breien maar. Het probleem is de beschrijving. Opzetten ✅ Boord ✅ En dan de eerste verdeling dan heb ik veel mee steken nodig dan dat erop mijn nld staat. Als ik alle steken tel mis ik er een heleboel,. Ik heb de uitgeprinte versie.
07.06.2022 - 08:40DROPS Design answered:
Dag Anja,
Welke maat brei je en hoeveel steken heb je ongeveer over? De verdeling van het aantal steken in het patroon zou wel moeten kloppen.
12.06.2022 - 21:02
![]() Ghouali wrote:
Ghouali wrote:
Bsr j ai 113 mailles pour le dos au lieu 99 mailles comment faire svp mer i
26.05.2022 - 20:01DROPS Design answered:
Bonjour Mme Ghouali, avez-vous bien le bon nombre de mailles dans les autres pièces? Aviez-vous bien A.6, 70 m de A.2, A.7 après A.4 et A.5? Essayez de bien vérifier vos diagrammes et vos jetés pour retrouver le bon nombre de mailles correspondant à votre taille. Bon tricot!
27.05.2022 - 09:04
![]() Ghouali wrote:
Ghouali wrote:
Bjr j'ai 113 mailles pour le dos au lieu de 99mailles comment les retrouver merci je bloque merci
26.05.2022 - 19:57
![]() Karen wrote:
Karen wrote:
Ang. Diagrammet til denne model. Hver anden række er blank, er det vrangpinden, eller skal det forståes sådan at der er en ret pind imellem mønsterpinden? Venlig hilsen Karen
22.05.2022 - 09:45DROPS Design answered:
Hei Karen. På denne jakken og i diagrammene strikkes de "blanke" radene fra vangen. Da skjer det minst mulig, slik at når masker strikkes sammen eller det gjøres et kast, så gjøres dette fra rettpinnen. mvh DROPS Design
23.05.2022 - 10:05
![]() Susan wrote:
Susan wrote:
Jeg fandt skema under diagrammerne. Det er mål på det færdige arbejde, så jeg skal vælge en størrelse over mine kropsmål, så der er lidt frirum?
26.04.2022 - 09:38DROPS Design answered:
Hej igen Susan, ja det stemmer :) for at få målene i måleskitsen er det vigtigt at man overholder strikkefastheden som står i opskriften :)
26.04.2022 - 15:48
![]() Susan wrote:
Susan wrote:
Jeg kan ikke finde mål på de forskellige størrelser, hvilket gør det svært at beslutte hvilken størrelse jeg skal strikke
26.04.2022 - 09:32DROPS Design answered:
Hej Susan, Jo, du finder målene i måleskitsen nederst i opskriften. Vælg den størrelse med de mål som passer dig bedst :)
26.04.2022 - 15:47
![]() Shubhangi wrote:
Shubhangi wrote:
Hello! "7 band stitches in garter stitch, A.6, A.2 over 14-14-28 stitches, A.4." could you clarify this line? It's in the yoke section of sizes L, XL, XXXL. Thanks!
15.04.2022 - 22:41DROPS Design answered:
Dear Shubhangi, you start working 7 band stitches in garter stitch, then you work 1 repeat of A.6 on round (= 14 stitches) then you work 1 repeat of A.2 (for sizes L, XL) or 2 repeats of A.2 for size XXL. Then you work 1 repeat of A.4. This concludes the part of the yoke for the left front, but the round isn't finished yet. You need to continue the round, working the left sleeve e.t.c, up to the right front. Happy knitting!
17.04.2022 - 11:40
![]() Lászlóczky Éva wrote:
Lászlóczky Éva wrote:
Köszönöm a mintát, de van egy észrevételem: DROPS design: bm-098 minta: Az XXl-es méretnél a jobb elejéből hiányzik a leírásból (az első mintás sornál) az A2-es minta, az A5 és az A3 közül. Megnéztem a norvég leírást, úgy derült ki. Köszönöm a figyelmet! :) Üdv Éva
09.03.2022 - 17:56
Queen Bee Cardigan#queenbeecardigan |
|||||||||||||||||||
 |
 |
||||||||||||||||||
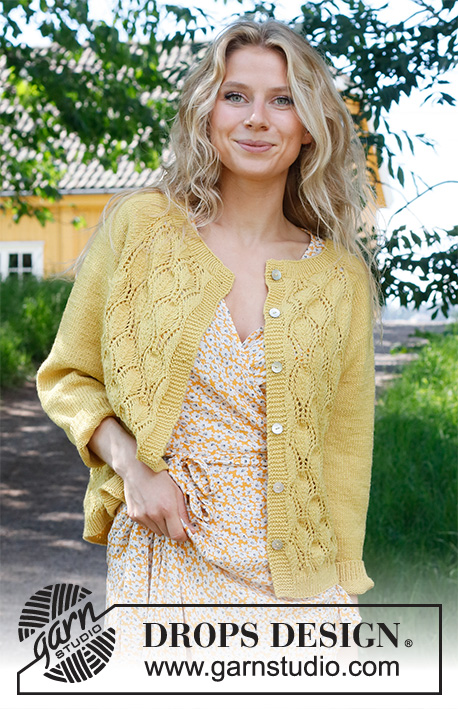
Knitted jacket in DROPS BabyMerino. The piece is worked top down, with raglan and lace pattern. Sizes S - XXXL
DROPS 231-15 |
|||||||||||||||||||
|
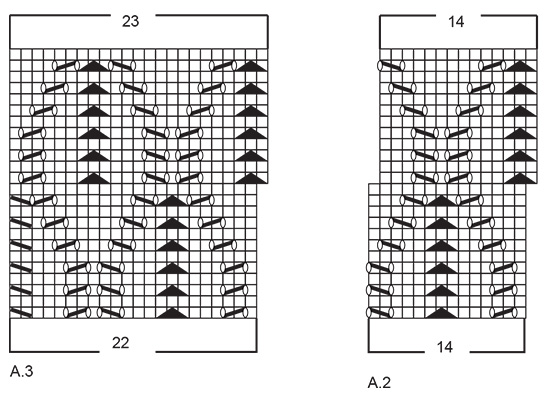
------------------------------------------------------- EXPLANATIONS FOR THE PATTERN: ------------------------------------------------------- RIDGE/GARTER STITCH (worked back and forth): Knit all rows. 1 ridge = knit 2 rows. PATTERN: See diagrams A.1 to A.7. RAGLAN: All increases are worked from the right side! The increases to raglan on the front and back piece are included in the diagrams. Increase to raglan on each side of the sleeves as follows: Increase 1 stitch after markers 1 and 3 and before markers 2 and 4 by making 1 yarn over. The yarn overs are purled twisted on the next row (= from the wrong side) to avoid holes. Then work the new stitches in stocking stitch. When A.4 and A.5 are finished, the increases on the front and back pieces are finished. Continue increasing only on the sleeves. BUTTONHOLES: Work buttonholes on the right band (when the garment is worn). Work from the right side until there are 4 stitches left, make 1 yarn over, knit 2 together and knit 2. On the next row (wrong side), knit the yarn over to leave a hole. The first buttonhole is worked when the rib on the neck measures approx. 3 cm. Then work the other 5-5-5-6-6-6 buttonholes with approx. 8-8-8½-8-8-8½ cm between each one. DECREASE TIP (for sleeves): Decrease 1 stitch on either side of the marker as follows: Work until there are 3 stitches left before the marker, knit 2 together, knit 3 (marker sits in the middle stitch of these 3 stitches), slip 1 stitch as if to knit, knit 1 and pass the slipped stitch over the knitted stitch (2 stitches decreased). ------------------------------------------------------- START THE PIECE HERE: ------------------------------------------------------- JACKET - SHORT OVERVIEW OF THE PIECE: The piece is worked back and forth with circular needle, from mid-front and top down. The sleeves are worked in the round with short circular needle/double pointed needles. NECK: Cast on 139-145-149-153-163-173 stitches with circular needle size 2.5 mm and DROPS Baby Merino. Purl 1 row from the wrong side, then work rib from the right side as follows: 7 band stitches in GARTER STITCH – read description above, * knit 1, purl 1 *, work from *-* until there are 8 stitches left, knit 1 and 7 band stitches in garter stitch. Work this rib for 3 cm. Remember the BUTTONHOLES on the right band – read description above. Change to circular needle size 3 mm. Knit 1 row from the right side and increase 10-4-28-24-42-60 stitches evenly spaced (increase by working yarn overs; do not increase over the bands) = 149-149-177-177-205-233 stitches. Purl 1 row from the wrong side (band stitches in garter stitch and yarn overs purled twisted). Insert 1 marker after the band at the beginning of the row. THE PIECE IS NOW MEASURED FROM HERE! REMEMBER THE KNITTING TENSION! YOKE: Sizes S-M: Work the next row from the right side as follows: Left front piece: 7 band stitches in garter stitch, A.1, A.4. Left sleeve: 1 stitch in stocking stitch, insert marker-1, make 1 yarn over, 18 stitches in stocking stitch, 1 yarn over, insert marker-2, 1 stitch in stocking stitch. Back piece: Work A.5, A.2 over 42 stitches, A.4. Right sleeve: 1 stitch in stocking stitch, insert marker-3, make 1 yarn over, 18 stitches in stocking stitch, 1 yarn over, insert marker-4, 1 stitch in stocking stitch. Right front piece: Work A.5, A.3 and 7 band stitches in garter stitch = 153-153 stitches (including the yarn overs). Continue this pattern and increase to RAGLAN – read description above, on the sleeves a total of 24-27 times on every row from the right side. When A.4 and A.5 are finished continue as follows from the right side: Left front piece: 7 band stitches in garter stitch, A.1, A.2, A.7. Left sleeve: Continue with stocking stitch and increase every 2nd row as before. Back piece: Work A.6, A.2 over 70 stitches, A.7. Right sleeve: Continue with stocking stitch and increase every 2nd row as before. Right front piece: Work A.6, A.2, A.3 and 7 band stitches in garter stitch. Sizes L-XL-XXXL: Work the next row from the right side as follows: Left front piece: 7 band stitches in garter stitch, A.6, A.2 over 14-14-28 stitches, A.4. Left sleeve: 1 stitch in stocking stitch, insert marker-1, make 1 yarn over, 18 stitches in stocking stitch, 1 yarn over, insert marker-2, 1 stitch in stocking stitch. Back piece: Work A.5, A.2 over 56-56-84 stitches, A.4. Right sleeve: 1 stitch in stocking stitch, insert marker-3, make 1 yarn over, 18 stitches in stocking stitch, 1 yarn over, insert marker-4, 1 stitch in stocking stitch. Right front piece: Work A.5, A.2 over 14-14-28 stitches, A.7 and 7 band stitches in garter stitch = 181-181-237 stitches (including the yarn overs). Continue this pattern and increase to RAGLAN – read description above, on the sleeves a total of 32-36-41 times on every row from the right side. When A.4 and A.5 are finished continue as follows from the right side: Left front piece: 7 band stitches in garter stitch, A.6. A.2 over 28-28-42 stitches, A.7. Left sleeve: Continue with stocking stitch and increase every 2nd row as before. Back piece: Work A.6, A.2 over 84-84-112 stitches, A.7. Right sleeve: Continue with stocking stitch and increase every 2nd row as before. Right front piece: Work A.6, A.2 over 28-28-42 stitches, A.7 and 7 band stitches in garter stitch. Size XXL: Work the next row from the right side as follows: Left front piece: 7 band stitches in garter stitch, A.1, A.2, A.4. Left sleeve: 1 stitch in stocking stitch, insert marker-1, make 1 yarn over, 18 stitches in stocking stitch, 1 yarn over, insert marker-2, 1 stitch in stocking stitch. Back piece: Work A.5, A.2 over 70 stitches, A.4. Right sleeve: 1 stitch in stocking stitch, insert marker-3, make 1 yarn over, 18 stitches in stocking stitch, 1 yarn over, insert marker-4, 1 stitch in stocking stitch. Right front piece: Work A.5, A.2, A.3 and 7 band stitches in garter stitch = 209 stitches (including the yarn overs). Continue this pattern and increase to RAGLAN – read description above, on the sleeves a total of 39 times on every row from the right side. When A.4 and A.5 are finished continue as follows from the right side: Left front piece: 7 band stitches in garter stitch, A.1, A.2 over 28 stitches, A.7. Left sleeve: Continue with stocking stitch and increase every 2nd row as before. Back piece: Work A.6, A.2 over 98 stitches, A.7. Right sleeve: Continue with stocking stitch and increase every 2nd row as before. Right front piece: Work A.6, A.2 over 28 stitches, A.3 and 7 band stitches in garter stitch. Continue this pattern until the piece measures 21-23-24-26-28-30 cm from the marker on the neck – finish after a row from the right side. When all the sleeve-increases are finished there are 349-361-409-425-465-501 stitches. Work the next row from the wrong side as follows: Work as before over the first 57-57-64-64-71-78 stitches (= front piece), place the next 68-74-84-92-98-102 stitches on 1 thread for the sleeve, cast on 13 stitches (in side under sleeve), work pattern as before over the next 99-99-113-113-127-141 stitches (= back piece), place the next 68-74-84-92-98-102 stitches on 1 thread for the sleeve, cast on 13 stitches (in side under sleeve), work pattern as before over the last 57-57-64-64-71-78 stitches (= front piece). The body and sleeves are finished separately. BODY: = 239-239-267-267-295-323 stitches. Work the next row from the right side as follows (continuing from the correct row in the diagrams): Sizes S-M-XXL: 7 band stitches in garter stitch, A.1, A.2 over 182-182-238 stitches, A.3, and 7 band stitches in garter stitch. Sizes L-XL-XXXL: 7 band stitches in garter stitch, A.6, A.2 over 224-224-280 stitches (= 12 times in width), A.7 and 7 band stitches in garter stitch. Continue working until the piece measures 24-24-25-25-25-25 cm from the division – with the next row from the right side. Knit 1 row from the right side where you increase 24-24-26-26-30-32 stitches evenly spaced = 263-263-293-293-325-355 stitches. Change to circular needle size 2.5 mm. Work the next row from the wrong side as follows: 7 band stitches in garter stitch, * purl 1, knit 1 *, work from *-* until there are 8 stitches left, purl 1 and 7 band stitches in garter stitch. Work this rib for 3 cm. Cast off. SLEEVES: Place the 68-74-84-92-98-102 stitches from the thread on the one side of the piece on short circular needle/double pointed needles size 3 mm and knit up 1 stitch in each of the 13 stitches cast on under the sleeve = 81-87-97-105-111-115 stitches. Insert a marker in the middle of the new stitches under the sleeve and start at the marker. Work stocking stitch in the round for 3 cm. Now decrease 2 stitches under the sleeve – read DECREASE TIP. Decrease like this every 4-3½-2½-2-1½-1½ cm a total of 8-9-12-14-15-15 times = 65-69-73-77-81-85 stitches. Continue working until the sleeve measures 37-36-35-34-32-30 cm. Knit 1 round where you increase 1 stitch = 66-70-74-78-82-86 stitches. Change to double pointed needles size 2.5 mm and work rib (knit 1, purl 1) for 3 cm. Cast off. The sleeve measures approx. 40-39-38-37-35-33 cm from the division. Work the other sleeve in the same way. ASSEMBLY: Sew the buttons onto the left band. |
|||||||||||||||||||
Diagram explanations |
|||||||||||||||||||
|
|||||||||||||||||||

|
|||||||||||||||||||

|
|||||||||||||||||||

|
|||||||||||||||||||

|
|||||||||||||||||||
Have you finished this pattern?Tag your pictures with #dropspattern #queenbeecardigan or submit them to the #dropsfan gallery. Do you need help with this pattern?You'll find 30 tutorial videos, a Comments/Questions area and more by visiting the pattern on garnstudio.com. © 1982-2025 DROPS Design A/S. We reserve all rights. This document, including all its sub-sections, has copyrights. Read more about what you can do with our patterns at the bottom of each pattern on our site. |
|||||||||||||||||||


Post a comment to pattern DROPS 231-15
We would love to hear what you have to say about this pattern!
If you want to leave a question, please make sure you select the correct category in the form below, to speed up the answering process. Required fields are marked *.