
Looking for a yarn?


Comments / Questions (77)
![]() Terry Williamson wrote:
Terry Williamson wrote:
This was an absolute disaster after switching to the 5mm. The project has to be stretched and ruined to fit on the needles and is so tight that it cannot be worked. So disappointed that I wasted my time and then could not finish it
30.12.2024 - 20:44
![]() Bettina wrote:
Bettina wrote:
Ab „den faden abschneiden“ komme ich nicht mehr klar. Ich verstehe deine anleitung nicht. Kannst du mir bitte helfen? Wenn der faden abgeschnitten ist mit was stricke ich dann?
27.12.2024 - 17:56DROPS Design answered:
Liebe Bettina, nach dem Faden geschnitten ist, wird man nur die mittleren 12-18 Maschen stricken und gleichzeitig die letzte Masche am Ende jeder Hinreihe und die letzte Masche jeder Rückreihe zusammen mit der nächsten stillgelegten 18-24 Maschen stricken bis alle Maschen beidseitig zusammen mit den mittleren Maschen gestrickt werden. Es sind immer noch 12-18 Maschen auf der Nadel. Viel Spaß beim Stricken!
02.01.2025 - 13:34
![]() Bettina wrote:
Bettina wrote:
Ich versteh das zunehmen auf der rückseite nicht. Kann man das verständlicher beschreiben?
16.12.2024 - 16:32DROPS Design answered:
Liebe Bettina, hier wird man beidseitig von den 2 rechten Maschen in der hinteren Mitte mit einem Umschlag zunehmen; bei der nächsten Runde stricken Sie den Umschlag verschränkt, um ein Loch zu vermeiden (siehe Video). Diese Zunahmen stricken Sie im Bündchen weiter. In diesem Video zeigen wir, wie man die neuen Maschen im Rippenmuster stricke (nb: mit einer anderen Technik für die Zunahmen). Viel Spaß beim Stricken!
17.12.2024 - 09:36
![]() Emily St Louis wrote:
Emily St Louis wrote:
Decrease like this in each side mid front on every row from right side 3 times in total. Increase like this on each side of marker on every row from right side 7-7-7-7 (7-8) times in total (including increase done when casting off stitches mid front). ^^^ please help me understand this, I’m very confused
12.12.2024 - 17:28DROPS Design answered:
Dear Emily, you had the following: "Work 1 edge stitch in garter stitch, work 2 stitches together (= 1 stitch decreased), work until 1 stitch remains before marker mid back, increase 1 stitch, knit 2, increase 1 stitch, work until 3 stitches remain on needle, work 2 stitches together (= 1 stitch decreased) and finish with 1 edge stitch in garter stitch." Work this sentence 3 times in total (including the first one) exactly as indicated, always on the right side. Then, work this sentence 4 (or 5 for largest size) more times but don't work the decreases (so work these stitches normally instead of together) to have 4 more rows but without decreases, only increases. Happy knitting!
15.12.2024 - 19:48
![]() Snoy wrote:
Snoy wrote:
Bonjour. Pouvez-vous m’expliquer votre méthode pour rabattrez les 6-6-6-8 (10-10) premières mailles? Merci
28.11.2024 - 21:16DROPS Design answered:
Bonjour Mme Snoy, vous pouvez utiliser votre technique habituelle pour rabattre les mailles, veillez juste à ce qu'elles soit rabattues ni trop serrées ni trop lâches. Retrouvez ici, en vidéo, différentes techniques pour rabattre. Bon tricot!
29.11.2024 - 08:31
![]() Christine wrote:
Christine wrote:
Bonjour, tout comme Stéphanie, j’ai eu beaucoup de mal avec avec la partie supérieure du bonnet. Je pense qu’il s’agit de la traduction française qui est très mauvaise et nous fait continuer sur les côtés alors qu’il faut de continuer la partie centrale. J’ai dû recommencer plusieurs fois. Tout cela a été donc bien compliqué. Dommage que les traductions ne soient pas vérifiées Merci, bien cordialement Christine
28.11.2024 - 18:07
![]() Stephanie wrote:
Stephanie wrote:
Good morning, I'm having a hard time understanding how to successfully knit the crown once you've separated your stitches on different needles and cut the yarn. would you consider making a video showing how this is accomplished as the written instructions aren't quite making sense to me? Thank you, this has been a very fun pattern so far and I look forward to hearing from you :)
17.11.2024 - 18:48DROPS Design answered:
Dear Stephanie, when you cut the thread you should have 3 separate pieces. Now you start working the central piece, on the circular needles. Work until 1 stitch is left on the circular needle, slip this stitch knitwise, knit the first stitch of the double pointed needle and pass the slipped stitch over the knit stitch. Now there is one less stitch in that double pointed needle. Turn the piece, work on the wrong side until 1 stitch is left on the circular needle and decrease as before, but you knit the first stitch of the other double pointed needle. Turn and repeat as before. So you will be, in each row, taking 1 stitch from one needle, in one side. Happy knitting!
18.11.2024 - 00:25
![]() Kati Sawda wrote:
Kati Sawda wrote:
Abgeleitet hat automatisch geschrieben.Das muss abgekettet heißen.sorry
11.11.2024 - 20:39DROPS Design answered:
Danke für den Hinweis, dann könnte die vorige Antwort helfen? Oder immer noch nicht? Welche Größe stricken Sie und bis wo haben Sie jetzt gestrickt? Danke im voraus.
12.11.2024 - 09:03
![]() Kati Sawda wrote:
Kati Sawda wrote:
Ich habe 56 M auf der Nadel. Nach 3 mal abnehmen und 8 mal zunehmen habe ich nur 58 M auf der Nadel plus die 10 abgeketten Maschen, dann habe ich insgesamt 68 M. Wenn ich aber nur 3 Abn. Und 3 Zun.mache habe ich wieder 56 M plus die abgeleiteten M sind 66M. Meine Frage: Wieviel M muss ich auf der Nadel bei 56 M haben ohne den abgeleiteten M haben
08.11.2024 - 17:21DROPS Design answered:
Liebe Frau Sawada, man wird 2 Maschen ingesamt 3 Mal abnehmen und 2 Maschen ingesamt 8 Mal zunehmen, so hat man: 56 - (2Mx3) + (2 M x8)= 66 Maschen. Ich verstehe aber nicht was Sie mit "abgeleiteten Maschen" meinen. Viel Spaß beim Stricken!
11.11.2024 - 08:01
![]() Pia Brandt wrote:
Pia Brandt wrote:
Hej, Jeg er ved at strikke jeres fine opskrift, men jeg har problemer med at forstå, hvordan jeg laver DOBBELT KANT. Jeg har lavet i størrelse 12-18 mdr, og har 16 masker på min rundpind nr 5. Jeg har forsøgt 3 gange nu, så jeg håber, at I kan forklare det på en mere simpel måde, da jeg ikke er den store strikker. På forhånd mange tak.
27.10.2024 - 17:47DROPS Design answered:
Hej Pia, du strikker masker op i kanten rundt om hele ansigtet (se video hvordan man strikker op), strikker 5 cm rib rundt på pinden og lukker af. Nu bukker du kanten ind mod vrangen og syr så den bliver dobbelt :)
29.10.2024 - 09:04
|
|
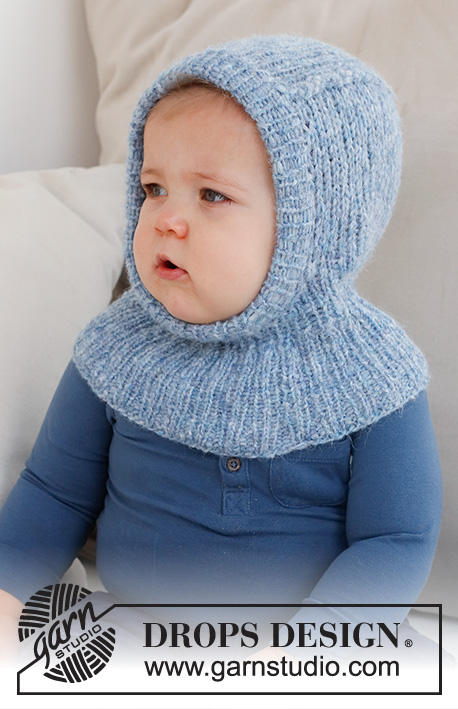
Chilly Day Balaclava#chillydaybalaclava |
|
 |
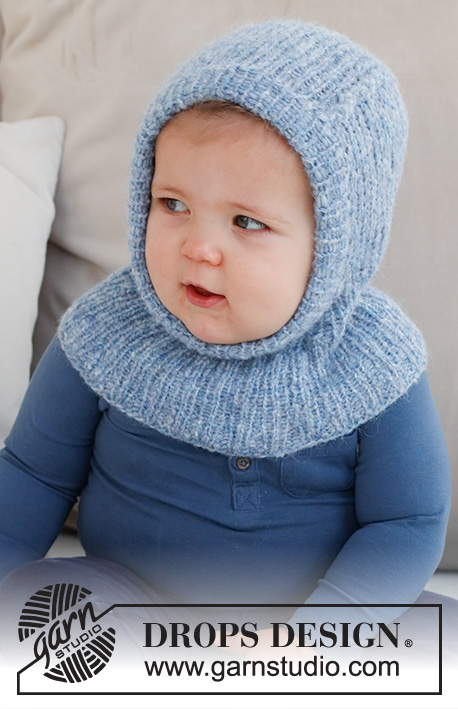 |
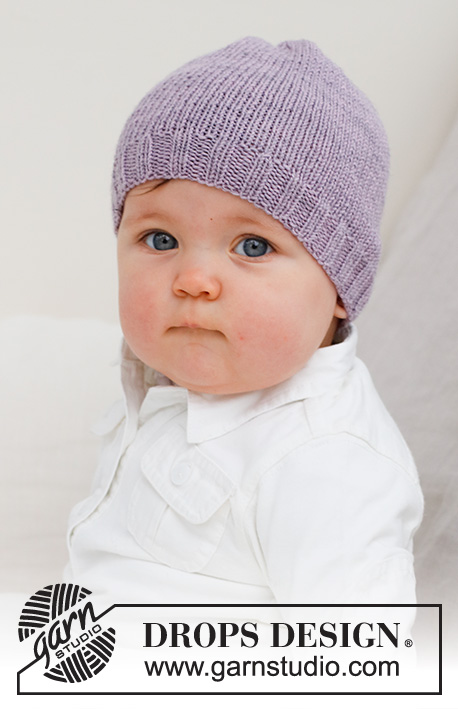
Knitted hat / balaclava for baby and children in DROPS Air. Piece is knitted in rib. Size 0 - 4 years
DROPS Baby 42-20 |
|
|
---------------------------------------------------------- EXPLANATION FOR THE PATTERN: ---------------------------------------------------------- GARTER STITCH (back and forth): Knit all rows. 1 ridge vertically = knit 2 rows. INCREASE TIP: All increases are done from the right side. Increase 1 stitch by making a yarn over. On next row purl yarn over twisted to avoid hole. DECREASE TIP: All decreases are done from the right side! WORK 2 STITCHES TOGETHER AT THE BEGINNING OF ROW AS FOLLOWS: Slip 1 stitch knitwise, knit 1, pass slipped stitch over stitch worked (= 1 stitch decreased). WORK 2 STITCHES TOGETHER AT THE END OF ROW AS FOLLOWS: Knit 2 together. ---------------------------------------------------------- START THE PIECE HERE: ---------------------------------------------------------- HAT - SHORT SUMMARY OF GARMENT: Worked in the round on circular needle, bottom up. Decrease stitches mid front and continue piece back and forth. Finish with a double edge around the opening for face. HAT: Cast on 88-96-104-108 (124-128) stitches on circular needle size 4 mm with DROPS Air. Knit 1 round. Then work rib (purl 2/knit 2) for 2-2-3-3 (4-4) cm. On next round work all 2 purl together into 1 purl stitch = 66-72-78-81 (93-96) stitches. Continue rib with purl 1/knit 2. When piece measures 6-6-7-8 (10-12) cm from cast-on edge, work all 2 knit together into 1 knit stitch = 44-48-52-54 (62-64) stitches. Switch to double pointed needles size 4 mm. Continue rib with purl 1/knit 1. When piece measures 8-8-9-10 (12-14) cm from cast-on edge, switch to circular needle size 5 mm and work back and forth as follows: Cast off the first 6-6-6-8 (10-10) stitches, work 1 edge stitch in GARTER STITCH – read explanation above, knit 17-19-21-21 (24-25), make 1 yarn over, knit 1, insert 1 marker around needle (mid back), knit 1, make a yarn over, knit 17-19-21-21 (24-25) and 1 edge stitch in garter stitch = 40-44-48-48 (54-56) stitches. Continue piece in stocking stitch back and forth with 1 edge stitch in garter stitch in each side (on next row work yarn overs twisted). AT THE SAME TIME on next row from right side decrease stitches on each side of opening mid front and increase stitches mid back as follows: Work 1 edge stitch in garter stitch, work 2 stitches together (= 1 stitch decreased) - read DECREASE TIP, work until 1 stitch remains before marker mid back, increase 1 stitch - read INCREASE TIP, knit 2, increase 1 stitch, work until 3 stitches remain on needle, work 2 stitches together (= 1 stitch decreased) and finish with 1 edge stitch in garter stitch. Decrease like this in each side mid front on every row from right side 3 times in total. Increase like this on each side of marker on every row from right side 7-7-7-7 (7-8) times in total (in addition to the increase done when casting off stitches mid front). REMEMBER THE KNITTING TENSION! When all increases and decreases are done, there are 48-52-56-56 (62-66) stitches on row. Continue in stocking stitch with 1 edge stitch in garter stitch in each side. When piece measures 10-10-11-11 (11-12) cm from where stitches were cast off mid front, slip the outermost 18-19-21-20 (22-24) stitches in each side on separate double pointed needle size 5 mm, i.e. 12-14-14-16 (18-18) stitches on circular needle. Cut the yarn. Stitches from double pointed needle in each side should be worked together with the outermost stitch in each side on circular needle at the end of every row as follows: FROM RIGHT SIDE: Knit until 1 stitch remains on needle, slip last stitch knitwise, knit 1 from pointed needle and pass slipped stitch from circular needle on to stitch worked (= 1 stitch decreased double pointed needle). Turn piece. FROM WRONG SIDE: Purl 1 twisted (i.e. work in back loop of stitch), purl until 1 stitch remain on circular needle, slip 1 stitch purlwise, purl 1 from double pointed needle and pass the slipped stitch over stitch worked. Turn piece. Work and decrease like this until all stitches from double pointed needles in each side have been decreased. There are 12-14-14-16 (18-18) stitches on circular piece and no stitches on double pointed needles in the side. Now work an edge around the opening as follows: DOUBLE EDGE: Pick up approx. 52 to 68 stitches (including stitches from circular needle) inside 1 edge stitch on double pointed needles size 4 mm. Adjust so that number of stitches is divisible by 2 and to avoid a tight/loose edge. Work rib (knit 1/purl 1) for 5 cm. Cast off with circular needle size 5 mm. Fold the edge double towards inside of hat and fasten cast-off edge to where stitches were picked up around the opening for face. To avoid a tight edge that sticks out it is important to keep the seam elastic. |
|
Have you finished this pattern?Tag your pictures with #dropspattern #chillydaybalaclava or submit them to the #dropsfan gallery. Do you need help with this pattern?You'll find 22 tutorial videos, a Comments/Questions area and more by visiting the pattern on garnstudio.com. © 1982-2025 DROPS Design A/S. We reserve all rights. This document, including all its sub-sections, has copyrights. Read more about what you can do with our patterns at the bottom of each pattern on our site. |
|


With over 40 years in knitting and crochet design, DROPS Design offers one of the most extensive collections of free patterns on the internet - translated to 17 languages. As of today we count 320 catalogues and 12094 patterns translated into English (UK/cm). 12094
We work hard to bring you the best knitting and crochet have to offer, inspiration and advice as well as great quality yarns at incredible prices! Would you like to use our patterns for other than personal use? You can read what you are allowed to do in the Copyright text at the bottom of all our patterns. Happy crafting!
Post a comment to pattern DROPS Baby 42-20
We would love to hear what you have to say about this pattern!
If you want to leave a question, please make sure you select the correct category in the form below, to speed up the answering process. Required fields are marked *.