DROPS Super Sale - SAVE 30% on 6 yarns all June!

How to read crochet diagrams

A crochet diagram consists of symbols, 1 symbol = 1 stitch (or a group of stitches) - the symbol definition explains what kind of stitch it is/how it is worked. The diagram shows all stitches seen from the right side (unless otherwise specified).

A typical crochet diagram looks like this:
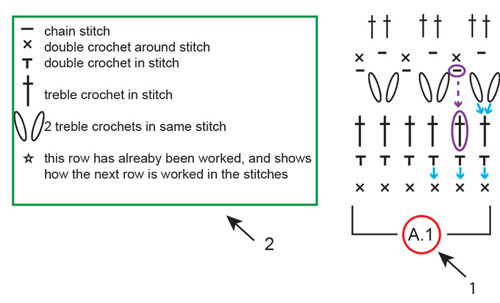
1: 1. A.1 is the name of the diagram and refers to the entire diagram - inside the square brackets. Everything inside the square brackets is 1 repeat of the diagram.
2: 2. This is the symbol definition, which explains how each symbol is worked.
Blue arrows: The symbol is worked in or around the stitch directly below itself in the diagram. Sometimes multiple stitches are worked in/around the same stitch.
Purple ovals and arrows: Not all stitches are worked in, for example: sometimes you work a chain stitch and the stitch below is skipped.

A crochet diagram is read opposite to how you would normally read: from right to left, from bottom to top. In other words: you start with the symbol in the bottom right corner, and work your way leftwards and upwards (see RED in diagram below).

If you are supposed to work several repeats of a diagram (ie: if it is to be repeated several times on the row/round), work until the end of the row of the diagram and begin again with the first symbol on the row.
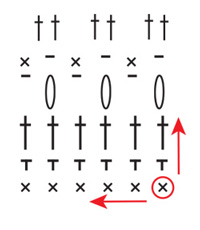
Back and forth:

When you’re working back and forth every other row is worked from the right side and every other row is worked from the wrong side. When working from the wrong side the diagram has to be read the opposite way: from left to right (see red arrow from right side, and blue arrow from wrong side below).

The row typically starts with a given number of chain stitches - the number equals the height of the following stitch, and are included to ensure you are starting from the top of the following stitch (see green circles below). If the chain stitches are included in the diagram (as in this example) all stitches are worked exactly as they appear. Sometimes the pattern includes CROCHET INFORMATION at the top of the instructions, which tells you how many chain stitches to work at the beginning of every row, and whether these chain stitches are replacing the first stitch on row (or in addition). If the chain stitches are NOT included in the diagram: follow instructions under CROCHET INFORMATION.

In the round:

When working in the round, all rounds are worked from the right side: from right to left (see red arrows below). How the round begins and ends are often displayed in a diagram of its own (see A.2 below - green square). Similar to when working back and forth, the round starts with a given number of chain stitches, equal to the height of the following stitch. At the end of the round you typically join the beginning and end of the round with a slip stitch in the last of the chain stitches at the beginning (see blue square below). In other words: the chain stitches in A.2 = the beginning of the round, while the slip stitch in A.2 = the end of the round.

If you are supposed to work several repeats of the diagram (A.1) (ie, it is repeated several times on the round) you work until the last stitch, and then begin again with the first stitch on the same row in A.1. NOTE: in this example it is ONLY A.1 that is repeated, A.2 shows how the beginning and end of the entire round is worked.

Several different diagrams worked consecutively on the row/round:

If you’re working several different diagrams after each other on the same row/round, work as follows: Work 1st row in diagram 1, continue with 1st row in diagram 2, then 1st row in diagram 3 etc. REMEMBER: if you’re working back and forth, the diagrams will have to be worked in the opposite order from the wrong side - ie: start with diagram 3, then diagram 2 and lastly diagram 1. They are also worked the opposite way, as usual.

Circular diagrams:

When working in a circle, ie you start in the middle and work your way outwards, this will often be displayed in a circular diagram. The diagram can either display the entire circle - in this case every symbol is worked exactly as it appears, or the diagram can display a fraction of a circle which is then repeated a given number of times to make a full circle.

Full circle:

In a full circle diagram you begin with the symbol in the middle of the circle: typically a small circle representing a given number of chain stitches, made into a ring with a slip stitch (see red circle below). Similar to when working in the round, the round begins with a given number of chain stitches (equal to the height of the next symbol) and ends with a slip stitch in the last of these chain stitches - ie: equivalent to A.2 in our previous example (see blue square) - NOTE: when the chain stitches are displayed in the diagram these do NOT replace any of the other symbols, and every symbol is worked exactly as they appear. If the chain stitches ARE replacing any stitch, this will have been removed from the diagram.

You work counter-clockwise: from right to left, 1 symbol after the other (see red arrow below). The stitches on the first round are typically worked AROUND the chain stitch ring, meaning you put the crochet hook THROUGH the middle of the chain stitch ring, pick up the strand and pull it back through the ring (working the stitch as usual) - You are not working the stitch IN any of the chain stitches, but rather AROUND the chain stitch ring. At the end of the round, join the beginning and end with a slip stitch, and start with the second round in the diagram: the second closest to the middle (se green arrow).

Fraction of a circle:

If the diagram is only a fraction of a circle, this is because the fraction is repeated a given number of times in the round, to make a full circle. You begin with the symbol at the bottom (see red circle) and work the same way as for FULL CIRCLE, but A.2 will be repeated a given number of times in the round. Similar to when working in the round there is typically a separate diagram illustrating how the round begins and ends (see A.1, blue square below). You begin with the diagram row closest to the chain stitch ring at the bottom, work the chain stitch(es) in A.1, then work the symbol(s) in A.2 (in the first round it is only 1 symbol) and repeat the symbol(s) in A.2 the number of times stated in the pattern.

At the end of the round you join the round with the slip stitch in A.1. When the first round is completed, continue with the next round: second closest to the chain stitch ring (see green arrow below).

Square diagrams / color diagrams:

Some crochet diagrams are displayed in a square diagram, where 1 square = 1 stitch. What type of stitch is worked will typically be explained in the pattern instructions, while the purpose of the diagram is to display what colors the stitches are worked in (see red circle below = symbol definition).

You work as explained above, depending on whether you work BACK AND FORTH, IN THE ROUND or a CIRCULAR DIAGRAM.

Comments (149)

Country flag Irene wrote:

Bij de toeren 5-10 loop ik vast. Ik begrijp niet hoe je op deze toeren moet meerderen en tegelijkertijd het patroon vasthouden. Want als je op deze toeren gaat meerderen krijg je een scheve verhouding van de kleuren. Ik heb nu alleen in toer 10 gemeerderd tot 120 stokjes, en toer 5 tot en met negen niet gemeerderd.(ziet er wel goed uit) Kunt u mij helpen want ik wil graag begrijpen met wat jullie bedoelen met 1 stokje tussen de meerderingen ? Alvast bedankt

01.02.2021 - 16:58

Country flag Louline wrote:

Bonjour, Merci pour cet article, pour reprendre les questionnements de Babelle, je suis aussi gauchère, et j'ai trouvé une solution qui me parait intéressante à partager. Comme on crochète dans l'autre sens, en rond, il suffit de faire une symétrie horizontale des diagramme sur Paint. On obtient alors le diagramme adéquat. Si çà vous intéresse, je peux rédiger une petit exemple... Mon contact c'est loulinelacroute sur insta ou louline chez gmail

26.01.2021 - 14:22

Country flag Marie Emond wrote:

Je suis tellement désolé du derangement .Mais je comprend pas ou va etre le dimunition pour arriver a 126 mailles car j'ai 139 mailles pourtant c pas d'aujourd'hu que je lis des patrons .Quand je commence le deuxieme rang je fais 6 brides qui es A1 apres je fait 1 bride au dessusde la bride suivante qui es A2 .apres sa dit répeter je repete quoi .Car je compte et sa me donne 139 mailles pareil.Merci beaucoup

25.01.2021 - 19:46

DROPS Design answered:

Bonjour Mme Emond, vous ne diminuez pas, vous devez crocheter ainsi: les 6 premières brides en suivant A.1, puis la maille suivante comme le montre A.2, vous crochetez ensuite 21 fois les 6 mailles de A.3 (= 6 mailles x 21 = 126 mailles) et vous terminez par les 6 dernières mailles comme le montre A.4, vous avez ainsi bien 139 mailles: 6+1+126+6=139 mailles. Bon crochet!

26.01.2021 - 09:45

Country flag Birgitta wrote:

Hej, jag ska försöka virka en sjalen Wave Whisperer i Drops Sky. Min fråga är om jag ska virka A1 i diagrammet flera gånger så hög som jag vill ha den. Eller ska jag virka alla diagram från A1 till A4 efter varandra? Jag kan het enkelt inte förstå mönstret. Tack för hjälp på förhand.

25.01.2021 - 14:43

DROPS Design answered:

Hei Birgitta. Først hekler du bare diagram A.1. Når du har heklet A.1 1 gang i høyden har du 33 masker på siste rad. Nå starter du å hekle A.2 (der pilen viser = 4 luftmasker), deretter hekler du A.3 og så A.4 (også der pilen viser). Når diagrammene (A.2, A.3 og A.4) er heklet ferdig i høyden, fortsettes det med mønster og økning i sidene. Dvs, det hekles A.2 og A.4 mot sidene som før og A.3 mellom diagrammene (du får plass til flere A.3 for hver gang A.2 til A.4 er heklet ferdig i høyden. Fortsett slik til arbeidet måler ca 69 cm fra spissen og opp – eller til ønsket lengde – avpass at det avsluttes etter en hel rapport i høyden. God Fornøyelse!

27.01.2021 - 07:28

Country flag Marie Emond wrote:

Bonjour j'ai acheter Drops Baby 29-15 et la laine de vous mais je ne comprend pas le diagramme .J'ai fait le premier rang 139 brides apres vous dite A2 au dessus de la bride suivante,rététer es-ce que je continu 1 bride au dessus de chaque bride jusqu'a la fin A1 veu tu dire le premier rang.ainsi que A2 le deuxiemen rang (ext)et A3 vous dite au dessus des 126 brides et j'ai 139 avez-vous une video Merci a bientot

24.01.2021 - 21:40

DROPS Design answered:

Bonjour Mme Emond, crochetez vos 139 brides ainsi, sur l'endroit: A.1 (= 6 brides), A.2 (= 1 bride = 1 seule fois le diagramme) répétez A.3 au-dessus des 126 brides suivantes (= 21 fois le diagramme en largeur) et terminez par A.4 (= 6 brides). Sur l'envers, crochetez: A.4, répétez A.3, A.2 et A.1 en lisant les diagrammes de gauche à droite. Bon crochet!

25.01.2021 - 13:50

Country flag Ilja-Nora wrote:

Jeg hekler støvelmansjetter med et mønster som brukes både til lue og votter, og etter jeg har heklet mønsteret står det Kant: 1. rad. Fortsetter jeg da der jeg avsluttet med mønsteret? Hva betyr: Sett til tråden nederst på Høyre side (retten).? Skal jeg da klippe tråden og hekle nederst? Hva er krepsem?

16.01.2021 - 21:03

DROPS Design answered:

Hei Ilja-Nora. Hvilken oppskrift gjelder det? Om du legger inn ditt spørsmål under selve oppskriften er det lettere å hjelpe. Om du skriver "Krepsemaske" i søke ord under alle "Instruksjonsvideoer" og "Søk i alle videoer", vil video for krepsemaske dukke opp. Krepsemaske = du hekler fastmasker fra venstre mot høyre. mvh DROPS design

18.01.2021 - 07:58

Country flag Babelle wrote:

Je suis gauchère comment lire les diagrammes et comment respecter l'envers et l'endroit ? merci d'avance Babelle

13.01.2021 - 16:05

DROPS Design answered:

Bonjour Babelle, je suis désolée, personne de notre équipe n'est gauchère, essayez juste, en fonction de votre façon de crocheter, d'ajuster l'endroit et l'envers - demandez conseil à votre magasin et/ou à un forum spécialisé où d'autres crocheteuses pourront vous aider. Bon crochet!

14.01.2021 - 08:31

Country flag Maria Randerly Cunha Feitosa wrote:

Quero imprimir. Diagrama

06.01.2021 - 01:43

Country flag Maria Randerly Cunha Feitosa wrote:

Excelente. Muito obrigado

06.01.2021 - 00:51

Country flag Maj-Britt Poulsen wrote:

Hej Jeg er helt vild med modellen JANIS - bluse med rude i Paris. Og vil gerne hækle den. Jeg kan ikke finde ud af at tyde diagrammer og vil spørge om ikke jeg kan finde opskriften på video. Håber du kan hjælpe mig. Godt nytår ☺

01.01.2021 - 15:57

DROPS Design answered:

Hei Maj-Britt. Ja, dette er virkelig en flott modell. Til denne modellen er det laget 2 hjelpevideoer, Hjelp til Halsfellingen og Hvordan hekle A.3. Å lage en video til hele genseren er dessverre ikke mulig, men håper hjelpevideoene og andre generelle videoer du finner under modellen kan hjelpe deg. God Fornøyelse!

11.01.2021 - 09:08

Country flag Hilde - Igjen wrote:

Jeg skal begynne på 2. omg og der står det "= omg med fm/lm" - skal det da kun hekles fm og lm på denne omgangen - før jeg går videre?

29.12.2020 - 12:34

DROPS Design answered:

Hei Hilde. I 2. omgang skal det kun hekles fastmasker og luftmasker. Om du ser på diagram A.1 (og A.2) hekles det en omgang med bare fastmasker og luftmasker, mens neste omgang hekles det kun staver (her økes det også i A.2). Altså alle omganger med partall, der hekles det kun fastmasker og luftmasker, mens omganger med oddetall hekles det kun staver. God Fornøyelse!

11.01.2021 - 08:56

Country flag Hilde wrote:

Gjelder Misty Mountain bærestykke:Når jeg skal hekle 2. omg og det står "hekle A1 over de første 10 stavene", så betyr ved det at jeg skal hekle 1. raden på A1over det de første stavene? Etter 2. omg: "repeter A1 i høyden og øk som vist i A2 samtidig økes det jevnt fordelt slik:" Blir dette starten på 3. omg? Har heklet mye - men dette mønsteret er ikke lett å forstå!

18.12.2020 - 16:34

DROPS Design answered:

Hei Hilde. 1. omgang i diagram A.1 og A.2 er forklart i oppskriftsteksten, den har også en stjerne markert i diagrammet (*). Når du har heklet 1. omgang har du 84 staver (str. S) og du starter nå på 2. omgang på diagram A.1 og A.2 (fastmasker og luftmasker). På 3. omgang hekler du kun staver og da økes det også når du hekler A.2. På 4. omgang hekles det fastmasker og luftmasker igjen, mens på 5. omgang hekles det kun staver og her økes det igjen (i A.2). Når du har heklet A.1 1 gang i høyden repeteres A.1 i høyden. God Fornøyelse!

11.01.2021 - 08:07

Country flag L H wrote:

Do you have your heart pattern written out. I can follow a written pattern but have a hard time with a diagram better. Thank you

09.12.2020 - 16:34

DROPS Design answered:

Dear LH, could you please ask your question on the pattern you would like to work? If there is only a diagram under the pattern page without any written explanation, this means there is only a diagram, but there might be a video showing how to crochet this pattern. Happy crocheting!

10.12.2020 - 09:30

Country flag Leanne wrote:

I need 183 stitches but am not sure where to add the extra stitches across the 155 that form the pattern, eg where do I add the extra 18 stitches to make 108 across the 90 that make up A.3a (3 repeats)? I presume 6 in each repeat but am not sure whether to add all 6 to the start of the A.3a row, the end or whatever. There are 2 chain stitches amongst the trebles in this row and I'm not sure where they should be positioned in relation to the extra stitches that I need to include. Thank you.

26.10.2020 - 00:47

DROPS Design answered:

Dear Leanne, could you please ask your question under the pattern you are working on? It will be then much easier for us to get the correct reference to help you. Thanks for your comprehension. Happy crocheting!

26.10.2020 - 13:37

Country flag Ursula Pereyra wrote:

Gracias por las explicaciones!!!, son de gran ayuda recien me inicié en este maravilloso mundo y gracias a sus patrones y explicaciones estoy tejiendo, Gracias!!! Estoy maravillada y sorprendida de mis logros!!!

17.10.2020 - 15:05

Country flag Patricia Bailey wrote:

A4,5,9 how many times then the next bit how many times ... totally confusing pattern, I ripped it out

03.10.2020 - 11:24

DROPS Design answered:

Dear Mrs Bailey, could you please ask your question in the question section of the pattern you are working on? This would help us to be able to assist you - remember to add the size worked as well as the part of the pattern you are stuck. Thanks for your comprehension!

05.10.2020 - 13:25

Country flag Nikki wrote:

Hi I have a crochet pattern here which I believe is one of your older ones as couldn’t find it on your site, but I need help following the diagram. I have horizontal lines in different lengths with no meaning, apart from the small one meaning a chain stitch. I say its your pattern as Drops Alpaca and Drops cotton viscose is used from the garn studios. I need help with this please. I can’t see a way of using photos to show you.. Thank you Nikki

16.08.2020 - 10:13

DROPS Design answered:

Dear Nikki, could you please ask your question in the "question" section of this pattern? It would be much easier for us to help you when we also can see the diagram and the diagram key. Thanks for your comprehension. Happy crocheting!

17.08.2020 - 10:25

Country flag Angela Jane Charles wrote:

You have a diagram of crochet stitches at the top, but in the pattern I am doing, I have 1) a stitch that appears in the diagram for the Fraction of a circle above: an upright line with a solid circle near the top. 2) two stitches that appear in the Full circle diagram: a solid oval and an outline oval with two solid dots in it. I can't find any step-by-step instruction on how to make these stitches, and the description in my pattern is not clear enough. Could you help me please?

02.08.2020 - 16:32

DROPS Design answered:

Dear Mrs Charles, could you please post your question under the pattern you are working on? It would be much easier for us to explain you. Thanks for your comprehension. Happy knitting!

03.08.2020 - 09:03

Country flag Mary wrote:

Thank you for the comprehensive explanations of different types of diagrams.

28.07.2020 - 01:42

Country flag Samantha wrote:

I brought this pattern because it states it has a tutorial video. Cant find it. Not very happy

26.06.2020 - 07:41

DROPS Design answered:

Dear Samantha, all our patterns are free - you are not supposed to buy them. There are videos for every patterns showing the different techniques used - but not all patterns do have their single videos - this page explains how to read a diagram. Feel free to ask your question in the pattern page or contact directly the store where you bought the yarn for any individual assistance. Happy crocheting!

26.06.2020 - 07:58

Leave a comment or question to this lesson

Your email address will not be published. Required fields are marked *.