
Popular categories
Looking for a yarn?


Comments / Questions (12)
![]() Iris wrote:
Iris wrote:
Wat een prachtig setje! . Is er toevallig ook een trui in dit patroon, dat zou geweldig zijn.
08.10.2024 - 22:29
![]() Christine wrote:
Christine wrote:
Hei! Jeg har strikket noen votter i denne oppskriften, bare med tynnere garn og flere masker. Jeg fulgte en oppskrift, men finner den ikke igjen. Veldig lyst å strikke et par nye av disse i tynnere garn
01.10.2024 - 23:21DROPS Design answered:
Hej Christine. Lite osäker på vilken oppskrift du menar, men här hittar du alla våra vantar med relieff-mönster. Mvh DROPS Design
14.10.2024 - 14:51
![]() Lisbet Peirup wrote:
Lisbet Peirup wrote:
Hej Vedr. strikkeprøve: Hvilket nummer pind er prøven beregnet fra (6 eller 7)? Og er det altid sådan, den største henholdsvis den mindste?
03.03.2023 - 16:53DROPS Design answered:
Hei Lisbeth. Som regel er det den største pinne str, ja. Den minste brukes som oftes til vrangbord. Strikkefastheten regnes ut fra det plagget strikkes i (ikke vrangbord eller halskant eller lign). mvh DROPS Design
06.03.2023 - 14:26
![]() Patti Latimer wrote:
Patti Latimer wrote:
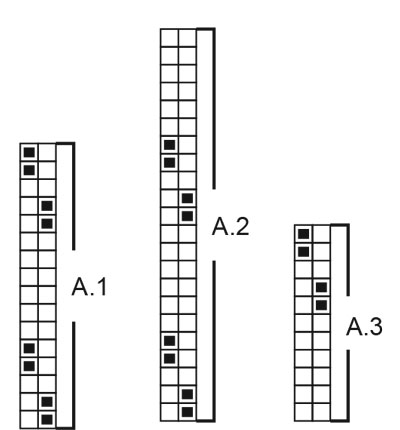
This English version does not show the A1-A3 Diagrams for some reason- though I found it by referring back to the original (German?) pattern. I am a newish knitter so thank you for all the great free patterns!
04.11.2022 - 19:39
![]() Laura Bartling wrote:
Laura Bartling wrote:
I am working the first mitten and I am confused regarding the thumb hole. The instructions say to cast on 5-6 new stitches on needle over the stitches on the stitch holder. I think that means to cast on to the working needle but would like confirmation.
02.11.2022 - 17:05DROPS Design answered:
Hi Laura, Yes, you cast onto the working needle. Happy knitting!
03.11.2022 - 07:01
![]() Sharon wrote:
Sharon wrote:
Hi! Having problems with the increase at the shoulders. Did the increases, but I don’t know if am doing this correctly. One eks is where it says to increase after marked nr 1. Would this be at the end of the round. Thanks for your help.
04.01.2022 - 23:27DROPS Design answered:
Dear Sharon, the first marker is at the beginning of the round and you will increase at the beginning of the round, ie right after first marker. Happy knitting!
05.01.2022 - 08:16
![]() Sharon wrote:
Sharon wrote:
Hi, started the neckwarmer just now. After knitting P2 k1 over 20 stitches and then knitting P2 K1 over 26 stitches I have 12 stitches left. How do I work these 12 stitches stitches? The instructs says to p2 k1 over remaining 6 sts, but there is 12 remaining. Double checked and I do have 58 stitches. Thanks for your quick response.
03.01.2022 - 21:44DROPS Design answered:
Dear Sharon, work the 58 sts as follows: the first 20 sts in rib (P1, K1), then purl 2, knit 1, work the next 26 sts in rib (P1, K1), purl 2, knit 1 and work the last 6 sts in rib (P1, K1) = 20+2+1+26+2+1+6=58 sts. Happy knitting!
04.01.2022 - 07:24
![]() Kjersti Kristiansen wrote:
Kjersti Kristiansen wrote:
Hei Jeg forsto plutselig hva jeg tenkte feil! Jeg strikker rundt og da er jo alt på retten! Beklager. Kjersti
07.12.2021 - 22:06
![]() Kjersti Kristiansen wrote:
Kjersti Kristiansen wrote:
Hei Jeg skjønner ikke mønsteret A1. På bildet av luen ser det ut som det er 2 omg rett, vrang over hverandre, men om man skal følge mønsteret helt vil det bli en omgang v, r, så en omgang rett igjen... det blir motsatt på de vrange og likt på de rette. Leser jeg mønsteret feil? Kjersti
07.12.2021 - 22:02DROPS Design answered:
Hej Kjersti, godt at høre at du fandt ud af det - god fornøjelse :)
08.12.2021 - 08:21
![]() Sabine wrote:
Sabine wrote:
Hallo, es gibt zwei Größen , aber die Skizze mit den Abmessungen scheint zu fehlen. Wie breit sind denn die beiden Größen jeweils?
10.10.2021 - 22:07DROPS Design answered:
Liebe Sabine, es gibt beim Kragenschal keine Maßskizze; Vorder- und Rückenteil sind mit 37-41 Maschen ca 34-45 cm breit. Viel Spaß beim stricken!
11.10.2021 - 07:59
|
|||||||
Cocoa Beans Set#cocoabeansset |
|||||||
 |
 |
||||||
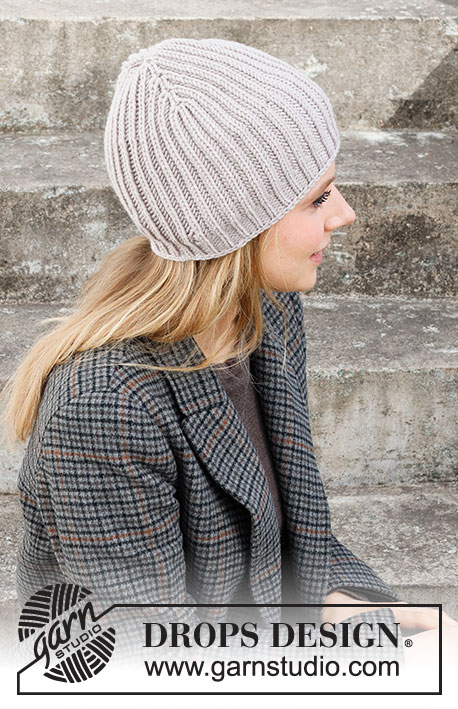
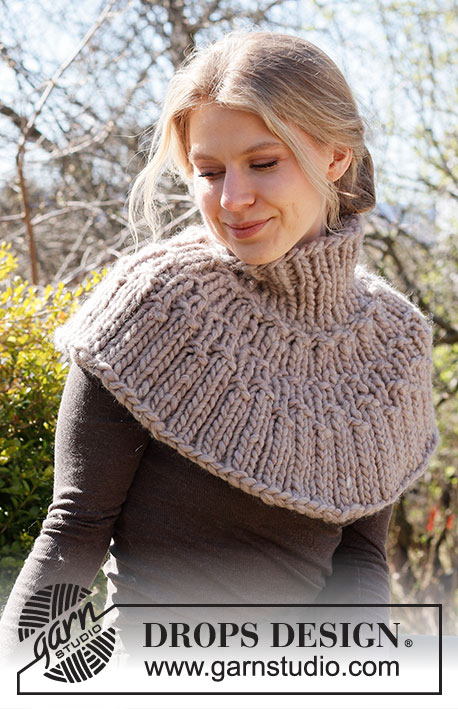
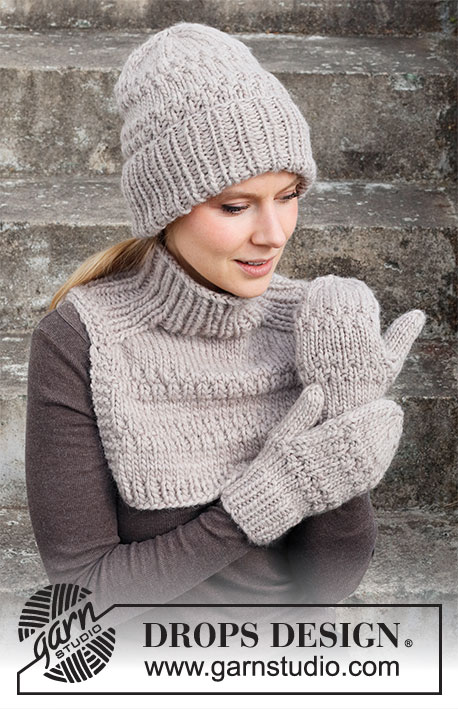
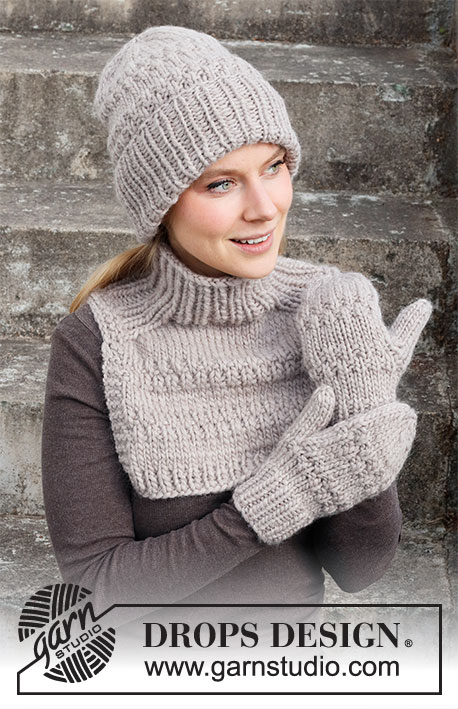
Knitted hat, neck warmer with saddle shoulder and mittens in DROPS Snow. Knit the entire set in textured pattern.
DROPS 214-23 |
|||||||
|
------------------------------------------------------- EXPLANATION FOR THE PATTERN: ------------------------------------------------------- GARTER STITCH (worked in the round): 1 ridge vertically = 2 rounds, i.e. knit 1 round and purl 1 round. GARTER STITCH (back and forth): Knit all rows. 1 ridge vertically = knit 2 rows. PATTERN: Hat: See diagram A.1. Neck warmer: See diagram A.2. Mittens: See diagram A.3. Diagrams show all rows in pattern seen from the right side. DECREASE TIP (applies to top of hat): Decrease as follows before marker thread: Begin 2 stitches before marker thread, knit 2 together (= 1 stitch decreased). Decrease as follows after marker thread: Slip 1 stitch knitwise, knit 1, pass slipped stitch over stitch worked (= 1 stitch decreased). INCREASE TIP (applies to saddle shoulder increase on neck warmer): BEFORE MARKER: The new stitch will be twisted, leaning towards the right. Use left needle to pick up strand between 2 stitches from the round below, pick up strand from behind and knit stitch in front loop. AFTER MARKER: The new stitch will be twisted, leaning towards the left. Use left needle to pick up strand between 2 stitches from the round below, pick up strand from the front and knit stitch in back loop. ------------------------------------------------------- START THE PIECE HERE: ------------------------------------------------------- HAT - SHORT OVERVIEW OF THE PIECE: Worked in the round on a short circular needle, bottom up. Switch to double pointed needles when needed. Fold the bottom 9 cm upwards. HAT: Cast on 54-56 stitches on a short circular needle size 7 mm with Snow. Work rib in the round = knit 1/purl 1 for 12 cm. Switch to a short circular needle size 8 mm, and work in stocking stitch in the round. REMEMBER THE KNITTING TENSION! When piece measures 18-19 cm from cast-on edge, work A.1 in the round. When A.1 has been worked, work the rest of hat in stocking stitch. When piece measures 29-30 cm from cast-on edge, begin decreases at the top of hat, and decrease as explained below. Insert 6-7 marker threads 9-8 stitches apart (this is done without working the stitches). On first round decrease 1 stitch on each side of 6-7 marker threads – read DECREASE TIP (= 12-14 stitches decreased). Decrease like this every 3rd-4th round 3 times in total vertically = 18-14 stitches remain. Work 1 round without decrease. On next round knit all stitches together 2 by 2 = 9-7 stitches remain. Cut the yarn. Pull yarn through the remaining stitches, tighten and fasten. Piece measures approx. 35-37 cm from top and down. Fold the bottom 9 cm of hat. ------------------------------------------------------- NECK WARMER - SHORT SUMMARY OF PIECE: Worked in the round on circular needle, top down. Increase out for saddle shoulder in each side. Then divide the piece - work back piece and front piece back and forth separately on circular needle until finished measurements. NECK WARMER: Cast on 50-58 stitches on a short circular needle size 7 mm with Snow. Work rib in the round as follows (from left shoulder on the back when neck warmer is worn): * Purl 1, knit 1 *, work from *-* over the first 18-20 stitches, purl 2, knit 1, work from *-* over the next 22-26 stitches, purl 2, knit 1, work from *-* over the remaining 4-6 stitches. Continue rib like this for 10 cm or desired length. Now insert 4 markers in piece (without working the stitches): Place markers between stitches, and use markers when increasing for saddle shoulders. Insert first marker at the beginning of round, count 13-13 stitches (= back piece), insert 2nd marker before next stitch, count 12-16 stitches (= shoulder – the 2 purl stitches are in the middle of these 12-16 stitches), insert 3rd marker before next stitch, count 13-13 stitches (= front piece), insert 4th marker before next stitch. 12-16 stitches remain on round after last marker (= shoulder – the 2 purl stitches are in the middle of these 12-16 stitches). Switch to circular needle size 8 mm, and increase for saddle shoulder as explained below. SADDLE SHULDER INCREASE: Work in stocking stitch over the 13-13 stitches on back piece and front piece, and rib as before over the 12-16 stitches on each shoulder. REMEMBER THE KNITTING TENSION! AT THE SAME TIME increase for saddle shoulders on every round as follows: Increase BEFORE 2nd and 4th marker and AFTER 1st and 3rd marker – read INCREASE TIP (= 4 stitches increased – the increased stitches are part of front and back piece, i.e. the 12 shoulder stitches are constant). Increase like this EVERY round - 8-10 times in total = 82-98 stitches. Then work 4 rounds as before (with increases as before on each of these 4 rounds), but over the 12-16 stitches on each shoulder work 2 ridges in GARTER STITCH – read explanation above = 98-114 stitches on row after last round with increase. On next round cast off shoulder stitches, i.e. work next round as follows: Purl 3, work in stocking stitch until 3 stitches remain before 2nd marker, purl 3, loosely cast off the 12-16 shoulder stitches, purl 3, work in stocking stitch until 3 stitches remain before 4th marker, purl 3, and loosely cast off the remaining 12-16 shoulder stitches. Finish back piece and front piece separately. BACK PIECE: = 37-41 stitches. Work first row as follows from right side: 3 edge stitches in GARTER STITCH – read explanation above, work A.2 until 4 stitches remain on row, work first stitch in A.2 (so that pattern begins and ends the same way in each side), and finish with 3 edge stitches in garter stitch. Continue A.2 back and forth as before with 3 edge stitch in garter stitch in each side. When A.2 has been worked vertically, piece measures approx. 32-33 cm from cast-on edge (measured mid back). Switch to circular needle size 7 mm, and work rib from right side as follows: 3 edge stitches in garter stitch, * knit 1, purl 1 *, work from *-* until 4 stitches remain on needle, knit 1 and finish with 3 edge stitches in garter stitch. When 4 rows rib have been worked, loosely cast off with knit over knit and purl over purl. Piece measures approx. 34-35 cm from cast-on edge mid back. FRONT PIECE: = 37-41 stitches. Work as on back piece. ------------------------------------------------------- MITTENS - SHORT OVERVIEW OF THE PIECE: Work piece in the round on double pointed needles, bottom up. LEFT MITTEN: Cast on 24-26 stitches on double pointed needles size 6 mm with Snow. Work rib in the round = knit 1/purl 1 for 6 cm. Switch to double pointed needles size 7 mm, and work A.3 in the round over all stitches. Continue the pattern like this - work A.3 2 times in total vertically, then work the rest of mitten in stocking stitch. REMEMBER THE KNITTING TENSION! AT THE SAME TIME when piece measures 12-13 cm, work an opening for thumb on next round as follows: Work 6-6 stitches as before, slip the next 5-6 stitches on 1 stitch holder for thumb, cast on 5-6 new stitches on needle over stitches on stitch holder, and work the remaining 13-14 stitches as before = 24-26 stitches on needles. Work until piece measures 22-23 cm. Approx. 3 cm remain until finished measurements, try the mitten on and work until desired length. On next round, decrease 6-6 stitches evenly (knit every 3rd and 4th stitch together) = 18-20 stitches remain. Work 2 rounds without decrease. On next round knit all stitches together 2 by 2 = 9-10 stitches remain. On next round knit all stitches together 2 by 2 = 5-5 stitches remain. Cut the yarn and pull it through the remaining stitches, tighten together and fasten. Mitten measures approx. 25-26 cm from top and down. THUMB: Slip the 5-6 stitches from stitch holder on double pointed needles size 7 mm, and pick in addition up 7-8 new stitches around opening for thumb = 12-14 stitches distributed on double pointed needles 7. Work in stocking stitch in the round – AT THE SAME TIME on first round decrease 2 stitches evenly = 10-12 stitches remain. Work until thumb measures approx. 6-7 cm (measured from where stitches were put back on needles). Approx. 1 cm remain until finished measurements, try the mitten on and work until desired length on thumb. Work 2 rounds in stocking stitch where all stitches are knitted together 2 by 2 on both rounds = 3-3 stitches remain. Cut the yarn and pull it through the remaining stitches, tighten together and fasten. Thumb measures approx. 7-8 cm. RIGHT MITTEN: Cast on the same number of stitches as on left mitten and work rib in the round the same way as on left mitten for 6 cm. Switch to double pointed needles size 7 mm and work A.3 in the round the same way as on left mitten. When piece measures 12-13 cm, work an opening for thumb on next round as follows: Work 13-14 stitches as before, slip the next 5-6 stitches on 1 stitch holder for thumb, cast on 5-6 new stitches on needle over stitch on stitch holder, and work the remaining 6-6 stitches as before = 24-26 stitches on needles. Work the rest of the mitten the same way as left mitten. THUMB: Work the same way as thumb on left mitten. |
|||||||
Diagram explanations |
|||||||
|
|||||||
|
|||||||
Have you finished this pattern?Tag your pictures with #dropspattern #cocoabeansset or submit them to the #dropsfan gallery. Do you need help with this pattern?You'll find 23 tutorial videos, a Comments/Questions area and more by visiting the pattern on garnstudio.com. © 1982-2025 DROPS Design A/S. We reserve all rights. This document, including all its sub-sections, has copyrights. Read more about what you can do with our patterns at the bottom of each pattern on our site. |
|||||||


With over 40 years in knitting and crochet design, DROPS Design offers one of the most extensive collections of free patterns on the internet - translated to 17 languages. As of today we count 314 catalogues and 11822 patterns translated into English (UK/cm).
We work hard to bring you the best knitting and crochet have to offer, inspiration and advice as well as great quality yarns at incredible prices! Would you like to use our patterns for other than personal use? You can read what you are allowed to do in the Copyright text at the bottom of all our patterns. Happy crafting!
Post a comment to pattern DROPS 214-23
We would love to hear what you have to say about this pattern!
If you want to leave a question, please make sure you select the correct category in the form below, to speed up the answering process. Required fields are marked *.